Windows and doors are particularly vulnerable to moisture problems. Both are built in rough openings framed into the walls. These openings are built slightly larger than the prefabricated window or door units that will be installed inside them to permit the carpenter to adjust or to level and plumb the units in the rough openings. These openings interrupt both the insulation blankets and the vapor retarders in the walls, and can create thermal or air/moisture leaks in the house. If the vapor retarder is not carefully sealed to the window or door frame, both heat and moisture can pass through these interruptions, and moisture damage can result. As noted in Section 5, Vapor Retarders, the retarder should be sealed to the window or door frame using a recommended sealant such as acoustic caulk.

Storm Combination Window: To install combination windows,
measure the height and width of the window. The window may be installed
inside the jambs (top illustration) or overlapped as shown (lower illustration.)

New Window Technology
Window Installation:

1. Check rough opening to be sure it's level, square, and plumb.
2. Center window in the opening and shim as needed.
3. Level the window and nail through flange.

4. Insulate the interior crack between the window and rough frame.
5. Apply interior window trim.
6. Caulk around the exterior of the window.
Following the energy crisis of the late ‘70s, window manufacturers improved technology to produce windows that are vastly superior to older models. By using better materials and construction techniques, manufacturers have produced windows with improved thermal and air infiltration ratings. The manufacturer’s close-tolerance construction and improved weather-strip ping of new window models can also reduce air infiltration rates around moving window sashes.
Use of transparent films has reduced conductive heat loss through the glass, and insulating or double-pane glass now has argon or other thermally efficient gases—rather than trapped air—between the sealed panes. Because of such advances, modern windows are not the thermal leaks they once were, and houses built over the past decade likely have highly efficient windows. Still, for reasons we have outlined above, installation of windows in walls can create problems.
When building or remodeling, for greater energy efficiency, select the best quality windows and , to avoid moisture problems, have an experienced trades- person install the windows.
Windows may be single pane or double pane, called insulating glass. In cold climates a second unit, called a storm window, may be installed on the outside of the primary window unit. These storm windows are called self-storing because they incorporate both screens and glass panes that can be closed to provide double-pane efficiency in cold weather.
Because glass itself is a poor insulator, either type of window has a low R-value relative to the insulated wall, and the glass panes will be cool in winter, often cool enough to permit humidity to condense on the glass. The moisture generated by this vapor condensation can run down the glass and wet the wood frames, or may run over the window sill and down the wall to cause moisture damage to the wall board or plaster. During this process, the moisture that collects on the wood sash or sill can peel the varnish or polyurethane finish, stain the wood black, and , in extreme cases, promote wood decay and ruin the window unit.
To refinish a peeled or stained window sash or sill, use sandpaper or a scraper to remove the peeled finish. Then use oxalic acid to bleach the wood and remove the stains. Oxalic acid, a bleaching product, is avail able in crystal form at paint or home center stores. Mix the acid with water, following the manufacturer’s directions, and apply by soaking a clean cloth in the mixture and laying the cloth on the stain. Repeat as necessary until the stain has disappeared and the natural wood color is restored, then rinse with clean water. Re-stain as necessary to match the rest of the window finish. To protect against future staining, use spar (marine) varnish or a tough polyurethane product to refinish the damaged area.
To prevent or limit condensation on the window pane or glass, you must either warm the pane or lower the indoor humidity. To ensure that the glass pane stays relatively warm, choose high-efficiency windows. Also, if indoor humidity levels are controlled and air circulation is constant, moving air will reduce moisture condensation on the glass pane.
If you use a humidifier, adjust the humidity dial to produce a comfortable moisture level while limiting the condensation on window panes. During cold weather, turn the humidifier up gradually until visible condensation begins to form on the window. Then turn the humidifier control back gradually until the condensation is no longer visible on the panes.
If condensation forms on exterior storm panes, between the primary and storm windows, that's evidence that the drafty primary window is permitting airborne moisture to leak into the space between the windows. At the bottom or sill edge of the storm windows are “weep” holes that permit moisture to escape outside from the space between the windows. Inspect the weep holes for dirt buildup, and use a straightened wire clothes hanger to clean them. Or open the storm sash periodically to allow the moisture that's trapped in the space between the windows to escape. If cleaning the weep holes does not eliminate condensation on the storm windows, either install new weather-stripping on the primary windows or replace the old primary windows with new, efficient models.
Double-pane or insulating glass windows are often not operable, but are fixed in the familiar “picture window” installation. These double panes are sealed at the perimeter so air or moisture can't enter the space between the panes. In time, the perimeter seal may develop a leak and moisture may enter between the panes, causing a fogged window in cold weather. No repair is possible; the only solution is to install a new double-pane unit. If the window is still under manufacturer’s warranty, ask for a replacement unit.
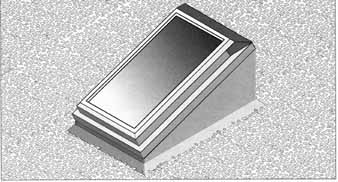
Roof Curb: This roof curb is required when installing
a skylight on a roof with a slope less than 1 5 degrees (3/12).

Curb-Mounted Fixed Light: In high-snow areas, a curb
can be built on site using 2 x 4s or larger to raise the skylight above
the roof.

Double-Pane Glass
Peeling Paint on Window Trim
As noted above, there are interruptions in the insulation and vapor retarder at all window and door locations. In the majority of houses the vapor barrier is not sealed to the window or door frame, so the path of least resistance for moisture migration is through the gaps around the window or door frames.

New Vinyl Window: Newer window designs ensure energy efficiency,
no maintenance, and tilt-in design for easy cleaning.
As the moisture flows around the window and door frames, it will penetrate through the wall assembly to the exterior trim, where the paint on the trim forms a barrier to moisture passage. However, vapor pressure is so great that it will lift or peel the paint finish on the window or door trim, and may cause decay or rot in the component itself.
If you have peeling exterior trim paint, first try to reduce moisture penetration into window openings from the inside. Use an acrylic latex caulk to seal any cracks between the interior wall and trim. Next, apply a coat of alkyd sealer to the interior walls to create a surface vapor retarder. Finally, paint the wall with the finish coating of your choice.
Wearing a dust mask and goggles, scrape or sand the peeling exterior areas to remove the failing paint. Often, the bond between paint and trim fails over a wide surface, beyond the obviously peeling areas. To prevent future peeling of the new paint coat, scrape beyond the obviously failed areas onto sound paint to be sure that all loose paint has been removed.
When failing paint is removed down to bare wood, repaint. Because latex paint breathes, or permits moisture to pass through the paint film more readily than alkyd paint does, always use a quality acrylic latex paint on peeling or problem exterior trim. Apply a coat of exterior latex trim paint, and when the base coat is dry, apply a final finish coat.

Old-Style Double-Hung Window: Old double-hung windows
can be upgraded. Remove the weights and cords, insulate the weight pockets, and install spring clips to hold the sash in position.
Skylights
Skylights can create two potential water problems; the first is that the window penetrates the roof deck, thus creating a potential roof leak if installation is not carefully done.
The second problem is that skylights position a window pane at the highest point in the room, so that the pane is more susceptible to fogging or frosting due to the effects of rising moisture- laden air. This condensed moisture will eventually rain down to the floor or furnishings below or may frost over the window pane.
To avoid these skylight problems, purchase the best quality skylight you can afford. Visit dealers who sell quality products, carefully compare the specifications of each unit, and buy the best.
Second, be sure that the manufacturer’s directions are strictly followed during sky light installation. This is not a do-it-yourself project: after selecting the unit, ask the dealer to recommend a qualified installer. In areas of high annual snowfall, it's best to frame a wooden base support or riser around the roof opening, then mount the skylight atop the riser. This procedure will raise the skylight above the potential winter snow level, and will help achieve a leak-proof installation. (See “Curb Mounted Fixed Skylight” illustration) Most manufacturers provide proper flashing to water proof the joint between the skylight and the roof.
Double-Hung Windows
If you have older double- hung windows, moisture can pass through the holes in the side frames that hold the sash cords and pulleys. To remedy this situation, there are two options.
The first is to remove the sash cord and weights. The best way to do this is to remove the interior window trim and pull out the cords, weights, and pulleys. Then use kraft- or aluminum-faced batt insulation to fill and insulate the weight cavities. Position the insulation so the aluminum-faced side is to the inside, toward the living area. Plug the cord holes in the side frames and replace the trim. To ensure operation of the windows, install spring clips on the frame to exert tension against the window sash and hold the window sash in the open position. Note that these springs may not pro vide enough tension on very large or heavy window sashes.
The second option is to install a special plastic cover over the holes that will allow the window to operate. Buy these cover devices at your home center.
Coping with Skylight Problems
If you already have problems with leaks on a skylight, have the installer or a roofer inspect and repair the unit. If the leak is between the skylight and the roof, a roofer may be able to improve the flashing and seal to eliminate the leak. If the leak is through the skylight structure, the only permanent solution may be to replace the unit with one of better quality.
By dehumidifying and following the humidity- reduction steps suggested in Section 6, Humidity Problems, you may be able to reduce interior humidity levels and thus limit the formation of condensation or frost on the window. For example, when cooking a large meal, or when you see condensation on the sky light pane, open the unit and permit the excess moisture to exit.
Window Replacement
Besides energy savings from better thermal and air infiltration control, window replacement will provide other benefits: reduced drafts will improve occupant com fort and new windows can transform a house. If your windows are drafty, peeling, damaged, or decayed, consider replacing them.
New wood window models may have aluminum- or vinyl-clad exterior trim. This permanent exterior cladding will not peel or rot and will reduce painting and other window maintenance. To take advantage of these features, consider buying replacement windows with no-maintenance exterior trim cladding.
As in the selection of any expensive components, there is no substitute for quality in windows. A wise business adage says that quality and good design will be remembered long after the price is forgotten.
DOORS
Like windows, exterior doors can suffer from moisture problems, and for many of the same reasons. Moisture can penetrate between the rough opening and the door frame, causing wood decay or peeling paint on exterior trim.
Wood Doors
Wood doors offer time- proven durability and the warm look of wood, but if they are not properly protected from moisture and weather, they are subject to shrinkage, cracking, and warping. These problems are often due to moisture entering the wood. To prevent sticking in the frame, door edges are left unpainted, and moisture can enter the door through these unsealed edges. If you have a wood door, remove the door and apply a clear wood sealer to all edges. This will reduce moisture penetration through all parts of the door.
Poor-fitting or worn weather-stripping can allow air and moisture to penetrate through the cracks between the door and the frame. You may be surprised to learn just how much moisture, air, and dust can penetrate the door opening.
Consider that to permit the door to open there is a perimeter crack around the door that's 20 feet (6 meters) long and ½ inch (0.3 centimeters) wide. The total area of this crack is equal to a hole that's 2-½ inches (6 centimeters) by 12 inches (20 centimeters) or about the same size—and effect—as having a hole the size of a brick in your wall. If it has been years since you have replaced your door weather-stripping, see the energy-efficient materials available at your home center store. Each kit contains enough weather-stripping to do an exterior door, including any nails or brads that are necessary for installation. Check before each heating season; replace when worn or torn.
Often overlooked is the door sweep, the weather stripping that seals the crack between the bottom of the door and the threshold. It is usually attached to the door with three or four small screws. Modern door sweeps may have multiple layers of vinyl that ensure a tight seal at the door threshold. This weatherstrip not only blocks infiltration of air and moisture but also is a barrier to dust and insects. Examine your door sweep at the beginning of each heating season, and replace any door sweep that's ill-fitting, old, or worn.
Clear Finishes for Wood Doors
A tough exterior paint coat may be the best protective finish for an exterior door, but many people prefer a natural wood appearance protected with a clear finish of polyurethane or varnish. However, ordinary clear exterior varnishes are subject to ultraviolet degradation from the sun, and may become dull and faded through simple exposure.
If you have problems with a clear finish on your exterior doors, remove the old finish, using a dust mask and eye protection. If moisture has left black stains on the door, use oxalic acid, available in crystal form at paint stores, to remove the stains. When stains are removed, clean and sand the bare wood. For the new finish, select a tough, water- resistant coating such as spar or marine varnish, or choose one of the new exterior polyurethane finishes that contain an ultraviolet blocker that resists damage from sunlight. Apply either of these finishes according to the manufacturer’s directions: most recommend at least two coats of finish on exterior surfaces. If you wait until the finish has deteriorated, refinishing the door will be a large job, so depending on your weather, it may be best to renew these clear finishes on an annual basis. For the best results, refinish the door in the fall, just before severe winter weather begins. If you live in a hot climate the best time to refinish is in the spring, before summer starts.

New-age door has the look of wood but is actually wood-grained
fiberglass. A polyurethane core makes the door energy efficient; a compression
weatherstrip, adjustable threshold, and thermal threshold break seal
against air and moisture entry.
Warped Wood Doors
If a wood door is not properly sealed on all faces and edges, moisture may enter the wood and cause the door to warp. Fortunately, this warping can often be reversed.
If a door is warped, wait until dry weather, then remove the door from its hinges and remove any peeling or failing finish. Use oxalic acid to bleach any stains.

Patio Door: New-generation patio doors have energy-efficient
glass, improved weatherstrip, and no-maintenance exteriors.
Place the door, convex or curved side up, over a pair of sawhorses set near each end of the door. Now place heavy weights, such as two concrete blocks, on the center area of the door. Leave the weights in place for several days, checking each day to see whether the door has become straighter. When the warp or curve of the door is gone and the door is flat, apply a coat of clear sealer to all the edges of the door. Then refinish the door as desired, with two coats of paint or polyurethane finish on each face of the door. Tip:
Painters often apply an extra coat of finish to the convex side of a warped door. Paint tension from the extra coat may help relieve the warp and straighten the door.
Insulated Doors
Due to the increased interest in energy conservation, new energy-efficient insulated doors have become very popular. These doors have a core of foam insulation, and may be clad on the faces either with steel or fiberglass.
Insulated doors don't warp, crack, or swell in damp weather. They are factory fitted with magnetic weather-stripping that ensures an airtight seal between the door and the door frame. These insulated doors provide as high an R-value as door/storm door combinations.
The factory finish reduces maintenance on insulated doors. Some of these steel and fiberglass doors are embossed so the finish resembles a wood grain. By using stains and a wood-graining tool available at most paint stores, you can finish any insulated door with a wood-grain pattern.
Patio Doors
Through improved technology and extensive testing, manufacturers have improved the thermal efficiency of both metal and wood patio doors. Metal patio doors have split frames with insulation between the frames, but metal patio doors still conduct cold, and although the metal doors have improved thermal efficiency, I advise having a quality wood patio door in cold climates. If you will be buying a new patio door, check the new model homes or open houses offered by builders in your area. You will be able to determine which type of patio door— wood or metal—is commonly used in your climate. Patio doors have double or insulating glass panes. Over time, a leak may develop in the seal between the insulating panes, which will allow moisture to enter the space, condense, and cloud the door glass. There is no solution for this problem; you must replace the glass pane.
Because of their large glass pane area, doors are prone to condensed moisture or frost on the interior side of the glass in cold weather. If the door frame is metal, the frame may also become covered with frost, sometimes to the point that it's impossible to open the door.
If the forced-air heating system is properly engineered, there will be a hot air vent in the floor in front of the patio door. Always keep this vent open, and if possible adjust it to direct the air flow toward the door. The heated air from this vent will rise and sweep over the door glass, warming the glass and removing condensation.
If you have this type of floor-mounted heat duct in front of the patio door, and are still getting condensation or frost on the door glass or frame, lower the humidity level in the house. For a review of suggested remedies, see Section 6, Humidity Problems.
If you have lowered indoor humidity to your basic comfort level, and there is still condensation on the patio door, open the door briefly every few hours to allow excess moisture to escape. Set a small fan near the closed patio door, and aim the fan so the air stream flows over the glass. This precaution will both raise the temperature of the glass and will carry away moisture that reaches the door.
If there are black water stains on the door, remove the finish and use oxalic acid to bleach the stains. Then refinish the door, using a durable interior paint, marine varnish, or polyurethane finish.
Garage Doors
Garage doors are available in wood, hardboard, steel, or fiberglass. Insulated garage doors are available, but when choosing a door remember that insulation is useful only as a thermal barrier between heated and unheated areas. There is no energy advantage in having an insulated door in an unheated or detached garage.
Steel and fiberglass garage doors are resistant to moisture attack, but wood and hardboard doors may suffer several kinds of moisture damage. At the factory, the garage door weather stripping is often nailed to the unsealed lower edge of the bottom door panel. With a hard rain or snow accumulation, water may reach the bottom of the door, and the water will wick up through the wood or hardboard in the bottom door panel. This can cause warping, staining, paint peeling, or decay in the door panel.
Pry away the rubber or vinyl weather-stripping at the bottom of the door, and inspect the bottom edge to see if it's painted or sealed. If it's not, remove the weather-stripping and apply a coat of latex paint or sealer to the unsealed edge of the wood or hardboard. This will provide a barrier to water entry at the door bottom. Replace the weather-stripping.
Because of rain or roof water splashing onto the garage apron or drive, the paint finish on the lower section of the garage door often will weather more quickly than the paint on upper panels. This is also true of the lower courses of siding on the garage and house. Inspect the lower panels of the garage door frequently, and refinish them when you see any indication of peeling paint, water stains, or mildew on the door. Pressure-wash the house siding and garage door at least once per year to remove grime and dirt that will support moisture buildup and mildew growth.
Attic Access Doors
Ceiling-mounted attic access doors interrupt the ceiling vapor retarder and the attic insulation blanket. If you have a one-piece hinged or lift-up attic door, paint the room side of the door with alkyd paint to provide some protection against moisture passage. Cut foam insulation such as Styrofoam to fit the door, and use an adhesive to attach the foam insulation to the attic side of the door. If you have a pull-down or folding-ladder type attic door, cut a panel of foam insulation large enough to overlap the framing around the attic door. Push the insulation panel aside when you need access to the attic; when you exit the attic, pull the foam insulation panel in place so it overlaps the entire opening.