In this section you will learn:
• about load-bearing foundations
• why different types of foundations are used
• about laying underground service and drainage pipes through foundations
• how and when foundation masonry is built
• about preparing to lay the ground floor slab
• how and when a damp-proof course and underfloor insulation are added
• how and when the floor slab is added.
Introduction
Why do you need to know about foundations? You will be able to undertake DIY tasks much more effectively if you have this essential background knowledge. For example, if you know how the foundations of your home are constructed, you will know whether, after a heavy rainfall, the water disappearing under the foundations will cause damp.
For the purposes of this guide, foundations are considered to be everything from the concrete in the bottom of the foundation trench, right up to the damp proof course. A house is designed so that every part works together. The foundations will be a certain size, depth and strength of concrete because of the load they will carry. This load includes everything from the roof down.
Load-bearing Foundations
Load-bearing construction has become the most popular form of construction in the United Kingdom, with load-bearing strength masonry walls being built onto concrete foundations. These are constructed so as to spread the load (weight) of the building over the entire footprint of the property. The weight of the roof is spread, therefore, via the load-bearing walls of a property directly to the foundations. If too much weight is placed on part of a building that's not directly connected to the foundations, collapse can occur.
Tip: load-bearing in cavity walls
It is worth noting at this point another important but little-known fact that, in most domestic cavity wall constructions, it's the internal skin of the wail that bears the weight of the building. The external skin, however solid and heavy it may seem, is simply there to look good and stop the weather getting in!
Every wall that can be considered structural, e. holding something up, or retaining something, needs a foundation. If you are simply putting a few bricks in a circle to provide a garden feature, no foundation is necessary. In all cases, the wall you are building is only as strong as the surface it's placed on. A wall built on soil will not stay in position long even if it's only holding back a few inches of gravel in your driveway.
How deep should foundations be? Foundations of any kind are designed in relation to the load they have to carry and the type of ground they are in. The minimum thickness of any type of foundation is 150 mm, the most common thickness, in solid ground, is 225 mm. However, these days foundation trenches are often filled to the top with foundation concrete as much as 1 m deep (see the explanation of trench-fill foundations later in the section). Tables giving foundation requirements can be seen at www.planningportaLgov.uk the government website for planning permission and building regulations. If you are in any doubt about what type or thickness of foundation is applicable to a project you are embarking on, you should contact the Building Control Department of your local council for advice. The ground conditions will determine which foundations you should use. |
There are many types of foundation. Differing ground conditions, proximity of trees, backfilled land, soil types, proximity of drains and wind speeds all dictate the type foundations required. This book explains a little more about strip foundations than other types of concrete foundations as they are the most common and widely used.
Strip Foundations
A strip foundation is quite simply a strip of concrete placed in a trench. The absolute minimum thickness of this strip is 150 mm, even for DIY work. Although a foundation of only 100 mm may be enough to carry the weight of your garden wall, it will not be thick enough to stop it cracking when the ground moves.
There are occasions, such as when a garden wall is to be placed on sloping ground, where it's impossible to achieve the required thickness of concrete on a level plane for the required length. It is then permissible to place a step or steps in this foundation, which then becomes known as a stepped foundation (a strip foundation that has steps in it when required). The depth of the step is usually dictated by the rise or fall of the wall, but the same rule applies as for strip foundations: the concrete must be a minimum of 150 mm deep, so from the top of one step to the bottom of the next step must be at least twice the thickness of the concrete, or a minimum of 300 mm, whichever is greatest.

fig. 4.1 stepped foundations in sloping ground
When a stepped foundation is required, you should consider the size of brick or block you will be laying for the wall. It is much easier to construct a step that's in accordance with the thickness of the brick or block course (see Figure 4.2).

fig. 4.2 use of bricks and blocks in stepped foundations
The following information may be useful when you are planning your stepped foundation:
• A standard brick is 65 mm deep and is usually laid with a 10mm joint.
• A standard block is 215 mm deep and is usually laid with a 10mm joint.
• A block laid flat is 100 mm or 150 mm deep, with a 10 mm joint. Blocks come in thicknesses of 100 mm, 150 mm and 215 mm. The depth will obviously depend on the thickness of the block you are laying flat.
It is also possible to lay a combination of bricks and blocks to get the height required for an easier job.
Using a combination of bricks and blocks, as long as the joints are still staggered, (more about that later) steps can be constructed to build a level wall into any type of sloping ground. DIY enthusiasts will usually only encounter foundation problems where a garden slope is to be leveled using a retaining wall, or where a garden wall is to be built. In these cases, follow the foundation rules in this section and ensure that the depth of the ground to be retained does not exceed four times the thickness of the wall (see Figure 4.3).
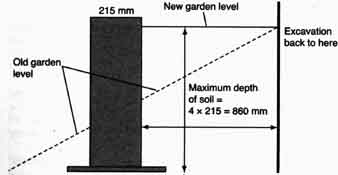
fig. 4.3 a retaining garden wall
Building regulations give a clear list of conditions that must be met in order for strip foundations to be suitable. This list is conditional upon the walls the foundations will support being placed centrally on their respective strip of concrete. The conditions apply as much to an extension as to a house, but don't apply to garden walls or garden retaining walls, as these are exempt from building regulations (although, in many cases, planning permission will be required for them).

fig. 4.4 stepped foundation overlap
There are also other considerations to bear in mind when building foundations.
• Existing trees draw a considerable amount of moisture from the ground, particularly in clay soils. The roots from trees can also be very damaging, and this should be considered when putting in garden ponds. Roots can easily puncture pond liners.
• The depth at which your foundations start may need to be determined by the local authority; which will make the decision based on ground conditions in the case of foundations for a wall that's required to meet building regulations.
• Again, in the case of an extension or other structural foundation, once the ground conditions have been ascertained, the weight of the load to be placed on the foundation (walls, etc.) is calculated and foundation widths are decided. The depth of concrete must also be worked out. This is a complex procedure for the layperson and employing the services of an architect is strongly recommended.
• When digging foundations for any form of strip foundation construction, it's as well to remember (unless you plan to fill the trench with concrete) that you will have to stand in the foundation trench to build the walls. Most foundations are excavated to a width of 600 mm. This will cover almost all eventualities in a domestic build. Marking out, or determining the exact position of a building, garden or retaining wall is made a great deal easier if the foundations are wider rather than narrower. This allows for a margin of error in excavation. It is also worth noting that 600 mm is a standard size for a digger bucket!
The choice of filling the foundation trench with concrete is now given in most cases, and it's usually much cheaper to do this. This type of foundation is imaginatively called a trench- fill foundation. The cost of the labor involved in laying bricks and blocks to ground level, together with the materials, is usually greater than the cost of pouring concrete to the required height. Steps can still be introduced in a trench-fill foundation.
• The walls constructed below the ground are subject to pressure from the earth in both directions and are treated as retaining walls. In most domestic builds, therefore, any cavity must be filled with a weak concrete mix (normally 8 parts ballast (sand and small stones pre-mixed) mixed with 1 part cement) up to finished ground level, and in all cases up to 150 mm below the level of the damp proof course. More details are given in the foundation masonry section below.
Underground Drainage and Services
Pipes passing through the foundation concrete (even the Concrete for your garden wall foundations) must pass through a purpose-made duct, allowing the amount of room indicated by the local authority, to remove the possibility of pressure from any other surface coming to bear on the pipework. These pipes are likely to be the drains taking away your foul waste (everything from your toilet, bath, shower, bidet and all hand basins) and /or surface water (rainwater from the roof and ground). This principle applies to service pipes (gas, electricity and water) which are inserted (or at least the ducts are inserted) at this stage. Laying pipes and cables through foundations should not be undertaken by the DIY enthusiast, so this guide will not go into detail about the thousands of regulations governing underground drainage. It is assumed that what you really want to know is what to do when something goes wrong. I this reason the book focuses on how the drains work until they are off your property, where they become someone else’s problem. Drains and drainage will be dealt with in more detail in Section 08, but this section will deal with ground water and land drainage.
Ground water and land drainage
You may be lucky enough to live in an area where natural drainage takes care of all surface water. The garden, if it's not rock or clay, may allow the rainwater to soak down to the water table, where it then drains to natural water courses, streams and so on, using gravity as its pump. (The water table is water collected underground in voids or porous rocks, usually in a layer. The depth of water table can vary greatly, depending on the porosity of ground.) On the other hand, you may suffer from a surplus of surface water caused by impermeable ground and your garden may be very boggy.
Do you need to improve land drainage?
If your garden tends to become boggy in bad weather, you may want to think about inserting some additional drainage to take water away from the parts of the garden used most often. Laying a land drain or a French drain is the easiest method of dealing with surplus water in your garden. The water can be taken to a natural drainage point, like a stream or ditch, but more often it will be taken to an artificial drainage point like a soakaway.
If you move into a newly constructed property, you may find that little attention has been paid to the garden and that just under the surface there are the discarded broken bricks and other rubble the builders have left there. Before you dig it all out and dispose of it, wait for a while to see if your garden drains well. If not, you can use the broken bricks and other debris in your new soakaway.
Drainage is dealt with at this point because, in the case of an extension, for example, this will be the last point at which access to the garden is relatively easy and the raw materials for a soakaway are available. Once you are happy that your garden will drain well it's time to start building.
Foundation Masonry
Having got a solid level base to work from with the foundation concrete, the underground masonry is built up to a level 150 mm above the ground surrounding the property. This is the level at which a damp proof course (DPC) is installed to stop any moisture, which may have soaked into the masonry below, rising up and soaking through into the habitable parts of the building.
Points to note:
• The underground masonry should not be laid, or treated, differently from the brickwork or blockwork.
• It should be laid to the correct bond (see Section 05) and all joints filled properly.
• The cavity should be filled with a weak concrete mix to ground level to stop the ground pressure collapsing the wall.
• The cavity wall should be insulated from this level according to specifications outlined by the architect and /or the building inspector.
Preparing To Lay the Ground Floor Slab
1. When the foundation masonry is complete and solid, the trench either side of the new masonry can be filled back up (backfilled). The backfill must be compacted in layers. The compaction is done on both sides of the wall at the same time to keep the pressure even. Compaction is done ‘to refusal’, meaning that it will not go down any more.
2. The area inside the building is then covered with a layer of hardcore (the hardcore bed, as it's called), usually between 150 mm and 300 mm deep. This too is compacted to refusal. Most faults with ground floor slabs (subsidence, cracking, etc.) are due to poor laying of the hardcore bed. Hardcore, historically, is broken bricks and concrete rubble but, although both excellent as hardcore, they are not that easy to shovel, work with and level. Crushed rock, broken chalk and gravel all make excellent hardcore and are much easier to work with. Road planings (the top few millimeters of tarmac which are shaved off a road when it's resurfaced) also make excellent hardcore and bind together really well under compaction. The compaction is achieved using a vibrating plate or vibrating roller; both of which can be hired locally from a tool-hire shop.
3. A thin (25 mm) layer of sand, called a blinding layer; is placed on top of the compacted hardcore. The purpose of this is to ensure that the damp proof membrane under the concrete floor slab (see Fig 4.6) can't be punctured by any sharp bits of hardcore.
4 A thick, polythene damp proof membrane is now laid on top of the sand. Building regulations say that a floor should resist the passage of moisture to the inside of a building, hence the introduction of the membrane beneath the concrete, which could soak up ground moisture if the membrane were not there. The membrane should be spread up the sides of where the slab will be, and tucked into the internal skin of masonry to avoid any moisture being squeezed between slab and wall, therefore forcing its way into the building.
Tip: using hardcore beds in DIY
All of these hardcore bases can be used for many DIV projects such as laying a patio, building a shed base and laying drives or paths, so the principle of a solid house base is again extended to DIV jobs. The hardcore should not contain any timber or building materials (paper, plaster, plasterboard, etc.), which will not compact at the same rate, or are likely to break down or rot and cause voids in the bed.
It is common for patios to sink, paths to ‘tilt’ and drives to develop huge holes, most of which can be avoided by simply hiring a vibrating plate or roller for the day and compacting the base properly.
Damp-proof Courses and Membranes
What is a damp proof course?
A damp proof course (DPC) is a layer of non-porous material, usually polythene, bitumen or plastic these days, which stops water passing between the sections either side of it. Polythene membrane can be bought in rolls from builders’ merchants. It is always laid in a continuous layer around the perimeter of a building at a minimum height of 150 mm. Damp proof courses can be formed by layers of impervious slate or very dense bricks called engineering bricks, but the effectiveness of these is determined more by the mortar which joins them than the materials themselves. If the joints are very porous, the DPC is far less effective.
Horizontal DPC
The horizontal DPC prevents water, that has soaked into the masonry from the ground, from rising up the wall to a height where it could cause problems. Of the problems this water could cause, one is particularly visible on outside walls, where the face of the bricks or stone is ‘blown’ off. This problem is called freeze- thaw action and is occurs because the water in the tiny pores of the masonry freezes in very cold weather. When it freezes it expands as ice does. This expansion causes tiny fractures in the masonry which, in turn, let in more water. This freezes, and so on. Eventually the masonry is more crack than brick and it falls apart.
A DPC will not stop this process entirely because most bricks are slightly porous anyway and will still get damp, but it will prevent it from concentrating at a lower level where gravity will take any moisture that has not evaporated.
Vertical DPC
DPCs are also used at every point where a cavity needs to be closed (see Section 05). This is usually a DPC placed vertically to stop moisture passing from the damp external skin to the inside skin.
Another use for a DPC is to transfer moisture which has made its way into the cavity through masonry faults, condensation or structure damage, back to the outside of the building. This is done using a cavity tray DPC, which simply acts as a slide and shoots any water in the cavity towards the outside skin where it escapes through vertical joints in the brickwork which have purposely been left empty. These are called weep holes. This situation is found mostly over windows and doorways where, if it was left to settle on top of the frame, the water would soon rot the wood or, in the case of PVCu frames, would stagnate and harbor mould spores. It would also soak into the inside skin of the building causing internal damp. Cavity trays over windows and doors are often in the form of specially shaped lintels (see Figure 4.5b). If these are not used a simple, extra- wide length of DPC is built into the appropriate courses of masonry (see Figure 4.5a).

fig. 4.5 cavity trays: Cavity tray DPC; Cavity tray lintel
Underfloor Insulation
In Europe in 2006, new building regulations were introduced which stated, in brief, that the heat loss from ground floors must be improved. This meant, in most cases, increasing the thickness of insulation placed under a floor slab. (In some cases this insulation is placed on top of the slab and under the floor screed.) The insulation has a high thermal resistance and an added benefit is that it also improves the resistance to sound. Tables are available in the building regulations that show you how to calculate the required amount of insulation for your extension or conservatory.
Of particular importance to the DIYer is the insulation placed at the perimeter of the slab, which stops the cold external temperature being transferred via brickwork and concrete to a ‘cold spot’ inside the room. Cold spots are areas where warm air can condense, introducing unwanted moisture and subsequently possible mould into the room. There is more about cold spots in the Section 05.
The Ground Floor Slab

Fig. 4.6 foundation construction to ground floor slab
Once the DPC and insulation (if it's going beneath the slab) have been laid, a concrete slab of a specified depth is then poured carefully on top.
A concrete floor slab is very likely to have sand and cement floor screed placed on top of it. Unless they are sealed correctly, concrete floors are not hardwearing and will cause a lot of dust; this is one reason for a screed. Secondly, because of the size of aggregates used, it's virtually impossible to get a concrete floor slab perfectly level, so a finely grained material, usually sharp sand or flooring grit, is mixed with cement at proportions of 4:1 to provide a perfectly level and smooth floor finish.
If the floor screed is laid within a couple of hours of the floor slab, allowing the two to go hard, or set, together (bonded screed) then the screed only needs to be 12 - 15 mm thick. If, as in most cases, the screen is laid well after the floor slab (semi- bonded screed), then a minimum of 40 mm should be laid.
Figure 4.6 shows the insulation under the concrete slab. In some designs insulation is placed between the slab and the floor screed, in which case the screed should be a minimum of 65 mm.
Floor screeding looks easy, but is a very difficult process. Project 16 on floor screeding, although only short, gives invaluable advice regarding laying a flat, level floor screed. This project is not just useful for screeds; the principles can also be applied to laying garden paths, patios, shed and garage bases, drives and so on.
Can I the over my existing floor coveting? DIV Doctor receives many questions asking if is acceptable to tile over existing lino / vinyl tiles/quarry tiles. Good building practice would advise you not to do this You are relying totally on the perfect adhesion of the covering below and , white your new floor make be stuck good and fast if the one below is not then you may have problems. There are huge handheld floor scrapers available from tool-renting centers add builders’ merchants (e.g., B&Q in UK and Home Depot in U.S.) which make removal of vinyl and vinyl tiles much easier. Them are even electric chisels. One thing that's worth repeating time and time again is that every single job in the building (and DIY) trade Is only as good as the preparation done for It. • If you Insist on doing It. then make sure that the original surface is absolutely stuck down, with no loose or floppy edges and no cracked tiles. • Prepare the surface well by scrubbing any grease or dirt with a solution of sugar soap. • Remove any loose or flaking material and vacuum up any dust. • Scratch vinyl surfaces with a wire brush (an attachment on a drill is ideal). • If you are applying vinyl to vinyl, use the adhesive straight onto the original surface. • If you are applying quarry tiles to vinyl, then coat the vinyl with an undiluted coat of SBR latex adhesive first. • If you are laying vinyl on quarry thee you will need to smooth the floor with a sell-leveling floor compound. • If you are laying quarries on quarries, then a coat of undiluted SBR latex adhesive is a good Idea as well, and make sure the joints of the new tiles are staggered with the joints of the old. Please note, we don't advocate any of the above applications and prefer to see a job started on ‘solid ground’. |