Carpentry tools
Not only is exterior trim an aesthetic consideration, it allows the outside of a house to function as a weatherproof skin, so that a controlled temperature can be maintained inside. To protect your home from the elements, give top priority to completing the enclosure. Exterior finish carpentry is the means by which you seal out wind, snow, and rain, by covering the gaps where materials meet. Easy-to-follow instructions and illustrations give techniques for installing exterior window and door trim, finishing corners, and adding soffits and cornices. You will also learn how to build exterior stairs and railings.
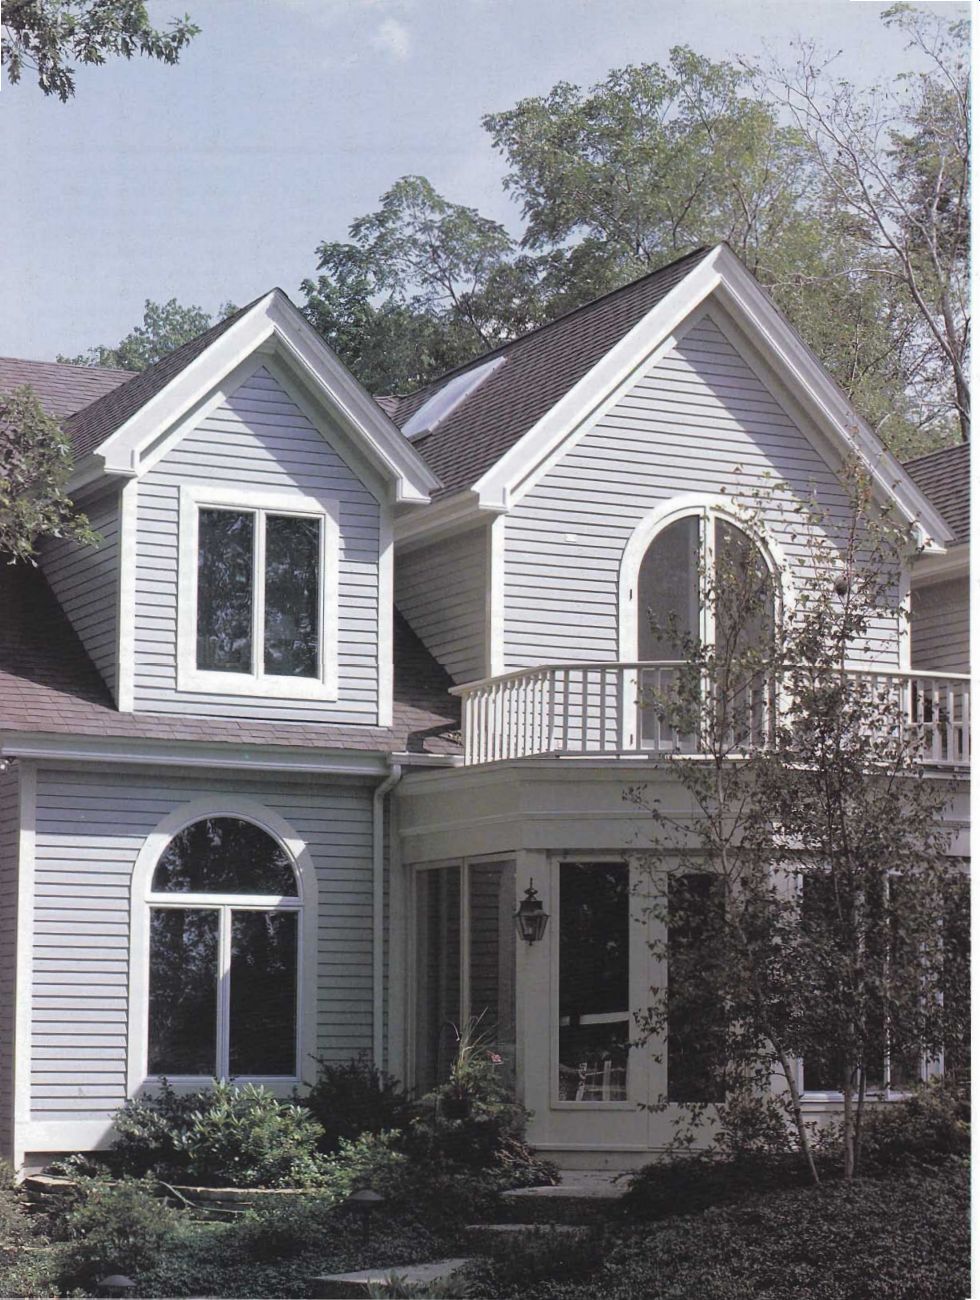

------------ Well-designed and carefully executed trim details, such
as cornices and window and door trim, are what make this lovely Michigan
home so striking.
+++++++
AN OVERVIEW
Exterior finish work entails weatherproofing. Window and door trim must be correctly lapped to prevent leaks. Joints must fit tightly. And no matter how carefully you've lapped and fitted, caulking is essential to keep out wind and rain.
Minimizing Warpage
On a hot summer day, it is sometimes difficult to imagine what effects rain or snow will have on the exterior of a house, or how a blustery storm can drive moisture in through the seams and joints. Just remember when weatherproofing the exterior: It's nearly impossible to overdo it. Properly fastening the finish materials and then applying a moisture-resistant covering, such as paint, stain, or sealer, over every surface that is exposed to the elements is the best way to minimize deterioration and war page.
Safety on the Job
Follow all the safety tips mentioned in the first chapter. In addition, there are a few pre cautions that are specific to this stage of the job. For example, you will need scaffolding and ladders for hillside or second story construction. Set them up properly and use them correctly. Don‘t underestimate the potential hazard here. Make the effort to work safely; it saves time in the long run. The projects in this chapter are well within the abilities of the average do-it-yourselfer. For the sake of safety as well as efficiency, however, enlist the aid of friends or work along side a professional if you feel uneasy about doing a job alone.
Materials
Exterior finish work is more exacting than rough framing, and the materials are more ex pensive. Give careful consideration to each piece of material that you select, cut, and install.
Check through the materials after they have been delivered; of course you want to be economical, but it is always wise to have extra on hand. Mistakes in calculation and cutting are bound to occur, and the job will be delayed if you have to wait for additional supplies.
Tim Techniques
Techniques for installing exterior trim vary with the trim itself, the roof overhang, and the sequence of construction.
The techniques for installing door and window casings vary with the wallcovering used.
These techniques and the sequence of installation are explained in this chapter.
Measuring for Exterior Trim
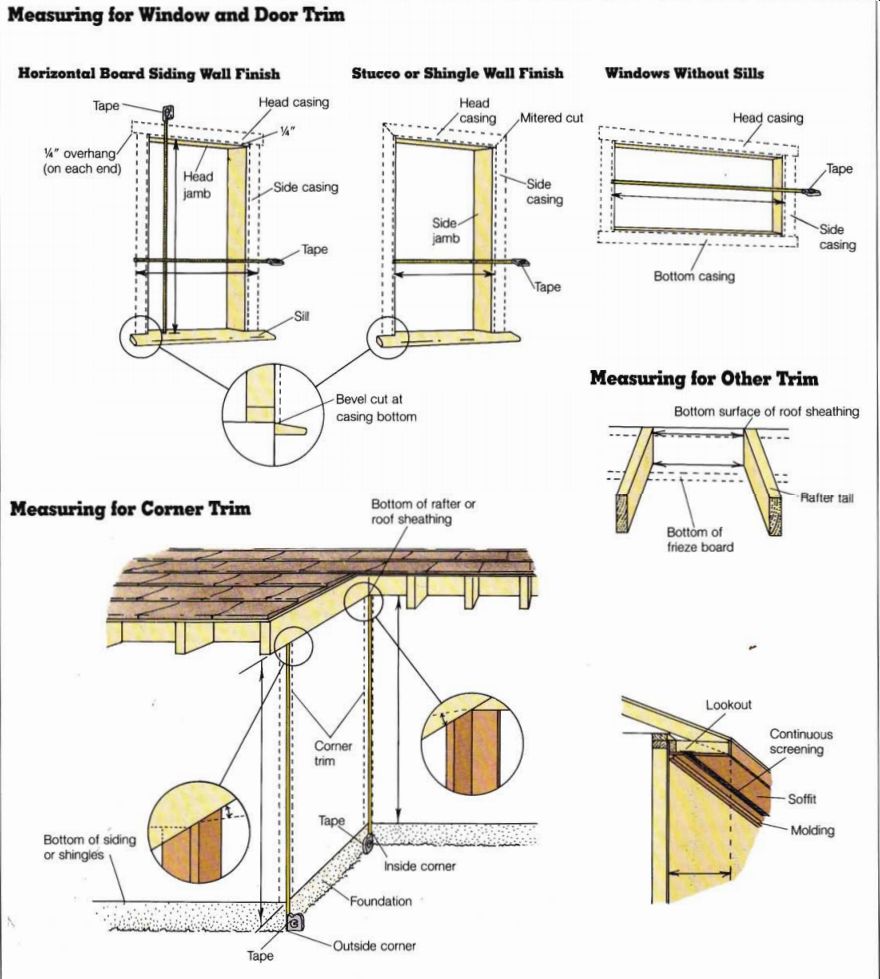
The placement of exterior window and door trim, also known as casing, is best determined with a steel tape measure. Trim for doors is measured in the same way as trim for windows with sills that protrude from the building and extend be yond the bottom of the side casings. Measure the side casings first. Touch the tip of the tape measure to the windowsill and extend the tape vertically along the side jamb to just past the point where it intersects with the head jamb. Mark the cut line 1/4 inch past the inter section. This allows for a 1/4 inch reveal, or setback, from the edge of the jamb when the casing is installed. Once the side casings are cut and tacked in place, determine the length of the head casing by measuring the distance between the outside edges of the side casings. The usual practice is to add 0.5 inch to this dimension, to allow the head casing to extend 1/4 inch beyond each side casing. See illustration on page 47.
The casings should be beveled on the bottom. If they are being installed over wood siding, they should be square on the top. If the trim is being installed with stucco or shingle siding, the side and head casings are usually mitered where they intersect. In this case, the measurement for the head casing is taken between the inside edges of the side casings, and the miter is cut from that dimension.
Other types of window frames require different procedures. Should a bottom casing be necessary on a window without a sill, its length is determined by measuring be tween the inside edges of the side jambs of the window and then adding 1/2 inch for reveal, plus twice the width of the side casing, plus inch for over hang. Tack this piece in position, allowing 1/4 inch of bottom-jamb reveal. Then determine the lengths of the side casings by measuring from the top edge of the bottom casing to M inch past the bottom edge of the head jamb. Once these side casings are tacked in position, the head casing can be measured, cut, and installed as described for trimming windows with sills.
When exterior corner trim is necessary, take measurements with a steel tape. For inside corners, either 1 by 1 or 2 by 2 trim pieces are cut to a dimension that extends from the bottom of the starter piece of siding (or shingle course), or the top of the water table, to the bottom edge of the frieze block or rafter (or roof sheathing), or to the soffit. For outside corners the measurements are taken similarly, the exception being that the trim pieces are usually 1 by 4s overlapped at the vertical edges.
Measuring for cornice work is best done with a steel tape, although for precise dimensions-such as those between rafters-a folding rule with an extension slide may be preferable. Framing lumber is seldom straight and true, so take dimensions at both the top and the bottom of a rafter space when measuring for frieze boards or frieze blocks. When measuring for soffits take dimensions in several locations and cut to the narrowest one.
This will reduce any necessary recutting. Gaps between the soffit and the siding will be covered by molding.
----------
++++++++++++
EXTERIOR WINDOW TRIM
Whether or not you need exterior window casing depends on the window frame and on the wallcovering. Nearly all wood-framed windows require exterior casing. Metal framed windows often do not, particularly when they are used with stucco, brick, or stone wallcovering.
When to Install It
The casing for wood-framed windows is installed before or after the wallcovering, depending on what type of wallcovering is used. With shingle, stucco, brick, and stone, the casing is usually installed first.
With horizontal or vertical board siding, the casing can be installed first or last. With plywood siding the casing is usually installed last. See illustrations on pages 49 to 51.
Metal windows with nailing flanges should be installed be fore the wallcovering. A casing may or may not be required.
With shingle the casing is optional; if you elect to use it, it should be installed before the wallcovering. With horizontal and vertical board siding and plywood, the casing is installed last. With stucco, brick, and stone, no casing is used.
If your house is of a unique design that calls for unusual windows, wallcoverings, or casing procedures, ask a knowledgeable source to help you to determine whether, and when, to install casing.
Installing Casings on Wood-Framed Windows
Now that you know what casing to install, when to install it, and how to measure it, you‘re ready to start. The following discussion deals with wood framed windows. Casing for metal windows is discussed on page 49. As part of taking the measurements, you will have marked the reveal from the edges of all jambs for positioning the casing ( see page 46).
In addition to the casing on a wood-framed window, a trim strip-called an apron-is often installed beneath the window sill on houses with a wood wallcovering. The apron, usually made of 1 by 3 or 1 by 4 stock, is used to close the gap between the underside of the windowsill and the adjoining wallcovering. Cut the apron the same length as the sill, and caulk the gap before installing the apron.
Square Cuts
Square-cut casings are recommended with board siding. Using a sliding bevel, determine the angle of cut where the bottom of the casing meets the sloped windowsill. Make this cut at one end of a piece of stock meant for that particular window. Then measure from the short end of the bevel and cut this piece to length. Tack it in place and repeat the procedure for the other side piece. To complete the job cut the top piece to length, position it, and tack it in place. Make any necessary adjustments and nail the pieces down.
Mitered Cuts
A variation of this procedure uses mitered cuts at the upper corners. Use this technique with stucco and shingle wall coverings.
Start by cutting the side casings. At one end of the piece of stock, make the bevel bottom cut. Then mark the measured dimension from the short edge of the bevel to the inside of the miter. Cut the miter-be sure to cut in the proper direction and tack the piece in place.
Cut the other side casing in the same way, but do not tack this piece in place yet. Now cut the mating miter (the head casing) for the first side casing on the remaining piece of stock and test it against the side casing miter to determine the it.
If this is satisfactory, hold the head casing in place and mark the length of the side casing at the short point of the miter on the opposite end of the head casing stock. Cut the miter, tack the second side casing in place, then position the head casing.
As with all casings, make any minor adjustments to the mitered cuts and the position of the pieces before you complete the nailing.
Caulking
If the casings are to be painted, small gaps or cracks can be caulked first. Casings that are to be stained or sealed with a clear material must it together well, because most caulks will show through and be unsightly. (A limited range of colored caulks is available. One of these may match the stained or sealed wood.) Nailing Hot-dipped galvanized common and box nails are most often used for exterior applications. Both are weather resistant and hold well. Finishing nails are not usually used on exteriors; their holding capability is inferior to that of common and box nails.
There is some controversy about galvanized nails. The galvanizing can be damaged by repeated hammering, and rust can form on the nail head and run down the casing. On painted exteriors the nail heads are covered, but on unpainted surfaces the rust can stain the wallcovering. In such situations aluminum, electroplated, or stainless steel (very expensive) nails are sometimes used. It’s also possible to set the nails slightly and then caulk the cavity to seal it; of course, this is effective only if matching caulk or wood filler can be obtained.
As a rule, nails should be evenly spaced between 12 inches and 18 inches apart. The top and bottom nails should be about 1 inch from the ends of the casing. Closer nailing may be necessary where the stock is bowed or otherwise irregular.
The preferred nailing pat tern is to have the outside and inside nails opposite each other. When driving a nail close to the edge or end of the casing, predrill a hole to avoid splitting the wood.
As an added refinement on mitered corners, nails can be driven through the edges of the side casings-near the top into each end of the head casing, and also through the top edges of the head casing down into the end of each side casing.
This will tighten the mitered joints and help to keep them from separating. Use finishing nails on these corners, set and sealed for appearance.
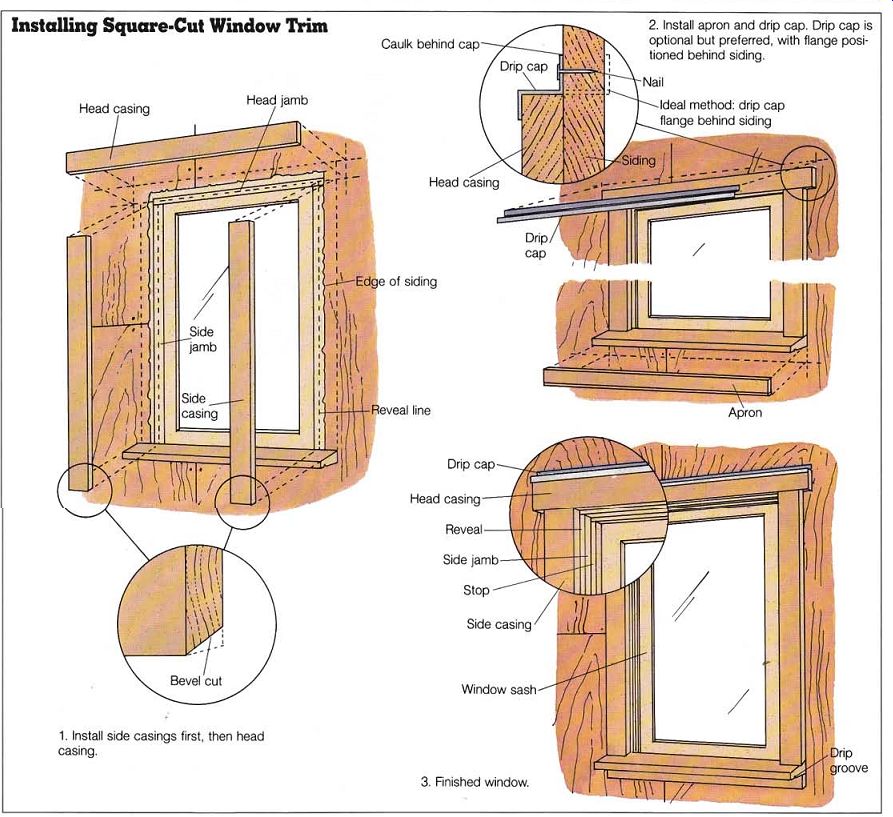
-------- Installing Square-Cut Window Trim
Side Stop Side casing method: drip cap flange behind siding
Drip broove Head 1.
Install side casings first, then head casing.
Window 3.
Finished window.
2. Install apron and drip cap. Drip cap is optional but preferred, with flange positioned behind siding.
Reveal line Drip Head ; Caulk behind
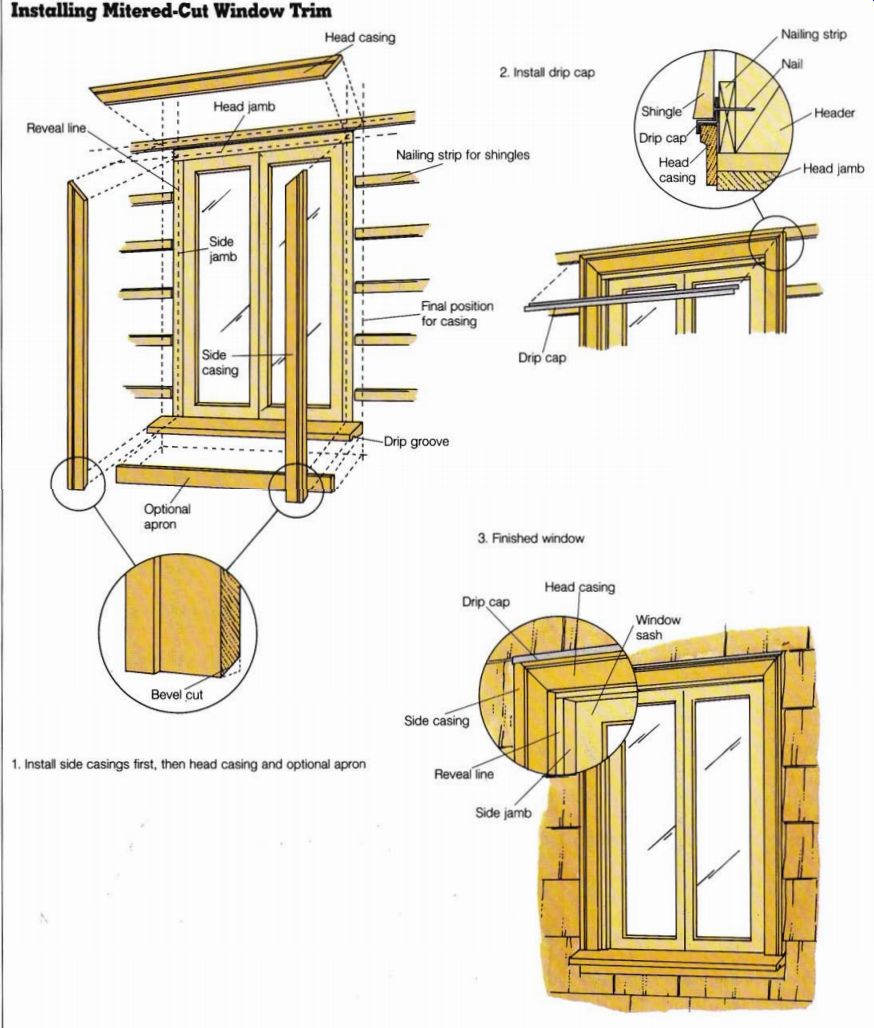
-- Installing Mitered-Cut Window Trim
Head casing Reveal line
2. Install drip cap
Nailing strip for shingles
Nailing strip
Nail Final position for casing Drip cap
-Drip groove 3.
Finished window Head casing Side casing 1.
Install side casings first, then head casing and optional apron
--------
----------
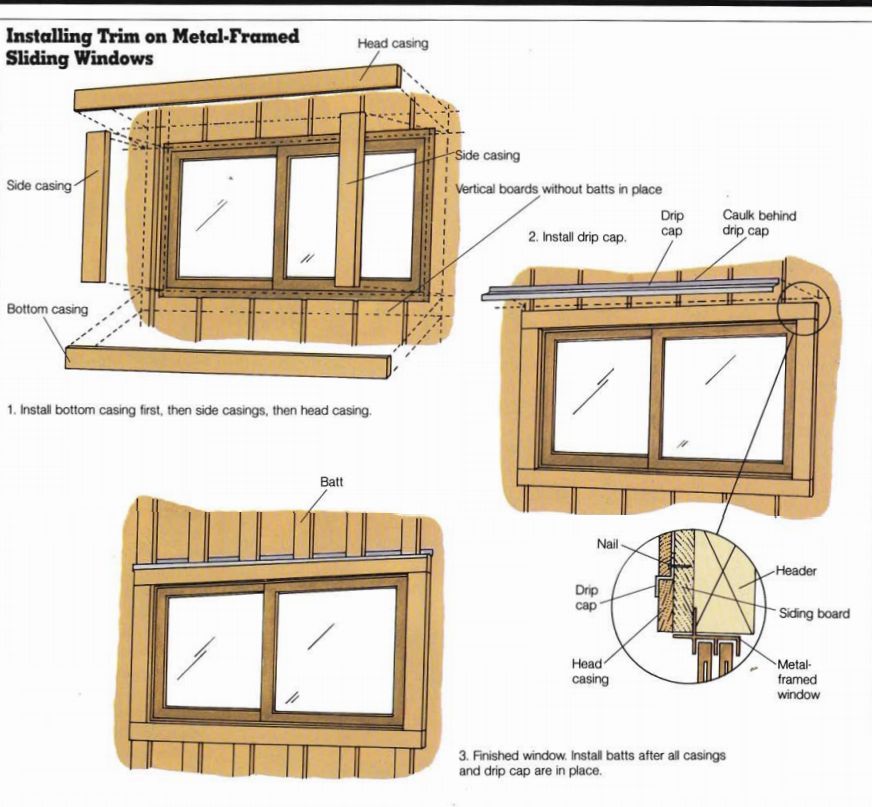
Installing Casings on Metal-Framed Windows
Casings are not required on metal-framed windows when the wallcovering is stucco, brick, or stone, since the metal frame acts as the finish for these materials. However, wood casing is occasionally used to frame a metal window when the wallcovering is shingle. In this instance, the casing is chosen primarily to enhance the design; it is not necessary for weatherproofing.
Wood casing can also be used with stucco; again, this is an option and not a necessity.
Before the stucco is applied, the casing is nailed over a previously installed board, called a ground, which is narrower than the casing. This allows stucco to squeeze behind the casing and seal the joint.
When board or plywood siding is used, the casing is usually installed after the siding is in place. All sides of the window, including the bottom, are cased out. The installation procedure is the same as that for wood-framed windows, except that there is a bottom piece of casing to it, and there is no reveal on the wood jamb to hold to, only the metal window frame. The bottom casing is in stalled first. It acts much like the sill in a wood-framed window. However, because the bottom casing is not slanted like a sill, the side casings do not take a bevel cut.
++++++++++++++
EXTERIOR DOOR TRIM
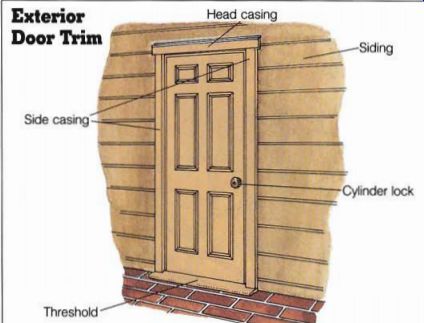
The procedures and techniques used to choose and install window casings are essentially the same ones that are used for doors. The type of casing is determined largely by the wall covering, and the style of finish is dictated by the desired appearance.
----------- Garage Door Tim
-------------- Exterior Door Tim: Side casing- Head casing Threshold
Siding
Cylinder lock
Types of Doors
Several types of exterior doors are used in residential construction. The most common is the wood-framed swinging door (see illustration at right). The bottom member of this type of door is called the threshold, which is analogous to a windowsill. This type of door is usually cased out in the same way as a wood-framed window.
The difference is the length of the side casings.
The sliding glass door is usually metal framed, but some models come with a wood frame. This type of door is usually cased out in the same way as a metal-framed window. A bottom casing is used with certain wallcoverings, such as board siding, and no casing is used with others, such as stucco, brick, and stone.
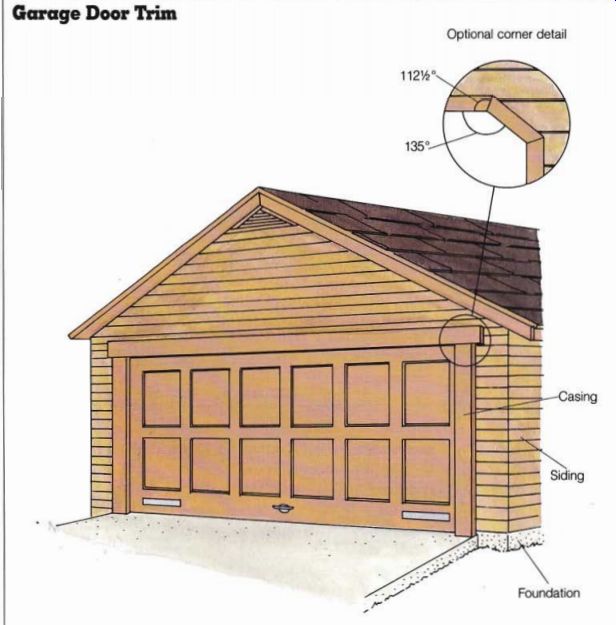
The trim procedure required for garage doors is nearly the same as that for swinging doors. The difference is that there is no threshold on which to set the side casings, so they are straight cut to finish even with the bottom of the side jambs. See illustration at left.
Most pet doors come with all the materials required to complete and weatherproof the installation. Should you choose to construct your own pet door, trim the exterior side as for a regular swinging door, in either threshold or picture frame style. Take care to weatherproof the door adequately without hampering its free movement.
++++++++++++++
OTHER EXTERIOR TRIM
Corners, cornices, and gutters and downspouts are elements of exterior finish work that are functional and lend polish to the outside of your home. The illustration at right is an overview of these and other exterior trim elements.
Corners
All buildings have outside corners; many buildings have inside corners as well. (An out side corner angles out; an in side corner angles in.) Corners are trimmed to create a finished appearance and to provide additional weather protection.
Different types of trim are used for each type of corner. Most treatments are also dictated by the wallcovering used, al though several different treatments are possible for each wallcovering. See illustration on page 54.
Outside Corners
The finish on an outside corner is largely determined by the wallcovering. With horizontal board siding the options are to miter each course where it meets at the corner or to make butt cuts on the siding and cover the corner with trim. For beveled siding it is also possible to apply metal corners to each course of siding.
Shingles are usually over lapped at the corners, alternating the lap with each course.
A less common option is to trim the corners with vertical boards. Vertical board siding is treated like shingle.
Trim pieces used at outside corners are installed after the wallcovering is in place. The trim extends from the bottom edge of the siding to the bottom edge of the frieze board or block. First, measure and cut a 1 by 4 (or whatever size of board is appropriate). Tack it in place at the corner, making sure that one edge is even with the plane of the intersecting wall. Next, cut the mating piece and hold it in position against the first piece, covering the edge. If the two boards it together well, finish nailing the first piece. Then nail the second piece in its final position. If the it is not acceptable, make the necessary adjustments.
If there are no frieze boards or blocks, the trim pieces should extend to the roof sheathing. This installation is simple, provided that you recognized the need for slightly longer stock when you ordered the material. Taking the time to visualize the completed details in advance is an important part of efficient ordering.
For a slightly different appearance, install a quarter round trim piece at the inter section of the two 1-by boards.
This gives a rounded look to the corner.
Inside Corners The sequence for installing trim on an inside corner depends on the wallcovering.
When horizontal board siding or shingle is used, it is common to install a square trim piece before the siding is applied.
This gives a more finished appearance. Trim for vertical board siding and plywood is usually installed after the wallcovering is in place.
At an inside corner 1 by Is are used to cover the joint between two pieces of vertical siding or plywood. With horizontal siding and shingle, 2 by 2s are standard. They are nailed in place before the wallcovering is installed. This produces a reveal that is pleasing in appearance. Occasionally a 1 by 1 will be installed after horizontal siding is in place. This is acceptable but less attractive.
Nailing The nails used for corner trim should be of the same type, and spaced in the same way, as those used for window and door casing. However, they should be smaller. When fastening a 1 by 1, nail it in both directions to attach it securely to the corner.
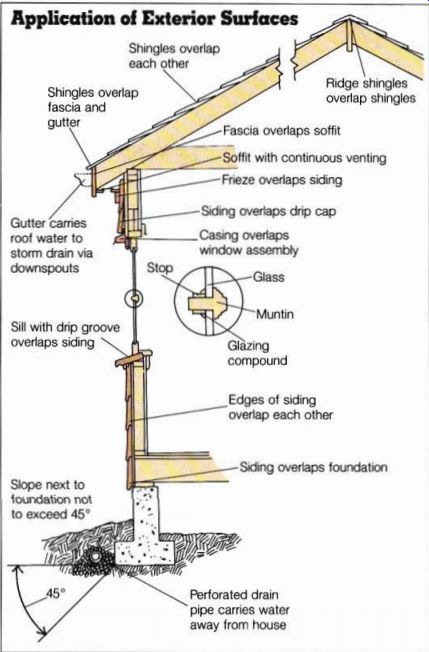
---------- Application of Exterior Surfaces---Shingles overlap each
other; Shingles overlap fascia and gutter; Ridge shingles overlap shingles;
Fascia overlaps soffit. Soffit with continuous venting Frieze overlaps
siding Gutter carries roof water to storm drain via downspouts Sill with dip
groove overlaps siding. Siding overlaps drip cap Casing overlaps window assembly;
Glass; Muntin Glazing compound Edges of siding overlap each other Siding
overlaps foundation Slope next to found. no to exceed 45° Perforated drain
pipe caries water away from house
--------------
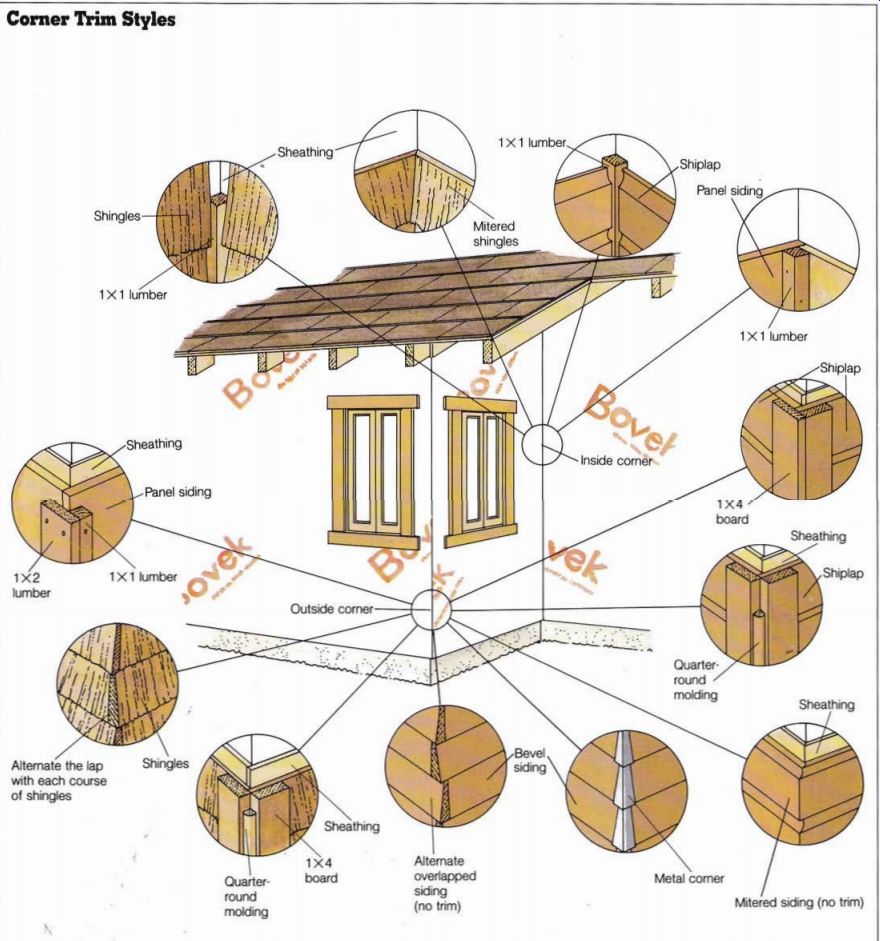
----- Corner Trim Styles Shingles -
Alternate the lap with each course of shingles Quarter
round molding overlapped siding (no trim) Mitered siding (no trim)
------------------
Cornices
A cornice is the trim that covers the joint where the roof and walls meet. The way in which the roof was framed deter mines the cornice treatment. If the intersection of the roof and walls forms a right angle, a horizontal cornice is used. At gable ends, where the intersection forms an acute angle, a raked cornice is used.
The overhang of the rafters determines the width of the eaves. If the rafters are not long enough to give the desired overhang, you can extend them by attaching tail rafters on the horizontal eaves or lookout rafters at the gable ends. How ever, this must be done before the roofing is laid.
All cornices, regardless of type, are classified as either open or closed. In an open cornice the spaces between the rafter ends (or the tail rafters) are left open. In a closed cornice, also called a boxed cornice, a panel known as a soffit covers the underside of the rafters. The soffit is attached directly to the rafters or mounted on the lookouts.
With any type of cornice work, the rafter spaces must be ventilated to prevent condensation from forming on the underside of the roof sheathing.
The moisture would deteriorate the wood members and the insulation in the attic or rafter spaces. Proper ventilation is achieved in various ways, depending on the particular cornice used.
Open Cornices
The open cornice is relatively easy and inexpensive to build.
Its main features are the frieze and the fascia. See illustration.
The Frieze
This is a 2-by board that closes the gap between the last course of siding and the rafters. Cut a rabbet on the bottom edge of the frieze to it over the top of the last course of siding and notch the upper edge of the frieze to it snugly around the rafters. To cover the remaining space between the frieze and the underside of the roof, cut frieze blocks from 1-by stock.
Nail the blocks to the frieze and to cleats that match the thickness of the frieze. If the gap is not too large, you can use sections of crown molding instead of frieze blocks. If the siding already reaches to the bottom of the rafters, all you need is frieze blocks. Back prime all pieces before nailing them in place.
The Fascia
To trim the ends of the rafters, rip a 1-by board so that it covers the edge of the roof and extends 1/4 inch below the rafters. Any joints in this board must occur over rafter ends so that each section can be nailed securely. To prevent splitting, drill pilot holes for the nails.
When you turn a corner, miter the ends of the fascia so that the joints are tight. Be sure to back-prime the fascia before attaching it.
On raked cornices nail the fascia so that it is snug against the underside of the roofing.
The fascia should cover and extend at least 1 inch below the nailing board. (It should extend 2 inches if the roof pitch is steeper than 6 in 12.) Closed Cornices In a closed, or boxed, cornice, the area between and underneath the rafters is closed off by a panel called a soffit. Except for the soffit and its supports, the closed cornice is the same as the open cornice.
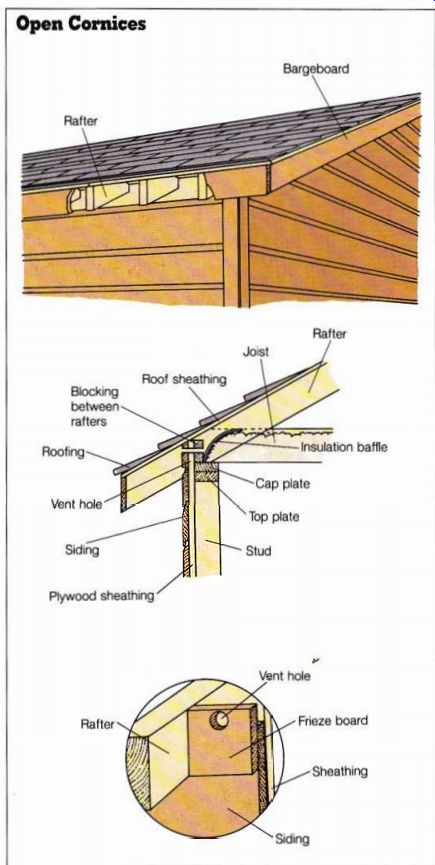
------- Open Cornices; Bargeboard; Rafter
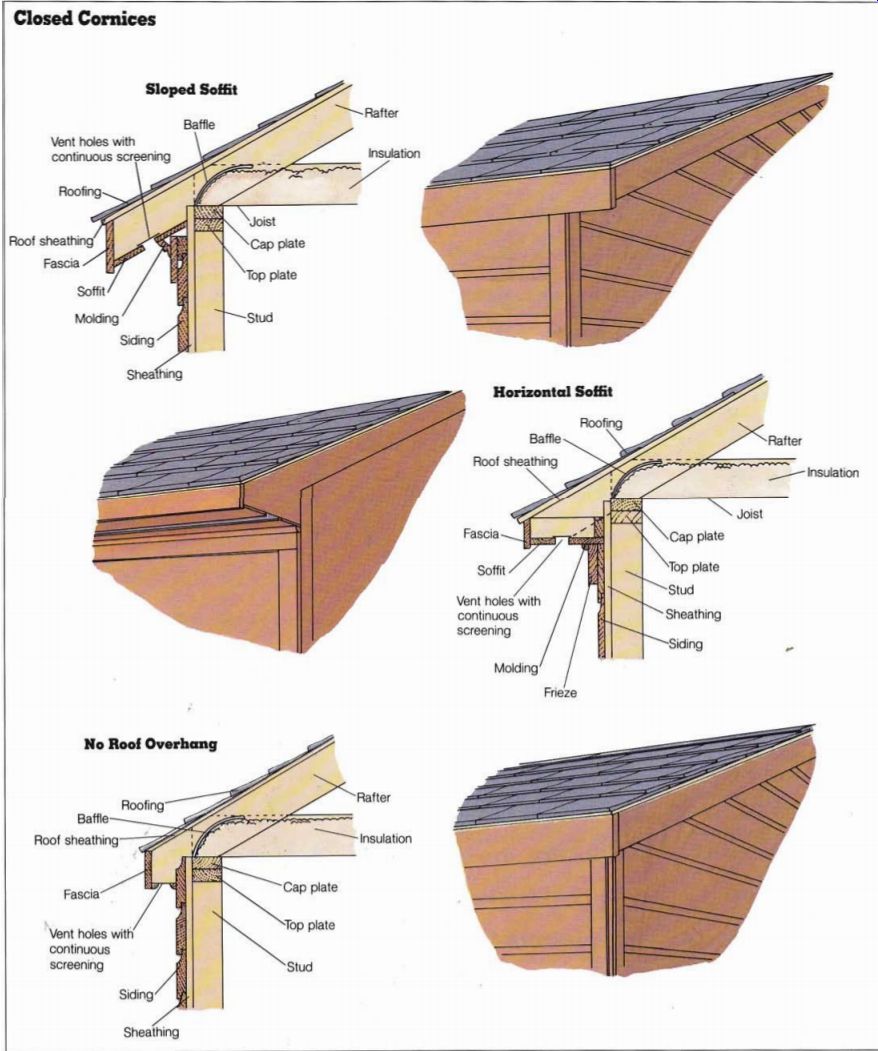
--------- Closed Cornices Sloped Soffit Bale Vent holes with continuous
screening Rooting Roof sheathing Fascia -
Joist
Cap plate Top plate Stud Horizontal Soffit Roofing Bale Roof sheathing Insulation Vent holes with continuous screening Molding
Sheathing
Siding Frieze Bale Roof sheathing Fascia'
_ Vent holes with' continuous screening
-----------------
The Lookouts
The first step in building a closed cornice is to attach a lookout to each eave rafter; these lookouts support the soffit and strengthen the over hang. Use 2 by 4 stock. Toenail the lookouts into the wall sheathing and facenail them to the rafters.
The Soffit
This can be made of 1/4-inch plywood if the rafters are no more than 16 inches apart. Use Vi-inch plywood if the rafters are more than 16 inches apart.
Measure the width of the soffit, subtracting 2 inches to allow for ventilation (described be low). Measure and cut the plywood to length, then cut each piece lengthwise into two.
Tack the front piece of plywood against the fascia. Install a continuous strip of 2.5-inch wide screening along the rear edge of the plywood and staple it at each rafter. Position the other piece of plywood 2 inches behind the first piece and next to the sheathing. Nail both pieces of plywood completely.
The Frieze
In a closed cornice as in an open one, a frieze covers the space above the top course of siding. Cut the frieze boards out of 2-by stock. Cut a rabbet along the bottom edge of each board to lap over the top edge of the siding. Butt the top of the frieze against the soffit.
If there is no nailing board on the gable, nail blocks to the siding between the lookout rafters. The angle and position of the blocks must allow for a raked soffit-the bottom edge of the blocks must be level with the bottom edge of the lookout rafters. Cut and nail the gable soffit in place as you did the eave soffit, but stop at the point where it meets the return cornice.
The Fascia
Cap the ends of the rafters by nailing a fascia board all around the cornice. Miter the corners and make sure that all the joints are positioned over rafter ends.
In a cornice where there is no roof overhang, fasten the fascia to the rafter ends so that it overlaps the upper edge of the top siding board. This eliminates the need for a soffit. In this hybrid between an open and a closed cornice, the closure is screening instead of a soffit. Since the attic (or rafter space) must be ventilated, the rafters must overhang the siding by an amount sufficient to allow the air to flow. A 2-inch opening is standard with this type of cornice. Cover it with continuous screening or mesh to keep out insects and birds.
Gutters and Downspouts
Usually made from galvanized metal, plastic, or aluminum, gutters are designed to catch rainwater running off the roof, and downspouts direct the flow of water away from the foundation. There is no firm rule governing the location of downspouts, but they are normally placed at the end of a gutter and not where they will be an eyesore-right next to a window, for example.
Gutters and downspouts come in a variety of sizes. Use the following guide to determine what size to use. As a rule of thumb, you should install one downspout for every 600 square feet of roof or for every 20 to 30 feet of gutter.
Square feet: 750 to 1,000 Gutter: 4 inch Downspout diameter: 3 inch Square feet: 1,400 to 2,500 Gutter: 5 inch Downspout diameter: 4 inch Installing Gutters; Gutters usually come in 10-foot lengths. Each section is fitted into the next with a slip joint that snaps into place. All the joints should be caulked to pre vent leaks.
Gutters are hung on the fascia board covering the exposed rafter ends, or on the rafter ends themselves if there is no fascia. They are attached with straps nailed under the roofing material at the eaves, with spikes that it through a ferrule in the gutter, or with brackets nailed to the fascia. Start in stalling the gutters at the end farthest from the downspout.
This starting end should be the high point of the run, and the end of the gutter should it snugly under the overhang of the roofing material.
For proper drainage the gutter should slope 0.5 inch for every 10 feet of run. If the run is more than 20 feet, position the high point in the center and install a downspout at each end.
To mark the slope drive a small nail at the high point, allow a 1/2-inch slope for every 10 feet of run, and drive an other nail at the low point.
Snap a chalk line between the two points and place the top of the gutter along this line.
For gutters made from heavy-gauge metal, such as galvanized steel, place hangers 4 feet apart; for lighter aluminum, 3 feet apart; for plastic, about 30 inches apart.
If the gutters will have to support snow, strengthen the connections with self-tapping metal screws. Remember to use screws that match the metal you are working with. Don’t use galvanized screws with aluminum, or vice versa, because the dissimilar metals set up an electrolytic reaction that causes rapid corrosion.
Close up the ends of the gutters with slip-on caps and caulk all seams carefully.
Installing Downspouts Sections of downspouts are joined to each other and to the gutter with slip connections that must be carefully caulked.
A series of elbows is usually used to make the downspout conform to the wall of the house. This is sturdier and more attractive than having it run from the gutter straight to the ground.- The bottom of the down spout should be fitted with an elbow connection to direct the flow of water away from the house. To prevent erosion there should be a splash block at the base of the downspout.
To keep a downspout from becoming clogged with leaves and other debris, make an inexpensive trap by fitting a cylinder of window screening tightly into the hole at the top of the downspout. The cylinder should be slightly higher than the gutter is deep, to prevent leaves from washing over the top of the screen.
+++++++++++++
EXTERIOR STAIRS AND RAILINGS
The style of the stairs has a considerable impact on the overall appearance of a house.
Several basic styles of stairway are common to residential construction. Each has its own look, appropriate uses, and method of fabrication.
Your choice will be based on considerations of design as well as of practicality.
Exterior Stairs
With each style of stairs comes the choice of how to cut and assemble the parts. One method is to notch the stringers in a sawtooth pattern so that treads can be fastened to them to serve as steps. If risers are used, they can be fastened to the stringers too. The stringers are included in the width of the stairway and do not protrude beyond the length of the tread.
Stairways constructed in this manner typically require more support than other types of stairways.
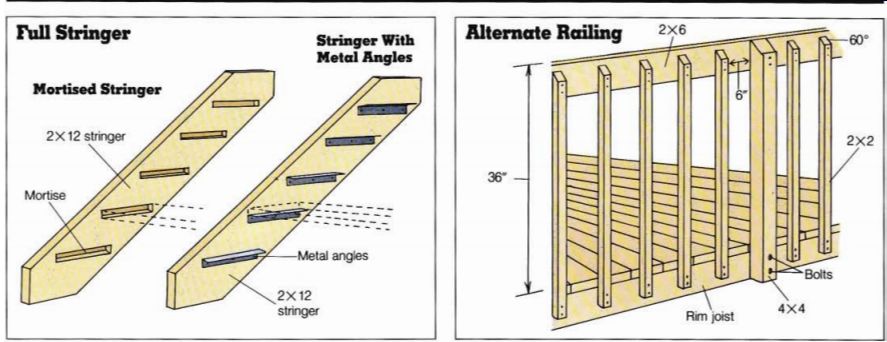
Another method is to mortise the stringers so that the treads and risers fit into them.
These stairs require less sup port than those with notched stringers.
Still another method is to use cleats or metal angles to support the treads on each stringer. Here again less sup port is needed.
Is one method better than the others? No; it is mostly a matter of personal choice. The notched-stringer method is usually faster; once the layout is completed, the cutting pro cess moves along rapidly. Mortising stringers or attaching cleats or metal angles to them both take more time.
The low end of exterior stair stringers ordinarily sits on a raised sill, which is elevated above ground level by a concrete pad. At the top of the stairs, the stringers are attached to deck or landing support members or to posts. Conditions vary, so exact fastening details must be determined at the job site.
Determining the rise and run-the relationship between the height of the riser and the width of the tread-is done in the same way for all three methods. In the explanation that follows, the notched stringer method is used as an example. See illustration on page 59.
Notched Stringers
The staircase in this example leads from a garden to a second-story deck; it is parallel with and close to the side of the house. The lowest step will be the concrete pad mentioned above. The height of this pad will be the same as the height of each of the risers.
Determining the Number of Steps
In constructing stairs the first task is to determine the rise and run. There is a given relationship between the height of the riser and the width of the tread (front to back). The sum of these two figures should be between 17 and 18 inches for stairs that are the most comfort able and safe to use. Thus, if the riser height is 7 inches, the tread width will be 10 inches; if the riser height is 6 inches, the tread width will be 11 inches.
Risers should be between 6 and 7 1/2 inches high and treads be tween 10 and 11 inches wide.
When the risers are much higher than this and the treads are narrower, the stairs are un comfortable to use and can be dangerous. The same is true if the risers are much lower and the treads are wider. Keep in mind that the lower the riser, the greater the number of risers and the greater the length of the stairway. If space is limited, the risers must be made as high as these rules permit.
To determine the rise and run, first find the difference in elevation between the two levels. In calculating the total rise of a stairway, always measure from the top of the finished surface of the lower (or ground) floor to the top of the finished surface of the upper floor. (If the decking has not yet been laid, add the thickness of the decking material). One way to do this is with a story pole, which is simply a straight piece of 1 by 2 or 1 by 4. Set one end of the pole on the ground where the bottom of the stairs will be. Hold the pole vertical and mark on it the location of the top of the stairs, in this case the second-story deck.
The distance between the ground and the finished deck level is the total rise. Say that this distance is 108 inches, and that the risers are to be about 7 inches high. To determine the number of risers, including the concrete step, divide the total rise by the approximate height of the risers and drop any fraction. To find the exact height of each riser, divide the total rise by the number of risers. Dividing 108 inches by 7 gives 15.43. Dropping the fraction gives 15 risers. Dividing of 108 by 15 gives 7.2, or 7.25 inches as the height of each riser. To determine the tread width, for example, subtract 7 1/4 from the arbitrary figure 17 1/4 (halfway between the recommended 17-to-18-inch sum of the rise and run), which gives 10 1/4 inches.
The total run is the total length of the stringers. To find this figure multiply the width of each tread by one less than the number of risers (because there is always one less tread).
In this example, multiplying 10 1/4 inches by 14 (15 risers minus 1) gives 14 3/4 inches as the total run.
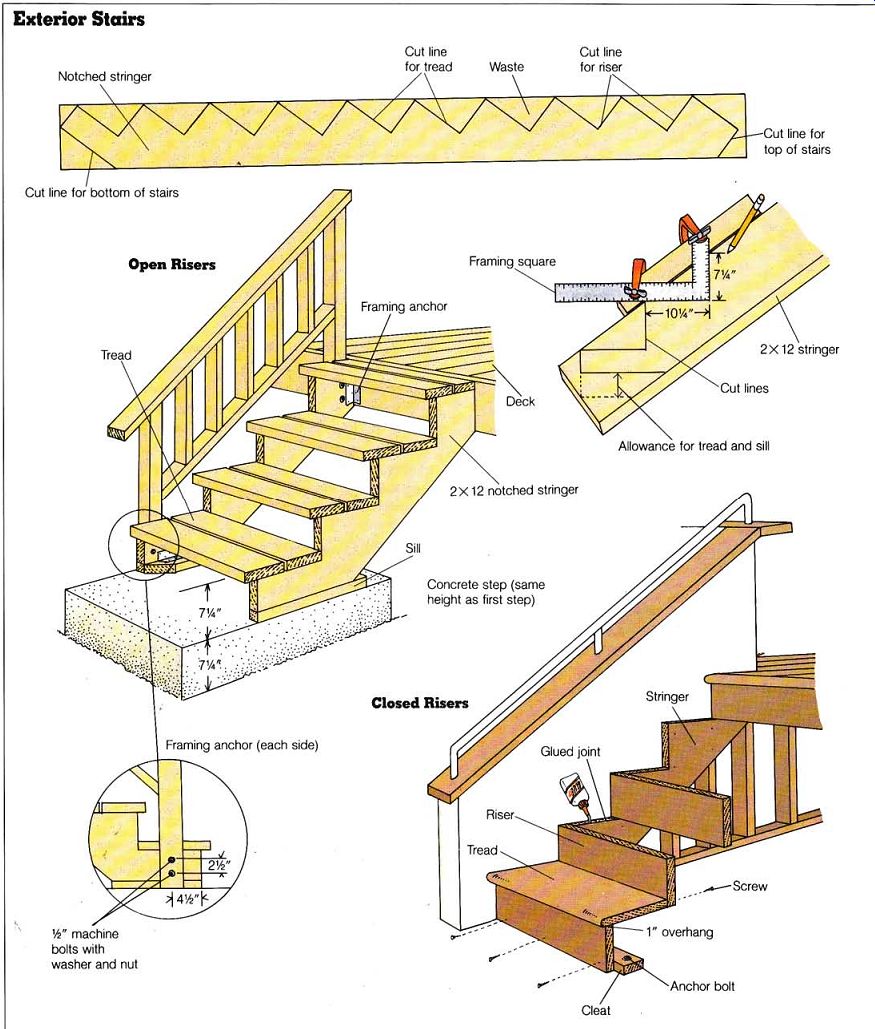
----------
Marking the Stringers Select-grade, pressure-treated 2 by 12 lumber is the best material for stringers. Select grade lumber has no knots, cracks, splits, curves, or other defects; 2 by 12s are used for strength and because it is easy to lay them out with the framing square. For a stairway about 3 feet wide, two stringers are adequate. For stairs more than 3 feet wide, add a central supporting stringer.
With your figures close at hand, mark the cuts for the first stringer. Position it on sawhorses; then set the framing square so that the tongue (the short leg) measures the height of the riser and the blade (the long leg) measures the width of the tread. See illustration on page 59. Scribe the outline of the square onto the stringer.
Continue this process until you have marked the stringer with all the riser heights and tread widths. Then, to make the bottom step the same height as the others, trim the bottom of the stringer by the thickness of the tread material plus the thick ness of the sill on which the stringers will sit.
Test the first stringer in position to see whether it its properly before cutting the other stringer. Use a carpenter's level to make sure that the horizontal cuts are indeed horizontal, so that the treads will be level. Make any necessary adjustments. Then use the first stringer as a pattern to cut the other stringer. Lay the first stinger on the second piece of stock, clamp the two pieces together, and draw the cut lines.
After the stingers have been notched for treads and risers, you should determine whether any other cuts are required at the upper ends in order to attach them to existing framing members. If so, make the necessary cuts.
Installing the Stringers
Position the lower end of one stinger on the sill in the proper location. Move the stinger into position at the up per end. Toenail the lower end into the sill with several 8 penny (8d) hot-dipped galvanized nails, alternating sides.
Then fasten the upper end with toenails, framing anchors, or joist hangers. For added strength attach framing anchors to the sill joint. Repeat the process with the other stinger, making sure that the distance between the stringers is consistent and appropriate for the length of the tread.
Cutting and Fastening the Treads and Risers
Select-grade, pressure-treated 2-by lumber is best for exterior treads. In open stairways when balusters are fastened directly to notched stingers instead of to a lower rail, the treads are usually flush with the outside edge of the outer stringers.
Otherwise, the treads often extend beyond the edge of the stingers by approximately 1 inch, giving a better appearance. When selecting tread stock allow for about 1 inch of overhang at the front, or nose, of the tread.
Where risers are appropriate, such as in enclosed stairways and formal entry stairways, use a medium-hard wood for both the treads and risers. The most common tread stock is 1 3/16 inches thick; risers are usually made from 1-by stock. When risers are used, they are in stalled before the treads. Starting at the bottom, install the first riser below the position of the first tread. Install the second riser next. Then butt the tread up against the second riser, using mastic adhesive and screws driven through the back of the riser into the tread, to give added support. Facenail the tread with 8d nails near the front edge of the riser beneath it. Follow the same sequence riser, then tread in front of it for the rest of the stairway.
Full Stringers
When cleats or angles are used to hold the treads, the stringers are laid out as described above.
The cleats, made from 1-by lumber or metal angles, are in stalled to the drawn lines using 1.5-inch screws. Pre-drill the cleat holes. Cutting is necessary only at the bottom of the stingers, where they sit on the sills, and at the top, at the deck level in the example. The tread stock is cut to the net dimension desired, and then positioned and fastened. See illustration above, left.
For a mortised stinger, follow the same layout procedure as described above. Then draw cutting lines for the mortises by tracing around the end of a piece of tread stock. Cut the mortises 0.5 inch deep. After assembling all the treads between the stingers with yellow aliphatic resin and 1/4-inch by 3 inch lag screws, install the complete staircase in place.
-------- Exterior Railings
A railing provides the finishing touch to a stairway or deck. It is also required by the building code and must meet code standards. There must be no gap between the balusters large enough for children to insert their heads-6 inches is the usual maximum distance al lowed-and there must be a handrail at a comfortable and safe height-usually a minimum of 3/4 inches above the tread and 36 inches above the deck. Check the local code for the requirements in your area.
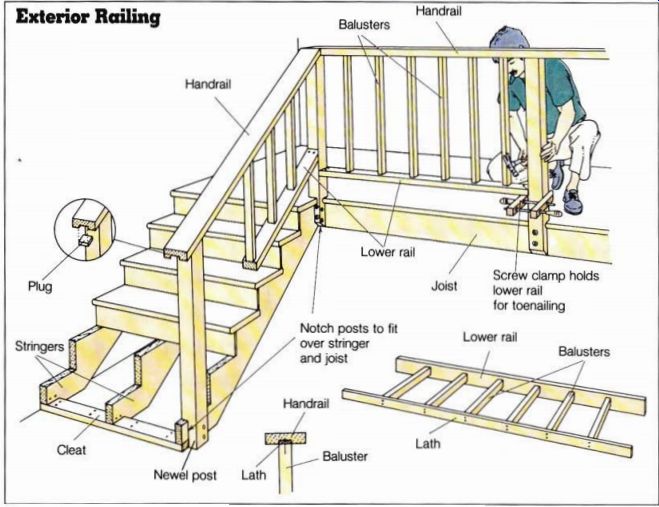
There are many styles of railings. One popular style consists of posts, a handrail, a lower rail, and balusters. To give a neat appearance and hold the posts and balusters firmly in place, it is a good idea to cut a 3/8-inch-deep groove in the underside of the handrail. Allow for this measurement on the plans. See illustration.
Posts
Because they are the backbone of the railing, posts must be sturdy. They must also be firmly anchored to either the stringers or the deck joists.
Choose 4 by 4s in an appearance-grade stock suitable for outdoor use. If you’re building a railing to enclose a second-story deck, as in the example, set one post (the newel) at the bottom of the stairs, one at the top of the stairs, posts equally spaced 3 to 6 feet apart on the stairs, one post at each corner of the deck, and posts at 6-foot intervals be tween the corners. Use tighter spacing if the posts are less than 4 by 4, if the railing will be pieced (see below), or if you want a sturdier-looking railing.
Cut the posts to a length that will support the handrail at the required height. Cut a 3/8-inch notch at the base of each post and it the post against the stringer before attaching the treads. Cut a tenon on the top of each post to match the groove in the underside of the handrail.
Drill the posts, stringers, and joists to accept at least two 3/8 inch carriage bolts or lag screws and secure the posts in position.
Rails Use 2 by 6 stock for the hand rail if you want it to overlap the posts. If you prefer it to be flush with the posts, or if the posts are less than 4 by 4, you can use 2 by 4 stock.
Cut sections of handrail to length. On the stair sections carefully mark the angle needed for the rail to run parallel to the stringers. It is best to span each run with a single piece; if you must make joints, be sure that they occur over a post. On the underside of the rail, cut a groove 1 1/4 inches wide and 3/8 inch deep. Position the rail, making sure that the posts are plumb and that the tenons it into the groove. At tach the rail to the posts with 12d galvanized casing nails.
Toenail the posts to the under side of the rail.
For the lower rails, cut lengths of 2 by 4 to it between the posts. Make straight cuts on the pieces that form the deck rail and angle cuts on the pieces between the newel and the top post.
Balusters
Measure and cut the balusters to length. Butt-cut the ends for the deck rail sections; angle cut the ends for the stair rail sections.
It is easier to assemble balusters in sections than to nail them in place individually. Cut pieces of 1.5-inch lath to the same lengths as the lower rails.
Lay out the pieces of lath and lower rails on the ground and space the balusters between them. Facenail the balusters in place. Lift the assembled sections into position, making sure that the lath strip its snugly into the groove on the underside of the handrail. Use parallel clamps on the posts to hold the sections in place while you toenail through the lower rail into the posts.
In another style there is no lower rail and the handrail is turned on edge. The balusters are cut to length with 60 degree angle cuts on top, then fastened to the rim joist with nails or small bolts and to the side of the handrail with nails.
The 4 by 4 posts are fastened in the manner described above.
The handrail is attached at the proper height--36 inches from top to deck-with the joints positioned at the posts.
Still another style uses horizontal rails to ill the space between the deck and the hand rail. The rails are usually 2 by 4s installed at intervals of 6 inches or less and toenailed to the posts at each end.
-------- Exterior Railing Handrail -- Handrail; Newel post; Lath
------------
=========