Carpentry tools
If you absolutely had to, you could probably build your home with no tools other than a handsaw, a hammer, and a ruler. By utilizing the wide variety of tools available today, how ever, you can build a better structure and build it faster and more easily. Acquaint yourself with the proper tools and learn how to use them. The right tool for the job is a joy; the wrong tool can be pure frustration.
The tools you need will depend on the projects you are undertaking. Buy tools from hardware stores, lumberyards, and mail-order suppliers. Keep an eye out for new tools on the market. Buy the best tools you can afford; you may pay more for them, but they will last longer and perform more reliably. Books are also valuable tools. Check to see what is available before you start the project. The techniques and tools used in finish carpentry are described on the following pages.
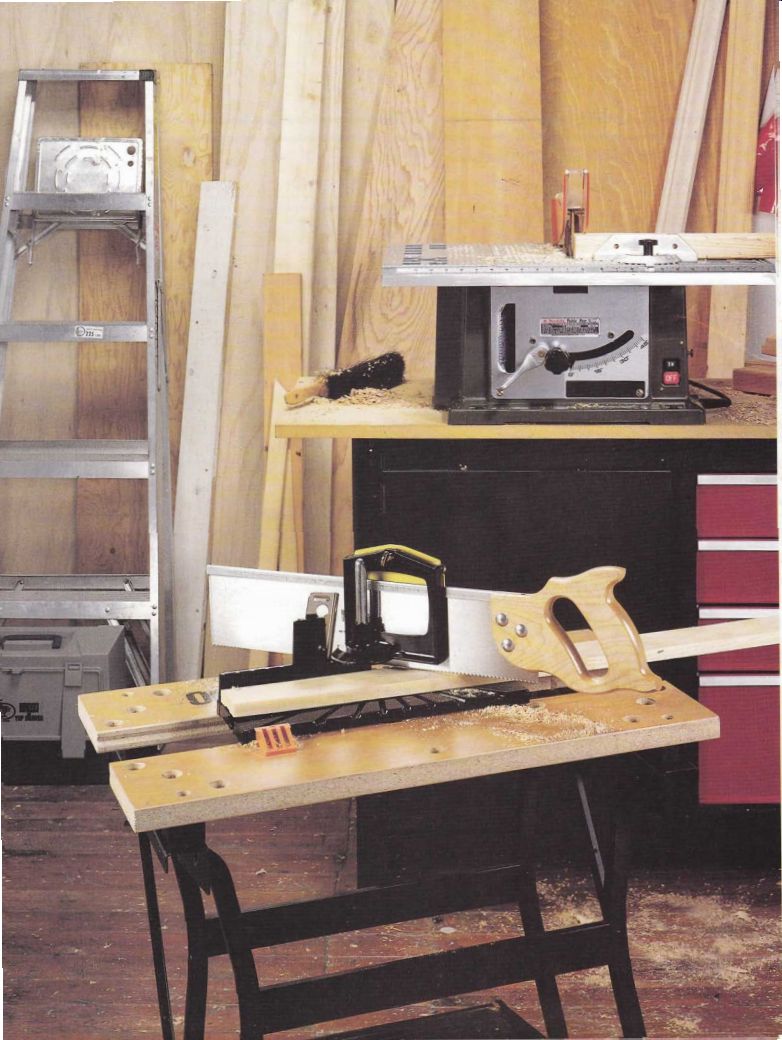

----------- A well-stocked workshop includes a combination of hand
and power tools, a workbench, and a tool box ready to take to the job site.
+++++++++++++++
MEASURING AND MARKING
Measuring is the key to success in every carpentry project. Measuring requires no strength or fancy tools--just common sense and concentration. Think about what you are doing and double-check your measurements.
You will save time, save waste, and save yourself from doing sloppy--or even dangerous--work.
Measuring the Building
Much finish carpentry simply consists of fitting boards and panels onto the part of the structure that is already completed. To ensure that the finish work covers the framing without overlapping or leaving gaps, take the initial measurements from the framing. You may need a 50-foot or 100-foot tape to measure the length of a fascia board, for example. For most measurements a 16-foot steel tape should be sufficient.
The hook on the end of the tape makes it possible for you to work alone.
A few situations call for more specialized tools. Measuring the inside opening of a window frame, for example, is easy if you use a folding rule with an extension slide. To measure the thickness of a board, panel, or piece of molding, a caliper is handy. Some bench rules have a caliper built into one end. Some measuring and marking tools you'll need for finish carpentry are shown in the photograph below.
Don’t assume that walls, floors, and ceilings are square and plumb. A wall that measures 14 feet 6 inches at the baseboard may be 14 feet 6.5 inches at the ceiling. To cope with this unevenness or to correct it, use a plumb bob or a spirit level. A 24-inch carpenter’s level, which is the most versatile size, can also be used to even picture rail, chair rail, and door and window casing.
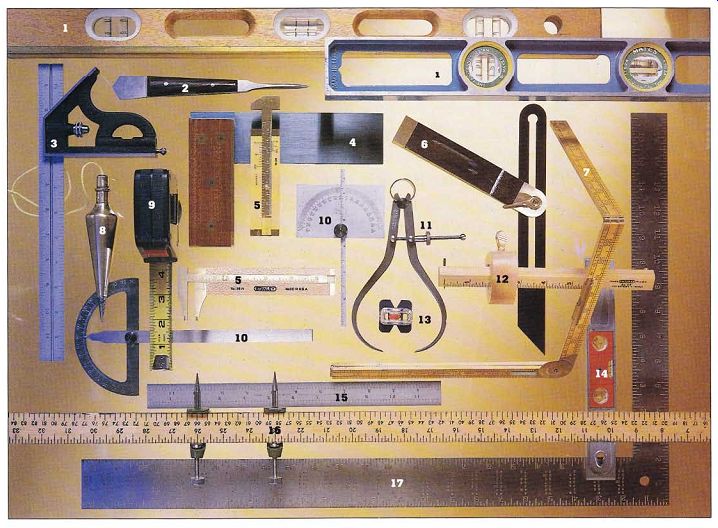
----------- The measuring and marking tools shown below include
(1) carpenter's level, (2) scribe, (3) combination square, (4) try square,
(5) wood caliper, (6) sliding bevel, (7) folding rule, (8) plumb bob, (9)
steel tape measure, (10) protractor, (II) steel outside caliper, (12) marking
gauge, (13) stud finder, (14) torpedo level, (15) steel rule, (16) trammel
points mounted on a yardstick, and (17) framing square.
-------------------
When you work with smaller pieces of trim, such as balusters, use a torpedo level.
Measuring at the eaves and around stairways entails transferring angles onto your work.
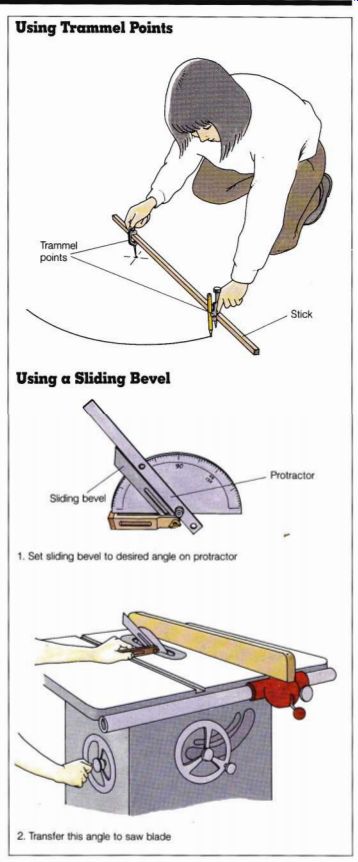
To determine the degrees in an angle, use a steel protractor with a swivel arm. If you simply need to transfer the angle, a sliding bevel is simple to use and will hold a setting for repeated markings.
Measuring and Laying Out Boards
Measuring the boards them selves is just as important as measuring where they will go.
First, don’t assume that the boards are square. They probably were cut square at the mill, but lumber often distorts as it dries, and there will usually be checks (cracks) at the ends, which must be trimmed off.
Start by cutting off one end of the first board in 1/4-inch increments. When there are no more checks, repeat with the other end. Then square both ends with a try square. Repeat the process for each board.
Interior finish work may require more than fresh end cuts. A damaged surface or an oversized board may have to be planed. To trim boards with accuracy, use a bench rule or a folding rule rather than a steel tape.
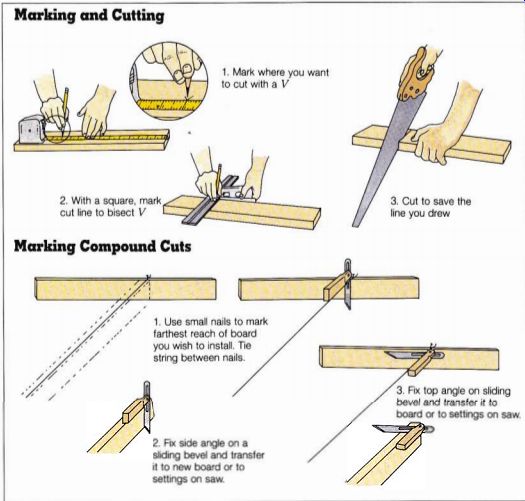
When you lay out cut lines on boards, always mark the angles-even if the angle is 90 degrees. All work on the job should be marked with a V to indicate a point, and a thin but dark pencil line to indicate a cut. Bisect the V with the cut line. Then cut just outside this line, remembering to allow for the saw kerf. " Save the line" is the rule to remember when cutting. See illustration.
Right (90-degree) angles should be marked with a try square. All other angles should be calculated or transferred using either a steel protractor with a swing arm or a sliding bevel. A combination, or speed, square is good for marking 45 degree angles; a framing square can be used to mark any angle.
Marking a compound cut is a challenge. Start by determining the point that represents the farthest reach of the board.
From this point mark both the side angle and the top angle.
Set up the saw to follow both lines simultaneously. Experiment on scrap wood first.
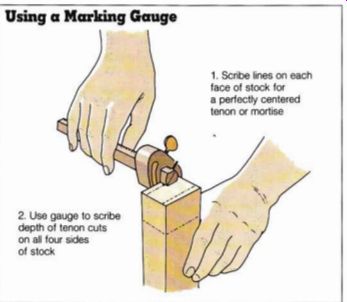
Mortises, dowel holes, and other joint lines should be scribed with a marking gauge.
This handy tool will also scribe accurate lines parallel to an edge for cutting strips or grooves. See illustration on page 26, left.
--------- Marking and Cutting
Measuring and Laying Out Panels Many of the tools used to mea sure and lay out boards are also used for sheet paneling and wallboard. A steel tape is best for work on panels, however, because the edges are usually hidden, either by paneling trim or by wallboard tape and mud.
Because moisture affects panels less than boards, they need not be squared. Trim the edges only if they are damaged, or if you need a smaller panel.
Because you will usually be dealing with 4 by 8 sheets, it’s advisable to use a framing square rather than a try square to mark right angles. If the floor-to-ceiling measurement for the first panel is 7 feet 8 inches, for example, don't automatically assume that the remaining such measurements will be too. Instead, measure for each panel as you progress around the room.
When marking cutouts use extra care. A mistake can ruin all or most of the panel. Use a bench rule if necessary and double-check the layout before you cut.
Marking a set of trammel points with a yardstick allows you to scribe circles up to 72 inches in diameter-large enough for most gable windows. See illustration at right.
Irregular shapes can be transferred to the face of a panel with a compass. The metal point of the compass follows the irregular contour while the pencil marks the cut line. See illustration on page 76.
------ Using a Marking Gauge
Using Trammel Points
2. Transfer this angle to saw blade
Trammel points
Using a Sliding Bevel Sliding bevel 1.
Set sliding bevel to desired angle on protractor
Protractor
--------------
Setting Up Tools
Another aspect of measuring, too often overlooked, is the set ting up of tools. Many tools used in carpentry have adjust able parts, such as blades, tables, and guides. Some even have built-in protractors and scales with which to set the movable pieces. These are fine for measuring angles on rough work, but don’t trust them for finish carpentry. Instead, use a try square, a protractor, a sliding bevel, or a combination square to make sure that each angle is as it should be. See illustration.
When making and attaching jigs for use with hand or power tools, it is impossible to be too accurate. Extra care up front marks the true craftsman. The inaccuracies of a sloppy setup will be magnified as the job progresses. Use a bench rule, a caliper, a protractor, and a combination square for accurate setup work. Use scrap wood to test the jigs and setups and adjust as necessary before making the actual cut.
+++++++++++++++
CUTTING
In recent years power tools, both portable and stationary, have proliferated. For jobs that are too small or too remote for a power tool, or for the person who enjoys working in the traditional manner, a wide selection of hand tools is also available. For clean, precise work, remember to keep sharp edges on all bits and blades.
The Simplest Cuts
Crosscuts--which run across the grain--and rip cuts--which run along it--are the two simplest kinds of cuts.
Crosscuts
These are the most basic cuts of all. A saw with 8 teeth per inch (TPI) is recommended for general crosscutting. Finer work, such as moldings, should be crosscut in a miter box using a 10- or 12-TPI blade. The portable circular saw and the stationary radial arm saw are particularly well suited for crosscutting boards, as is the power miter saw. These power saws are good for general cut ting, used with a combination blade, but if you are going to do cutoffs or crosscuts exclusively, invest in a crosscut blade. A selection of cutting tools is shown in the photo graph below.
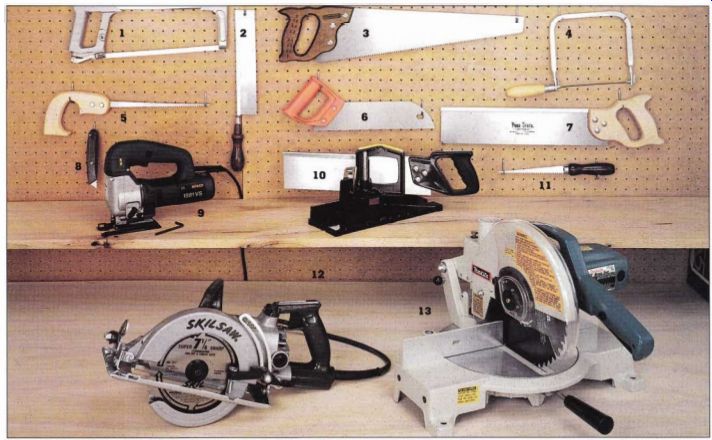
-------------- The cutting tools shown above include (1) hacksaw,
(2) dovetail saw, (3) crosscut saw, (4) coping saw, (5) compass saw, (6) plywood
saw, (7) tenon saw or hacksaw, (8) utility knife, (9) saber saw, (10) miter
box and saw, (71) wallboard saw, (12) circular saw, and (13) power miter saw
------------- Guide Fence for Handsawing: Table Saw Handsaw Radial Arm Saw
Board acts as temporary guide fence Partial Cuts Compound cuts Groove Rabbet
-----------------------
Rip Cuts
Cutting a board lengthwise along the grain is called rip ping. Hand ripsaws look nearly the same as hand crosscut saws, but the larger teeth are de signed to chisel out bits of wood rather than slice it. Rip ping can also be accomplished on a radial arm saw or a table saw, or with a circular saw.
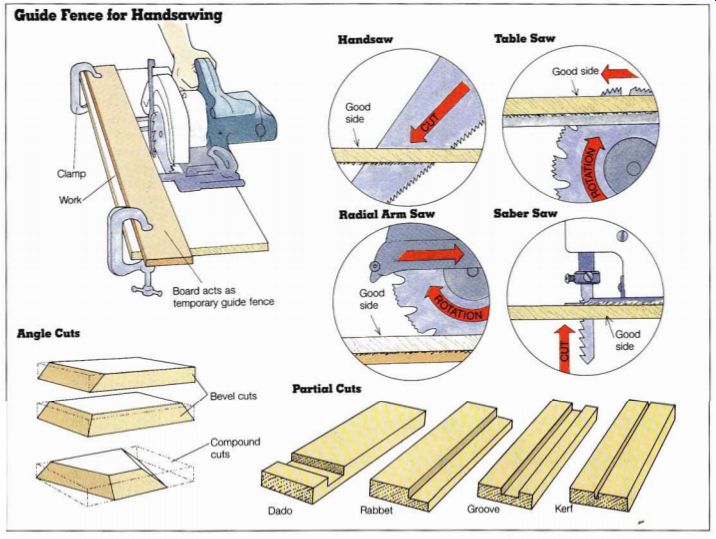
When ripping by hand, clamp a guide to the board--the grain of the wood can sometimes direct the blade off the cut line.
The same type of guide should be used with a circular saw to ensure a straight cut. See illustration on page 28. The movable fence on a table saw ensures precise ripping.
To use a radial arm saw for ripping, turn it so that the blade is parallel to the back fence. Always feed the work into the blade, against the direction of rotation.
Angle Cuts
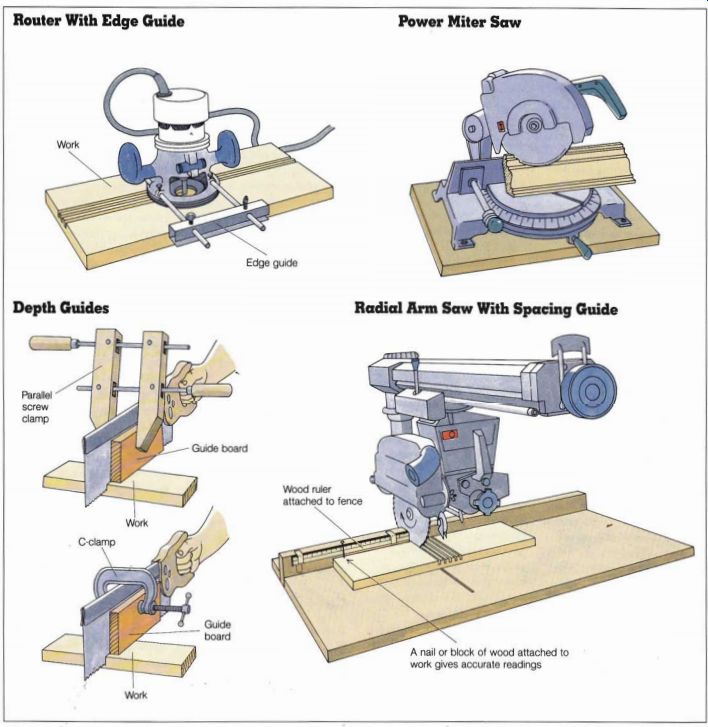
You can cut accurate angles on moldings with a miter box. If you are going to cut a lot of miters, or angle cuts, consider buying a power miter saw. This is a circular saw, hinged at the back, with a blade up to 14 inches in diameter (a 10-inch. blade is the commonest). The pivoting saw motor is lowered onto the work, and the work is held against a fence.
For cutting along the length of a board or for making consistent square or other angle cuts, a table saw is best.
Power Miter Saw
This saw, illustrated opposite, can dramatically reduce the time and energy it takes to cut miters. Nearly as portable as the mechanical miter box and saw, the power miter saw brings not only speed but also precision to the job. If first cuts need adjusting-you may be surprised at how many do this saw is unbeatable.
The setup for a power miter saw is important. This tool operates at up to about 5,000 revolutions per minute (RPMs), so it’s important to position it properly at the work station to prevent shifting. It’s also important to support each end of the piece being cut by providing auxiliary worktables positioned at either end of the miter saw. This makes for greater safety and for cleaner, more precise cuts. For maxi mum convenience the miter saw should be set up at waist height, with 6 feet of auxiliary support on each side. It’s best to have a clear work space around this station; 15 feet on one end is usually sufficient.
A 10-inch power miter saw is adequate for most applications. This size is far more manageable than the larger models. A carbide-tipped blade is best for finish work.
When making cuts keep the saw table clean. Accumulated sawdust can cause work to mis align, and loose scrap can be hurled forcefully in almost any direction.
It is best to experiment with this saw before plunging into the actual work, especially on angle cuts. Lay a piece of scrap wood flat on the saw table and notice where the cut begins.
Then turn the wood on edge and repeat the process.
A word about safety: Resist the temptation to remove the guard when sawdust clings to it and obscures your view.
Clean the guard, and leave it in place; it's there for a purpose.
Someday it may save you from losing a finger.
------------------ Wood ruler A nail or block of wood attached to work
gives accurate readings Parallel screw clamp Guide board Power Miter Saw
Radial Arm Saw With Spacing Guide Router With Edge Guide Depth Guides Guide
board Work
----------------------
Table Saw
Although all cutting can be done with a handsaw or a hand-held power saw, a table mounted saw makes certain cuts more easily and swiftly.
With other types of saws, the saw blade moves through the work, which is held stationary.
With the table saw the work is moved through the blade. For this reason your position relative to the table saw will be different from your position relative to other saws.
The table of the saw is usually large enough to support short pieces of stock as they’re being cut. With longer stock auxiliary tables should be positioned for support.
A word of caution when using a table saw: To protect your eyes, always wear safety goggles. To protect your fingers, always know where they are relative to the blade. To move small pieces of stock past the blade, use a push stick-a suit ably sized piece of wood (notched at the end, the better to hold the stock)-instead of your fingers.
To cut angles on boards and panels that, because of their size and shape, cannot be handled in a power miter saw or a table saw, clamp a guide to the work and then follow the guide with a handsaw or a circular saw. See illustration on page 28. A saber saw can be used on panels, but it tends to give a rough cut unless it is fitted with a special blade.
When cutting panels with a circular saw or a jigsaw, cut on the back. Since the blade cuts with an upward motion, the smoother side of the cut will be on the reverse, or finish, side of the board. When using a hand saw, a table saw, or a radial arm saw, cut with the face side up.
To make a bevel cut, position the work flat on the work bench or the saw table and tilt the blade. Any type of saw that makes a crosscut or a rip cut can also be used to make a bevel cut. With a power saw follow the directions for tilting the blade or the table.
A cut that combines an angle and a bevel is called a compound cut. The hardest part of executing a compound cut is calculating it and marking the cut line. Once that is done, setting up the saw poses no problem. A radial arm saw and a table saw with a miter gauge are both especially good for making compound cuts, be cause they can be adjusted in two directions.
Partial Cuts
You will sometimes need to make cuts that go only partway through the board. They include rabbets, dadoes, grooves, and kerfs. See illustration on page 28.
By hand these cuts are made with a backsaw-a handsaw with a metal rib along the back. Clamp a piece of wood to the blade to act as a depth guide. See illustration on page 29.
Since a handsaw has a narrow kerf, you'll have to make several parallel cuts and then chisel out the center portion to make a wide groove.
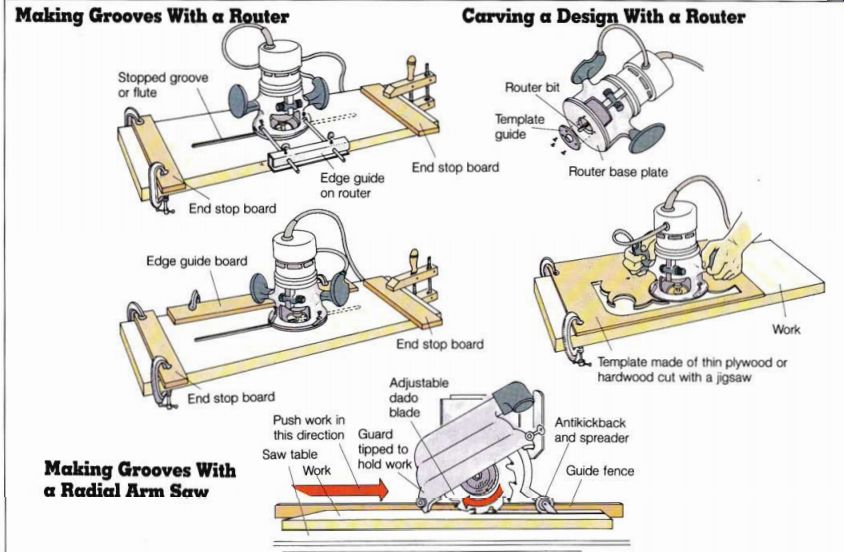
Both a table saw and a radial arm saw can be fitted with dado blades. Some of these blades have a fixed width; others are adjustable. All are de signed to create a wide dado, or groove, in one pass. If you need to make repeated cuts in a single piece of wood, fasten a wood ruler to the fence of the saw. A nail, or a block of wood fastened to the end of the board, will enable you to sight your measurement more accurately.
The router is designed specifically for making partial cuts.
A hand router isn't often used, but a power router is a valuable tool. A wide selection of router bits and accessories is available.
Two accessories very useful for making partial cuts are the edge guide and the router table.
Set the guide or adjust the fence to produce a straight cut or a series of parallel cuts.
Use carbide bits in your router; they will last longer and produce smoother work than other bits. To prevent the bit from breaking and from burning or chipping the stock, try not to cut more than 3/8 inch deep in a single pass. Be careful to feed the work into the router at a moderate, even speed. If fine dust rather than sawdust is being produced, you're feeding the work too slowly, which can cause the bit to heat up and burn the stock. If large curls of waste are being produced and you hear the RPMs drop dramatically, you’re feeding the work too fast.
To get a board to bend with out breaking, saw a series of parallel kerfs on the back. Be cause a great many small cuts are necessary, a power saw, such as a radial arm saw, is more efficient than a handsaw.
Experiment with extra stock to determine how deep the kerfs must be and how they must be spaced to produce the flexibility you desire.
Curved Cuts
To install a lock it is necessary to cut one or more holes in the door. Originally this was done with a keyhole saw or a com pass saw. Nowadays it " s done much faster with a hole saw an attachment for an electric drill that has a pilot drill in the center surrounded by a serrated ring. Interchangeable saw blades are available in a wide variety of sizes.
To cut large circles and irregular shapes, follow a pencil line with a compass saw or a keyhole saw. For smaller shapes use a coping saw.
In all cases, sawing will be neater and more efficient if you provide support for the work.
As you cut, continue to reposition the piece on sawhorses or on the workbench to keep the piece from vibrating. If you are cutting several pieces to the same length, clamp or nail them together, then make a single cut.
The band saw, jigsaw, and saber saw are all designed to make circular and irregular cuts. The relatively narrow depth of the blade on these saws allows it to follow curves without binding. Some saber saws come with a combination edge guide and circle cutter attached. The circle-cutter-an arm with a pin on the bottom-allows you to pivot the saw around a center point.
Joints in Wood
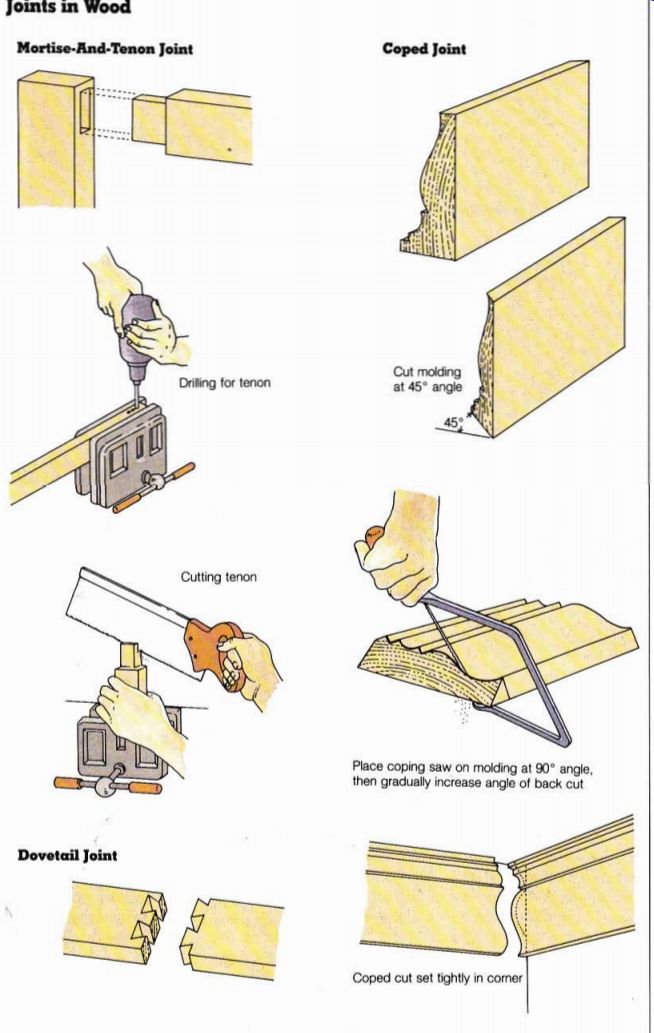
Some wood joints are so famous that they have saws named after them-or maybe it’s the other way around. In any case, the complete wood worker's toolbox includes a tenon saw, a dovetail saw, and a coping saw.
Mortise-And-Tenon Joint
Unlike the lap joint or the coped joint, the mortise-and tenon joint requires that both of the boards to be joined be cut. See illustration. The tenon is formed on one board by marking and sawing away blocks. The tenon saw gives precise control for straight cuts, but unless you have a good eye and a steady hand, clamp a depth guide block to the blade before making the tenon cuts.
Do the four end cuts first and then the four side cuts.
The radial arm saw and the table saw do a fine job of cut ting tenons. Set the depth of the cut as required and make several passes to remove all the material. Use this same method to cut tenons with a band saw or a jigsaw.
Every tenon needs a mortise. One of the two ways to cut a mortise is to mark the board accurately and then carve out the recess with a chisel the same size as the mortise you are cutting. The other method is to use a mortising bit in stalled in a drill press or a mortising apparatus. This bit drills a round hole, which the square housing chisels into a rectangle. Unless your tenon is exactly square, you will have to make several cuts with the mortising bit.
---------- Coped Joint Cut molding at 45° angle Place coping saw on molding
at 90° angle, then gradually increase angle ot back cut Coped cut set tightly
in corner Joints in Wood Mortise-And-Tenon Joint for tenon Cutting tenon Dovetail
Joint
-----------------
---------
Trimming Edges
Base wood
Trimmed with straight or bevel router bit
Veneer #2
-X Base wood Veneer #1 Blades Follower ) Router bit (roller)
* Veneer Using a Veneer Saw Beveling an Edge With a Router Veneer saw with one side for crosscutting, the other for ripping Trimmed flush with straight router bit/ Veneer # 1 / extending beyond edge
----------------
Dovetail Joint
When done well by hand, the dovetail joint is a work of art.
To execute it takes skill and patience-and a dovetail saw.
Careful marking is more than half the battle.
The band saw and jigsaw can also be used to execute dovetails, but the same careful measuring is called for. A sure ire way to make perfect dove tail joints is to use a router, a dovetail bit, and a dovetail jig.
Secure both boards in the jig, one positioned horizontally and the other vertically, and cut them at the same time. The sign of a routed dovetail joint is that only one side shows evidence of the cuts.
Coped Joint
This joint, which requires that only one piece be cut, is best executed with a coping saw.
See illustration on page 31. For the tightest fit when cutting molding, for example, start the coping cut at a 90-degree angle to the back of the workpiece.
This initial top cut will show as a final part of the joint. Direct the rest of the cut slightly in ward, away from the molding to be joined. This will ensure good contact between the two pieces of molding at the visible edges. To avoid vibration while working on thin stock and to create a clean cut, support the stock close to the cut.
Working With Veneer
As hardwood increases in price, veneer becomes more popular. Improved adhesives and tools make working with veneers easier than ever. For the traditional woodworker, glue pots and hide glue are still available; the latter is mixed with water, heated, and painted on with a brush. However, white polyvinyl resin glue is so universally used these days that it comes in 55-gallon drums as well as the standard squeeze bottle.
Large areas of veneer should be clamped while the glue dries. Transverse boards clamped along the edges will ensure good adhesion. If you use contact cement on veneer, you need not clamp the work.
Paint the glue onto the surfaces to be bonded, let it dry (set up), position the pieces carefully, and press them together. When they touch they bond and can not be moved. If you need to break the bond, there is only one way. Dribble a small amount of lacquer thinner into the joint and pull the pieces apart gently, applying more thinner as you go. A plastic squeeze bottle with a small opening works well. When the pieces are separated, let them dry until tacky, reposition them, and press them back together. It is usually not necessary to re-glue them.
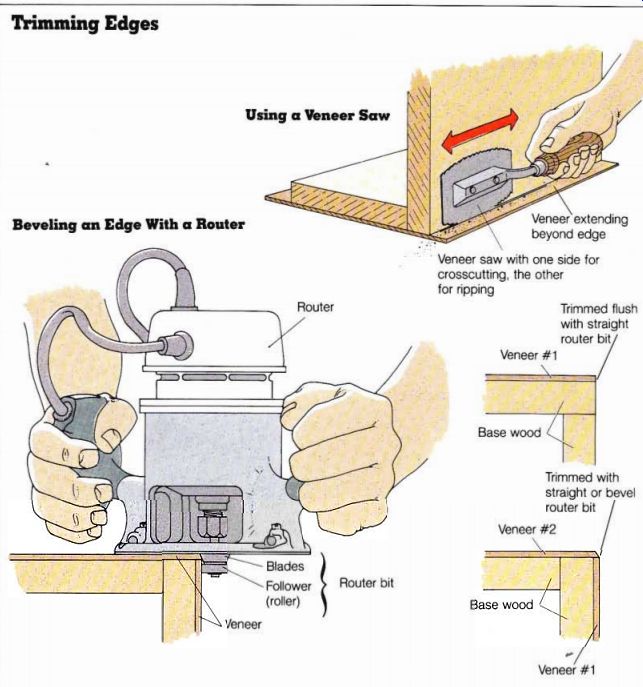
Once the glue has set up, the edges can be trimmed.
A veneer saw made for this purpose has a side-mounted handle, and the cutting teeth are flush on one side to prevent you from overcutting the edge.
This saw is inexpensive, com pact, and well suited to small jobs. See illustration. To trim long lengths use an electric router. A special laminate trimmer blade has a roller to follow the surface of the work. At a corner use the chamfered trimmer to put a slight bevel on one edge. This bevel makes the veneer or laminate less prone to chipping. A file can also be used to bevel edges.
+++++++++++++++
SHAPING
Unlike the cuts already discussed, shaping involves the cutting away of wood for decorative reasons-to create moldings and molded edges. Although much of the shaped wood used in today's homes is produced in lumber mills, you can extend the variety and even duplicate antique moldings by making your own.
Moldings and Molded Edges
The tools used in making moldings are specialized, but they are readily available to the amateur woodworker. A selection is shown in the photograph at right. In addition, some basic power tools, such as the table saw, the radial arm saw, and the router, can be used for shaping.
Virtually all of today's moldings have a linear design:
The relief runs across the grain and the dimensions are constant along the grain. This means that the carpenter must feed the boards lengthwise past the shaper bit no matter what tool the bit is attached to.
The bit, or combination of bits, that you affix to the spindle determines the final shape of the molding.
Adjust the fence so that the cutting portion of the shaper bit protrudes. Hold the work firmly against the table and fence as you slide it past the bit. Be sure to feed the work against the rotation of the bit to avoid the danger of kickback.
Cutting a design across the end of a board requires a different setup. The board will probably be too narrow to slide along the fence. Leave the fence in position, but use the miter gauge and slot on the tabletop to hold the board.
Move it on a steady path across the cutter, keeping it perpendicular to the fence. See il lustration on page 107. When edging all four sides of a board, do the ends first and then the long sides.
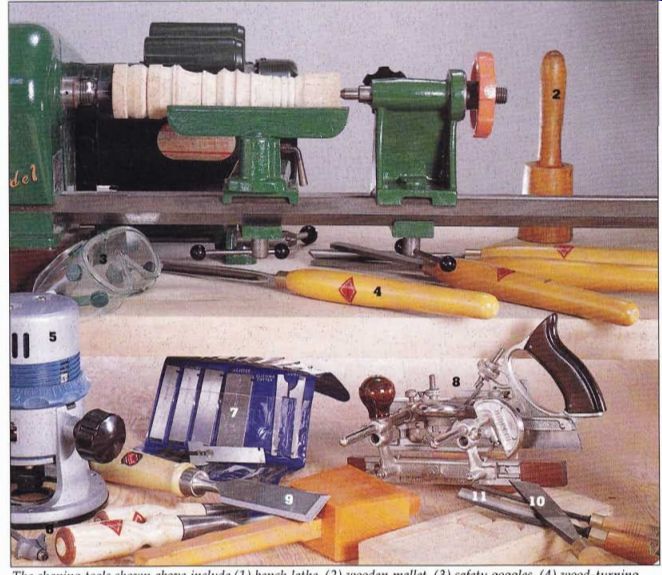
---------- The shaping tools shown above include (1) bench lathe,
(2) wooden mallet, (3) safety goggles, (4) wood-turning tools, (5) portable
power router, (6) router bits, (7) multiplane cutters, (8) multiplane, (9)
chisel, (10) skew, and (11) gouge.
------------- Making Grooves With a Router Stopped groove or flute
Carving a Design With a Router
Router bit Template guide End stop board End stop board Adjustable dado blade Making Grooves With a Radial Arm Saw End stop board Push work in ., this direction Guard \ Saw table \ ),PPed a Template made of thin plywood or hardwood cut with a jigsaw Anti-kickback and spreader Guide fence
---------------------------
Surface Patterns
Occasionally you will want to cut a molded pattern along the face of a board. Use a router, a table saw, or a radial arm saw.
To use a router, clamp a guide board onto the work and move the router along it. See illustration on page 34. Cutting flutes is done in this way; by using different bits or by making several passes, you can create many different effects.
To create a panel or plaque with a continuous design, make a template containing the pattern for one side and a corner. Attach this to the work and follow the pattern with the router. When you have completed the cut, remount the template. This way all sides and corners will be identical.
Using the table saw for surface cuts is simple--just crank the molding head to the de sired height, lock the fence in position, and feed the material through. The bits tend to lift the material as it passes over, so exert a little pressure near the head (use a push stick if necessary), or attach a pressure arm jig to the fence.
To use the radial arm saw for surface cuts, rotate the saw 90 degrees so that the blade is parallel to the fence.
Then feed the work through against the rotation of the blade. See illustration.
The router is by far the best power tool to use for freehand designs, such as numbers or letters, recessed into the surface of a board. After accurately penciling the design onto the board, follow the shapes care fully with the router as far as the radius of the bit will allow.
Use a chisel to clean out and square up the corners.
For a small design it may be easier to work by hand, using chisels and a mallet, or gouges.
You can even execute straight surface designs and borders by hand with a hand router or a multiplane. These tools operate in the same way as a hand plane, but they are fitted with variously shaped cutting blades and adjustable fences, so that designs can be cut parallel to the edges of a board. These traditional tools may be hard to find in retail stores, but they are available through mail order catalogs.
Turned Pieces
Balusters, newel posts, and drawer knobs can be turned on a lathe. Producing these items would not justify the cost of even a used lathe, but if you'd also like to make chair or table legs, bowls, or candlesticks, you'll need this tool.
To make balusters you’ll need a lathe with a capacity of 36 inches or more. You’ll also need a basic selection of turning tools, including 0.25-inch, 0.25-inch, and 3/4-inch gouges; a 3/4-inch round-nosed scraper; a 1-inch skew chisel; and a 1/4-inch V-parting tool.
Select clear stock with no checks, cracks, or splits. Locate the center on each end by drawing intersecting lines at 90 degrees to each other. Mark the centers with a hole punch.
Mount the stock in the lathe and adjust the tool rest so that it is 1/8 inch above the centerline and 1/8 inch away from the wood. With the lathe at slow speed (approximately 800 RPMs), start shaping the work by easing the edge of a chisel or gouge into the wood. Hold the tool firmly and work from the center toward each end. Next, increase the speed appropriate to the hardness of the wood and finish the work with the appropriate wood-turning tools, using a caliper to transfer the dimensions from the master drawing to the workpiece.
Finally, smooth the surface of the work with strips of sand paper-first medium, then fine.
+++++++++++++++++++++
SURFACING
To achieve the smoothest surfaces, it is generally better to surface each component before it is installed. Indeed, some pieces must be surfaced in order to fit. Others must be surfaced to eliminate saw cut marks, raised grain resulting from exposure to moisture, and damage suffered during transport. Smooth surfaces also result in neater and much stronger joints.
Rules and Tools
To achieve consistently good results, follow two basic rules:
Always use sharp tools. Study the grain of the wood and work the surface accordingly.
You will need a variety of tools and materials: hand and power planes, a jointer, files, rasps, a Surform plane, sand paper, and scrapers. A selection of surfacing tools is shown in the photograph below. For surfaces that need filling or building up rather than planing down, add wood putty and liquid sealer-fillers to the list.
The tools, materials, and techniques (including surfacing) used in working with wallboard are described on pages 67 to 74. Refer to these pages for specifics. The following discussion covers working with wood.
Maintaining a Keen Cutting Edge
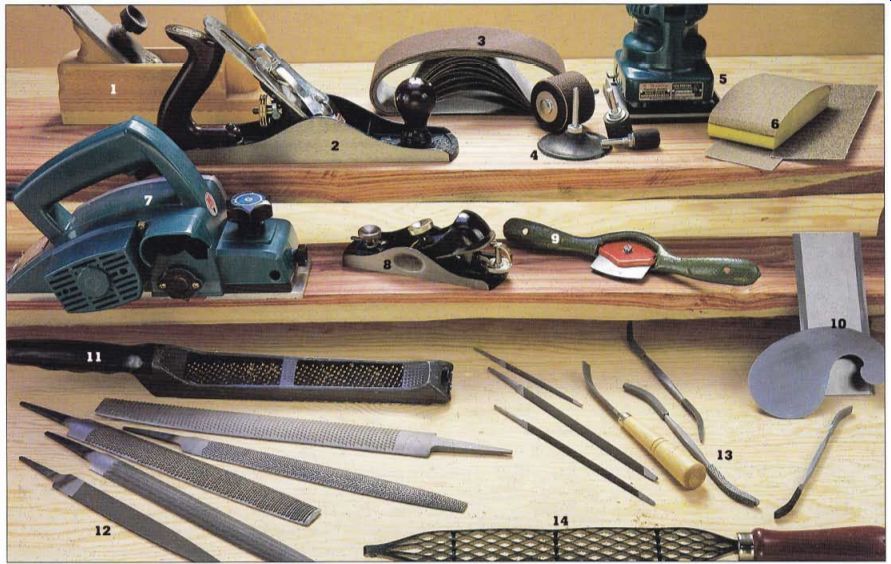
----------- The surfacing tools shown above include (1) wood-body smoothing
plane, (2) metal-body jack plane, (3) sanding belts, (4) sanding accessories
for drills, (5) orbital finishing sander, (6) sanding block and sandpaper,
(7) portable power planer, (8) block plane, (9) spokeshave, (10) scraper plates,
(11) Surform* plane, (12) assorted rasps and file, (13) triangular files and
rifflers, and (14) two-sided rasp.
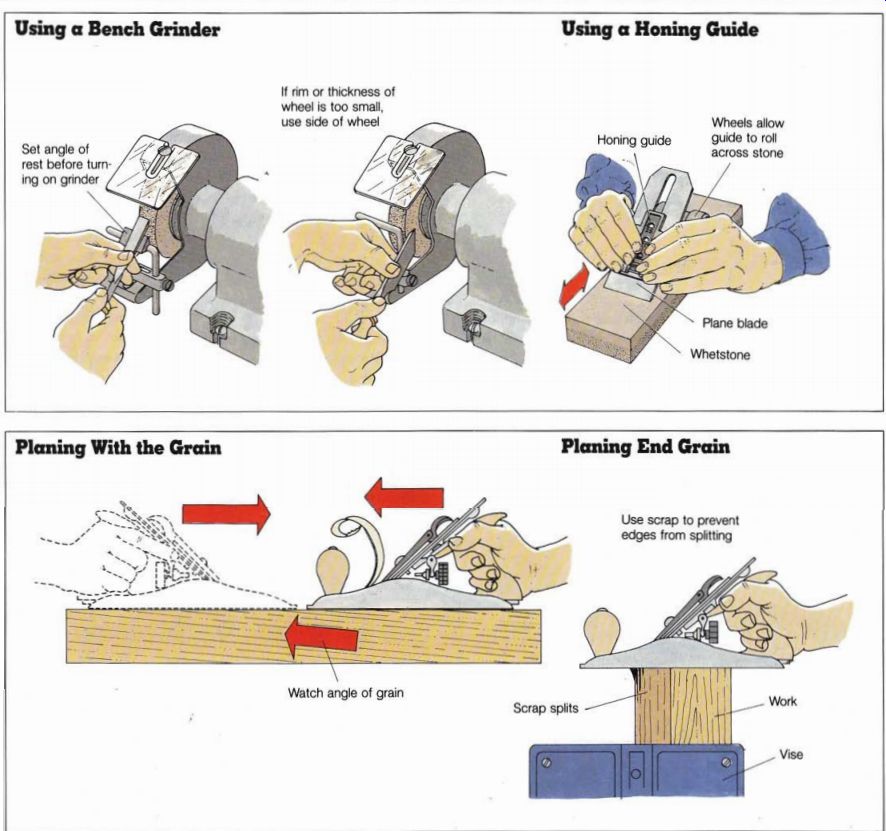
-------------- Using a Bench Grinder---If rim or thickness of wheel
is too small, use side of wheel. Set angle of rest before turning on grinder.
Using a Honing Guide. Plane blade. Whetstone. Honing guide. Wheels allow
guide to roll across stone
------------------------
Always use sharp tools. Tools with metal edges should be sharpened on a whetstone. If the blade is very dull or misshapen, dress it first on a grinding wheel, being careful to maintain the original beveled angle. See illustration on page 36, top. Move the blade back and forth across the wheel using light pressure. Don’t press hard enough to generate heat, or the temper of the edge will be lost.
A two-sided whetstone is used for sharpening and then honing the edge after grinding.
Increase the original angle of bevel slightly as you hone.
With normal use tungsten carbide blades will outlast high-speed steel ones; therefore these more expensive blades are more economical in the long run.
Working With the Grain
Reading wood grain is simply a matter of observing whether it runs lengthwise or crosswise.
Except when working with the end grain, all surfacing is done lengthwise. Before surfacing the face or side of a board, observe the direction of the grain.
Then take a closer look to deter mine which way is uphill. See bottom illustration (above). Al though boards with a grain pat tern perfectly parallel to the surface can be worked either way, most boards are best worked in the uphill direction.
This allows the cutting or scraping tool to cut the wood fibers rather than break them.
The result is an easier job and a smoother surface.
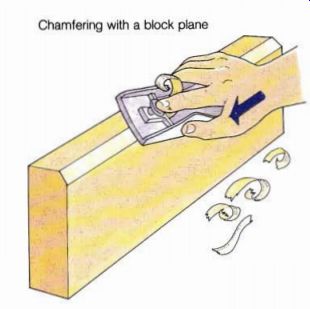
----------- Chamfering; Chamfering with a block plane
The end of the board can be smoothed in either direction, since the end grain is nondirectional. Use sharp tools to avoid compressing the wood fibers and opening spaces between them; this makes the surface rough and porous. It is also important when working with end grain to avoid splitting.
Clamp a piece of scrap wood to the edge of the work and let that piece split instead, or make a small bevel (called a chamfer) along the edge. The chamfer method is best, pro vided you can smooth the bevel later by trimming or surfacing the length of the board.
A third method is to work from each edge toward the center of the piece. It is difficult to get a really square surface by this method, but it does prevent splitting.
Planes
To surface wood by hand, you need a jack plane, a smoothing plane, and a block plane. All three are available with wood or metal bodies, and all have similar cutting irons. Use the jack plane when working rough timber down to size or when removing large amounts of wood from a straight board.
The 14-inch to 17-inch sole plate bridges depressions and takes off only the high spots good for initial cuts when you are actually establishing a level.
Follow up with the smoothing plane, which has an 8-inch to 10-inch soleplate. The curl produced by this plane marks your progress. When you produce a smooth, thin curl, the piece is sufficiently planed.
A block plane is more com pact than the other types, and it is light enough to control with one hand. Use it to plane end grains and put chamfers on large boards. See illustration.
A small power plane can be used in place of these three hand planes. A power plane makes quick work of edge planing jobs, and it can also be used for surface planing.
Jointers
Hand planing is laborious and time-consuming, even for small jobs. The jointer-essentially a mechanized stationary plane saves a lot of time and energy, and it turns out work that is smooth and square. Select a jointer capable of handling a board at least 4 inches wide.
You’ll find even more uses for a model that will handle a 6-inch or 8-inch board.
Before turning on the ma chine, observe which way the blades travel as they cut away the wood. Position the work piece so that the wood is cut in the uphill direction. Always feed the work against the rotation of the blades. To avoid chipping the end of a board, first make a small (1.5 -inch to 1 inch) false start with the work reversed. Then back the work up, turn it around, and make the main pass. Never tamper with the guard on the jointer.
To plane the edges of boards on the jointer, construct a wooden fence out of 3/8-inch plywood. Make it 12 inches high and attach it to the regular fence. The added height eliminates wobbling when you feed boards through in an upright position.
Files and Rasps
Curved shapes in wood are usually cut with a band saw, a jigsaw, a saber saw, or any of the handsaws capable of cut ting a radius. Irregular shapes and reliefs are sometimes chiseled or gouged out by hand. All of these methods leave a surface made up of small irregular cuts that must be smoothed out. Wood files, rasps, and the Surform plane are the tools used for this purpose.
Files with single-cut teeth (that is, teeth that cut in one direction) will produce a smoother surface than double cut files. Rasps and double-cut files, however, are less prone to clogging than single-cut files.
Files and rasps are available in four grades-coarse, bastard, second, and smooth. A four-in hand rasp combines all four on the slightly rounded surfaces of a single tool. Some carpenters prefer the finer metal files for smoothing wood, even though they clog more easily.
The Surform® plane is related to both the hand plane and the rasp. Its blade is stamped out of sheet metal and then ground in such a way that the surface is covered with small cutting edges. The plane is available with a variety of handles that are designed to hold blades of different shapes.
The blades should be replaced when they become dull.
The key to success when using files (or any other smoothing tool) is to keep the wood from chattering, or vibrating, as you work. Secure the piece with a vise or clamp; use side supports if it is thin. If the wood chips or splinters when you work the end grain, clamp a bit of scrap against (and level with) the splintering edge. Always make sure that your files are sharp.
Rifflers are small files or rasps. They come in a great variety of sizes and shapes. Use them to smooth the hard-to reach areas created in wood carving. They are also useful for cleaning out the small rounded corners left by the router bit. Small curved and irregular areas can also be smoothed with any one of several attachments to an electric drill, including rotary files, rotary rasps, and even a drum type of Surform tool.
Sanders and Scrapers
Say "surfacing" and most people think immediately of sandpaper. Nearly every piece of finished wood has been smoothed by this useful material at some point. Each sandpaper has its own grading system; refer to the chart on page 18.
When you sand by hand, always use a block to back up the paper. With inside curves wrap the paper around a bit of dowel or closet pole, or make a sanding block out of the scrap piece from the cut.
Several power sanding machines are available to the do-it yourselfer. The stationary disk sander and the belt sander are ideal for large projects. Among the hand-held models, the belt sander is capable of surfacing large areas quickly. For small areas the orbital sander is less expensive and more portable.
Perhaps its greatest virtue is that it uses partial sheets of regular sandpaper, which are quickly and easily changed.
Sanding attachments can be used to convert a table saw, a radial arm saw, and an electric drill motor to a disk sander.
For smoothing flat surfaces a scraper plate can be used in place of sandpaper. The edges of this 4-inch by 5-inch metal sheet can be renewed periodically by filing and burnishing.
Use a scraping motion to pro duce a smooth, flat surface. See illustration. The plate is inexpensive, and it will outlast hundreds of sheets of sandpaper. Curved plates are also available in a variety of shapes and sizes for use on irregular surfaces. Remember to scrape or sand in the direction of the grain of the wood.
Fillers
To hide small gaps in finish work, or to ill the depressions left when the finishing nails were set, use wood putty. Apply it in small amounts and sand it smooth when it is dry.
Choose a color that matches the color of the natural wood.
When it dries it will stain and finish like the natural wood.
Several open-grained woods are used in finish carpentry; they include oak, mahogany, walnut, and chestnut. These woods have large, open pores, which must be filled before sealing to produce a smooth surface. Use a paste wood filler thinned down to the consistency of syrup, or thin according to the manufacturer's instructions. Choose a color to match the unfinished wood.
Paint on the filler with a stiff brush, working it well into the open pores. When the filler is nearly dry (when it balls up on your thumb as you rub it), re move the excess with a loosely folded or crumpled rag. Wipe across the grain to avoid pulling the filler out of the pores.
After you have removed most of the filler, let the work dry overnight. The next day lightly sand the surface, in the direction of the grain. You are now ready to apply the finish.
Caution: Rags used to apply or remove wood-finishing sub stances should be hung loosely in a ventilated area, stored underwater, or disposed of immediately. Spontaneous combustion may occur if rags are crumpled, stacked, or stored in a closed area.
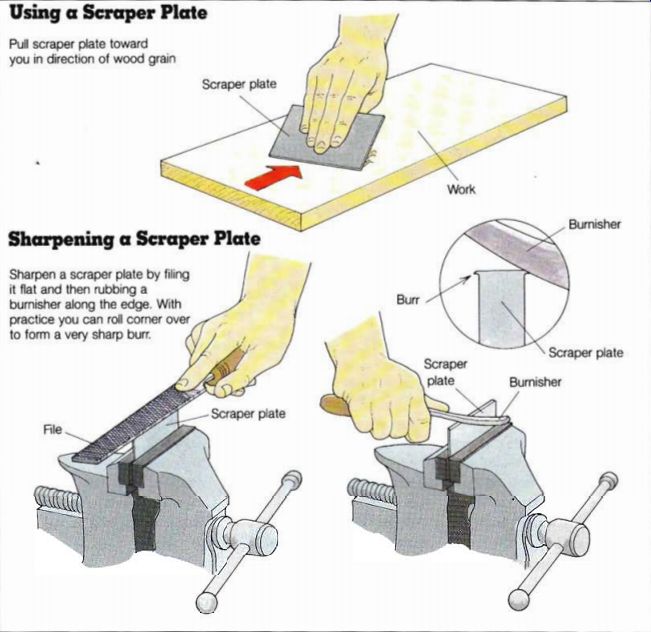
-------------- Using a Scraper Plate -- Pull scraper plate toward you
in direction of wood grain Scraper plate Sharpening a Scraper Plate Sharpen
a scraper plate by filing it flat and then rubbing a burnisher along the
edge. With practice you can roll corner over to form a very sharp burr.
Scraper; Scraper plate Burnisher; Scraper plate Work Burnisher
--------------------
+++++++++++++++++
FASTENING
Nails, screws, glue, and dowels are the most commonly used fastenings. Logic will usually dictate the correct choice. Examples of various types of fastenings are shown in the illustration on page 40.
Nailing
Many kinds of nails have been designed to meet the fastening requirements of various materials. In addition, corrugated fasteners and wood joiners are commonly used (along with glue) to secure mitered corners.
Like nails, these fasteners are driven in with a hammer. Use the illustration on page 40 as a guide to selecting the right nail for the job.
Hammers
If you are buying just one hammer, choose a 16-ounce curved claw. It will be adequate for most finish carpentry work.
The bell face will help you to avoid creating quarter moons as you drive nails home, and the claw will remove small and medium-sized nails. When pulling nails from any finish work, put a thin piece of scrap under the hammerhead to protect the surface.
If you are installing wood shakes or shingles to the roof or sides of a house, use a shingling hatchet; it has a slightly curved, checked face for driving nails. For lighter nailing a 5-ounce to 8-ounce tack hammer or Warrington hammer is better than the full-sized curved claw. These smaller hammers let you start brads, tacks, and nails without hitting your fingers, and they are easier to control in tight areas and around glazed windows.
Occasionally you will need a really heavy hammer. A 20 ounce to 28-ounce ripping hammer may do for tightening up tongue-and-groove flooring or driving a peg or a large stake, but the job will probably be easier with a 5-pound short handled sledge or dead-blow hammer. Older dead-blow hammers have heads of solid lead. The faces deform easily and are not intended for nailing, but the hammers deliver a tremendous blow. Some newer models have a plastic casting filled with lead shot. A variety of hammers is shown in the photograph at left.
Helpful Hints
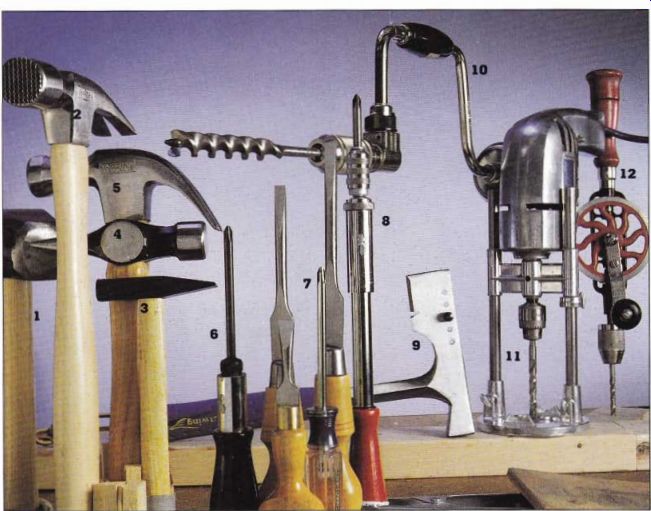
---------- The fastening tools shown above include (1) four-pound
sledgehammer, (2) checkered-face ripping hammer, (3) brad hammer, (4) Warrington
hammer, (5) claw hammer, (6) ratchet screwdriver with Phillips-head bit,
(7) assorted screwdrivers with slotted-head bits, (8) Yankee screwdriver,
(9) shingling hatchet, (10) brace and auger bit, (11) portable drill with
guide, and (12) hand drill.
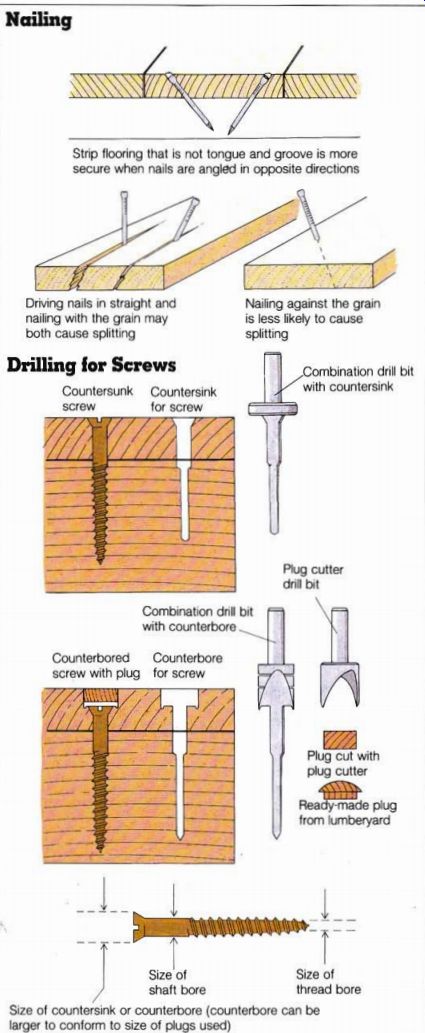
To maximize the holding power of nails along a single piece of wood, angle them in alternate directions as you drive them in.
The board will be less likely to work loose as it dries out or as the weight load shifts. See illustration on page 41.
To prevent boards from splitting when nailed near the ends, nail at an angle against the grain, or through the annual rings, not between them.
If you can’t see which way the annual rings run, blunt the nail before driving it. This will cause the nail to shear the wood fibers as it passes through them, an effect somewhat similar to that caused by drilling a hole. Drilling a hole, in fact, is the surest way to avoid split ting. Make pilot holes approximately two thirds of the diameter of the nail shank.
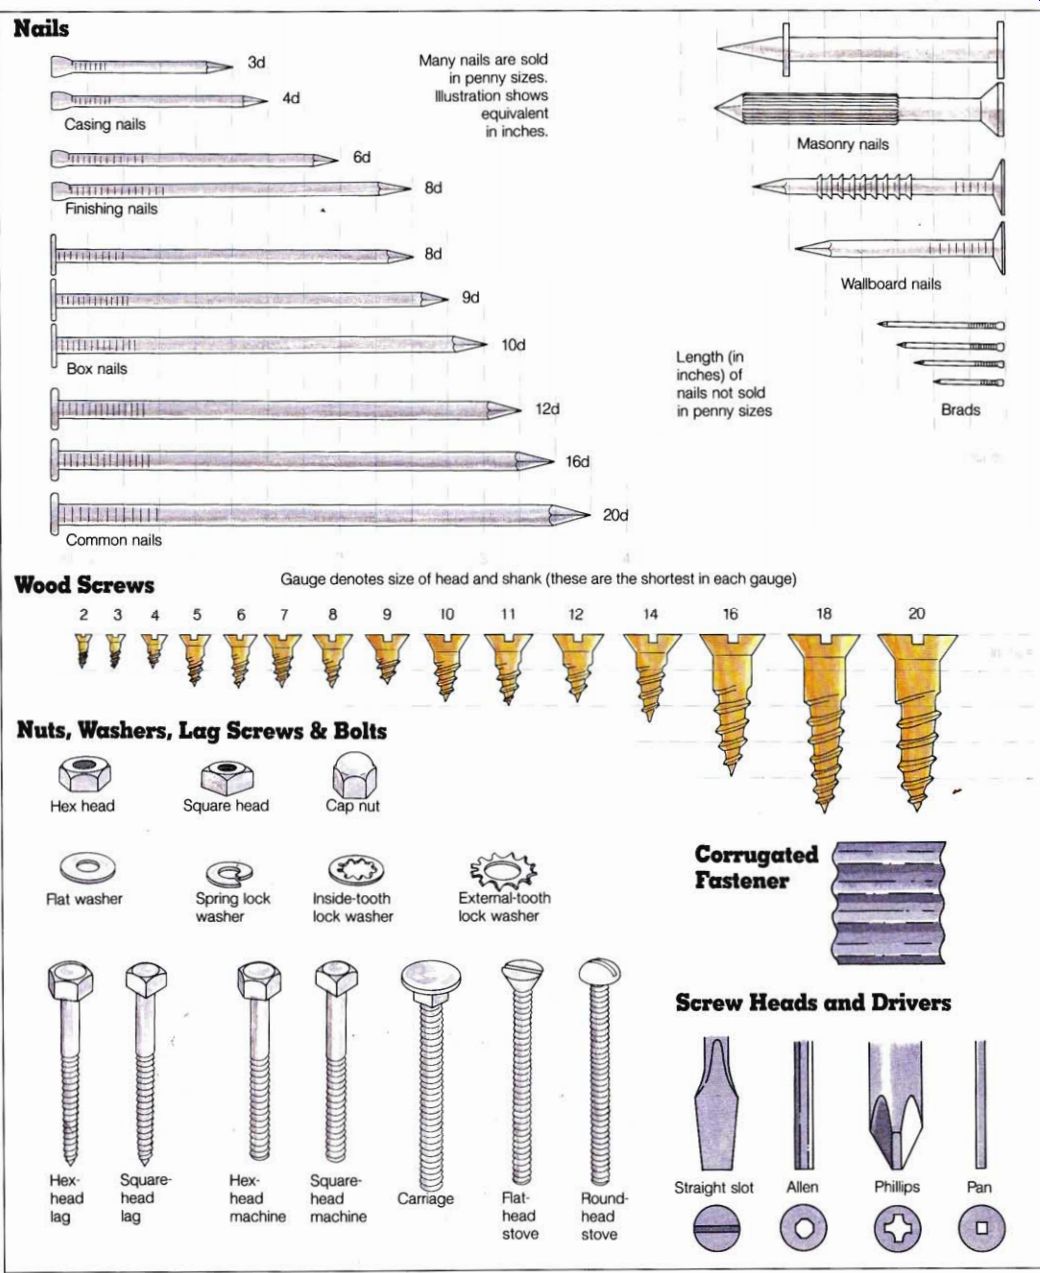
----------------42 Nails 3d 4d Casing 11; Many nails are sold in penny
sizes.
Illustration shows equivalent in inches.
6d 8d Finishing nails
8d ; 9d
10d Box nails ; 16d ; 20d; Common nails; Wood Screws Wallboard nails Length (in inches) ol nails not sold in penny sizes Gauge denotes size of head and shank (these are the shortest in each gauge) 2 3 4 5 6 7 8 9 10 11 12 14 16 ft vy If W Nuts, Washers, Lag Screws & Bolts Hex head Square head Cap nut 18
‘Brads 20 cs’
Rat washer Hex head lag Square head Spring lock washer Inside-tooth lock washer External-tooth lock washer Hex- Square head; head machine Carriage & Rat head stove g E Round head stove Corrugated Fastener Screw Heads and Divers Straight slot Allen Phillips Pan
-------
Nailing: Strip flooring that is not tongue and groove is more secure when nails are angled in opposite directions shaft bore thread bore; Size of countersink or counterbore (counterbore can be larger to conform to size of plugs used) Plug cut with plug cutter; Rea CKie plug from lumberyard Driving nails in straight and nailing with the grain may both cause splitting Nailing against the grain is less likely to cause splitting Combination dill with counterbore Plug cutter dill bit Counterbored Counterbore screw with plug for screw; Drilling for Screws: Countersink for screw.
Combination drill bit with countersink
-------------------
Pneumatic Nailers, Staplers, and Nailing Guns
A pneumatic nailer is a great help to the carpenter faced with a large project. It can be used for nailing exterior and interior trim. A pneumatic stapler is handy when the fastening will not be visible, such as for sheathing, subflooring, and roofing. A power-actuated nailing gun, which is used to attach sleepers or furring strips to concrete, takes .22-caliber cartridges and special nails. It is potentially very dangerous and must be used with extreme caution. In some areas only licensed contractors may buy or rent this tool.
As with the selection of any tool, the proper choice of a pneumatic tool will make a big difference in the results achieved. First, ask yourself whether the size and complexity of the job warrant spending the money to buy a pneumatic tool, a compressor, and the required accessories. If not, does the job warrant renting this equipment? Should the answer to either question be yes, the following information is for you. The discussion focuses on pneumatic nailers, since they are usually the most appropriate pneumatic tool for the fastening required in finish carpentry.
Pneumatic nailers have a two-step firing sequence in order to meet safety requirements. To drive a nail you must depress the shoe, or work contacting element, against the work as you pull the trigger.
This feature prevents the nailer from firing like a gun-activated by the trigger only.
The best firing sequence for finish work is called the sequential trip, or trip-then trigger. You must fully release the trigger before you can drive the next nail. This scheme allows for more accurate positioning of the nailer and a better nailing pattern than the firing sequence known as bounce nailing, or the contact trip. The sequential trip is also safer, because the nailer will not ire with accidental contact while the trigger is being held.
It's important to select the right nail, of the right length, for the job. For most exterior finish work, choose a nail that will penetrate beyond the material to be fastened by a ratio of about 2 to 1. That is, if the material to be fastened is about 1.5 inches longer than that thickness, or 2.25 inches overall.
More penetration is generally better than less, so a slightly longer nail is accept able. For exterior finish work select a nail with a galvanized finish. Better yet is a stainless steel nail, but be prepared to pay a premium. For interior finish work, smooth nails are standard (and the most economical).
Many brands and models of pneumatic nailer can accommodate nails in the range of lengths mentioned above.
Some have nail magazines that extend at right angles to the nail-driving mechanism; others have angled magazines, which allow for a little more maneuverability. Give some thought to the various nailing positions that will be required of any nailer; this will help you to select the right tool.
Once the nailer is on the job site, take some time to practice before you start nailing. Drive several nails into a scrap of the material you’ll be working on, using some suitable backing.
You'll get a feel for the nailer and a chance to observe the effect of the nail head on the wood. It is usually best to drive the nail so that the head winds up parallel to the grain (in most cases, parallel to the length of the workpiece). If the nailer can be set to allow the nail to be driven to various depths, experiment to get the depth you want. Practice until you are satisfied with the results.
If you're buying a pneumatic tool, investigate the capabilities of different models before making a final decision.
If you’re renting, talk to several rental stores about their equipment, in order to get the most suitable tool for your project.
Whether buying or renting, insist on a demonstration and some instruction to make sure that you get the best tool for the job.
Nearly as important as the selection of the tool is the choice of the compressor and hoses. Compressors come in different sizes and shapes and with different capabilities.
Tank size for portable compressors for finish nailers, for example, ranges from 1 to 4 gallons. As for hoses, the better the quality, the more consistent the inner diameter of the hose and the smoother the action of the nailer.
Safety is important when you work with pneumatic tools. Wear safety goggles, as you would when operating any power tool. Study the owner’s manual. Understand what you are doing before you begin.
Screwing
Screws are stronger fasteners than nails, although they are more expensive and take longer to install. Drill pilot holes for fastening wood to wood. This makes the screw easier to seat and also creates a stronger bond.
Boring for Screws
A time-consuming but necessary preparatory task is boring pilot holes for screws. See illustration on page 41 for an example of a tapered counter bore for a plugged flat-head wood screw. Drilling this type of bore is much easier and faster with a combination bit either with a countersink or a counterbore. The bits come in configurations matching particular screw sizes. The former will drill a tapered hole for a countersunk screw. The latter will drill a tapered hole for a counterbored screw and plug in one operation.
You can prepare a pilot hole without a combination bit, but you will have to use two drill bits and either a countersink or a counterbore bit. To drill a pilot hole for a countersunk screw, bore the hole for the shank first, making it equal to the shank diameter. Next, bore the hole for the threaded portion of the screw. The diameter of the hole should equal the diameter of the shaft (threads excluded). Then use the countersink bit. The countersink for a flat-head screw should be equal, at its widest point, to the diameter of the screw head. To drill the pilot hole for a counterbored screw, use the counterbore bit first, then bore the hole for the shank and the threaded portion of the screw, as described above.
Driving Screws
To drive slotted screws, use a conventional flat-blade screw driver. Keep the edges sharp and square, to avoid slipping and burring the slot. Choose the correct size of screwdriver so that you do not deform either the tool or the screw head. When driving Phillips head screws, make sure that the screwdriver its snugly into and reaches to the bottom of the slots.
Because the pan-head screw is much easier to drive than either of the other types of screws, it is gaining in popularity. It has a square hole and is driven by a square-headed bit. The head is much smaller than other screw heads and can be countersunk without pre drilling.
Ratchet screwdrivers with interchangeable bits, including the push-driven (or Yankee) version, are a great time-saver.
Special bits are available to convert 1/4-inch and 3/8-inch ratchet (wrench) drivers to either Phil lips or flat-blade screwdrivers.
A hand brace can also be fitted with screwdriver bits.
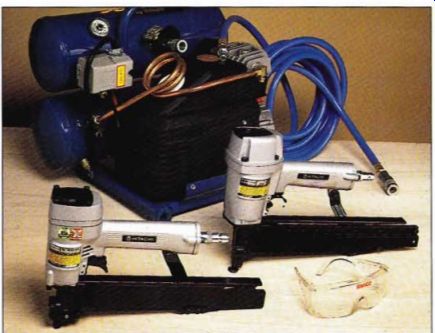
----- A pneumatic stapler (left) and a pneumatic nailer (right) are
powered by an air compressor. Always wear safety goggles when using a power
tool.
Power Screw-driving
Regular 1/4-inch and 3/8-inch drill motors accommodate special screwdriver bits with hexagonal shafts, but make sure that the drill has a slow or continuously variable speed. If you are buying a drill with screw-driving in mind, choose one with reversible speed.
An alternative to nailing wallboard to joints and studs is to attach it with wallboard screws, using a special drill (see illustration on page 69, bottom). Wallboard screws have Phillips heads and are threaded all the way up the shaft. The drill has a clutch that disengages when the screw is properly seated. Because wallboard installers must move around a lot, many of them like to use the new cordless driver that runs on a rechargeable battery.
If you buy an extra battery pack, you can charge one battery while you use the other.
Gluing
Many woodworking joints can be fastened with glue alone.
When a properly glued joint is stressed to the breaking point, it is often the wood surrounding the joint that fails, leaving the bonded surfaces intact. Although many types of glue are available, most finish carpentry jobs can be done with white polyvinyl resin glue or contact cement. Two exceptions are yellow aliphatic resin glue, which is used in high-heat situations, and the marine resin glues, such as resorcinol, which are used where waterproof joints are needed.
White Glue
Polyvinyl resin glue is a good all-around woodworking adhesive. It has replaced a variety of glues, some of which required mixing with water or heating in a pot. White glue is inexpensive, has a long shelf life, is transparent when dry, and has good gap-filling capability. The last is especially important to the strength of joints; although some gaps occur at visible edges, others occur in the heart of the joint, where they would not be detected until too late.
White glue also sets up fast and dries quickly, which may or may not be an advantage de pending on the project. A quick setup time is not desirable when many pieces must be assembled before clamping.
Clamping white-glue joints is a must. Mount the clamps as soon as possible, and don't flex the joint while it is drying. To prevent edge-glued pieces from buckling, mount bar clamps on opposite sides of the work.
When the work is impossible to clamp, hold the joint in place with screws.
Yellow Glue
Aliphatic resin glue, or yellow glue, is often used in place of white glue, even when heat resistance is not a factor. The bonding is strong, and cleanup and sanding are easier than with white glue.
Contact Cement
This liquid adhesive is especially good for bonding large, flat materials, such as plastic laminate, to counters and table tops. It can also be used to cement wood veneers in place.
For very large jobs apply it with an inexpensive paint roller. For smaller projects simply brush it or pour it on and spread it with a serrated metal spreader.
Coat both surfaces to be joined and let the cement dry for 15 to 30 minutes before joining them. (Follow the manufacturer's instructions.) Then bring the pieces into contact.
Once they touch they are bonded and cannot be repositioned. To break the bond see Working With Veneer, page 32.
To allow for accurate positioning, place a piece of paper between the two glued surfaces after they have set up. The paper lets you move the work around. When you are satisfied with the placement, slip the paper out. Alternatively, use lengths of dowels to roll the work into position.
To ensure contact apply pressure to each part of the glued surface-a heavy-duty rubber roller is made for this purpose-or pound the back of a wood block as you move it systematically over the work.
Mastic
This latex- or rubber-based cement, often called construction adhesive or paneling adhesive, has a heavier consistency than white glue or contact cement. It is applied directly from a tube with a caulking gun, or from a can with a serrated metal spreader. The sticky consistency of this glue enables it to adhere to vertical surfaces without running off; the glue will also conform to irregular surfaces. Use mastic to attach ceiling tiles, wall paneling, or floor tiles to furring strips or concrete.
Doweling
You can purchase dowels in various diameters and cut them to length. Put a 45-degree chamfer on each end of a dowel by drawing it across a sheet of medium sandpaper, twisting it as you do so. Then create a channel in the dowel to allow air and excess glue to escape when it is seated. Manufactured dowels have a spiral groove carved around the out side, but you can get comparable results by passing a regular dowel through a doweling jig made from a block of wood.
Drill a hole in the block one size larger than the dowel; then drive an 8-penny (8d) nail into the block so that the point protrudes 3/8 inch into the hole.
Force each dowel through the hole several times to score it.
The hardest part of creating a good doweled joint is locating the sets of holes so that the dowels match up and the two pieces are properly aligned.
There are three ways to do this: with dowel centers, a marking gauge, or a doweling jig.
For dowel centers, drill a hole in one workpiece only and put a dowel center of the same size into this hole. Carefully place the second workpiece in position over the hole containing the dowel center and press firmly. The point on the dowel center will mark the exact position for the hole in the second workpiece.
A marking gauge has many uses; marking dowel holes is one of them. Place the two workpieces side by side, with the surfaces to be joined face up. Set the marking gauge to the proper position and score a horizontal line across both pieces with one stroke. If you are using a marking gauge with two pins, you can scribe lines for two rows of dowels. Other wise reset the gauge and scribe to mark as many rows as you need. For the vertical lines that create the cross-points for drilling, reset the gauge and scribe each workpiece individually.
A doweling jig is a viselike apparatus with interchangeable drill guides of various sizes.
Once adjusted, the jig is clamped to each piece of work and a precise pattern of holes is drilled.
Simple variations on this machine are available, but most of them allow for drilling only one hole at a time. The Port align drill guide, a versatile tool that can be used as a doweling jig, attaches to most 1/4 inch and 3/8-inch portable drill motors; it can be left in place when it isn‘t being used.
=========