Carpentry tools
When you have completed the projects in this chapter putting up ceilings and walls; installing closets, cabinets, and shelves; and adding interior casings and trim-you will be ready to decorate and move into your finished home.
Before starting work on the interior, take a careful look around. Now is the time to make any changes. Try to imagine each room furnished, and foresee possible problems. Where will the bed go? Have you planned outlets for lamps beside it? Will the closet doors clear it? Is there enough storage space? Although you should have made all the decisions concerning the floor plan before you started to build, you may have had a change of heart, or your requirements may be different now.
Decide whether each room is the size and shape you want. Don’t change them too hastily-spaces are deceptive when defined only with framing-but even moving a nonbearing wall is not difficult at this stage.
Although there is still a lot of work and mess ahead of you, the excitement of seeing your new home take shape will spur you on.
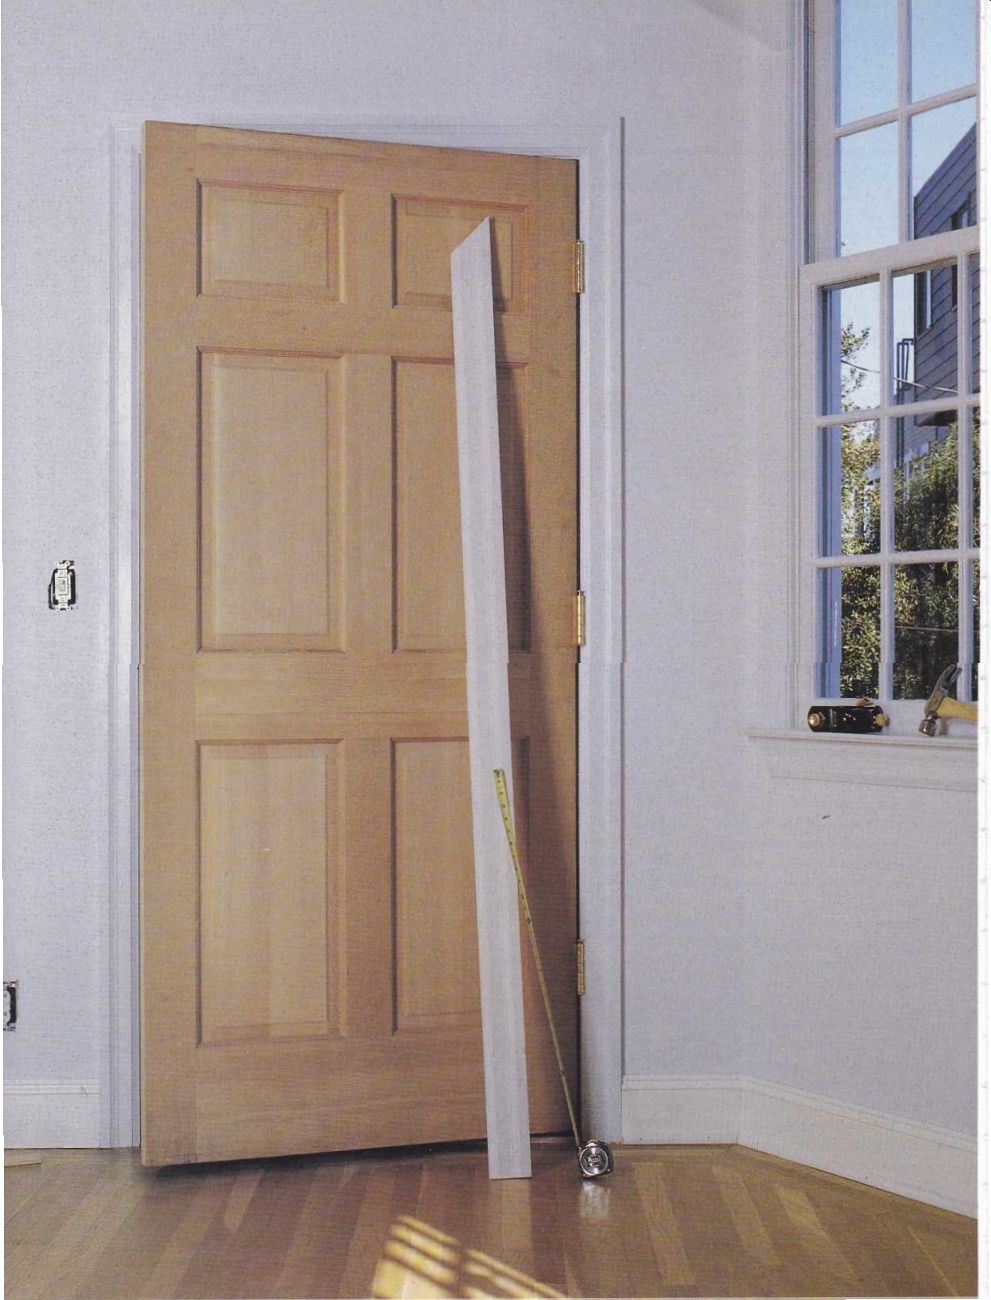

----------- Finely crafted trim details, such as gracious moldings and
small-paned windows, mark the attention of a careful, patient finish carpenter.
+++++++++++++++++
SEQUENCE OF ACTIVITIES
As with exterior finish carpentry, there are many materials and techniques you can choose from to finish the interior of your home. Now that the exterior is weatherproof, you can take a well-earned breather and make these decisions at your leisure.
Interior finish work can proceed once the heating, plumbing, wiring, and insulation have been installed.
As you reach each succeeding phase of a house-building project, you must pay more and more attention to detail. This is because the visibility of the work is greater. Your task, then, for this phase of the project is to bring to the job site the appropriate frame of mind and to proceed in the knowledge that you and others will be viewing your handiwork for a long time. This phase represents the culmination of all the skills and experience you have developed over the course of the project. By now you will have gained a certain measure of confidence that you can draw on to get the work done.
Where you choose to do each job and how you set up your work station will affect your efficiency and the quality of the end product. Before starting a given task, visualize the work to be done, the size and nature of the materials you will be handling, and the physical movements required. Once you grasp the whole picture, you can choreograph the activities efficiently.
Remember the underlying principle of all carpentry, which is especially important in the finishing phase: Take measurements twice and cut once. This means that before making any cut, you double check your measurement. It will undoubtedly save you time, money, and aggravation in the long run. Establish this habit at the beginning; you will soon understand why it pays.
Another technique essential to successful finish work is to install the materials so that they give the best appearance possible, even though there may be flaws or defects in the surrounding materials. Say, for instance, that when installing molding, you find that the walls are not square and you cannot correct this law completely. You may have to compensate by making cuts that are not perfectly true and joining pieces together in such a way as to camouflage the connection. This is best accomplished by imagining what the eye will perceive when the work is finished. It is perfectly valid and acceptable to compensate for laws; to do so skillfully marks your achievement as a finish carpenter.
Remember to get help when you need it. Holding up a long trim piece while trying to nail it in place is not only awkward but also potentially hazardous.
A second pair of hands can make the job proceed faster and more safely.
The tools you will need for each of the activities described in this chapter will be discussed in the appropriate sections. Refer to the chapter "Gaining the Skills" for tips on using them.
The general rule for interior finish carpentry is to work from the top down. Cover the ceilings first and then the walls. After that the usual order is to hang the cabinets, construct the interior stairs and railings, hang the shelves, in stall the door and window casings, put in the wainscoting, install the baseboards and other moldings, and finally build and install the fireplace mantel. In most instances, if you do these jobs out of order, you will have to do some of them twice.
Correct any laws before you start each activity. This is always advisable; often it is the only way to achieve a fine finish. The laws requiring remedy are discussed in the appropriate sections following.
It’s time to get started. Read each section carefully, follow the directions, and know that you have prepared yourself well for the jobs at hand.
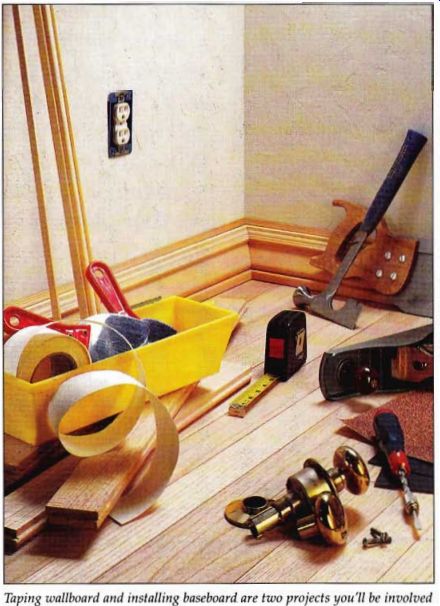
---------- Taping wallboard and installing baseboard are two projects
you'll be involved in when finishing the interior of your home.
+++++++++++++
CEILINGS
The first task in interior finish carpentry is to install the ceiling material. Not only is it a good idea to get this awkward job over with, but it is always better to finish a room by starting at the top and working down.
From the Top Down
There are two main reasons for starting with the ceiling when finishing a room.
. You can get a tight fit between the ceiling and the walls, and later, between the walls and the floor.
. You should always try to in stall the most visible surfaces last, when they are least likely to be damaged. Dropping a hammer or stepping on spilled nails is almost guaranteed to leave marks on a newly surfaced floor unless it has been very carefully protected.
Lighting
Before you hang the finish ceiling, make all decisions regarding overhead lighting. If you plan to install either a flush mounted or a pendant fixture, attach an appropriate fixture support to the ceiling box. If your scheme includes recessed spotlights or floodlights, these must be installed before the ceiling is hung. In either case, mark and cut out holes in the ceiling panels before you attach them. Work carefully; although the edges of the holes will be hidden under a cover plate or trim piece, there is not much room for error.
Play It Safe
Wear safety goggles. It is un comfortable enough working above your head without running the risk of getting dust or shavings in your eyes. Wear a tool belt, too. Balancing tools on top of a ladder can be dangerous, and it is certainly a nuisance when they fall.
Scaffolding
When you're on a ladder, don’t try to save time by stretching beyond the area that you can easily reach. Coming down and repositioning the ladder takes a lot less time than waiting for broken bones to mend. If possible, work from scaffolding. You can rent small units that fold up, are adjustable, and have locking casters. If scaffolding is unavailable, erect a simple version by placing a board be tween two stepladders. Make certain that neither the ladders nor the board can slip.
--------------
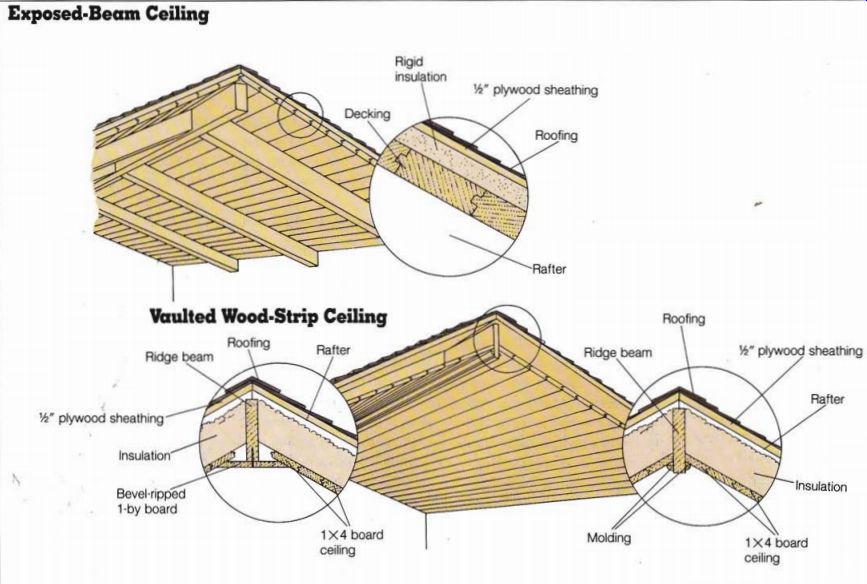
Exposed-Beam Ceiling Rigid insulation W plywood sheathing
Roofing Vaulted Wood-Strip Ceiling Roofing Ridge beam X Ma'
3/8" plywood sheathing' Insulation' Bevel-ripped 1-by board 1X4 board ceiling Rafter Roofing Molding 1/4" plywood sheathing Rafter Insulation 1X4 board ceiling
------------------
Exposed-Beam Ceiling
In some homes the decking for the roof is also the ceiling for the room below; the rafters and joists (or beams) are exposed from within. With this type of ceiling, use rigid insulation and 3/8-inch plywood sheathing on top of the decking, and then apply the finish roof.
Use decking that is 2 inches thick (nominally). Consider using tongue-and-groove soft wood flooring in a C or D grade for the decking. It is available up to 1 3/16 inches thick and 1 3/8 to 5 7/16 inches wide.
Start the layout for the decking on the upper edge of the rafters, so that the horizontal decking joints at the top of the ridge are parallel to the ridge beam. Starting at the ridge measure down the rafters at each end of the roof the distance necessary to completely cover the roof, and make a mark at this point. Stretch a chalk line from end rafter to end rafter at this mark. Snap the line across all the rafters.
This is the true starting point for installing the decking.
Align the first piece of decking with the snapped line.
Facenail it with two 16-penny (16d) hot-dipped galvanized nails at each rafter. Complete the first course of decking in the same way. Be sure to center the joints over the rafters. Proceed with the next course of decking, this time using one face nail and one blind nail driven down diagonally through the tongue of the decking into the rafter. This drives the groove of the piece of decking tightly against the tongue of the previous piece, giving it a finished look.
As you install the succeeding courses of decking, take periodic measurements to make sure that they are still parallel to the ridge. You will probably find that the distance is increasing at one or more of the rafters. If this happens, al low the seams to open slightly over the next few courses where the distance is shortest.
Do this until you regain a line parallel to the ridge.
You will undoubtedly fall into a comfortable routine, checking every four or five courses to ensure consistency.
Try to keep the seams as far as possible from the walls and ridge, to minimize the effect of nonparallel lines. This may require that the starter piece be ripped to the dimension that allows for the maximum distance between wall and seam.
Vaulted Wood-Strip Ceiling
With this type of ceiling, the wood strips are nailed to the bottom of the rafters, unless lo cal codes require a layer of wall board under the rafters. Batt insulation can be installed be tween the strips and the roof sheathing. To achieve a tight fit, tongue-and-groove strips are better than straight-cut boards.
A wood-strip ceiling is generally installed with the strips running horizontally. Place the first course (groove side down) so that the bottom edge butts up to the wall. As with the installation of roof decking described above, the starter course of wood strip should be positioned to allow for parallel seam lines as the ceiling reaches the ridge beam. You may have to rip the starter piece at an angle to achieve this result, because the wall and the ridge beam may not be parallel.
Plan carefully so that the last board you install against the ridge is as close to full width as possible.
Nail the starter piece in place and continue to the peak.
The best appearance is achieved when wood-strip ceiling material is blind-nailed, and no face nailing is done.
This means that only one nail is used for each course of wood strip, but this is ordinarily sufficient for 1-by material. Measure frequently and make small adjustments so that the final course is parallel to the ridge beam. Place insulation between the rafters as you proceed. A ridge beam protruding into the room can be edged with strips of molding, or it can serve as a nailing board for a piece of bevel-ripped 1-by stock.
When 1-by material is used, the rafters should be spaced no wider than 24 inches on center for best appearance.
Crisscrossed Beam Ceiling
Ornate beamed ceilings can be created using decorative trim installed beneath a standard ceiling of wallboard or wood paneling. Before starting the actual installation, experiment with various combinations of moldings and dimensioned lumber to create a pleasing de sign. Work out a pattern that attaches easily to standard framing lumber (2 by 2, 2 by 4, and 4 by 4 are the most commonly used). See pages 108 and 109 for examples.
The first step is to attach a grid of framing members to the ceiling to support the pieces of decorative molding. The size of the framing members can vary depending on the scale of the room. For smaller rooms use 2 by 2s or 2 by 4s. Run the first pieces full length across the ceiling, perpendicular to the ceiling joists and spaced 3 to 4 feet apart. Snap chalk lines on the ceiling to keep the framing straight. Secure the framing members where they intersect each ceiling joist with a self tapping wallboard screw or a lag screw. The screw should penetrate the ceiling joist at least 1 inch. Countersink the heads of the lag screws.
When all the full-length members are in place, cut and install identical framing pieces between them to create a criss cross grid. Apply a bead of construction adhesive to the top of each crosspiece. Then hold it in place against the ceiling and either toenail or screw each end to the full-length framing member.
For larger rooms with long spans or ones that require massive beams, you .can make lightweight hollow box beams out of 2 by 4s and plywood.
Attach the upper 2 by 4 members first, as described above.
Then, to complete the beams and make them deeper, fabricate continuous U-shaped channels the same length as each ceiling member, using 2 by 4s with plywood glued and nailed to the sides. Nail each channel to the corresponding grid member on the ceiling.
Once the framework grid is in place, attach the decorative trim pieces to the sides and bottom of the beams.
+++++++++++++++++++
Wallboard Ceilings and Walls
---
The most widely used covering for interior walls and ceilings is wallboard. It has almost entirely replaced lath and plaster in general residential applications because it has the properties of plaster and many other advantages as well.
Properties of Wallboard:
You may recognize wallboard by one of its other names […]
•The sheet form enables you to obtain flat wall surfaces with out acquiring the specialized skills of a plasterer.
•The gypsum compound in wallboard retains 20 percent water, which makes the wall board tire resistant.
• Manufactured sizes confirm to standard wall heights.
Selecting Wallboard.
Wallboard usually comes in 4 by 8 panels. although longer panels are sometimes avail. The standard thicknesses are V. inch, } inch, ', inch, and ¾ inch.
•The ½-inch sheet is the standard panel for residential construction. It combines ease of handling with good impact resistance. A 4 by S sheet of ½-inch wallboard weighs 58 pounds-light enough (or one person Lo handle.
The ' sheet is often used for tni ceilings where the truss spacing is 24 inches on center. It is also used on 'fl mon walls between a house and an attached garage, for example, for greater fire protection.
•The '.-inch sheet is used primarily for resurfacing t watts. I3ccausi it has little impact resistance, it must be solidly supported.
•The 0.5-inch sheet can be used for resurfacing, but it is more often hung in a double layer to make ¾-inch nails. The sound insulating properties of a double panel make it a good choice for recreation moms.
• Special 0.5-inch wallboard is manufactured for use in high-humidity area such as bathrooms and laundry rooms. This type ol wallboard is identified by the light green or blue cover paper, which is moisture resistant. In addition. the core is made of a moisture-resistant gypsum compound.
Insulating wallboard is similar to regular wallboard except that it has a foil coating one side. it' obtain the benefit, you must leave a ' air space between the foil and any other insulation. The foil also acts as a vapor barrier.

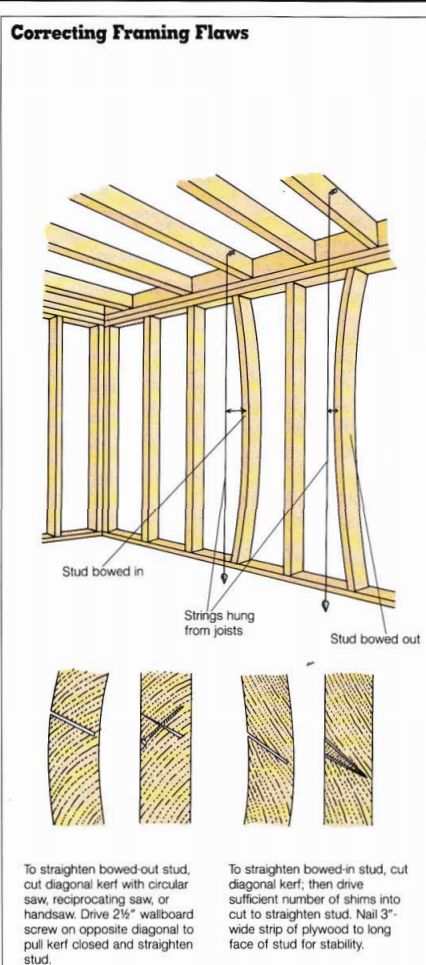
---- Correcting; Framing Flaw.
------------
Wallboard is available with a decorative surface laminated to one side. This surface, usually vinyl, comes in colors, patterns, and simulated wood grain or marble. Consider this for a child's room, where it is often necessary to remove a future Picasso’s handiwork from the walls.
Be aware that installing wallboard, although not difficult, is extremely messy, arduous, and time-consuming for the amateur. If the budget al lows, call in the pros. You will be amazed at how quickly and seemingly easily they get the job done.
Preparing for Installation
Hanging wallboard is much easier if the joists and studs are even and square. Check with a string nailed to the member in question. If you find studs that bulge inward or outward more than about 3/8 inch, correct the problem before proceeding. If a stud is bulging out, straighten it by making a diagonal hand saw cut about three quarters of the way through the stud; then drive a screw through the cut to squeeze it together. A bulging stud may also be straightened by shaving or planing. If a stud is curved inward, make the same cut; drive in enough shims to straighten the stud; then nail a 3-inch piece of plywood scrap alongside the stud for stability. See illustration on page 67.
Other flaws and oversights should be corrected before the wallboard is hung. Check to see that all electrical outlet boxes are extended away from the stud or ceiling joist at the proper distance to receive the wallboard. Finally, be sure to provide a backing wherever the wallboard is to be fastened.
To prepare for installation remove any moldings attached to the window frames. Bring the wallboard into the room and stack it in the middle of the floor. If you lean it against a wall, you run the risk of cracking or warping the panels and damaging the edges.
Studs, plumbing, and electrical conduits determine where the wallboard can be nailed. You want to hit the studs, not the conduits or the plumbing. Before putting up the wallboard, remember to at tach protection plates to studs drilled for plumbing and wiring; nails won’t penetrate the protection plates.
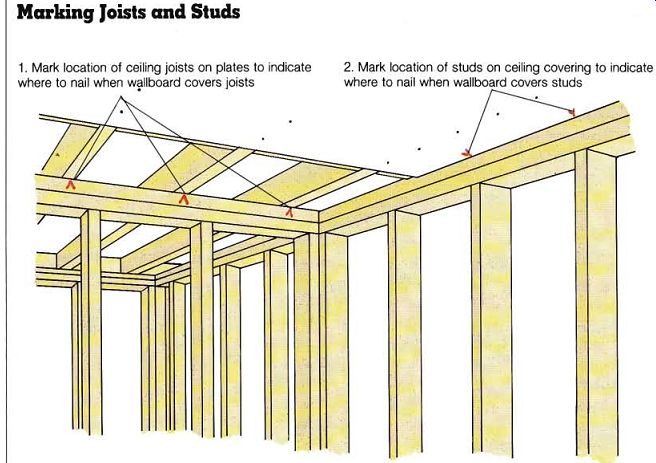
So you'll know where to nail the ceiling wallboard once it covers the joists, mark the location of the joists on the plates. When the ceiling wall board is in place, mark on it the location of the studs, so you'll know where to nail the wall board for the walls. See illustration. Tack the wallboard adjacent to the joist and stud marks. Then snap a chalk line as a guide for nailing.
When soundproofing is required between living levels in a multistory dwelling, you can install a sheet-metal strip, called resilient channel, on the ceiling of the lower level, to which a second layer of wall board is attached. This reduces the sound transmission be tween levels. See illustration on page 70, right.
----------- Measuring and Laying Out Wallboard
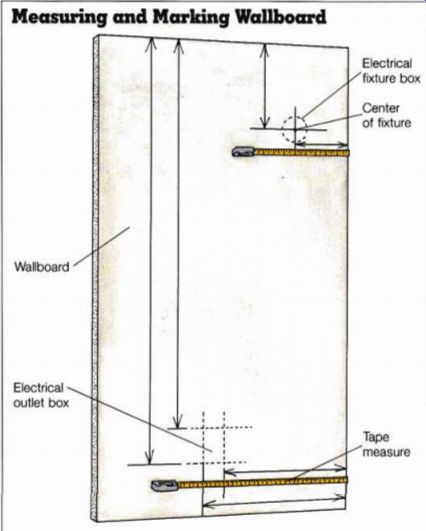
When more than one measurement is involved in a sequence, take progressive readings with a steel tape in one position, rather than moving the tape after each reading. This reduces cumulative error.
To take progressive readings lay a panel of wallboard on sawhorses in the same position as that in which it will be in stalled. Touch the tip of the tape measure to a ceiling-wall corner or to the edge of the adjacent piece of wallboard. Extend the tape to the first edge of any cutout that you come to, such as an electrical outlet box, a recessed light fixture, a window or door frame, or a wall opening. Record this dimension on a scrap of wall board on which you have first drawn the entire schematic of cutouts for this panel. Then ex tend the tape to the other side of the cutout and record this dimension on the schematic.
Measure any other cutouts necessary to complete the panel in one direction. Then take perpendicular measurements:
Touch the tip of the tape to the wall (or to the ceiling if you’re measuring a wall panel) or the adjacent piece of wallboard, then follow the same procedure. See illustration at right.
Make the actual cutouts about 0.25 inch larger all around than the dimensions on the schematic. This makes it easier to install the panel. The exception is cutouts for electrical boxes, which should be within H inch or less of the actual size of the box.
Cutting Wallboard
Cut sheets of wallboard by scoring the top (finish) surface with a utility knife. Draw a line with a pencil first or snap a chalk line on the face of the sheet. Use a T square (the 4-foot size is the handiest) to ensure that the line is straight. Now bend the board backward. If it does not break easily, bend it over a 2 by 4 or use your knee.
After the wallboard snaps, cut the back surface with the utility knife. If the break is not clean and gypsum protrudes beyond the edge of the paper, use a rasp to remove the excess.
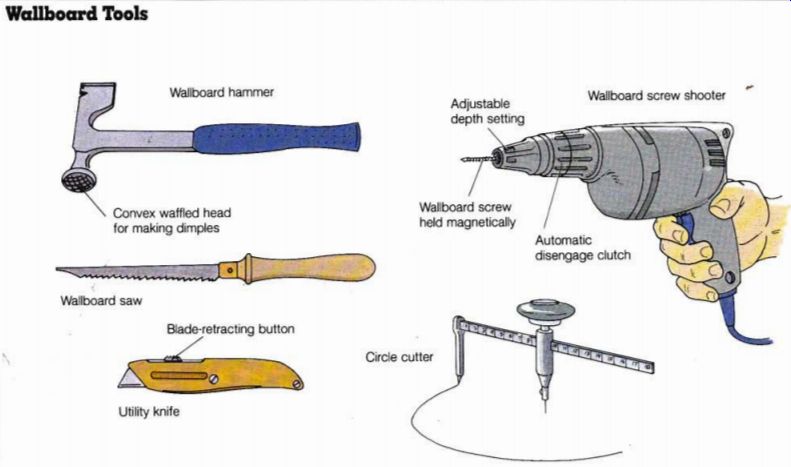
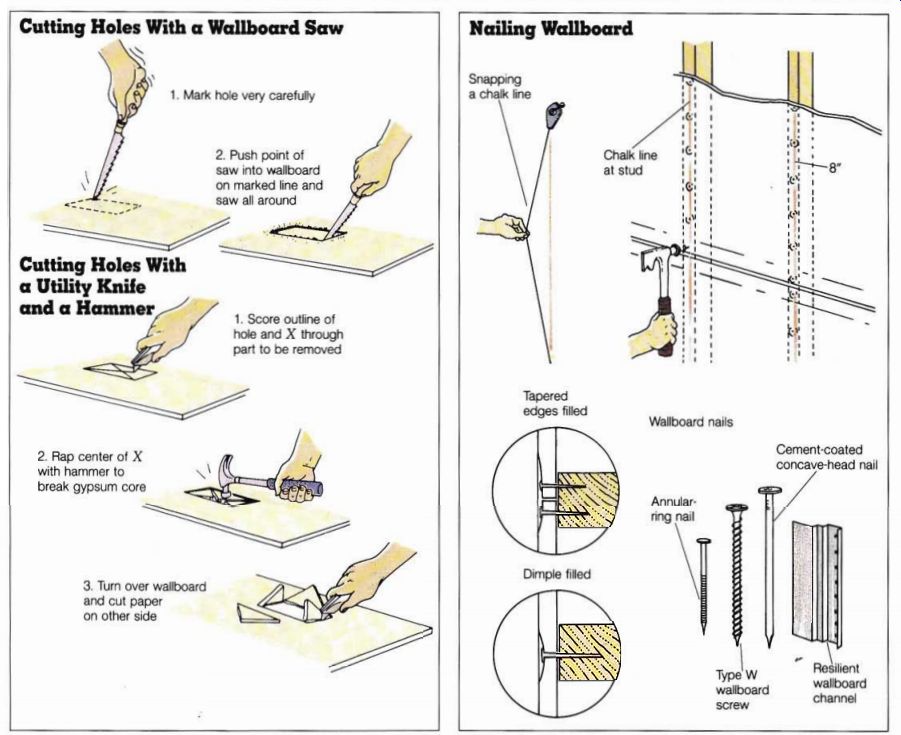
Use a wallboard saw to cut holes or irregular shapes in the panels. This pointed saw, which has a sturdy 6-inch blade and five teeth per inch, can poke right through a panel to start a cut, and the coarse teeth will not clog up. See illustration below.
----- Measuring and Marking Wallboard
---------- Wallboard Tools Wallboard hammer Utility knife Adjustable
depth setting Wallboard screw shooter Wallboard screw held magnetically
Automatic disengage clutch Convex waffled head for making dimples Circle cutter
--------------
-------- Nailing Wallboard ; Snapping a chalk line Tapered edges
filled Wallboard nails Cement-coated concave-head nail Annular ring nail
Type Wallboard screw wallboard channel Dimple tilled
----------------
An adjustable compass-like device called a circle cutter scores accurate circles. It has a 3/8-inch pin at the point.
Push the pin through the front of the wallboard and score the edge of the circle. Use the same hole to score another circle on the back of the wallboard. Punch out the circle. See illustration on page 69, bottom.
Be sure to measure each panel carefully. Plot the cuts in pencil on the surface of the board and recheck the measurements before you break the surface.
If you have some scrap wall board to practice on, try the method that the pros use to make rectangular cuts-it is fast once you get the knack. Pencil the cuts onto the board and score them with a utility knife as de scribed above. Score an X through the area to be cut and tap the center with a hammer.
This loosens four wedge-shaped pieces, which fall free when you cut the back cover paper. See illustration above left.
Attaching Wallboard
Wallboard may be nailed, screwed, or glued to the studs.
Whichever method you use, the panels should fit snugly against each other. Do not economize by using cut pieces of wallboard. The material is cheap, and the joints are not as neat when neither butted panel has a tapered edge.
Nailing Wallboard
The most common method of attaching wallboard is nailing.
Use the annular-ring nails de signed especially for this purpose; the rings should prevent the nails from popping out. See illustration above right. Choose a nail long enough to penetrate the framing 3/8 inch to 1 inch after passing through the wallboard.
Let the framing reach its stabilized moisture content before nailing into it. Wood shrinks as it dries, which makes the nails pop out. If possible, close the doors and windows and keep the room at about 72° F for at least four days, preferably two weeks, before you install the wallboard.
When attaching the ceiling panels, space the nails 7 inches apart along each joist and no less than % inch from the edge of a panel. Attach the wall panels with nails spaced 8 inches apart along each stud. For a handy nail-spacing guide, affix pieces of tape to your hammer handle 7 inches and 8 inches from the head.
Be careful not to break the cover paper of the wallboard when you drive in the nails.
Using a special wallboard hammer will reduce the risk of damaging the surface. The checked face of the hammerhead is bell shaped to seat the nail head below the surface. See illustration on page 69, bottom.
Screwing Wallboard
Wallboard can also be attached with screws. This method is becoming popular; however, you will need a drill with a clutch, which costs between $90 and $130. The special bit can be bought at most home improvement centers for about $1. For small jobs it may be more economical to rent the tool, but be realistic about how long the job will take.
The 1.25-inch Type W screws are stronger than nails. See illustration on page 70, right.
You can space them up to 12 inches apart on the ceiling and up to 16 inches apart on a wall, but not closer than 3/8 inch to the edge of the panel. The screws are driven by a Phillips screwdriver bit in a drill with an automatic disengage, which activates just as you counter sink the screw head.
Unlike nails, screws do not require a fine touch. Just keep an even, solid pressure on the dill. Don’t let the bit jump the screw slots or you will have a very messy hole.
----- Gluing Wallboard
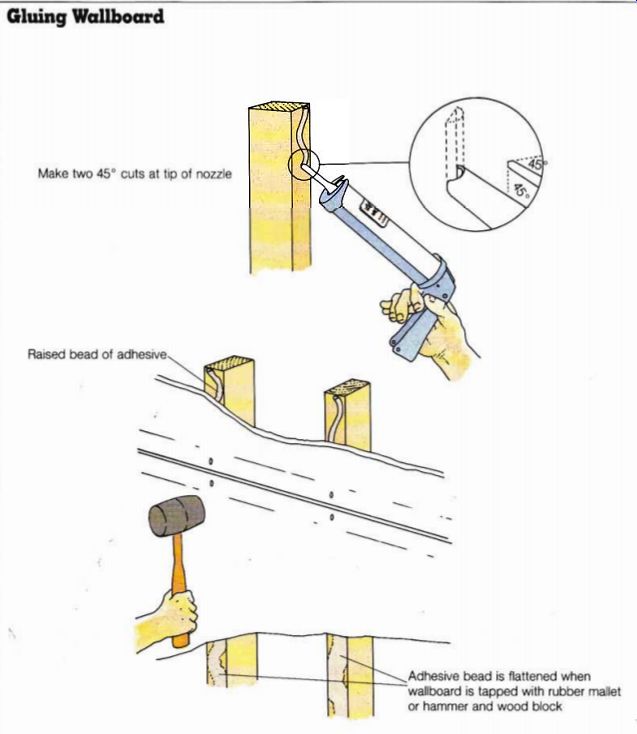
Gluing Wallboard
Wallboard held to the studs by adhesive makes a stronger wall and one that absorbs more sound. Using adhesive also eliminates nail holes-and the job of filling them. Pre-decorated panels look better glued, even though matching nails are usually available.
This method is well suited to small jobs, on which you can use 1-quart cartridges of adhesive. Large jobs are done with a refillable applicator and adhesive in 5-gallon cans.
Hold the applicator at a 45-degree angle to the framing member and apply a 3/8-inch wide bead of adhesive. Use a zigzag pattern on members where two panels meet. See illustration.
After you have applied the adhesive, lift the panel into position and press it firmly against the beads of glue. Nail or screw the outer edges only or tap with a rubber mallet.
To ensure contact and to spread the adhesive, hold a 2 by 4 protection block against the surface and strike the glue lines with a hammer.
On pre-decorated panels overlap the extra surface material or attach matching battens over the joints.
-----
Installing the Ceiling
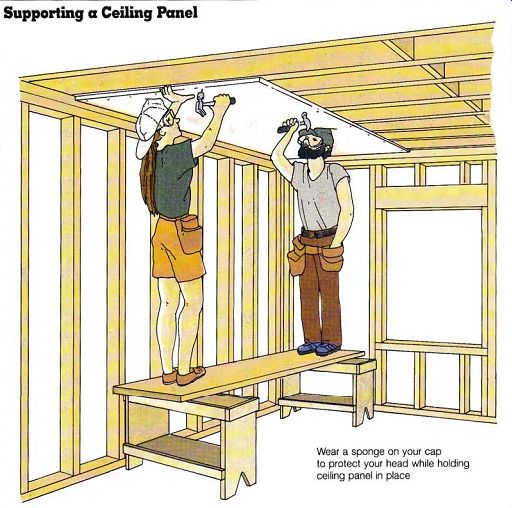
It is best to have help when you install the ceiling (see illustration). However, you can do it alone if necessary, using a T-brace or a rented wallboard jack. A T-brace is simply a long 2 by 4 with a crosspiece nailed at the top. The long upright must be slightly longer than the floor-to-ceiling distance so that the T-brace can be jammed up under a piece of wallboard to hold one end in position while you nail the other. To cushion your head for holding wallboard against the ceiling as you nail it, wear a hard hat or a cap with a sponge under it.
A jack is much easier to use.
You place a sheet of wallboard on it, then crank the jack so that it lifts the wallboard up to the ceiling and holds it there.
The jack is on wheels so that you can roll it around to position the wallboard perfectly.
Start by positioning a full panel in one corner. Attach the panel to the joists, using the method of your choice. Cut the last panel in each row 0.25 inch short, to provide clearance at the end. If the walls are going to be finished with wall board, nail no closer than 7 inches to the edge of a ceiling panel; the butting panel will tighten the joint. Complete the first row, placing the panels end to end. Position the joints on the joists, as close as possible to the center of the joists. A dozen or so fasteners will hold each panel in place until the remaining ceiling panels are in stalled, at which time you can finish fastening all of them.
Cut the first panel of the next row in half, since staggering the joints results in a finer job.
When you come to a panel that needs a cutout-for a light fixture or a trapdoor to the at tic, for example-transfer the measurements from the ceiling to the wallboard before raising the panel. (See Measuring and Laying Out Wallboard, page 68.) Pencil the cut lines onto the face of the panel so that the opening will be no larger than necessary. Recheck your measurements before you cut.
If you are covering the walls with wallboard, put these panels up before taping and filling the ceiling.
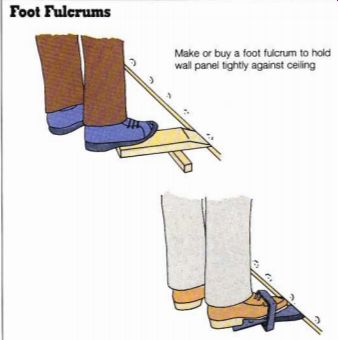
-- Foot Fulcrums---- Make or buy a foot fulcrum to hold wall panel
tightly against ceiling
Installing the Walls
The materials and techniques used to cover walls are basically the same as those used for ceilings. Since the studs run vertically, the preferred position for the panels is horizontal. It is acceptable-and in fact faster to run them vertically, but this way the joints are more likely to show as the structure settles.
Fit each panel snugly against the ceiling; use wedges or a foot fulcrum (see illustration) to help you to get a tight fit. A gap of 0.5 inch to 3/8 inch at the bottom is acceptable-it will be covered later by the baseboard.
Starting in one corner slide the panel up against the ceiling and attach it with nails, screws, or glue, as described on pages 70 to 72. If you're placing the panels horizontally, complete the upper row around the room. Cut out openings as accurately as you can; plates will cover the holes you make for electrical outlets and switches, but they don’t allow much room for error. Openings for doors and windows are less critical, because the gaps will be covered by molding. Avoid joints at the corners of doors and windows, since cracks are more likely to appear at these locations.
The second of the two panels forming an inside corner butts up to and holds the first panel against the framing. For this reason you don‘t need to nail or screw the first panel along the butted edge. The panels forming an outside corner lap must be capped with a metal corner beading to protect the edge. The beading is covered later with joint compound.
Taping and Filling the Joints
Whether the wallboard is attached with nails, screws, or glue, you have to hide the joints and fasteners. Vinyl covered pre-decorated wall board may have a flap to cover the joint, but standard wall board must be taped and filled, a process sometimes referred to as mudding.
You need 4-inch, 6-inch, and 10-inch putty knives, a corner knife, paper tape, and joint compound. You can buy powder and mix your own joint compound following the manufacturer’s directions, or buy it premixed in containers holding up to 5 gallons. If you are using a large container of compound, scoop a small amount into a tray and work from this. Clean out the tray often, because dust and dried-out compound make it difficult to get a smooth surface.
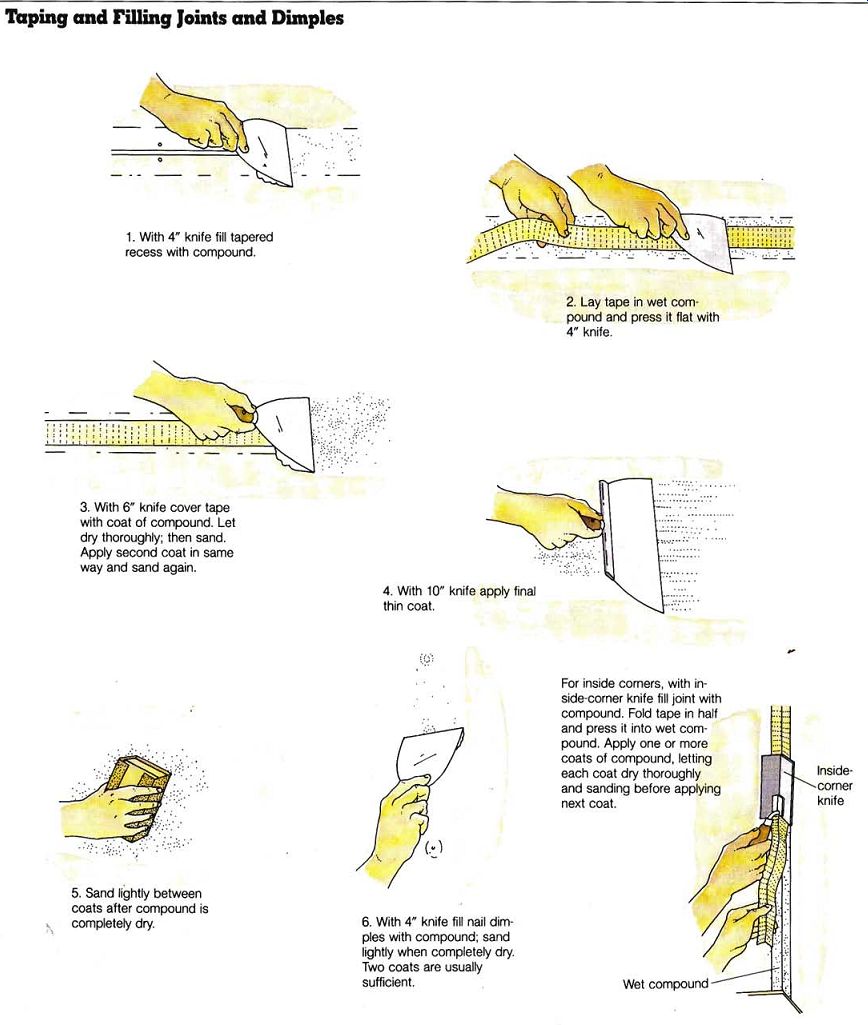
Start by spreading a quantity of compound into a joint with a 4-inch knife. Lay the tape on the wet compound and embed it smoothly. (Some people find that wetting the tape before pressing it into place makes application easier.) Apply more joint compound over the tape with the 6-inch knife, feathering the edges. Re peat this procedure for all the joints. Fill all nail dimples you don’t need tape here. Allow the compound to dry; then sand lightly before applying the next coat. See illustration on page 74.
An alternative to paper tape is a 2-inch-wide strip of fiber glass mesh that has a light adhesive on one side. This strip can be applied to the joint prior to mudding; the joint com pound penetrates through the openings in the mesh to the surface of the wallboard, speeding up the drying process.
Apply a second, wider coat with a 6-inch knife. Feather the edges, getting them as smooth as you can, and sand lightly when dry. (You can get a good finish and make less mess by smoothing the compound with a damp sponge.) Two coats are sufficient if you are going to apply texture compound. If you are going to paint or paper the walls or if you require a smooth surface for some other reason, apply a third coat with a 10-inch knife.
Finish inside corners and wall-ceiling joints in the same way. Apply the compound to the corner, smoothing it with a corner knife. Fold sections of tape lengthwise, place them on the wet compound, and use the corner knife to press them into place. Apply another coat over the tape and smooth it with the knife. Let it dry, sand lightly, and then apply a second coat.
On outside corners the metal beading takes the place of tape. Apply two or more coats of compound, letting it dry and sanding between coats.
Note: There are many ways to texture wallboard to make it look like plaster, but they all entail applying compound over the entire surface with a sponge, roller, or trowel. Experiment on scraps before doing this, or call in a wall board professional.
------------
+++++++++++++++++++++
WALL PANELING
Even if you don't use wood wallcoverings throughout the house, there are rooms that look particularly good decorated this way-the den or library, for example. A wide selection of panels is available; some are routed to look like individual boards.
Sheet Paneling This type of paneling is actually 0.25-inch plywood with a surface veneer in a selection of hardwoods, softwoods, textures, solids, simulated marble, and brick-the choice and the price range are large. You can even get wallpaper veneer over a Vi-inch plywood backing.
The 4 by 8 sheet is standard, but 9-foot and 10-foot lengths are also available. The sheets should always be applied vertically to avoid unsightly joints, so use the long ones if you have high ceilings.
Paneling can be installed over studs and over almost any existing wall surface, even concrete.
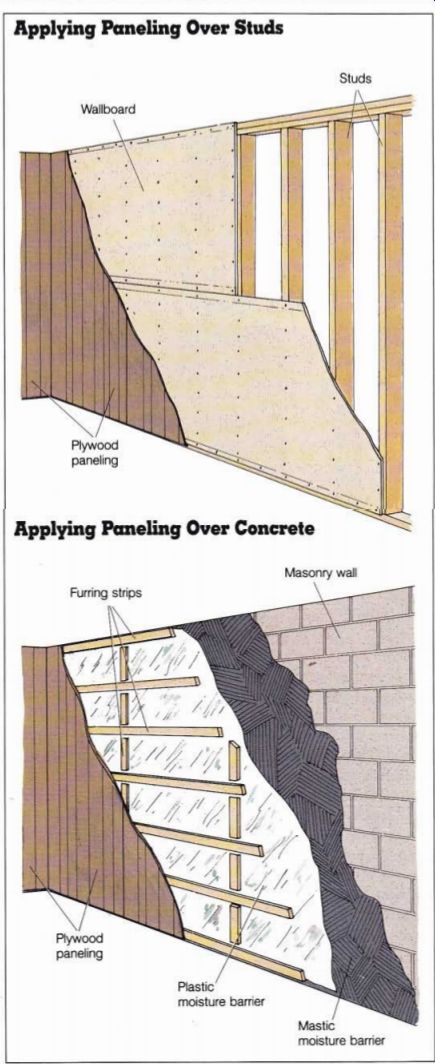
--------- Applying Paneling Over Studs
Plywood paneling
Applying Paneling Over Concrete Masonry wall Furring strips Studs Wallboard Plywood paneling moisture barrier moisture barrier
----------------
Over Studs
You can make the wall more solid and increase sound insulation by first covering the studs with 3/8-inch or 0.5-inch wallboard. See illustration.
There is no need to tape and ill, but you should stagger the wallboard and paneling joints.
Over Concrete or Concrete Block
Apply a coat of asphalt mastic (with or without plastic film over it) as a vapor barrier. Using a nailing gun ( see page 41) or hand-driven concrete nails, attach horizontal 1 by 2 furring strips every 16 inches. Attach vertical furring blocks between the horizontal strips at 48-inch intervals. Lay out the paneling so that the joints fall over these vertical blocks.
Once the support system is in place, attach the paneling with either nails or adhesive.
You can buy nails with heads to match the color of the paneling or the darker grooves. You can also use finishing nails and cover the heads with a special putty available in a convenient crayon-like stick.
Adhesives come in easy-to use cartridges. Adhesives are not all the same; follow the manufacturer’s instructions.
You must cut, it, and mark the exact position of each panel be fore you apply the adhesive.
Once the glue is on, it's too late to make adjustments.
Installing Sheet Paneling
When you use a circular power saw to cut paneling, you must cut with the face of the panel down so that any splintering occurs on the backside. A ply wood blade, which is designed to reduce splintering, makes for a neater job. If you use a hand saw or a table saw, be sure to cut the paneling face up.
Start by placing a full sheet of paneling in one corner and continue around the room.
Make sure that the first panel is plumb-if it is not, the entire installation will be crooked.
Gaps at the top and bottom can be covered by molding. Mark cutouts as you come to them.
Check your measurements and then cut, using a compass saw or a saber saw.
Irregular shapes can be traced directly onto the panel with a compass and pencil.
Place the panel against the irregular surface. Adjust the compass so that the span equals the amount that this panel overlaps the one next to it. If this is a first panel, butt it against the point that protrudes the most and set the compass for the distance between the edge of the panel and the point that protrudes the least. For the final panel, set the compass to the amount of overlap. In either case, mark the panel and cut with a saber saw or a com pass saw. See illustration.
Board Paneling
A more traditional way to obtain wood-finished walls is to cover them with paneling boards. These come in a variety of species, grades, and mill pat terns, with softwoods dominating the list. If you want wormy chestnut or cherry, consider laminated veneer panels rather than board paneling; hardwood boards are very expensive. Paneling boards are commonly available in 4-inch to 12-inch widths and with tongue-and groove or straight-cut sides.
Board paneling is usually applied vertically. First, cover the studs with wallboard. Then attach 1 by 2 furring strips horizontally, nailing them to the studs. If you are surfacing a smoothly sheathed wall, you can glue the boards with a panel adhesive. In this case, fur ring strips will not be needed.
With tongue-and-groove boards, drive 6d finishing nails into the V at the base of the tongue at a 45-degree angle and set the heads. See illustration on page 77. The next board clips over the tongue and covers the nail holes.
To keep from ending with a piece that is conspicuously narrower than the rest, you can work back from each corner with whole boards. A narrow board above a door or at a window will be barely notice able. Keep in mind that board paneling plus furring strips adds up to a thickness at least 1 1/4 inches greater than that of standard wallcoverings. Use thicker door frames or add square molding to build up the edge of standard frames.
Board-paneled walls can be finished in a number of ways.
Varnish, shellac, stain, paint, bleach, and antiquing (paint applied and then partially rubbed off with a rag) are some of the options.
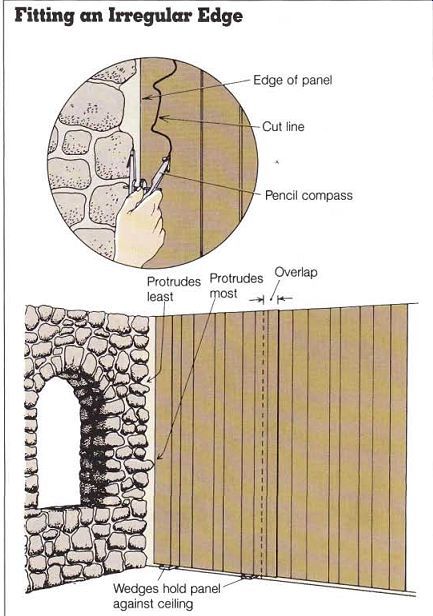
------- Fitting on Irregular Edge Pencil compass Protrudes
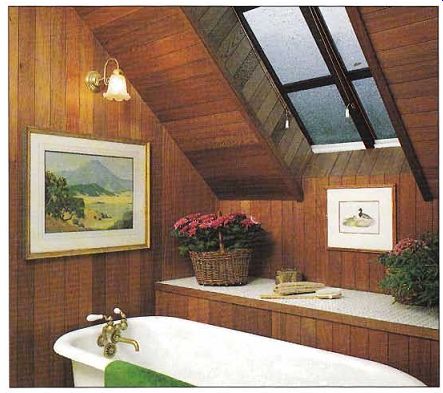
------------- Redwood board paneling covers the walls, ceiling, and
skylight well of this room. The tongue-and-groove configuration of the
boards allows the nails to be concealed, a technique known as blind-nailing.
Wainscoting
Wainscoting is decorative wood wallcovering, such as paneling or tongue-and-groove boards,
that is applied to the lower part of a wall. The paneling can be solid wood (square edged or tongue and groove), veneered plywood, or hardboard. The method of installation differs with the type of wainscoting.
Installing Tongue And-Groove Wainscoting
Tongue-and-groove boards are installed perpendicular to the floor. Begin the installation by chalking a horizontal line on the wall to indicate the height of the wainscoting. Measure the pieces so that they will stop just short of the floor and cut them all to length ahead of time. Baseboard will cover the gap at the bottom.
Since each piece must be nailed in at least three places, board wainscoting requires a continuous backing. This is usually provided by letting 1 by 4s into the studs horizon tally before the wallboard is installed. For remodel jobs where there is no access behind the wallcovering, 1/2-inch ply wood can be installed on the surface of the wall to provide backing for the wainscoting.
If there are outside corners, it's better to start with them, since they are especially prominent and visible. You can miter the mating pieces or square-cut them. In either case, glue these pieces together at the corner and nail them 8 inches on center (nail in both directions for a miter). Hold the corner very firmly so that the pieces do not move away from the wall.
Then work your way toward inside corners and window and door casings, nailing each piece at an angle through the tongue into the backing at about 12 inches on center. (Other than the mitered or square-cut out side corner described above, tongue-and-groove joints should not be glued.) At inside corners allow a small gap between the piece and the corner. As you prepare to install the mating piece, consider ripping it to a width that will match the reveal on the piece previously installed. This is a refinement that indicates a more thoughtful approach to the job.
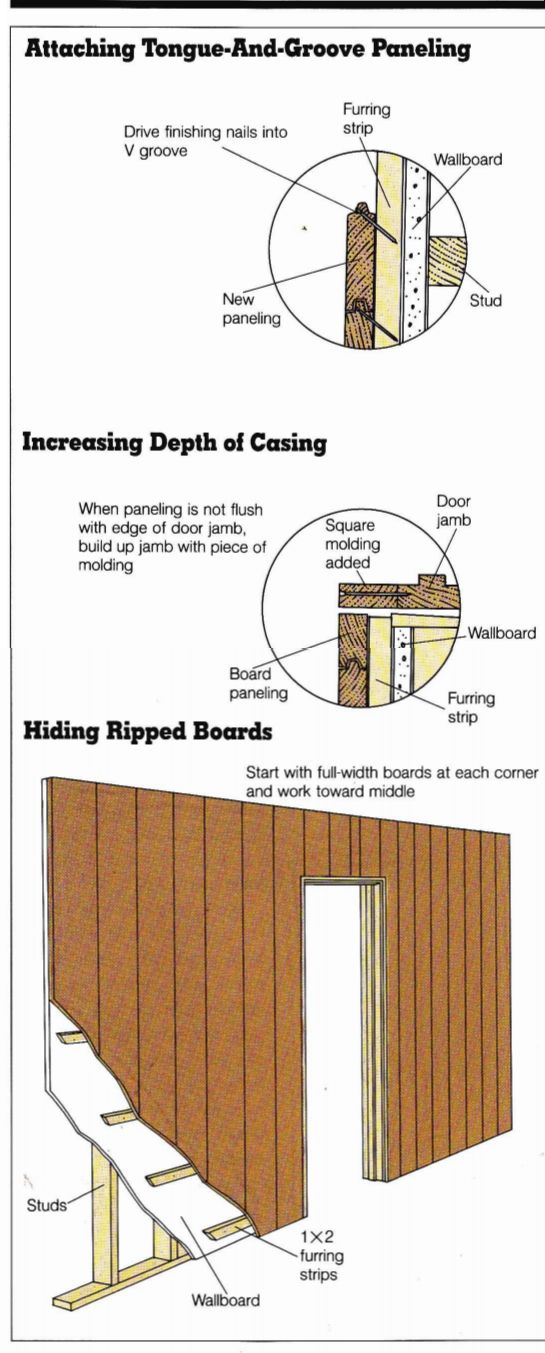
--------
Attaching Tongue-And-Groove Paneling Increasing Depth of Casing Drive finishing nails into V groove Furring strip Wallboard paneling Wallboard When paneling is not flush with edge of door jamb, build up jamb with piece of molding Start with full-width boards at each corner and work toward middle paneling Hiding Ripped Boards Furring strip
--------------- At doors and windows take very careful measurements from the top, middle, and bottom of each casing to the piece of wainscoting previously in stalled. If the measurements are all the same and are less than the width of a full piece, draw a vertical line between the bottom and top marks, allowing a little extra width for adjustment. Cut or plane the piece as necessary to achieve a good it.
If the measurements are different, a line drawn between the top and bottom marks will not align with the middle mark, so draw a vertical line between the top and middle marks, and another between the bottom and middle marks. Cut along these lines to more closely match the contour of the mating piece. Adjust the piece to fit; then facenail it to the backing close to the casing. Set all exposed nail heads. See illustration on page 78.
In very humid climates leave a thin gap beside each piece to allow for expansion and contraction. Use shim material about 0.5 inch thick.
Installing Plain-Panel Wainscoting
In its simplest form this style of wainscoting consists of a sheet of veneered plywood applied to a wall 1/4-inch plywood is best if there is no backing). A cap or chair rail covers the top edge, baseboard covers the bottom edge, and battens cover the joints and nails over the studs.
See page 75 for directions on installing plywood. See page 103 for installing the chair rail and page 104 for installing baseboard.
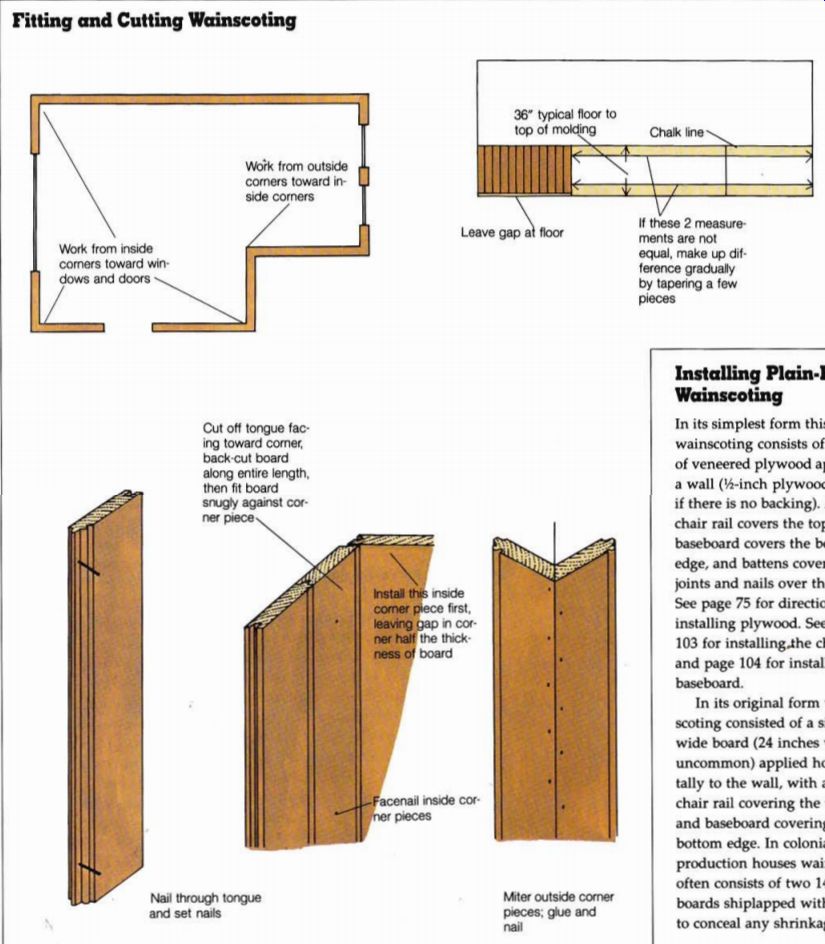
--------- Titling and Cutting Wainscoting---Work from outside comers
toward in side corners. Work from inside comers toward windows and doors.
Leave gap at floor If these 2 measurements are not equal, make up difference
gradually by tapering a few pieces.
Cut off tongue facing toward corner, back-cut board along entire length, then fit board snugly against corner piece. Install this inside corner piece first, leaving gap in corner half the thickness 6f board facenail inside cornier pieces Nail through tongue and set nails Miter outside corner pieces; glue and nail.
-------------- In its original form wainscoting consisted of a single wide board (24 inches was not uncommon) applied horizon tally to the wall, with a cap or chair rail covering the top edge and baseboard covering the bottom edge. In colonial reproduction houses wainscoting often consists of two 14-inch boards ship-lapped with a bead to conceal any shrinkage.
+++++++++++++++++
CLOSETS
The popular prefabricated modular closet units are designed for the most efficient use of space and easy access. They are discussed below, along with traditional, contemporary, and multipurpose closets. Choose the size and type of closet that will provide you with the storage space you need.
Planning Ahead
Adding a closet requires the same rough framing as installing a non-load-bearing wall.
The framework must be tied into existing studs and joists, so install closets before applying the finish wall, floor, and ceiling surfaces. If this is not feasible, locate studs and joists by referring to the blueprints of the building, by removing some of the finish material, or by using a stud finder.
Check with the local building department to determine whether you will need a building permit (any new electrical wiring will require one). Then draw detailed plans. Bear in mind that you should allow 12 inches behind and at least 12 inches in front of a closet pole. (Remember to allow for finish wall surfaces.) Position the closet wall at a stud location. If necessary, adjust the size of the closet or toenail an additional stud into the existing wall. Frame the opening to fit the closet doors of your choice.
Finally, install the wallcovering and add the shelves, drawers, and poles.
Traditional Closets
A clothes closet needs at least one shelf and a pole. These are usually supported by 1 by 4 cleats fastened to the studs on the side walls and across the back. Allow at least 12 inches behind and in front of the pole.
Its top should be 63.75 inches from the floor. Wood poles that span more than 48 inches will need center support. Wood dowel 1 1/4 inches or 1 3/8 inches in diameter is generally used for closet poles, but W-inch steel pipe works well and is more rigid.
Measuring for Closet Shelves
See page 91 for detailed in formation on measuring for closet shelves.
Installing the Pats
First, attach a cleat to the rear wall of the closet, positioning the top edge 2 3/8 inches above the pole and 66 inches from the floor. Check with a spirit level before nailing or screwing the cleat into the studs (use two nails at each stud). Attach matching side cleats between the rear and front walls. Screw wood or plastic closet pole hangers to the side cleats. Cut the dowel or pipe to length and drop it into the hangers. To prevent the pole from sagging, purchase any of the many metal supports available and attach it to either the wall or the shelf. See illustration. Set all nail heads.
For the shelf cut a 1-by board to length. ( See page 91 for installation procedures.) Finish the front edge with a shaper or a router, or attach a piece of molding with glue and finishing nails.
Contemporary Closets
Efficiency has dictated the design of the contemporary closet. Shelves, drawers, and poles are organized to make the best use of space and to provide easy access. This can be achieved in several ways: by using traditional methods of construction but installing the parts in a contemporary configuration; by purchasing prefabricated modular units that it into the available space; or by using a combination of both techniques.
With the traditional method of construction, you begin by creating your own design. Decide how many shelves and dividers you want and the horizontal and vertical dimensions of each. Decide where drawers are to be located and where and how high you want the poles to be.
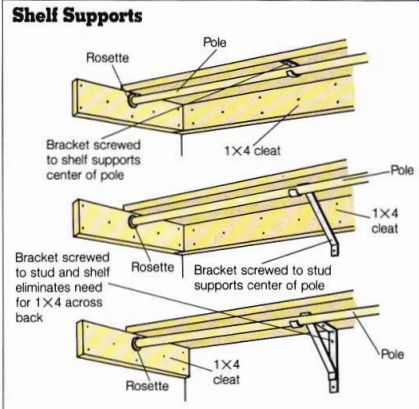
------ Shelf Supports Rosette Pole Bracket screwed to shelf supports
center of pole 1X4 cleat Bracket screwed to stud and shelf eliminates need
for 1X4 across back Pole Rosette Bracket screwed to stud supports center
of pole; Pole
-------------
Start with the side cleats; fasten them to each wall at standard height. Cut and install the shelf (see illustrations on pages 81 and 91). Mark it for vertical dividers. Measure and cut the dividers and install them in their respective positions. Nail through the shelf down into the top end of each divider, using three 6d finishing nails (glue the joint first), and toenail the bottom of each divider to the floor, using three 6d finishing nails on each side.
Cut and install shelves between the dividers. Construct and in stall drawers. ( See page 86 for complete directions.) If the dividers are to contain shelves that will rest on cleats, fasten the cleats to the dividers before you install them. If you’re using shelf clips that will it into predrilled holes, drill the holes before you in stall the dividers. If the dividers will contain drawers, attach the drawer supports at this point.
Mark locations for closet pole hangers and install them.
(If you want several poles, you will need additional side cleats to hold the extra hangers.) Measure and cut the poles and drop them into place.
A second shelf 12 inches above the first shelf provides storage space for little-used items. If you want a second shelf, install it last.
Prefabricated modular units are usually assembled on-site.
They may require no fasteners other than those supplied with the unit. Install these units according to the instructions included in the package.
A combination installation procedure may be desirable with non-wood closet units. For example, plastic-covered metal standards, shelves, and baskets have found widespread use in residential construction and are reasonably economical. When using these install the main shelf first. Next, install the up per storage shelf. Then purchase the unit of your choice to ill the space below the main shelf most efficiently. Modular units come in a wide variety of sizes and shapes; choose the ones that best it your needs.
Multipurpose and Specific-Use Closets
Closets in family or activity rooms usually require more shelving than clothes closets and seldom have poles. Linen closets ordinarily contain a series of shelves, located at heights convenient to the user.
Guest rooms usually have small traditional closets.
Closet Doors
Choose a conventional swinging door ( see page 99 for how to trim) or a sliding (bypass) door or an accordion (bifold) door (see illustration).
Bypass doors come either 0.75 inch or 1 3/8 inches thick. They are mounted on an exposed upper track or on a track built into the head jamb.
For a built-in track, the doors and the frame are ordered as a unit. Cover the gap between the frame and the finished wall surface with casing.
A less expensive method is to frame the rough opening (either top and sides or across the top only) with 1-by jamb stock cut as wide as the wall is thick (including wallboard on both sides). Nail this frame to the header and the trimmers.
Measure and cut a length of sliding-door track and screw it to the head jamb. Position the track to allow for the thickness of the doors (and a trim valance, if one is needed).
Trim the door panels to size, if necessary, and attach roller hardware to the top corners on the back of each door. Lift the doors onto the track (tilt them in order to do so), and check for it and smooth operation. To make adjustments loosen the screws in the roller hardware and lower or raise the door as necessary. Tighten the screws before removing the doors in order to mount the valance.
Attach the valance either by screwing it directly to the finish wall or by hanging it from corner angles mounted to the head jamb. (Make sure that the doors will clear the valance.) Apply casing around the opening. Re-hang the doors and screw or nail stops and guides into the finish floor.
Installation of bifold doors is the same as that for bypass doors; only the hardware differs. If the door has two panels and is more than 3 feet wide, support the sliding end with a special weight-bearing slider.
On narrower doors a simple locating pin is sufficient.
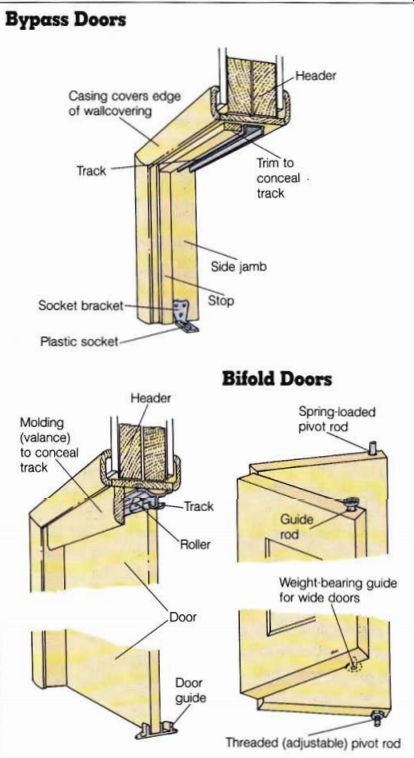
----- Header Casing covers edge of wallcovering / trim to conceal track
Socket bracket Plastic socket Bifold Doors Header Spring-loaded pivot rod
Molding (valance) to conceal track \ .
Guide rod Weight-bearing guide for wide doors Threaded (adjustable) pivot rod Bypass Doors
----------------
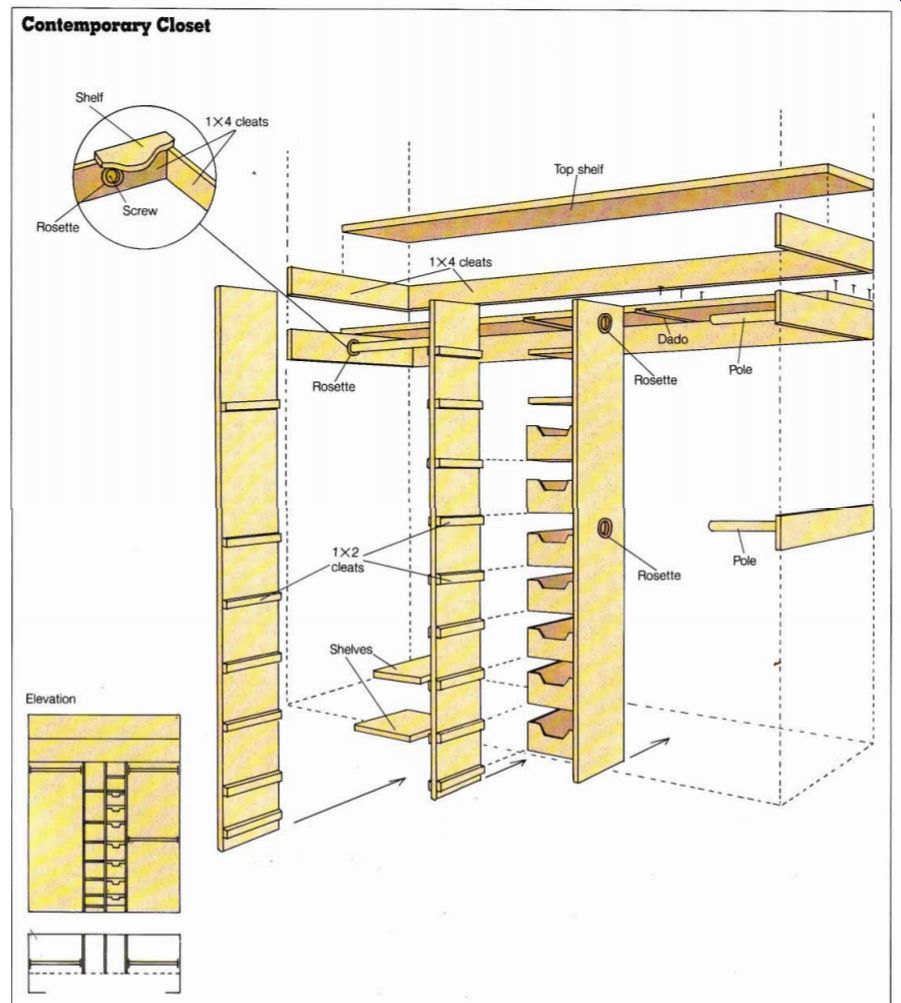
--------- Contemporary Closet
+++++++++++
CABINETS
Cabinets are the showpiece of most kitchens.
They represent a large share of the cost of renovation as well. If you would like to extend your finish carpentry skills and make your own cabinets, the following explanations will guide you through the process.
Organize the Sequence of Construction
Begin by grouping the construction into phases. The first phase is cutting and assembling the basic case: ends, partitions, fixed shelves, bottom, and back. The second phase is attaching the face frame. It can be completely assembled first and then attached to the base as a unit, or it can be glued and nailed to the base in separate pieces. The third phase is building the doors and drawers, and the fourth phase is making toe kicks and underlayments for the lower units.
To begin each phase, pre pare a detailed cut list of all the pieces that you will need. A cut list is simply a list of cabinet parts in the final cut size. It is important to make a complete list for each phase in order not to waste stock. For instance, if you know ahead of time that you will need three 36-inch pieces of 1 by 2, you can use a 10-foot length instead of three 4-foot lengths.
Wall Cabinets Until recently the traditional method of installing wall and base cabinets was to build and fasten them to the wall piece by piece.
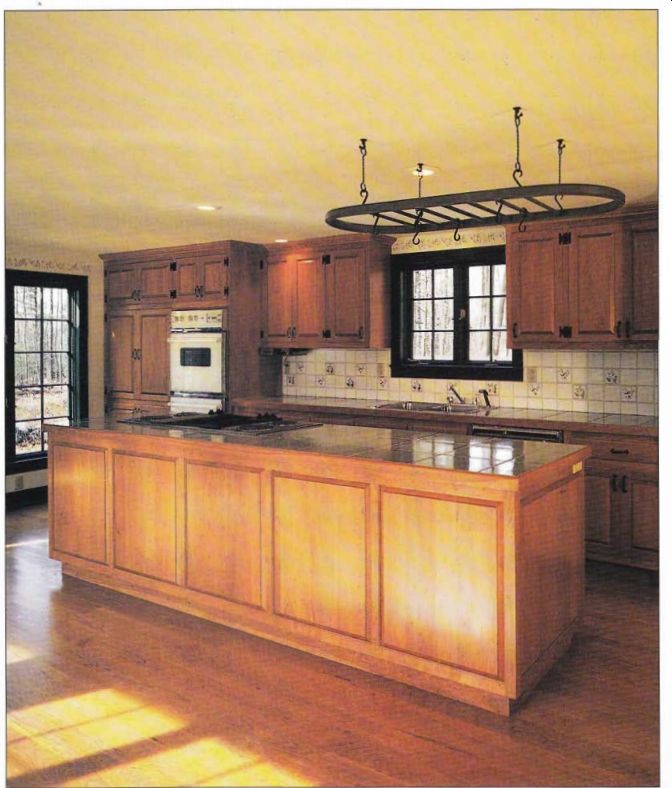
------ Noticing some of the details in these solid cherry cabinets
crafted by a fine cabinetmaker will help when planning your own kitchen. The
colonial style of the room is enhanced by paneled lipped doors ( see page
85) and exposed offset H-hinges painted flat black.
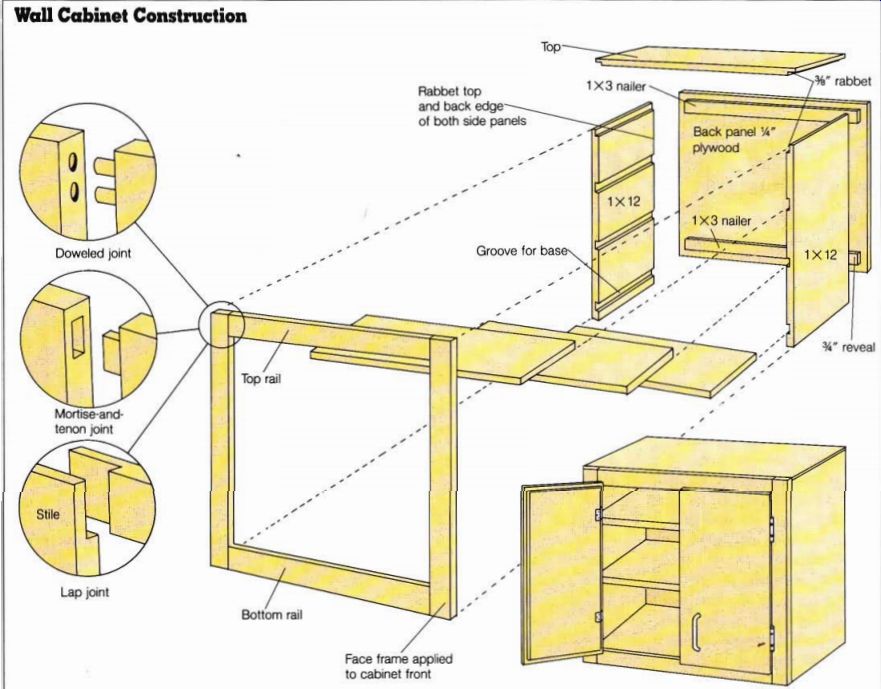
--------- Wall Cabinet Construction
Nowadays, however, it is standard practice to construct the units completely before in stalling them. This approach is quicker, easier, and much less awkward.
Since it is usually simpler to attach the wall cabinets before the base units are in place, make the former first. Remember that full cabinets are very heavy. Always use strong joints and always fasten each unit to the studs.
Standard manufactured wall cabinets are usually 12 inches deep and are generally fastened to the wall 18 inches above the countertop. You can use any dimensions you like, but the standard dimensions provide the most efficient clearance.
Constructing Wall Cabinets 1.
Using 1 by 12 appearance grade stock, cut the side, top, and bottom pieces of the cabinet to length. If you prefer, cut these pieces out of plywood that is finished on both sides.
Cut rabbets in the side pieces to accept the top of the cabinet and the plywood back, and dadoes to accept the bottom of the cabinet and the shelves. (The depth of the dado cuts should be 3/8 inch.) If you prefer adjust able shelves, see page 92. The dado for the bottom of the cabinet should be positioned to al low the face frame to cover the edge (see illustration). Apply glue to the ends of the bottom of the cabinet, it the bottom into the dadoes of each side piece, and nail the bottom in place with 4d finishing nails.
Fit the top of the cabinet into the rabbets on each side piece (after applying glue to the edges) and nail in place.
2. Set the cabinet on its face in order to install the back 1 by 3 nailing cleats. Square up the cabinet. Glue and fasten the 1/3 inch plywood back in place, preferably with staples or cement-coated nails.
3. Set the cabinet on its back. Cut the shelves to length (remember to allow for the depth of the dadoes). Apply glue to the edge of the shelves at each end, slide the shelves into the cabinet, and nail them in place.
4. Cut 1 by 2 strips for the face frame and assemble it, using either doweled, mortise and tenon, or lap joints. (Correct measurements are essential, since the frame determines the dimensions of the door opening.) Glue and clamp the joints. Wipe off excess glue with a damp cloth before it sets. When it is dry nail the face frame to the front edges of the cabinet. Set all nails and fill the holes.
Base Cabinets
When you make your own cabinets, you can design them to suit yourself. However, re member that appliances such as dishwashers, stoves, ovens, and refrigerators are made to fit standard-sized cabinets. For kitchen base cabinets the standard dimensions are 35 1/4 inches high (not including the countertop) and 24 inches deep. Bathroom vanity cabinets are generally 30 inches high, although 36-inch cabinets are becoming more popular. The width of the vanity is determined by the size and shape of the washbasin.
If you have a long line of base cabinets, such as a kitchen peninsula or wall unit, you can either build it as a single assembly or build several smaller units and attach them together, as described for wall cabinets on page 87.
Constructing Base Cabinets 1.
From 3/8-inch stock cut two side panels 23.25 inches by 35.25 inches. Cut a 3.5-inch-square notch at the lower front corner of each panel. See illustration.
2. On the inner side of each panel, dado a -3/8-inch-wide by 3/8-inch-deep groove from front to back. The bottom edge of the groove should be even with the top of the 3.5-inch notch. These grooves will support the bottom panel. Cut a 3/8-inch-wide by 1/4-inch-deep rabbet on the inside back edge of each side piece. These rabbets will accept the back panel, which will be cut out of 1/4-inch plywood.
Dado additional grooves if you plan to install any fixed shelves or adjustable shelf standards ( see page 92); or drill holes for adjustable shelf supports.
3. From 3/8-inch sheet material cut a base panel 23 inches wide by the length of the cabinet less 3/8 inch. From 1 by 8 stock cut a nailer the length of the cabinet less 0.5 inch.
4. Following the sequence described for the wall cabinets, assemble the pieces, using glue and nails. Check for square.
Then hold in position while you nail the plywood back.
5. Make a face frame out of 1 by 2 clear stock. Cut two stiles (vertical pieces) to the full face length of the sides. Cut the rails (horizontal pieces) to fit be tween them. Cut stiles for the vertical dividers (mullions) and rails for the drawer divisions.
Glue, clamp, and assemble the frame before attaching it to the cabinet; wipe all excess glue from joints before glue dries.
Mount the frame in place with finishing nails. Set all nails and fill the holes.
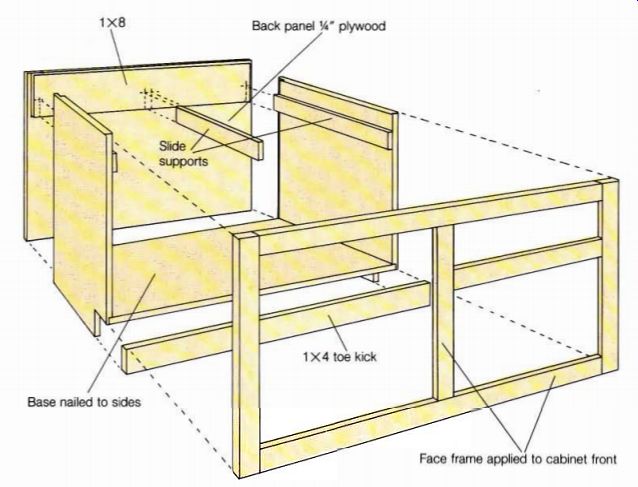
--------- Base Cabinet Construction
Cabinet Doors
Hinged doors can be lush mounted, full-overlay, or lipped. See illustration to com pare the styles and the hard ware required for each.
Flush Doors
Cut doors to match the size of the opening; they will lie lush with the outside face of the frame. An inset European-style hinge is the most popular type.
With this type of hinge, holes are bored on the inside of the door to accommodate the wafer section of the hinge so that it will fit snug and lush. The other section of the hinge mounts on the inside of the cabinet. Although it costs a good deal, this type of hinge is popular because you can make wide adjustments to align the doors. Butt or pivot hinges are a less expensive option.
Full-Overlay Doors
Cut the doors to match the outside dimensions of the face frame. The full-overlay European-style hinge is the most popular choice for this type of cabinet door. You can also use butt hinges screwed to the front face of the frame and the inside face of the door, or angled or lat pivot hinges screwed to the top and under side of the cabinet and the inside face of the door.
Lipped Doors
These are a combination of full overlay and lush doors. The inside face fits inside the opening, and the outside face over laps the frame. Cut the doors to a size that gives the desired amount of overlap; then cut rabbets around the edges. If there is a divider in the cabinet, or if the cabinet has only one door, rabbet all four edges. If there are double doors but no divider, do not rabbet the edge that butts against the other door. Use semi-concealed 3/8 inch inset self-closing hinges for mounting the doors. (The narrow leaf will be exposed on the face frame.)
Door Hardware
Most hinges nowadays are spring loaded and do not re quire any special type of catch.
However, in cases where special catches are needed, there are many types to choose from.
Mount each catch beneath one of the shelves or on a mullion or stile, so that it will be out of the way. The choice of knobs, pulls, and handles is also a matter of personal preference. To mount, carefully mark all doors so that the knobs align horizontally and, if possible, vertically as well.
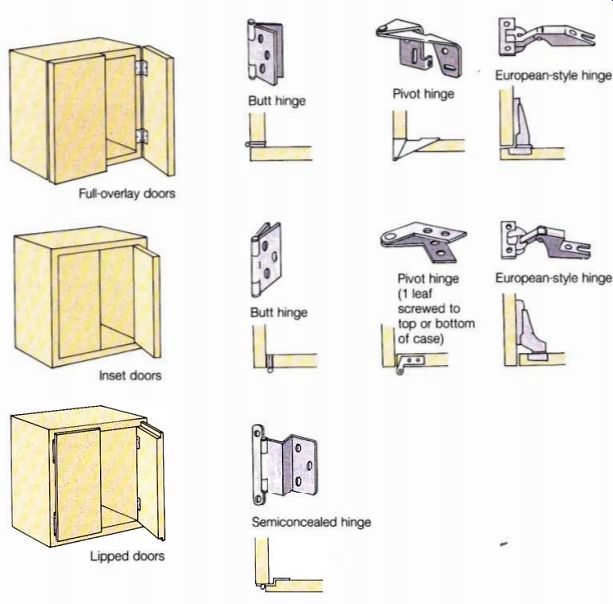
--------- Cabinet Doors and Hinges Full-overlay doors; Inset doors
Lipped doors Butt hinge Butt hinge Pivot hinge (1 leaf screwed to top or bottom
of case)
Semi-concealed hinge European-style hinge European-style hinge
--------------
----------- Drawer Construction Dado joint. Dado in side holds back.
Groove joint. Groove 1/4" from bottom edge holds bottom.
Butt joint.
Glue and nail.
Back view of drawer construction This is flush drawer face plate, For over lay drawer face plate, rabbet top and sides of plate
---------------
Drawers
A drawer is simply an open faced box. It can be made out of 0.5-inch or 3/8-inch board stock, plywood, or special high-pressure particleboard. The latter material, which is coated with a tough, scratch-resistant laminate, is becoming very popular.
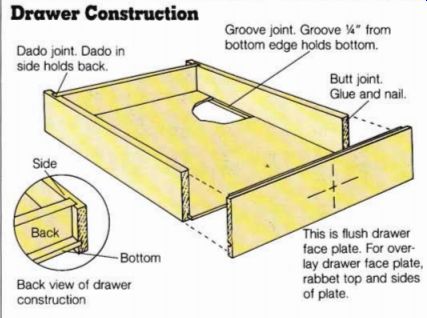
Traditionally the sides of drawers were dovetailed into the front and back piece to make solid joints. If you don’t own a dovetail jig for your router, use dadoes and grooves to make a strong drawer. See illustration.
1. Cut the side and front pieces to length and cut dado grooves in them to receive the base of the drawer. These grooves should be !4 inch from the bottom of each piece. Cut the back piece to length and dado the side pieces to accept the back. Assemble the pieces;
if they fit, glue and nail the sides together. Apply glue to the edges of the base, slide it into the grooves on the side pieces, and clamp until dry.
2. For a full overlay drawer, the face plate should overlap the drawer opening by about Vi inch on all four sides. Cut the face plate to length out of 0.5 inch or 3/8-inch appearance grade stock. If you wish you can carve a design on the front or chamfer the edges with a router. Attach the face plate to the drawer with two screws.
Use screws long enough to grip, but not to penetrate, the plate. Make sure that the face plate is centered on the opening rather than on the drawer.
(The slides may make the drawer sit slightly off center.)
3. Drawers can be supported by slides mounted on each side of the drawer cavity. For side supports to hold the slides, nail 1 by 2 rails to the outer walls of the cabinet and 2 by 2 rails to the vertical center partition and to an additional vertical sup port placed between the cabinet floor and the rear wall support.
4. It is easier to install the sliding hardware before the countertop is in place, so do this next. The local building supply outlet should have a variety of mechanisms from which to choose. It is also easier to install the counter supports now. Nail them between the rear wall support and the face frame every 2 feet, except where you need a larger opening for the sink.
Installing Cabinets
Whether you have constructed your own kitchen cabinets or purchased ready-made units, installing them is a meticulous and demanding task. It’s easy to underestimate the time required to do it right. For a kitchen of average size, figure on putting in about a week of work.
In a successful cabinet installation, the units are level, plumb, and square; all joints are tight and flush; and the doors and drawers are aligned.
Carefully study the following techniques, and the manufacturer’s instructions if you’re in stalling purchased units, before you start to work. The following description applies to purchased units, but it can also be used for units that you‘ve constructed yourself. Note especially the differences between frame and frameless cabinet installations. There is no margin for error with frameless cabinets; if they are not perfectly square and straight, then the doors and drawers will not it properly.
Preparation
Cabinets are installed relatively late in the construction sequence. All the walls and ceilings should be smooth, and the soffits, if any, should be finished, unless you are adding them later. Painting should be completed, wallcoverings may be up, and wiring for under counter lighting should be in stalled. If the finish floor is down, protect it with plywood or cardboard while the cabinets are being installed. Remove paintings and other valuable objects from the walls.
The tools you will need are a 3/8-inch or 0.25-inch electric drill, preferably variable-speed; a countersink bit; an assortment of screwdrivers; a tape mea sure; a hammer; 2-foot and 4 foot levels; a 6-foot straightedge or a long level; adjustable clamps or C-clamps; a stepladder; shims; a flat prybar; masking tape; and a bar of soap.
An extra electric drill with a Phillips-screwdriver bit is handy to have. You will also need a supply of 1/4-inch, 2 1/2 inch, and 3-inch quick-drive wood screws; 3d, 4d, and 6d finishing nails; 1-inch brads; and whatever special connecting screws are provided with frameless cabinets.
Inspect all the cabinets for defects and verify the sizes.
Make sure that the doors it, that none of the boxes is warped, and that all the drawers slide perfectly. Remove all the doors; mark on each door which cabinet it belongs with; and put the cabinets back into the cartons. Store them until you need them.
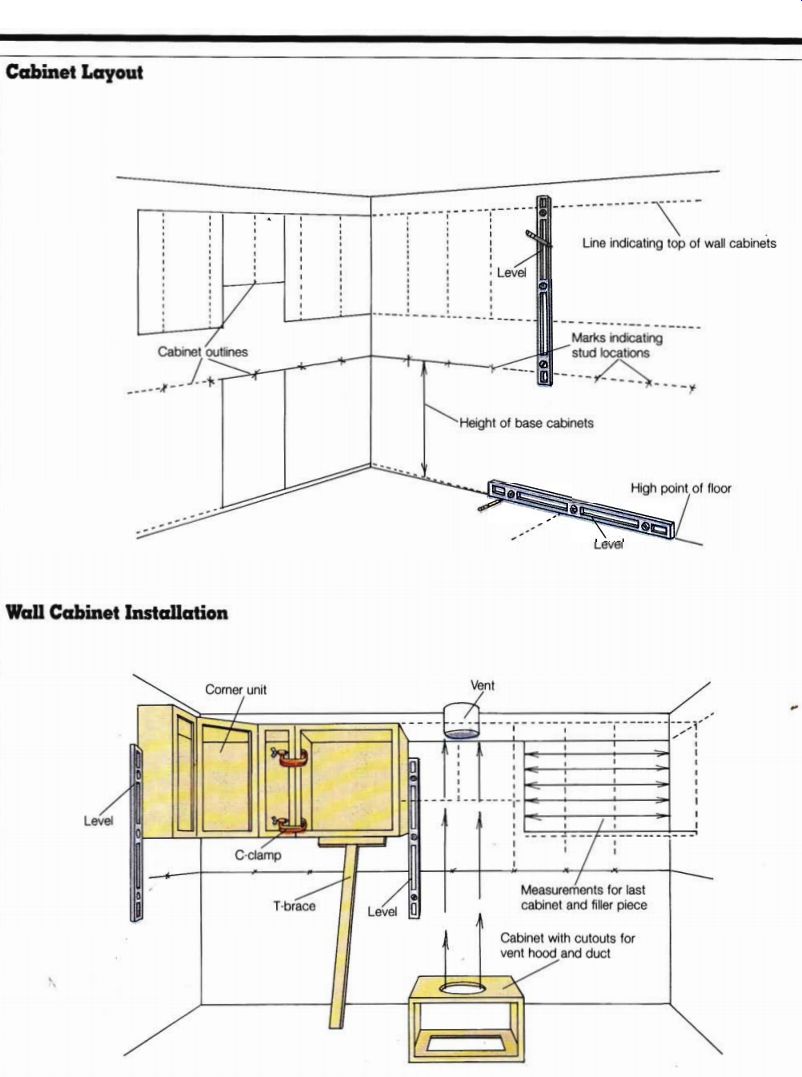
Start the layout for the cabinets by locating the highest point of the floor in the area where the base units will be installed. See illustration on page 88. Use a long level or a straightedge with a level on it.
If the highest point is not against the wall, use a level and a pencil to transfer the height of that point to the wall. Having marked the wall at the appropriate height, measure up from the mark and make a second mark at the height of the base cabinets (usually 34 1/2 inches). Add an allowance for the thickness of the finish floor if it is not yet down and make a third mark. Using the straight edge and a level, draw a line on the wall at this third mark. This line represents the tops of all the base cabinets. (The line will be covered by the counter or the backsplash. Make heavy marks on the wall only where they will be covered; elsewhere use a faint pencil line.) Now draw another level line for the tops of the wall cabinets. Most wall cabinets are 30 inches tall and are positioned 18 inches above the countertop. For most installations, then, this line will be exactly 84 inches (36 + 18 + 30) above the highest point of the floor.
If the wall cabinets extend up to a soffit or up to the ceiling, check them for level.
Find the lowest point of the ceiling or soffit in the area over the cabinets and draw a level line on the wall at that height for the cabinet tops. You can now see how much of a gap there will be between the ceiling or soffit and the cabinets.
After the cabinets are installed, cover this gap with a strip of molding.
If the installation includes a full-height cabinet, measure it now to make sure that it will it beneath the ceiling or soffit.
You may have to trim the top or the base, according to the manufacturer’s instructions.
Using the lines on the wall for horizontal guides and a level for plumb, lay out the cabinet dimensions on the wall.
Make sure that they line up properly with each other and with the various corners, windows, sinks, appliances, and so forth. Make any necessary adjustments.
Next, mark the location of each stud just above the line for the base cabinets, in the area where the upper cabinets will be hung. To find a stud, tap lightly on the wall and listen for a solid sound. Probe the area with a hammer and nail until you locate both edges of the stud. Mark the exact center of the stud on the wall. Using a level, draw a vertical line through this mark. Repeat for each stud behind the upper cabinets. If there is blocking between the studs, mark a horizontal line at the center of the blocking where the cabinets will be hung.
It is usually easier to install the wall cabinets before the base cabinets. However, if the back splash will be full-height laminate that extends up to the wall cabinets, the base cabinets and the countertop must be in stalled first. It is also better to install the base cabinets first if there is a full-height cabinet in the middle of a run.
Installing Wall Cabinets
Start a run of wall cabinets with a full-height unit or a corner unit if you have one.
Otherwise start at whichever end will not require a filler piece. The first cabinet is the most critical-it must be perfectly level, plumb, and square, or the entire run will be out of alignment.
Measure where the studs line up behind the first cabinet and transfer these measurements to the inside of the cabinet at the top and bottom hanger rails. See illustration on page 88. Countersink and drill holes through the back of the cabinet at these marks; make the holes just large enough for the 3-inch screws.
If the cabinets are frameless, they may require a metal sup port rail, provided by the manufacturer. Install this rail next.
It must be attached to the wall behind the cabinets, which will be hung from it. Cut the rail to length and screw it securely to each stud at the height recommended by the manufacturer.
There are several methods for holding the cabinets in place while you attach them to the wall. One is to build a T brace slightly longer than the distance between the floor and the bottom of the cabinet. An other method, used when the base cabinets are installed first, is to build a simple rectangular frame out of 2 by 4s; this frame should be just high enough to support the wall cabinets when it sits on a makeshift counter top. A third method can be used if the walls have not yet been finished. Simply screw a 1-by cleat to the wall to support the bottom of the cabinets. A specialty jack is useful here, if you know a professional who might lend you one.
To begin, lift the first cabinet into place and slide the brace up Under it. You will need a helper to stabilize the cabinet while you do this. At tach the cabinet to the studs with 3-inch screws, tightening only one of the top screws and leaving the others slightly loose. Place a shim behind the cabinet, next to a screw, at any point where the wall bows in ward. Use a level to check that the cabinet is plumb and horizontal in all directions.
Now transfer the stud dimensions to the inside of the second cabinet and countersink and drill the screw holes. Drill two more screw holes through the vertical stile on the side that will be attached to the first cabinet. Drill where the hinges will cover up the screw heads.
For frameless cabinets the side holes are already partially drilled, about 3 inches back and 2 to 3 inches up from the bottom or down from the top.
Simply complete the drilling.
Special fasteners go into these holes; they screw into each other, leaving a smooth head on each side that is covered with a plastic cap.
Lift the second cabinet into place and support it, but do not screw it into the back wall.
Instead, clamp the two cabinets together so that the joint be tween them is tight and flush.
Use wood shims to protect the cabinet finish from the clamps.
Choose a drill bit slightly smaller than the shank of a 1 1/2 inch screw and center it in the ...
--------- Cabinet Layout Wall Cabinet Installation
---------
--------- Base Cabinet Installation
---------
... first side hole of the second cabinet. Drill about two thirds of the way into the adjoining stile of the first cabinet.
Do the same for the second side hole. Now lubricate two 1 1/2-inch screws with bar soap and drive them firmly into the holes that you have just drilled.
If the cabinets are tall or if the face frames do not align perfectly, predrill more holes and add more screws. Then attach the cabinet to the back wall, in the same way as you did the first cabinet.
Repeat this process for all the wall cabinets in the same run. If a vent hood will be mounted to a wall cabinet, cut holes in the cabinet for the duct before you install the cabinet.
If the final cabinet will end next to a sidewall, there may be a gap that needs a filler piece.
These come in 3-inch and 6 inch widths and must be cut to it snugly. Before you install that cabinet, attach the filler piece to the stile in the same way as you would attach two cabinets together. Then take a series of measurements be tween the wall and the last cabinet installed. Transfer these measurements to the face of the final cabinet, marking them on the filler piece. Now connect the marks with a line. Cut along the line with a fine toothed keyhole saw, angling the back of the cut toward the cabinet. The cut will follow any deviations in the wall so that the filler piece will it perfectly.
Filler pieces for corners are in stalled in the same way, but they need not be scribed and cut. Some manufacturers pro vide cabinets with wide stiles, called ears, already attached.
These ears function as filler pieces and are trimmed in the same way.
When the full run of wall cabinets is in place, check for level, plumb, and square (mea sure diagonals). Use shims to make any necessary adjustments, loosening the back screws to slip the shims into place. After all the screws are tightened, make a final check.
Be especially careful with frameless cabinets. The slightest warp will make the doors hang crooked.
Installing Base Cabinets
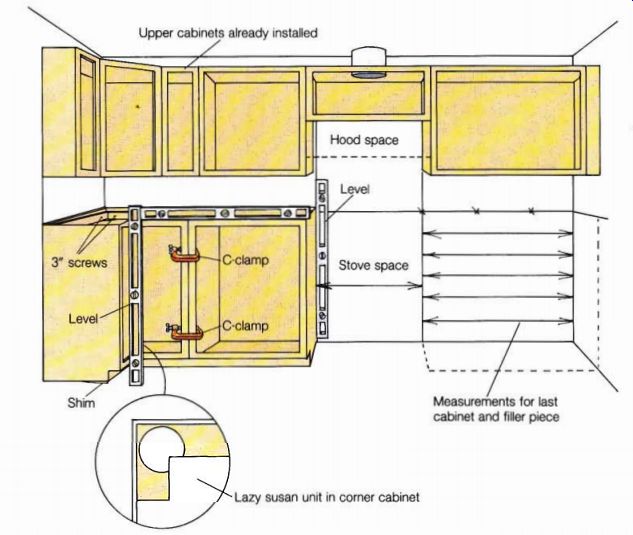
Frame and frameless base units are installed in the same way as wall cabinets, except that with the frameless style there is no margin for error. Start with a corner unit, unless a cabinet in the middle of a run must be perfectly aligned with some other feature, such as a window or the sink plumbing. Set the cabinet in place and shim un der the base until the top is even with the layout line.
Countersink and drill through the top rail at each stud and attach the rail to the stud with 3-inch screws.
If the wall is not straight, place shims behind the cabinet, using a level to check the top, sides, and front.
Hold the level against the frame and not against a door or drawer.
Set the second unit in place and attach it to the first unit, using the method described on page 87 for wall cabinets.
Screw it to the back wall. See illustration on page 89.
Complete the run of base cabinets. Some of them, such as lazy susan corner units and sink fronts, have no box to attach to the wall. They are held in place only at the face frames. (With frameless styles the sink fronts have sides that extend back just far enough to attach them to the adjacent cabinets.) Because these units have no backs, you will have to provide support for the countertop along the backside. Screw cleats of 1-by lumber to the wall just below the layout line.
You will also need to fabricate a floor for some sink fronts. Cut it out of a piece of 0.5-inch to 3/8-inch plywood and support it on cleats screwed to the wall and to the adjacent cabinets. Seal it or paint it be fore you install it.
If there will be an appliance in the middle of a run--a dish washer, trash compactor, or slide-in range-you must allow for it when you install the base cabinets. Check the appliance specifications to determine the exact width of the space. To keep the cabinets on both sides aligned, bridge the gap with a long straightedge at the front and back. Install filler pieces at the end of the run and at the corners, just as you did for the wall cabinets.
Finishing Touches
Finish panels, doors, trim, and handles are the most noticeable features of a cabinet installation. Take care to attach them correctly. Try to set aside one day just to do this part of the job; don’t try to do it at the end of a long day‘s work.
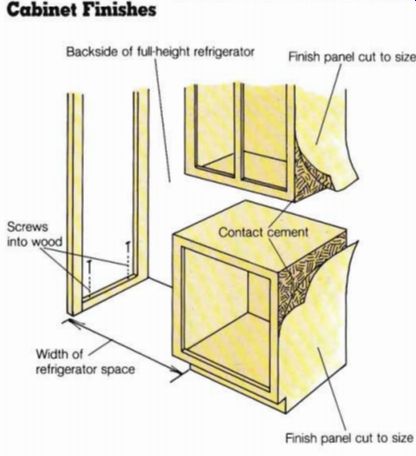
In some lines of manufactured cabinets, finish panels must be installed on all the exposed faces of every unit.
These panels come either pre-cut or as a full sheet of ply wood paneling from which you cut out each piece to it. If the panels have grain patterns, match each one carefully with the patterns on the adjacent cabinets.
Measure and cut each panel to size. Spread contact cement on the back of each panel and on the side of the cabinet where the panel will be positioned. Let it set for the amount of time given in the instructions. Press the panel in place, clamp it, and leave it overnight to dry. See illustration. If necessary, use 3d nails to help hold it in place. The nail heads can be countersunk and the holes filled with putty after the cement dries.
-----
When you put the doors back on the cabinets, some of them may not line up perfectly.
Most hinges have a mechanism for making slight adjustments to correct this problem.
Before you install trim pieces, be sure that the cabinets are aligned and securely fastened. Cut the trim to length with a miter box, and stain or paint the trim, including the cut ends, before you attach it.
Predrill the trim and fasten it with 3d, 4d, or 6d finishing nails. Sink the heads with a nail set and fill the holes.
For frameless units attach the trim pieces from inside the cabinet, using screws. Predrill holes through the cabinet large enough to take the screws; use a smaller bit to drill pilot holes in the trim itself. Most manufacturers provide plastic caps to cover the screw heads.
To finish the toe kick, cut baseboard or similar molding to length and paint or stain it a dark color. Attach it to the cabinet kicks with finishing nails.
+++++++++++++++++
SHELVES
You can use shelves in almost every room of the house: for cookware in the kitchen, for towels in the bathroom, for books in the den, for china in the dining room. Shelves are also necessary in kitchen and bathroom cabinets and in linen and miscellaneous storage closets.
Types of Shelves
There are two distinct types of shelves. One is custom-fitted between two sidewalls and a rear wall in a closet. The other is square cut and positioned between two finished side pieces in a cabinet or bookcase.
The first is permanently fastened in place; the second can be either permanently fastened or adjustable.
Fitted Shelves
Custom-fitted shelves are used in closets and freestanding bookcases.
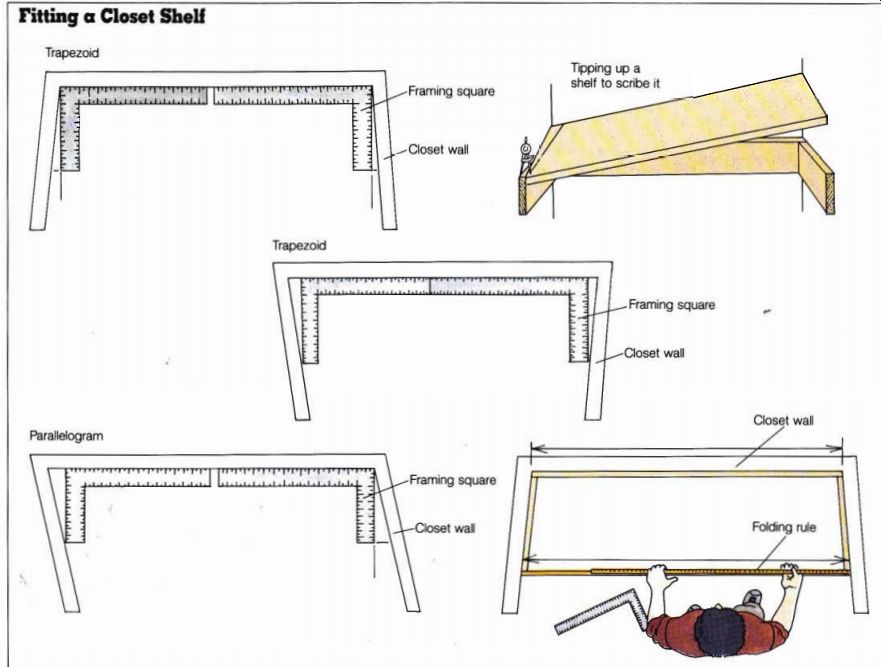
------ Fitting a Closet Shelf--- Trapezoid Tipping up a shelf to scribe it; Trapezoid; Framing square
In Closets
To make custom-fitted shelves for a closet, start by measuring between the sidewalls at the height for each shelf. For closets with several shelves, start at the bottom and work your way up. (The cleats should be in place.) Take measurements between the side walls at the front and the back of the closet; they will probably not be parallel to each other or square with the rear wall. Walls are seldom exactly true.
Now check the corners with a framing square. Position the long leg of the square against the rear wall and move it to ward a corner. If the corner of the framing square touches the sidewall before the short leg touches it, note the gap be tween the wall and the short leg of the square. Repeat this procedure at the opposite side wall. If there is a gap on both sides, the shelf board will be trapezoidal when it is cut to fit.
If the short leg of the framing square touches the sidewall before the corner of the square meets the corner of the wall, and if this happens on both sides, the shelf board will once again be trapezoidal. If the corners touch first at one side and the short leg touches first at the other, the shelf board will be shaped like a parallelogram (see illustration on page 91).
If the space is a trapezoid or a parallelogram, add 1 inch to the longest dimension of your measurement to allow for scribing and making final cuts on the board. Cut the board to this length. Position it in place, tipped up at one end, and mark the other end with a scriber set at the width of the gap. Saw along this line, starting with a square cut at the front of the board and back-cutting as you progress. Hold this cut against the wall to test it. Correct it with a rasp if necessary.
Transfer the longest measurement between the side walls to the board. Position it in place, tipped the opposite way.
Set the scriber to this mark and scribe the board. Saw the board as described above and place it in position. If the fit is a little tight, correct it with the rasp.
With the shelf in place, scribe it and fit to the rear wall.
In Bookcases
The shelves in a freestanding bookcase it into dadoes in the uprights, just like the shelves for cabinets. The only difference is that bookcases have no back frame. If you want a book case backing, a thin sheet of plywood or hardboard adds stability and gives a finished look.
Adjustable Shelves
These can be mounted in one of several different ways. See illustration.
Holes and Dowels
Mark and drill parallel rows of holes down each side of the cabinet or bookcase. Do this carefully so that the shelves will lie flat and level. Drill the holes 3/16 inch in diameter and 1/4 inch deep, and space them at 2-inch intervals to provide flexibility in arranging the shelves.
Cut lengths of 1/4-inch dowel into 1-inch pieces. Use these pieces as shelf supports.
Holes and Clips
Drill the holes as described above, but instead of dowel, plug them with metal clips available at most hardware stores and building-supply out lets. Drill test holes on a scrap of wood to determine which bit gives the best it.
Standards and Clips
Inexpensive metal shelf standards are readily available.
They can be screwed directly onto alcove walls (over studs) or dadoed into the sides of a bookcase or cabinet. Special clips snap into the slots.
Standards and Brackets
Shelf brackets lock into standards that are screwed onto the back wall of an alcove over the studs or onto the sides of a bookcase. Choose brackets long enough for the hook on the end to slip over the front edge of the shelf, or cut a slot in the underside of the shelf to accept the hook.
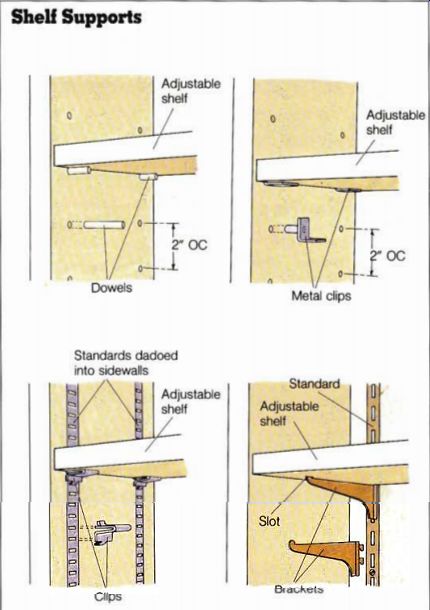
-------- Shell Supports--- Standards dadoed into sidewalls
Installing Shelving
Most lines of ready-made cabinets include matching open shelf units. You can also construct shelving of your own design from hardwood, ply wood, or particleboard with a laminate covering. You can make a single shelf from an extra filler piece.
Adjustable shelves are recommended for large units. The simplest and least obtrusive way to build them is to drill a series of holes in the side of the unit into which small brackets can be inserted. These brackets will support the shelves.
There are several ways to harmonize the shelving with the cabinets. You can use the same kind of wood as was used for the cabinets and stain it or paint it to match. Use touch-up stain provided by the cabinet manufacturer. You may want to experiment first with scraps of the same wood. You can also harmonize the shelving with the cabinets by using the same moldings and trim. Finally, you can make the shelf unit the same height as the top of the wall cabinets and set the shelves at the same heights as the countertop, vent hood, and other prominent features.
++++++++++++++++++++
INTERIOR STAIRS AND RAILINGS
The basic elements of stair building are the same indoors as out. Laying out and cutting the stringers is done in the same way; the differences are primarily in the finished appearance.
Compared to Exterior Installations
Exterior stairways are usually open and the materials used are weather resistant. Interior stair ways take on a more finished look. This is mostly because they are generally, though not always, enclosed. Materials used are usually of higher quality than those used for exterior stairways, and a higher degree of finish is required. In addition, enclosed stairways usually have risers. When carpeting is to be installed as finish flooring, 1 1/8-inch plywood is often used for the risers and treads.
Some applications of exterior enclosed stairways are similar to interior installations.
Where code requirements dictate weathertight construction for exterior stairways, risers are necessary. In this case, the finished stairway will closely resemble an interior installation, although, of course, it will be more weatherproof. The design of the railings will usually differ, however.
Interior Details
If you were wise you laid temporary treads on the stair stringers during the heavy construction. Now that the messy part is over, you can install the finish treads, risers, posts, handrail, balusters, and trim.
For detailed instructions on in stalling stairs, see the section starting on page 58.
Posts
Remove the temporary treads.
Cut a hole in the subfloor large enough to allow you to attach the newel post firmly to the floor joists. (It may be necessary to notch the post or add blocking.) Use glue and carriage bolts or lag screws. Secure the post at the top of the stairs in the same way. See illustration on page 94.
Treads and Risers
Install the finish treads and the risers, taking care to it them snugly around the posts. Commonly, risers are mitered where they join the finished stringer.
On housed stringers butt the treads and risers tightly against the wall. On open stringers overlap the treads but not the risers. Drive in glue-coated wedges of scrap wood underneath to hold the treads and risers in position.
Softwood tread stock commonly comes with a bullnose.
If hardwood tread stock is used, a nose strip must be applied to the edge of the tread using glue and finish nails.
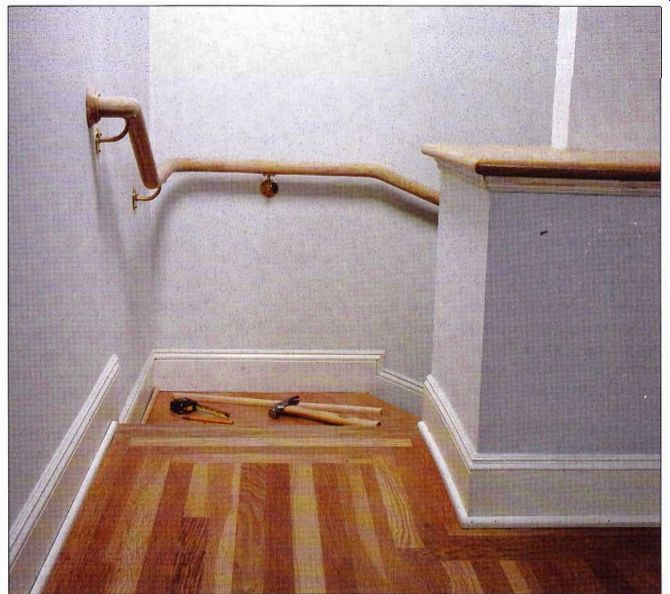
---- On an enclosed staircase, which has no balustrade on either
side, the handrail is attached directly to the wall with brackets made especially
for this purpose.
Handrail
There are several different ways to attach a handrail. You can use doweled butt joints,
mortise-and-tenon joints, countersunk and plugged screws or bolts, or metal straps. The last method entails cutting a mortise on the underside of the handrail.
Position the handrail, but before you secure it, mark the position of each baluster. (Usually you will need two balusters per tread to meet code requirements.) Mark the position of the balusters on the treads. Then drop a plumb line from the handrail. Carefully mark the position and angle of the plumb line on the rail.
If all or part of the staircase is enclosed and there is no balustrade on either side, you will have to attach a handrail to the wall. Building-supply outlets have brackets made especially for this purpose. Screw them to studs and attach the rail.
Balusters
These can be attached to the handrail either with a mortise and-tenon joint or with dowels.
To make sure that the balusters will be equidistant and plumb, drill the holes for the dowels or chisel the mortises at the marked points and at the correct angle.
Traditionally balusters were dovetailed into the treads, and molding was used to cover the dovetailing. An easier method is to drill pilot holes at an angle and screw or toenail the balusters to the treads. When you have done this, position and attach the handrail.
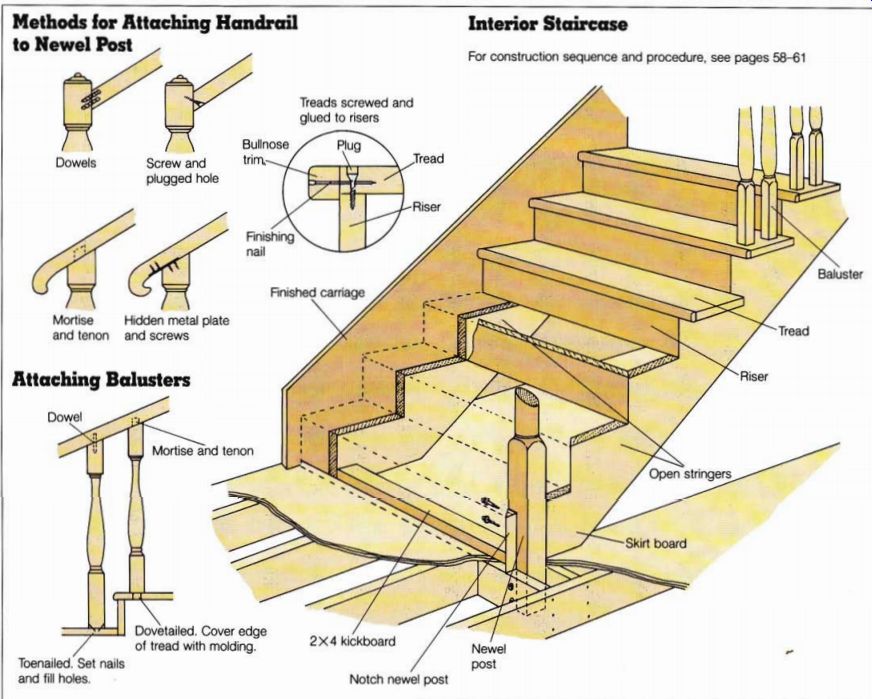
------
Trim
Used creatively molding and quarter round can act as decorative accents while they conceal the joints. Use pieces of trim to cap a housed stringer and to finish off risers on an open one.
+++++++++++++
INTERIOR WINDOW TRIM
Your choice of interior casing will probably be dictated by design considerations. It may also be dictated by the need to match other trim in the house.
Compared to Exterior Installations
Interior installations are both similar to and different from exterior installations. Both cover the gap between the window jambs and the wall covering and both are cut and fitted in essentially the same way. Differences occur primarily with picture frame casing, which requires the use of mitered cuts.
Correcting Flaws
Your first task, as with any finish work, is to check for flaws and to correct them. Look for jambs that protrude beyond the plane of the wallcovering.
These make it nearly impossible to get good joints. Look too for jambs that don’t quite meet the surface of the finish wall.
In the former case, planing the jamb will usually solve the problem. See illustration. In the latter case, it may be necessary to install jamb extensions to bring the surfaces even, or to plane the wallboard. Finally, look for jambs that are bowed or curved. This flaw is usually corrected by straightening the jamb as the trim is nailed.
If the window frames are out of square, it‘s too late to correct them. You will have to make the necessary adjustments when you install the trim, by making cuts that match the angle of the frame.
These cuts, then, will not necessarily be true 90-degree, or 45-degree, angles.
Window Trim Styles
Windows may be cased out in either of two styles. A picture frame installation consists of four identical casings, each mitered at a 45-degree angle. A stool-and-apron casing with a butted head exists in several variations. Sometimes, in fact, the head is not butted at all but mitered. See illustration on page 96. Before cutting any casing check the window frame for square by taking diagonals.
A small discrepancy can usually be made up by adjusting the casing. If the window is substantially out of square, use a sliding bevel to determine the angle at each corner; transfer the angle to the mating casing piece and make the cut. Each corner will have a different angle, so you must check all of them.
Finally, remember to use finishing nails appropriate to the thickness of the casing. For example, for the most common casing-pine beveled-which is between 1 3/8 inches and 2.5 inches wide and is 3/8 inch thick at the jamb side and H inch thick at the trimmer side, use 3d finishing nails at the jamb side and 6d finishing nails at the trimmer side. For the more traditional straight casing (usually Douglas fir), which is 3 1/4 inches wide and 3/8 inch thick, use 6d finishing nails at the jamb side and 8d finishing nails at the trimmer side.
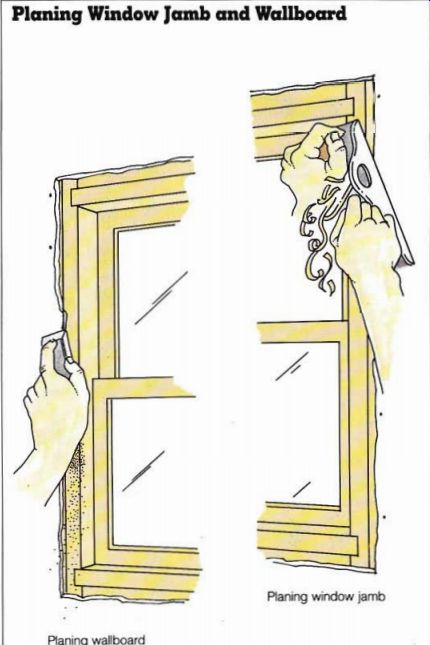
------ Planing Window Jamb and Wallboard
Planing window jamb Planing wallboard
Picture Frame Casing
This style of casing requires 45-degree mitered cuts. Al though a handsaw and a miter box will get-the job done, you can make these cuts faster and more smoothly with a power miter saw. Either way, the pro cess is the same. It’s the attention to detail that counts.
You may wish to practice on scrap material before you get started. When you‘re ready, layout the jambs for a constant reveal (normally 3/16 inch) all around the window (see illustration). Use a reveal gauge or a combination square and a sharp pencil or a knife blade.
Starting with the head casing, cut a 45-degree miter on one end of a piece of trim and place the piece in its final position against the window frame. The short dimension of the miter should be at the reveal mark on the side jamb. Hold the piece firmly in place and mark the opposite end at the side jamb reveal mark. Cut a 45-degree miter at this end. Nail the casing to the jamb, starting at the center and working toward each end. Use appropriate sized finishing nails spaced at 8 to 12 inches. Now nail the casing to the trimmer (through the wallcovering) at the same intervals. Be careful when you nail near the ends of a piece of casing; the wood may split. To avoid this, predrill a pilot hole or blunt the point of the nail before you dive it.
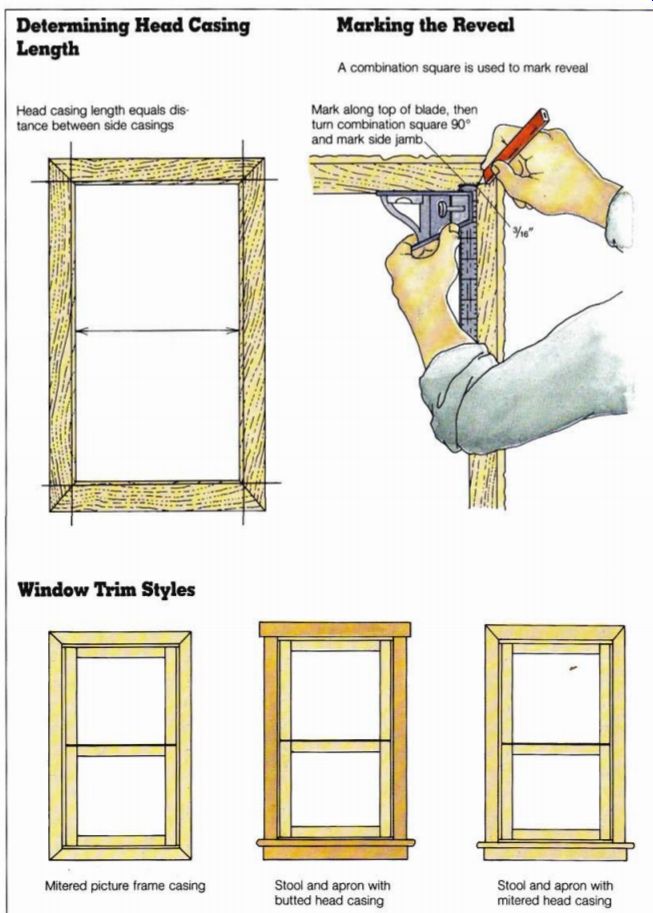
--------
Determining Head Casing Length
Head casing length equals distance between side casings
Window Trim Styles
Mitered picture frame casing
Marking the Reveal
A combination square is used to mark reveal
Mark along top of blade, then turn combination square 90° and mark side jamb.
Stool and apron with butted head casing Stool and apron with mitered head casing
----------------
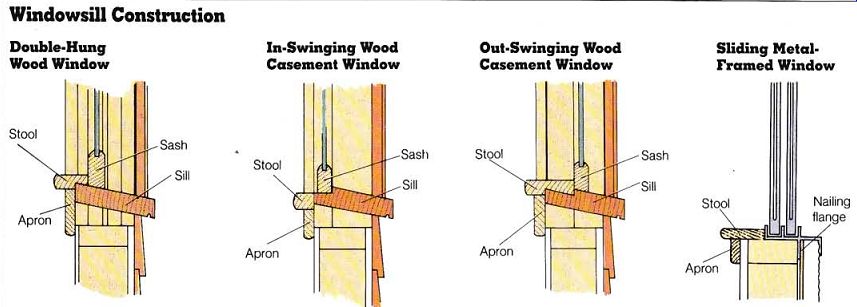
-------------
--------------- Next, cut 45-degree miters at each end of each side casing.
Place the first piece in position against the miter of the head casing and check the it. If it is satisfactory, carefully nail the side casing close to the miter, fastening it firmly in position.
Nail down the wall, attaching the casing to the trimmer. If the window jamb is straight, nail the casing to the jamb. If the jamb is curved, pull or push the casing into position as you nail.
Repeat the procedure for the other side casing.
To install the bottom casing, cut a 45-degree miter at one end of a piece of material, place the cut against a side piece miter, and check the fit. Make adjustments if necessary. Reposition the piece and mark the opposite end at the place where it intersects with the other side casing. Now double-check the cut you are about to make. If the preceding miters are perfect (or very nearly so), a 45-degree cut on the bottom casing should it exactly. However, even slight variations for which you have adjusted may cause a discrepancy in the final miter, so test the angle. Hold the bottom casing in position for marking (tack it temporarily if you like). Mark the out side intersection point of the two casings. Then mark the in side intersection point. Make your cut between these two marks. If it is not a 45-degree angle, you can recut it by placing a wedge between the fence of the saw table or miter box and the casing to produce a slightly different angle. When using a power miter saw, it is possible to make cuts that are extremely close to the final cut, check the angle, and move the piece in the saw to make any adjustment, if necessary.
Place the adjusted casing in position, check for it at the miter, and readjust as necessary. Nail the casing to the jamb in the center and in both directions. Finally, nail the casing to the trimmer.
Note: Since the bottom ends of the side casings are tacked in position, slight adjustments can usually be made at these miters by shifting the pieces as necessary to achieve a good it.
When all the casings are in stalled, set all the nails and ill the nail holes.
Stool-and-Apron Casing With Butted Head
Trimming a window with a stool and apron is more complicated than trimming a picture frame window, even though there are few, if any, miter joints. If the head and side casings have the same dimensions, they can be mitered at the top.
If they have different dimensions, they must be butted.
Stool
To trim a window with this style of casing, start with the stool. Stool stock is available in a variety of profiles; choose one that matches the windowsill.
See illustration. The most common stools assume a sloped windowsill. For flat window sills the stool can be 1-by material (the front edge can be rounded) that is cut to f it and simply butted against the sill or the window frame.
Begin by cutting the stool to the finished length. This length is equal to the inside distance between the jambs plus the lengths of the two horns. Each horn is equal to the width of the side casing, plus the reveal, plus the amount the stool ex tends beyond the side casing. See illustration on page 98.
Next, mark the centerlines of the sill and stool and hold the stool against the window opening, as shown in the illustration on page 98. If the window sash (or finished sill) is not parallel to the edge of the stool, scribe a cutting line along the stool with a compass. Cut along this line. Then, holding the stool with the centerlines aligned, position a combination square on the stool and push its blade tight to the finished jamb. Draw a light pencil line across the stool.
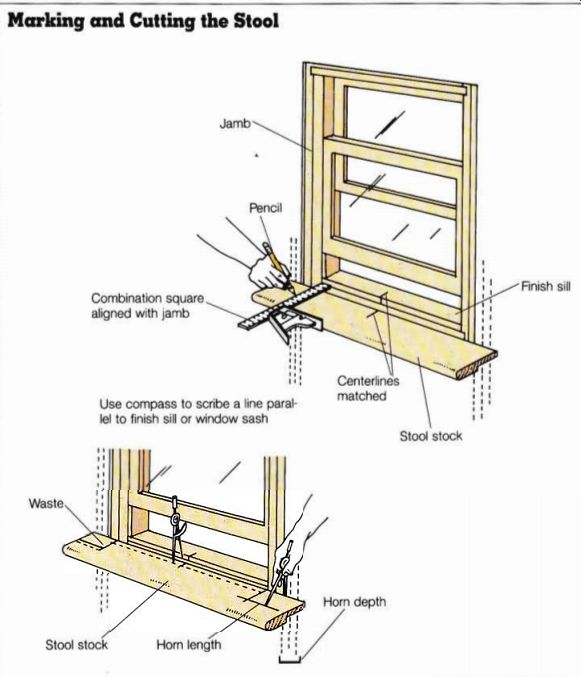
------- Marking and Cutting the Stool
Determine the depth of each horn by setting a compass to the distance between the windowsill or window sash and the edge of the stool. Use this setting to scribe the stool parallel to the wall at the horns. This is the cut line; it ends at the point where it intersects with the cut line of the jamb (the line scribed against the combination square).
Make these cuts with a jig saw or a handsaw. If the jambs are not square, leave a little extra material at the horns as you cut; then plane or rasp it to fit. Place the stool in position and check to see that it is level and square. If necessary, insert shims under the stool to bring it up to the proper level relative to the windowsill or sash. (The stool should be about 3/8 inch higher than the windowsill or the sash.) Use the appropriate sized finishing nails to fasten the stool, driving them through the shims at 8 to 10 inches on center. On long horns nail horizontally through the horn into the trimmer.
Side Casings
Make the first casing by cutting a piece of stock square at one end and a little longer than the final length. Position the squared end on the stool, aligning the edge of the piece with the reveal marks. If it doesn’t it, plane or rasp as necessary.
When the it is satisfactory, mark a cut line on the piece at the head casing reveal mark.
Make a square cut at this line, position the piece, and tack it to the jamb and trimmer. Repeat for the other side casing.
If the side casings are to be mitered at the top, proceed as described above but at the re veal mark cut a 45-degree miter instead of a square cut. Then tack the casing in place.
Head Casing
Mark this casing by measuring the distance between the outside edges of the side casings and adding twice the amount of the head casing overhang.
This dimension should equal the length of the stool. Position the head casing on top of the side casings and equalize the overhangs. If the butt joints are not tight, remove the side casings and adjust as necessary for it and reveal. Fasten the casings to the trimmer and to the jamb with appropriate-sized finishing nails, spaced at about 12 inches on center.
A mitered head casing is in stalled like a picture frame casing ( see page 95).
Apron
The material that you used for the side casings, or something similar, can be used for the apron, but the apron should not be wider than the casings, for aesthetic reasons. Measure the side casings, outside to out side, and cut the apron to that length. If the exposed end grain is unsuitable, it can be shaped with a router or a coping saw, or you can mount a return on the end of the apron to give it a finished appearance. Position the apron and drive the appropriate-sized finishing nails into the rough sill at about 12 inches on center.
Then prop a temporary support under the apron and attach it by driving 6d finishing nails down through the stool into the top of the apron.
+++++++++++++++++++
INTERIOR DOOR TRIM
Door trim, or casing, is very similar to window trim: It can be mitered, butted, or butted with ornamental features added. The primary difference is that on a door there is no stool, apron, bottom casing, or sill. There may or may not be a threshold, depending on the floor covering. The joinery is the same, but the installation sequence may be different.
Mitered Casing
The two top joints of a mitered door casing are cut like those of a picture frame window casing.
Only the bottom joints differ.
See illustration.
Head Casing
Start by marking the reveals (which normally measure 3/16 inch) on the head and side jambs. Cut the head casing to length with miters on both ends and tack it in place precisely on these marks. Use appropriate-sized finishing nails to fasten the casing to the jamb and to the trimmer.
Side Casings
Measure the side casing dimension from the subfloor to the intersection of the head casing reveal mark and the side casing reveal mark. Miter one end of the casing and square-cut the other end. Hold the piece in position to the reveal marks and check the miter for fit.
Adjust as necessary. If the finish floor is to be of wood, use a piece of this wood to scribe the bottom of the casing and cut at the mark. This will allow the casing to clear the finish floor.
For carpeting allow 0.5 inch of clearance from the subfloor. Re peat on the other side casing.
Butted Casing
A butt joint replaces a 45 degree miter in this type of door casing.
Head Casing
Center the head casing on top of the side casings, cut it to length, and nail it in place. If it doesn’t it lat, remove the side casings and trim the top of each one until you get a good it.
Reposition them, nail them securely, reposition the head casing, and nail.
Side Casings
Mark the reveal on all jambs. Begin by cutting a side casing slightly long and holding it in place, aligned with the reveal marks. If the casing does not it lat on the floor, scribe and re-fit. If the finish floor will be of wood, slip a piece of this wood under the bottom of the casing and scribe to it. For carpeting allow about 0.5 inch of clearance from the bottom of the casing to the subfloor. Hold one side casing and mark the point where the head casing reveal line intersects with the edge of the side casing. Cut and tack the side casing in position.
Repeat for the other side casing.
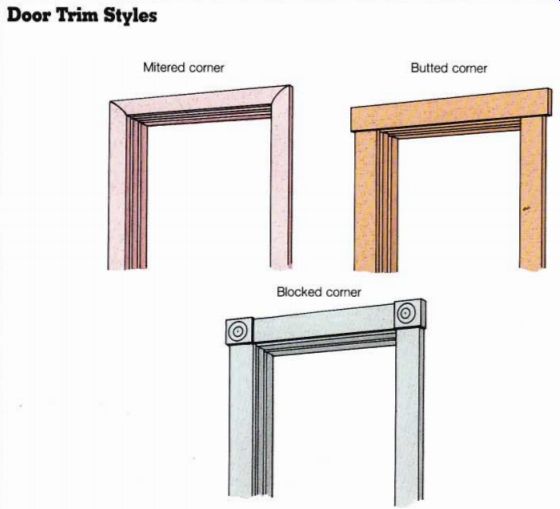
---- Door Trim Styles Mitered corner Butted corner Blocked corner
Ornamental Butted Casing When corner and plinth blocks are used, the plinth blocks are installed first. The side casings are installed next, then the corner blocks and the head casing.
++++++++++++++++++++
OTHER INTERIOR TRIM
Although improvements in materials and advances in construction methods have made it possible to create uniform, close-fitting surfaces, many people regard moldings as a necessary part of the decoration and apply them even when there are no gaps to cover.
Types of Trim
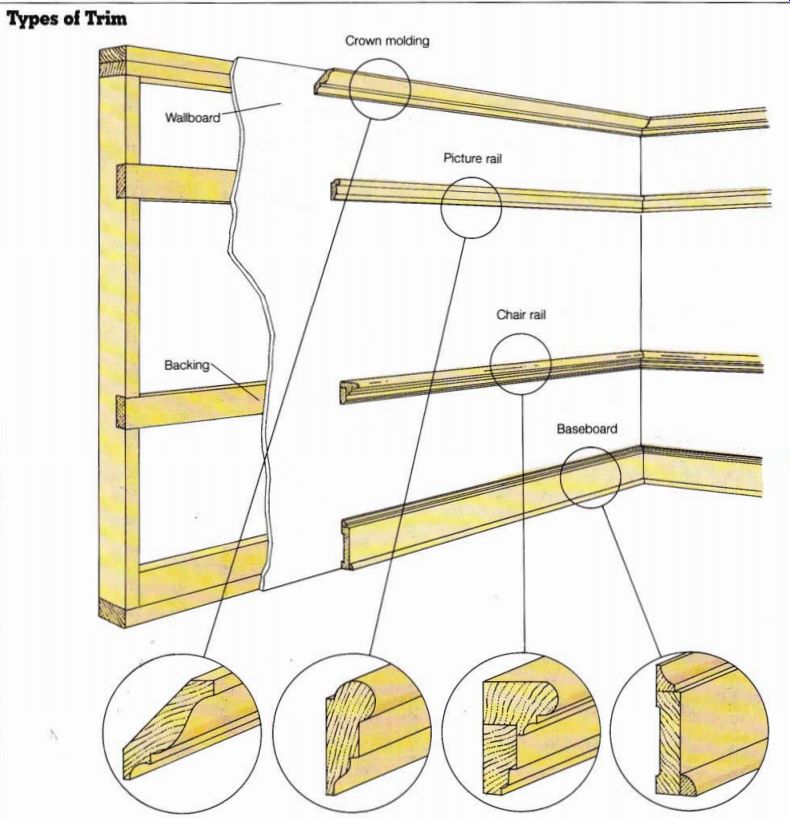
-----------
The most common types of trim are baseboard, which covers the joint where the walls meet the floor; ceiling trim, to cover the joint between the walls and the ceiling; picture rail, applied about a foot down from the top of a wall; and chair rail, attached to the wall about three feet from the floor to separate different wall treatments. See illustration. See pages 108 and 109 for suggestions on how to use standard trim for decorative effects.
Working With Trim
Softwoods are commonly used for trim; hardwood trim is available, but it is more expensive. Because the milled shapes of trim strips are susceptible to damage, exercise great care when working with them.
Trim should not be exposed to dampness--especially when it is unprimed. Milling puts a very smooth surface on the wood, and moisture will raise the grain; it will also cause the strips to bend, warp, and twist.
If you are recreating a traditional architectural style, or if you want to create a specific look, you can make your own trim. Refer to the discussion of shaping on page 33.
Installing Trim
Once you have completed the casing around the doors and windows, start installing the other trim. Work your way down from the top, starting with the ceiling trim and ending with the baseboard.
There is nothing to stop you from using more than one strip if you are after a more elaborate look and have become proficient at mitered cuts. In stall the same type of trim in all the rooms before you move on to the next type.
It is easier to get all the painting done before you at tach the trim. Once the trim is in position, all you have to do is ill the nail holes and touch up the paint.
Your goal should be to span from corner to corner with a single piece of trim, so cut efficiently. Scrap pieces can be used around columns, or in nooks and bays that can be spanned by shorter lengths.
When turning an outside corner, you should cut miters.
For inside corners, use miters or coped joints, depending on the type of wood.
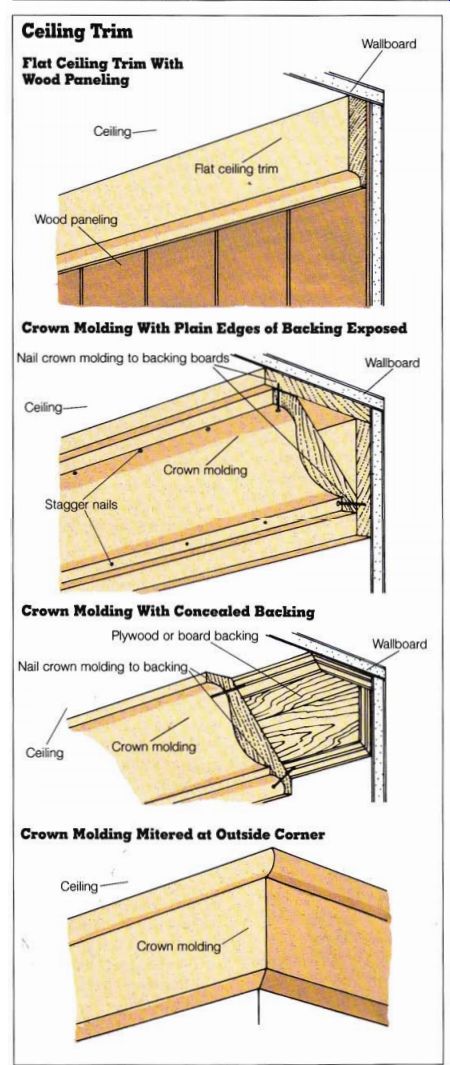
--------- Wallboard Ceiling Trim
Flat Ceiling Trim With Wood Paneling Ceiling Crown Molding With Plain Edges of Backing Exposed Nail crown molding to backing Ceiling Crown Molding With Concealed Backing Plywood or board backing Nail crown molding to backing Ceiling Crown molding Crown Molding Mitered at Outside Corner
-----------
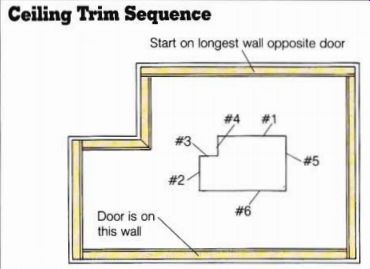
------
Ceiling trim Sequence Start on longest wall opposite door
--------------
Ceiling Trim
As the name implies, this trim is used to cover the joint be tween the ceiling and the walls.
In contemporary construction ceiling trim is mainly ornamental, although it can be used to hide flaws or disguise imperfections. The simplest ceiling trim is flat, or plain. The most elegant ceiling trim is crown molding, installed alone or with other trim pieces. See illustration on page 101, left.
If you are using flat ceiling trim with board paneling, it is easier to install the trim first, then butt the paneling against it. Any resulting gaps can be covered with baseboard. If you are using trim (crown molding, for example) with an irregular, rather than a lat, back, remember to place the stock in the miter box or against the fence in the same position as that in which it will rest against the wall. Remember too when you make the cut that the mark represents the inside length.
Installing Flat Trim
Start by preparing a plan view sketch of the room to be trimmed. Then decide in what sequence each piece of trim will be installed. Arrange the cuts so that the joints are out of the direct line of sight as you enter the room. If the walls are longer than the stock pieces, use 45-degree mitered cuts to join them. The following installation sequence describes the room shown in the illustration on page 101, right.
Install the trim at the longest wall first, using square cuts at each end (No. 1 on the dia gram). Make the piece 1/3 inch longer than the measurement between the end walls. Hold the piece away from the wall in the center with each end in place and let it snap into position. Now, holding the piece firmly against the wall and ceiling, nail it through the wall covering into the plates along the top edge and to the studs along the bottom edge. Nail along the entire length of the piece at 16 inches on center.
The nails should be long enough to penetrate into the backing by at least one half their length.
The trim piece at No. 2 on the diagram is next. Cut, it, and nail it exactly the same as you did the first piece.
Moving clockwise to No. 3 on the diagram, make a coped cut on the appropriate end of a piece of trim stock, test it against the installed piece, and adjust as necessary. The opposite end of this piece is an out side miter; hold the piece in place and mark where it inter sects the corner. Check the angle of the corner before cut ting the miter. If the angle is either greater or less than 90 degrees, bisect it and cut the miter accordingly. Set this piece aside.
Take a piece of stock for installation at No. 4 on the dia gram and cope and it the appropriate end to piece No. 1.
Position the piece and mark for the outside mitered cut. Make the cut 1/16.inch longer than the mark. With piece No. 3 repositioned and nailed securely in place, hold piece No. 4 in position and check the it.
It should be too tight to it properly, so cut it (with a power miter saw) or plane it (with a block or Surform plane) just a little and check it again. If the miter its well, nail the piece in place. If the miter does not quite it, shave off a little more until it does.
Now move to the opposite wall (No. 5 on the diagram).
Make a coped cut on one end of this piece of trim (to fit against No. 1 on the diagram) and a square cut on the opposite end.
The cut piece should be about 1/16 inch longer than the measurement. You should be able to hold the piece in approximate position, so that it curves slightly out from the wall, and snap it into place to check the it of the coped end. Fasten a temporary shim on the wall behind the trim piece to grasp if you have to pull out the trim for adjustments. Adjust the trim as necessary, remove the shim, reposition the trim, and nail it in place.
Prepare piece No. 6 by measuring the distance between wall No. 2 and wall No. 5. Cope both ends of the piece; again, it should be 1/16 inch longer than the measurement. Position the piece (it should curve out slightly from the wall) and check for it on both ends. Ad just as necessary, reposition, and nail.
If the last wall (No. 6) is longer than the longest piece of stock, you will have to con struct a joint. The best place to put it is over the door, where it will be least visible. A joint requires a bevel-cut at a 45 degree angle. Cope one end of each piece, it them to their respective mating pieces, cut a bevel with an open face on the longest piece, and nail the piece in place. Measure the distance from wall No. 5 to the bottom edge of the bevel on the long piece, add 1/32 inch for adjustment, and cut a bevel. Check for it. Cut or plane as necessary to get a tight it at the bevel and nail in place.
Glue all the joints and wipe the excess glue off the surface of the trim with a damp cloth.
Then set all the nails and ill the nail holes.
Installing Crown Molding
Crown molding is a wide, thin trim that projects out from the junction of the ceiling and walls; it comes in various widths and angles. Because this trim is expensive, take special care in measuring and cutting it to avoid making mistakes.
Crown molding does not lie flat against either the ceiling or the wall; rather, it spans the angle between them. Therefore you must provide backing wherever fastening is necessary. You can install backing before or after the wallcovering is applied.
To prepare for installation, and to ensure that the molding is applied correctly, make a template with a scrap of the molding. Hold it in position and with a pencil lightly mark where its edges meet the ceiling and wall.
Don't worry about placing joint cuts out of the direct line of sight; the profile of crown molding makes it too difficult to fit complex cuts at both ends.
For crown molding, then, out side corners should be cut and installed first; each piece has a square cut at the opposite end from the miter. You may have to install a long piece with a coped end cut that is more visible than you would like, but the tradeoff in difficulty, and perhaps in wasted material, will be worth it.
Nail crown molding through the flats (near the edges) into the back (see illustration on page 101, left). It is also a good idea to nail outside miters after they have been installed; pre drill the holes.
Picture Rail
This old-fashioned but clever trim element deserves to be revived. Traditionally pictures were suspended from the rail by hooks and rods or wire; these were unsightly, which may be why picture rail lost its appeal. Today you can use practically invisible monofilament fishing line and spray paint the hooks to match the trim color.
Picture rail is generally positioned 6 to 12 inches down from the ceiling. Since it is intended to carry considerable weight, you must nail or screw it securely into the studs.
To install the picture rail, snap chalk lines on the walls at the desired distance down from the ceiling. The bottom edge of the rail will be on this line and will cover it after installation. As with the other types of horizontal trim, pre pare a plan view sketch of the room and determine the sequence for installing each piece.
Miter outside corners and cope or miter inside corners.
Nail into the studs, using the same plan view sketch and installation sequence as de scribed on pages 101 and 102 for ceiling trim. Since the out side miters may project some distance out from the wall, nail them in place. Glue all joints and wipe them clean with a damp cloth.
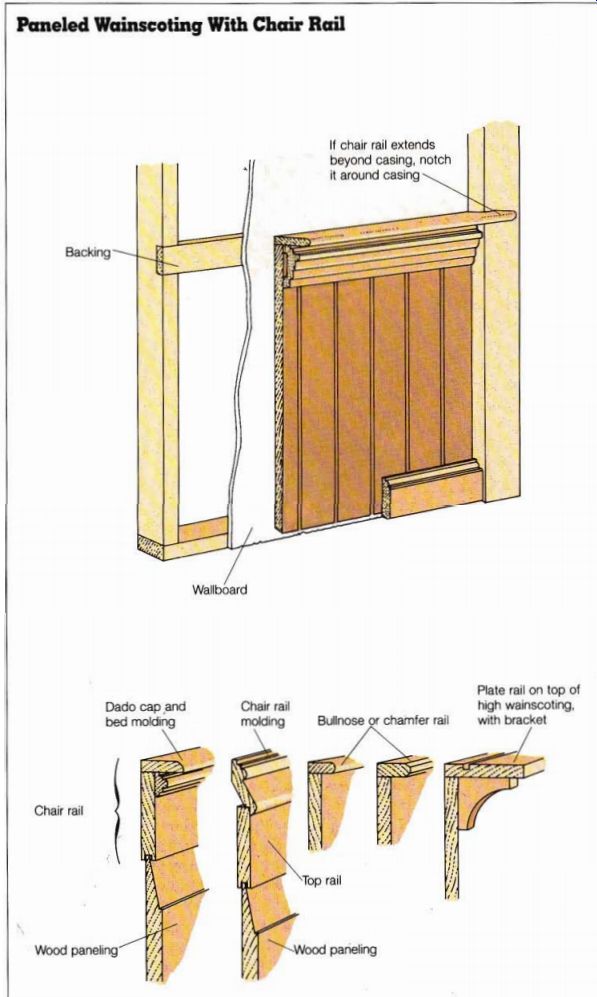
---------- Paneled Wainscoting With Chair Rail Backing If chair
rail extends beyond casing, notch it around casing Wallboard Dado cap and
bed molding Chair rail Wood paneling Chair rail molding Bullnose or chamfer
rail Plate rail on top of high wainscoting, with bracket Wood paneling
----------- Chair Rail
Also known as cap molding, this trim was originally in stalled in dining rooms or other rooms where chairs were moved about, to protect the walls from being scraped. Position the molding according to the height of the chairs that you intend to use in the room.
Chair rail is usually installed about one third of the way between the floor and ceiling, although if you use it as a cap for wainscoting or wallpaper, you may adjust the height accordingly. Follow the same procedure as for other horizontal trim. Plan the installation sequence. Miter and cope the corners. Nail to the studs, following the rules for baseboard.
Glue all joints and wipe them clean with a damp cloth.
Chair rail is also used as a border for wainscoting (see illustration on page 103). The molding is grooved on the back side to accommodate the thick ness of the paneling. Nowadays many people use chair rail as a purely decorative detail, to di vide a wall that is painted at the top and wallpapered at the bottom, or vice versa.
Baseboard
This trim is usually installed last, so that it can be joined to the casings and the wainscoting. It is preferable to install it after a wood finish floor is laid.
If this is not possible, the base board will have to be elevated with scraps of the flooring to give the necessary clearance.
Baseboard is invariably in stalled before carpeting is laid.
It’s a good idea to pre-finish baseboard before you install it.
Use stain or a clear finish on hardwood and at least a prime coat of paint on softwood. Filling and touching up or final painting can be done later.
The joinery depends on the type of baseboard you use. Flat baseboard with no decorative profile can simply be butted at the corners. Molded base will have to be coped or mitered at inside corners and mitered at outside corners. A coped inside corner is superior to a miter, because it is less likely to open up after it is nailed.
Baseboard trim can be made up of from one to three separate pieces. See illustration, opposite page. Ideally, the base board should not be thicker than any door casing to which it butts up. If it is thicker, butt it up to the point where it meets the casing and then cut remaining thickness back at a 45-degree angle. If you are installing a base shoe along the bottom edge of the baseboard, nail the baseboard to the wall 0.25 inch from the top edge. Nail it again 0.5 inch above the finish floor, position the base shoe over the joint (allowing a 1/8 inch expansion gap between the base shoe and the floor), and attach the base shoe only to the baseboard. This allows the floor to expand and con tract without pushing and pulling the trim.
As with any horizontal, or running, trim, prepare a plan view sketch of the room and determine the installation sequence. Arrange the cuts so that the joints are out of the direct line of sight as you enter the room, as with lat ceiling trim. Following the sequence shown above, install the first piece of trim on the longest wall opposite the door (No. 1 on the diagram), using square cuts at each end. Move progressively around the room as you did with ceiling trim. The No. 2 piece on the diagram has one coped cut and one square cut, and the No. 3 piece has one coped cut and a square cut at the door casing. (If the casing is not plumb, cut the trim piece a little long and scribe it to fit.) The No. 4 piece has one coped cut and one square cut, and the No. 5 piece is cut like No. 3.
When working with outside corners, it is helpful to use scraps of baseboard to mark the intersection lines on the floor, to determine the angle of cut on the miter. After coping or mitering one end of the base board and fitting it snugly to the inside corner, mark the baseboard on top at the outside corner of the wall and on the bottom at the intersection lines on the floor. With a combination square draw a vertical line up the face of the baseboard to the top edge. Connect this line across the top at an angle to the mark at the back edge of the piece. Cut to this line and set the piece aside. Prepare the mating piece using the same method, but make the cut about 1/16 inch longer than the intersection mark on the bottom of the piece. Install and nail the first piece; then it this second piece, making adjustment cuts as necessary. Install it and nail it in place.
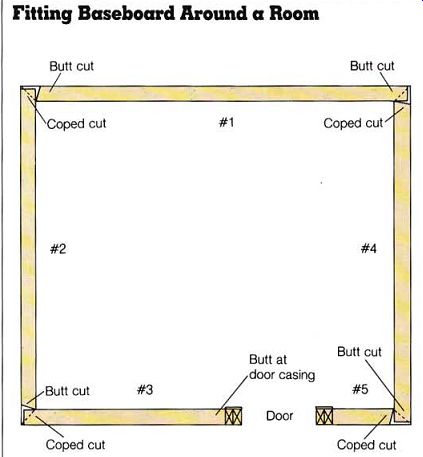
------- Fitting Baseboard Around a Room
When using baseboard made up of more than one piece of trim, make coped and square cuts in appropriate locations on the cap or on the shoe, or both, for appearance’s sake.
(Flat baseboard is mitered only at outside corners; inside corners are square cut.) Nail the cap or the shoe or both to the baseboard, in order to minimize gaps caused by shrinkage or expansion.
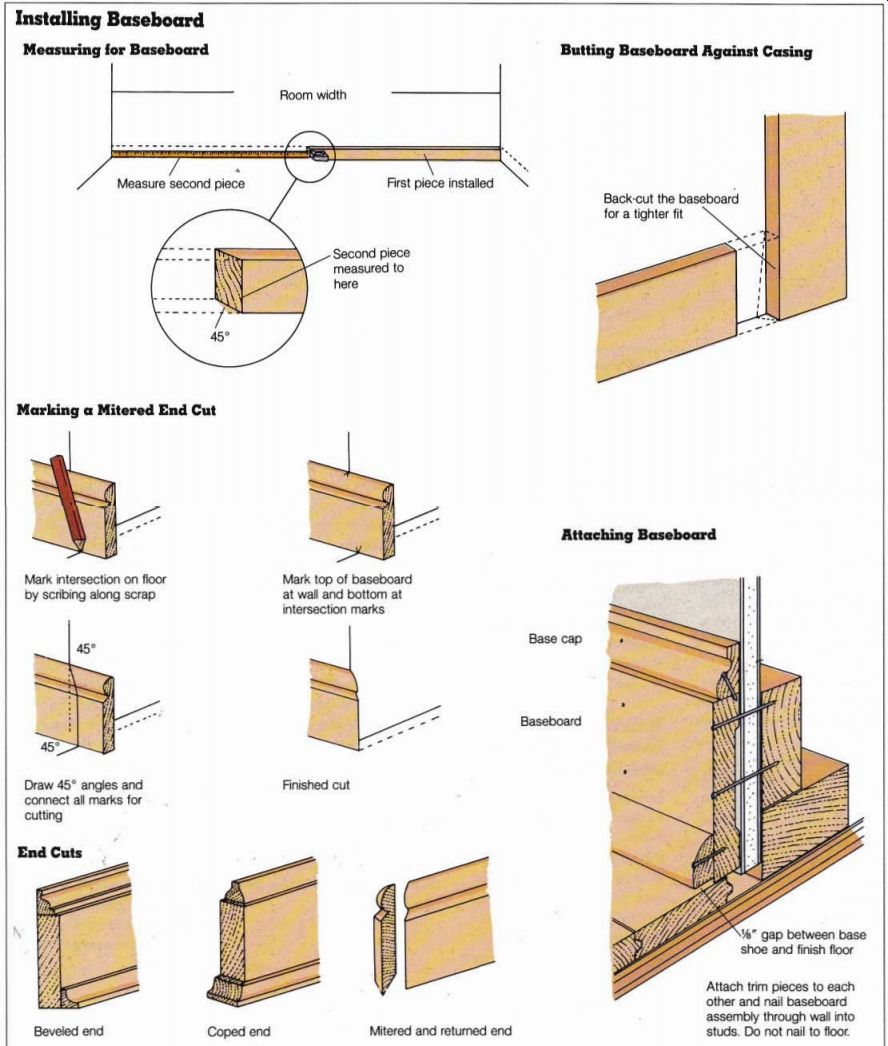
--------- Installing Baseboard
Measuring for Baseboard Room width
First piece installed Second piece measured to here Butting Baseboard Against Casing Back-cut the baseboard for a tighter fit Marking a Mitered End Cut Mark intersection on floor by scribing along scrap Draw 45° angles and connect all marks for cutting
* End Cuts Mark top of baseboard at wall and bottom at intersection marks Finished cut Attaching Baseboard Base cap Baseboard Beveled end
Coped end Mitered and returned end
1/8" gap between base shoe and finish floor Attach trim pieces to each other and nail baseboard assembly through wall into studs. Do not nail to floor.
----------------
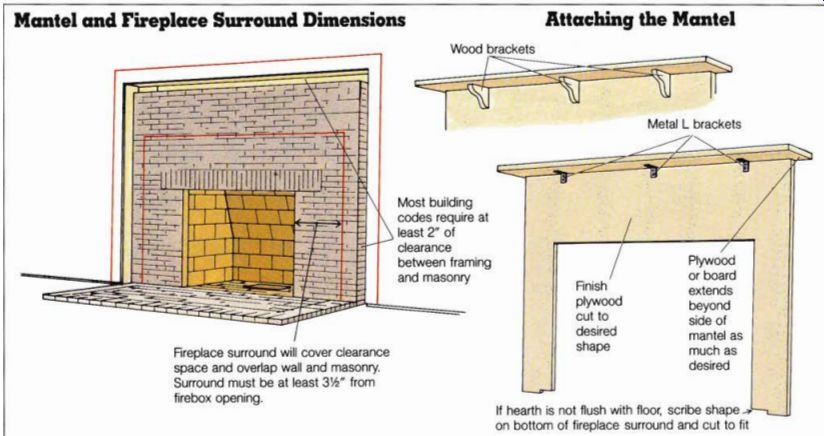
--------- Most building codes require at least 2" of clearance
between framing and masonry Fireplace surround will cover clearance space
and overlap wall and masonry.
Surround must be at least 3 1/4" from firebox opening.
Finish plywood cut to desired shape
7 Plywood or board extends beyond side of mantel as much as desired If hearth is not flush with floor, scribe shape on bottom of fireplace surround and cut to fit
----Attaching the Mantel Wood brackets Metal L brackets Mantel and Fireplace Surround Dimensions
----------
It is advisable to glue all joints. Make sure to wipe excess glue off all trim surfaces with a damp cloth after installation.
+++++++++++++++
Fireplace Mantel and Surround
A fireplace surround is basically an elaborate piece of trim that functions as a casing. It covers the gap between the finish wall and the edge of the firebox in the same way as a door or window casing covers the gap between the wall and the frame. A mantel is a shelf that tops the surround.
See illustration, opposite page.
Rather than building a surround and mantel, consider buying a unit ready-made. You can probably order one in the size and style of your choice.
To find a local source, check the yellow pages or ask your building-supply dealer. Salvage yards and antique stores often carry old surrounds and mantels that have been rescued from demolished houses.
Caution: Building codes are strict about the setbacks required for flammable materials.
Generally any wood trim should be at least 3.25 inches from a firebox opening. Any projection, such as a mantel or a hearth, should be at least 12 inches from this opening.
Check the local building code for the exact requirements in your area.
Building and Installing a Mantel and Surround Making your own mantel and surround will be a test of your finish carpentry skills. Because this trim is generally the focal point of a room, all materials, cuts, and finishing techniques will be on display. To ensure good results make certain that miters are perfect and that each piece is carefully smoothed and fitted. For more information, refer to the second chapter.
1. Measure the opening and draw a set of plans to scale. Most surrounds are constructed on a backer board so that the entire assembly can be done in a workshop. Choose a veneered plywood for this piece, since the parts not covered by molding will show. Remember to allow for the thickness of the plywood in your plans.
2. Choose a clear, straight board for the mantel and attach a piece of half-round molding to the front and side edges.
Alternatively, cut a design with a shaper or a shaper attachment. Fasten the mantel to the backer board with metal L brackets or wood brackets. If you use metal brackets, cover them with crown molding. See illustration.
3. Attach the trim to the backer board. For the tightest it start underneath the mantel and work down toward the floor, cutting miters on each piece of trim that turns a corner. Glue each piece and hold it in place with finishing nails.
Make sure that these nails penetrate well into, but not be yond, the backer board. Cut the final pieces of molding long and trim them flush with the edges after they are mounted.
4. Carefully fill and sand the outside edges of the surround and mantel (or add more trim after they are attached to the wall). Set all nail heads and ill them with an appropriate putty. Stain or paint the entire surround and mantel. When they are dry, attach them securely in position. Set or countersink the fasteners and touch up the finish.
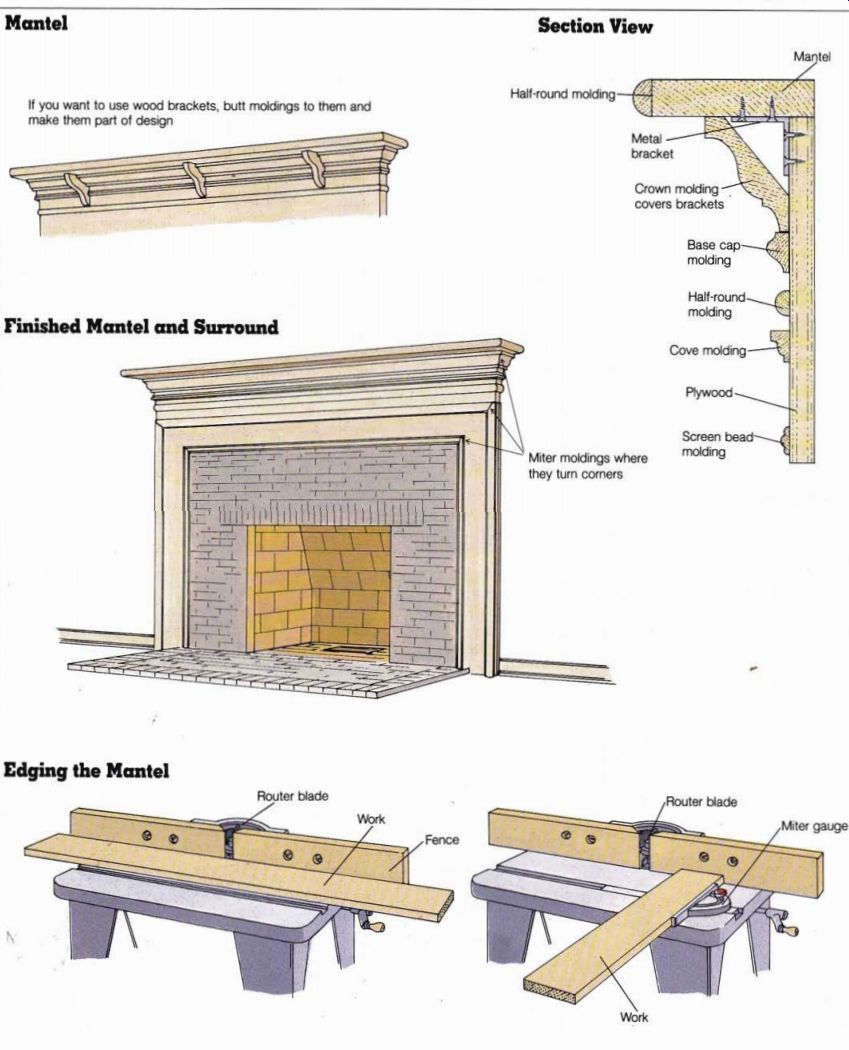
---------- Mantel Section View Mantel If you want to use wood
brackets, butt moldings to them and make them part of design Half-round molding
Miter moldings where they turn comers Metal -
bracket Crown molding - covers brackets Base cap molding Half-round molding Cove molding -
Plywood Screen bead molding Finished Mantel and Surround Edging the Mantel Router blade ; blade gauge
--------------
Using Standard Trim for Decorative Effects
Installing standard trim pieces against wallboard or wood paneled ceilings and walls al lows you to create various decorative effects. See page 66 for construction details for crisscrossed-beam ceilings.
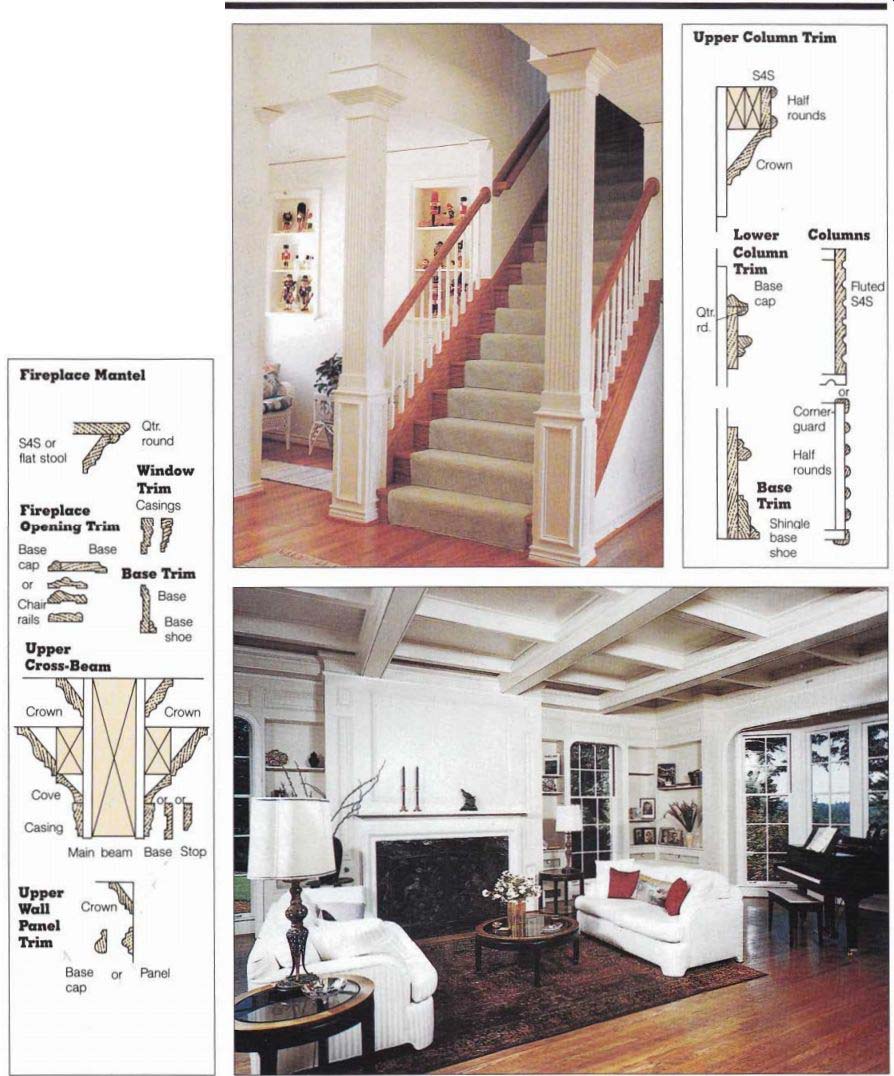
-------- Top: Trim applied to columns give stairway a stately
elegance Bottom: Large beams trimmed wit moldings (see also page 66) ad drama
to a living room ceiling Fireplace Mantel Qtr.
-----------------

--------
----------------
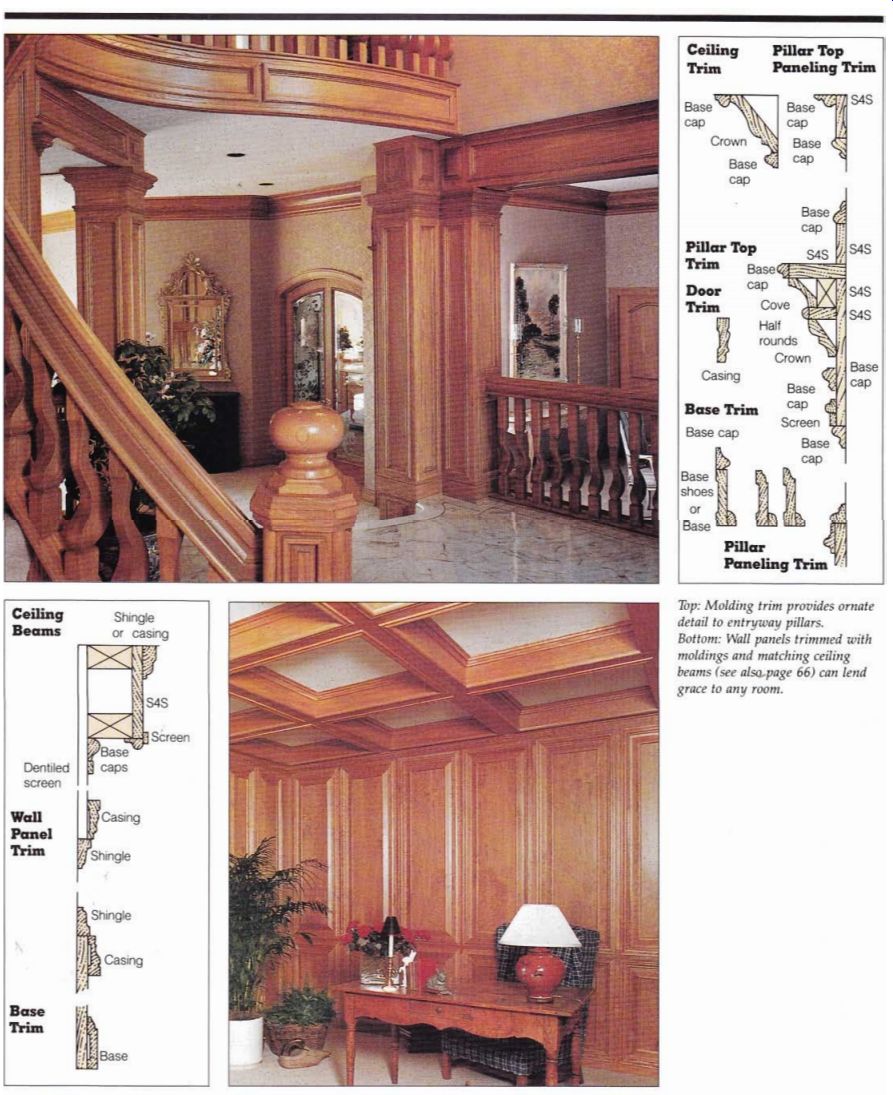
--------- Top: Molding trim provides ornate detail to entryway pillars.
Bottom: Wall panels trimmed with moldings and matching ceiling beams can lend grace to any room.
Ceiling Shingle Beams or casing Wall Panel Trim Base Trim i Base
Ceiling Trim Pillar Top Paneling Trim S4S cap Pillar Top
Trim Cove Half Casing Base Trim Base cap Base shoes or Base rounds Crown Screen LL, Base V: cap Pillar Paneling Trim
------------
=========