Good gardens don’t simply sprout like natural forests or glades but are made from the ground up with specific tools, materials and know-how brought to bear by the individual gardener. The gardener’s knowledge must include more than just care and placement of plants; to build a successful garden, it’s necessary to understand construction techniques and possibilities that can provide a frame work for plants to grow in and for people to sit or stroll in. The encyclopedia that follows presents in alphabetical order basic building designs and materials you will need to complete a wide variety of gardening projects.
The first section of the encyclopedia lists common garden structures, from time-tested classics like the picket fence and brick wall to artfully designed terraces and decks. Most of the designs are within the capability of any energetic do-it-yourself gardener; a few, however, may require professional help. All the designs have been chosen with an emphasis on the simple and functional, and to aid you in the choice of projects a cross-referenced guide is included at the bottom of each page.
The encyclopedia’s second section lists the many types of materials available for each construction use. Since the right choice of materials is critical to the success of any construction project, the text discusses the strong points, weaknesses, relative costs and maintenance needs of the various options. Taken together, the two sections tell you not only what pattern you might use in building a deck, but what kind of wood you might choose; not only what kind of brick is available for a wall or walk, but how it can be laid.
Whether you are building a completely new garden from a sea of truck-tracked mud left after the construction of your home or merely searching for an attractive plant box, the encyclopedia offers a variety of choices compatible with diverse budgets, geographic areas, architectural styles and tastes in gardening.
---
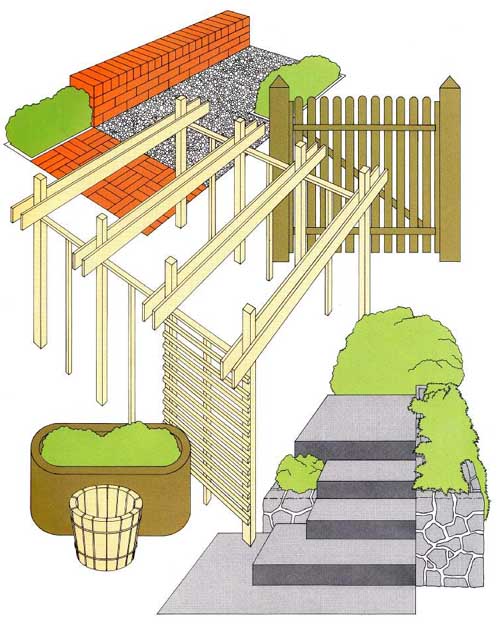
The steps, walks, arbors and fences in the montage at left are among the many projects, described below, that can be made from a well-chosen selection of concrete, brick, stone or wood.
----
ARBORS See Overhead Structures
Bird lures
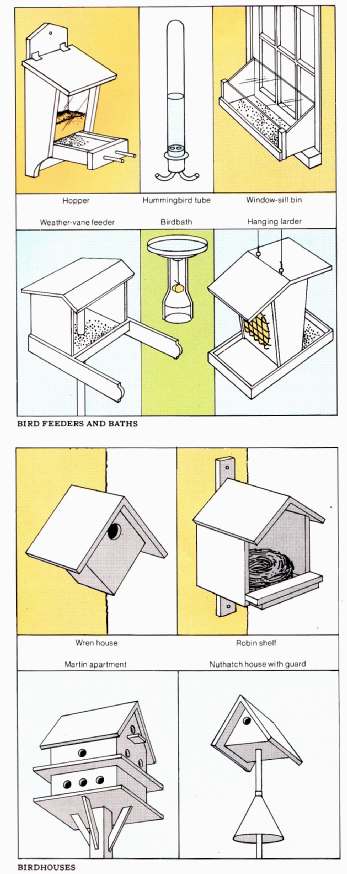
Birds are welcome helpers in any garden, devouring large quantities of insect pests as well as seeds and suet. The sight and sound of birds chirping on a feeder ledge gives a garden special charm. The type of lure you build depends on the kinds of birds you want to attract. Some species of birds like small, single dwellings while others nest in colonies. Blue birds and wrens like a simple nesting box with a single round hole for an entrance; robins will nest on a sheltered shelf, purple martins prefer apartment complexes. The size of the entrance hole often determines the species attracted. Many other species prefer to build their own shelters. But all birds, no matter what the species, love baths.
DESIGNS
There are several kinds of bird feeders. The simplest is a platform feeder—a board mounted atop a pole and given a low rim to keep the seeds from falling off. The window shelf and tree box are variations of the platform feeder. Hopper feeders, mounted on a wall, tree or window sill, release seeds from a storage bin onto a platform below. Another type of feeder is a cage of large-mesh wire to hold Suet suspended from a tree branch. Among the most elaborate feeders is the terravium, a framed glass box that is set on a window ledge and extends inside the room. Among the simplest feeders are hollowed-put gourds and coconut shells. Weather-vane feeders pivot on posts so the seeds and the birds are sheltered from the weather.
The simplest of birdhouses are boxes with open fronts or with removable or hinged tops. Roosting perches made of dowels should be placed inside; a perch outside the entrance may help enemy birds more than the occupants. Sheet-metal guards placed around the mounting tree or post, above and below the house, will keep cats and squirrels from the nest.
Although all birds like baths, they won’t necessarily be attracted by all containers of water. A birdbath should be shallow with sides that slope gradually to a depth of no more than 2½ or 3 inches. Line the bottom with coarse sand or gravel; birds like a rough bottom where they can get a foothold. A simple birdbath can be made by inverting a plastic garbage-can lid atop a length of draintile; tie a weight to the handle of the lid to hold it in place.
MATERIALS
Scrap lumber, plywood, branches, wire screening and glass are common birdhouse and feeder materials. Metal should be avoided because it gets too hot. Naturally rot-resistant wood or wood that has been pressure-treated to prevent rot can be stained or left unfinished so it will weather to an unobtrusive color. Concrete and concrete-and-stone combi nations are commonly used for permanent birdbaths, but high-fired clay is also suitable. Clay or concrete baths may crack if water freezes in them.
BRICK PATTERNS See Terraces and Patios, Walks, Walls
Cold frames and hotbeds
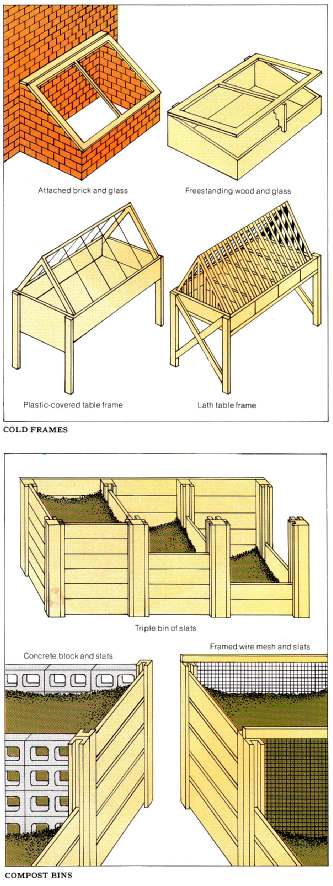
Like miniature greenhouses, cold frames and hotbeds are used for starting seedlings, cuttings or bulbs several weeks ahead of the outdoor planting season. A cold frame is heated only by the sun; a hotbed is also heated by an insulated electric cable placed under the soil. Otherwise the structures are identical. Hotbeds can be used earlier in the growing season and in colder climates.
DESIGNS
Cold frames and hotbeds are rectangular frames with transparent covers. In cold climates, both structures are set 3 to 4 inches into the ground for extra insulation. A 3-by-6-foot frame will hold four standard seed flats plus a few extra pots. A larger structure with compartments and a divided cover allows you to work in one section at a time without exposing the entire bed. The back of a cold frame or hotbed faces north and is higher than the front. The sides slope about an inch per foot so the winter sun reaches all plants and rain or melting snow will run off. A layer of sand or gravel within the frame speeds drainage. As the weather warms, the cover is propped up during the day to let excess heat escape. If a cold frame or hotbed is used only a few months of the year, it can be built with hinged sides and tops; use hinges with removable pins in the center so the structure can be disassembled for storage. In mild climates a cold frame can be mounted on legs to make it more convenient to use; in summer laths can be added to provide shade.
MATERIALS
An all-season, all-purpose cold frame or hotbed can be built with a framework of concrete blocks, bricks or a rot-resistant wood like redwood. A glass cover admits maximum light; old storm windows are often used. Glass is easily broken, however. Plastic reinforced with wire is less expensive than glass but clouds with age. A polyethylene sheet tacked to a frame of 1-by-2s makes a tough cover inexpensive enough to be replaced each year. Panels of corrugated or flat rigid plastic are long lasting but expensive.
Compost bins
Every serious gardener recognizes the value of compost, the organic fertilizer made from grass clippings, other plant re fuse and animal manure. A good compost bin lets air circulate so the mixture decomposes evenly.
DESIGNS
A three-bin structure provides one space for fresh material, one for an aging mixture and one for ready-to-use compost. A single chamber with a removable centerboard that lets you convert it into a two-bin unit provides almost as much flexibility and takes up less space. Choose an out-of-the-way location where there is enough space to wheel a garden cart or wheelbarrow alongside. A bin 4 feet wide, 4 to 6 feet deep and 4 feet high will provide a supply of compost adequate for most suburban gardens.
MATERIALS
A compost bin can be built of combinations of wood and heavy-gauge wire, wood and concrete blocks, or wood slats in a wood frame. Welded-wire fencing is easy to install and allows good air circulation. Concrete blocks stacked on their sides with core holes exposed also allow ventilation; they don’t need to be mortared in place. If grillwork blocks are used, such a bin can be an attractive adjunct to a garden. An unfinished wood bin, as it ages, blends well with a garden setting, but should be made of a naturally rot-resistant wood such as heartwood of cedar or redwood, or a softwood that has been pressure-treated to resist rot.
CONTAINERS See Planters
Decks
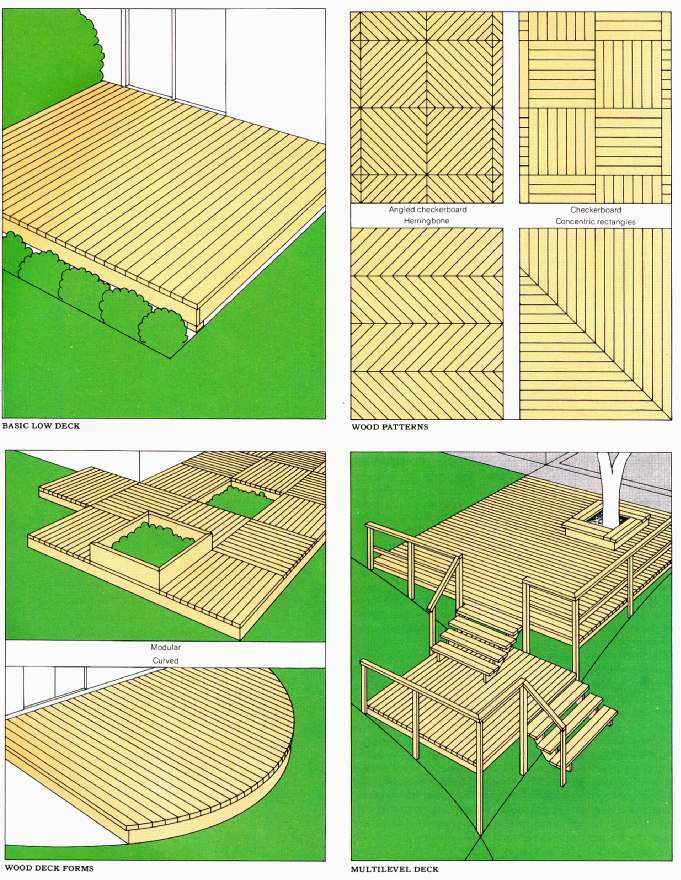
Unlike a terrace, which must be built on level ground, a deck rises over almost any terrain without grading or filling, thus converting unusable space to living space. A deck can be only a few inches off the ground or many feet.
DESIGNS
Decks sit atop carports or wrap around trees. A deck that is slightly elevated above ground level serves as an inviting transition from house to garden. A multilevel deck takes full advantage of a slope. In addition to topography, deck design must take into account local building codes, sun direction, prevailing winds, privacy and such options as overhangs, railings and built-in benches.
Building codes usually require a strong deck foundation set on sturdy footings. Such a support can be made from cinder-block piers set onto concrete footings that extend be low the frost line. Decks more than 12 feet off the ground require special heavy-duty posts and crossbraces, installation work best left to a building contractor.
Once the footings and piers are in place, support posts are attached to them with anchor bolts. The joists that form the deck’s outer framework are bolted to the support posts, the interior joists are attached with joist hangers, and crosspieces are nailed in place. The deck floor is nailed to this frame work. Most building codes require a deck strong enough to support 50 pounds per square foot.
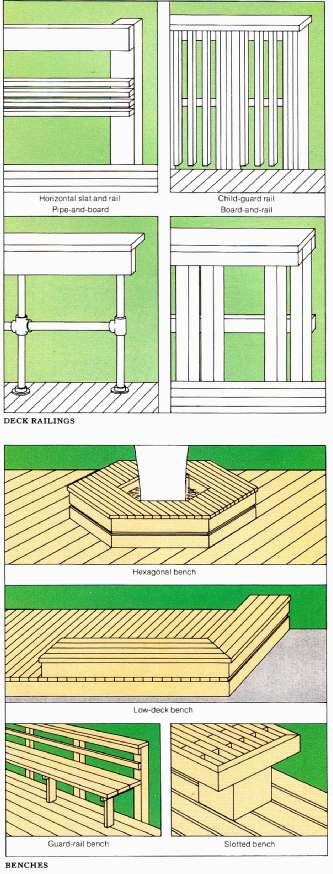
MATERIALS
Wood is the most popular deck flooring, although tile and concrete are also used. Dimension lumber—2-by-2s, 2-by-3s, 2-by-4s and 2-by-6s-—is commonly used for decking. Lumber 2-by-8 and wider tends to cup (warp crosswise); boards thinner than 2 inches can be used for decking but require more joists to provide adequate support.
Naturally rot-resistant redwood and cedar decking can be stained or left to weather to a silvery gray. Other softwood lumber like fir and pine must be bought in pressure-treated form or soaked with a preservative.
A simple deck floor can be built of parallel 2-by-4s laid flat, spaced ¼ inch apart for drainage; the joists can be overhung 1 inch for decorative effect. A floor of 2-by-4s set on edge requires spacer boards nailed to the joists as well as twice as much lumber. Checkerboard floor is created by dividing the deck into squares and surfacing the squares in alternating patterns. This design makes it easy to leave a hole for a tree or sink a planter.
Concrete and tile also can be used for a deck surface. Concrete is relatively inexpensive but requires reinforced supports because of its weight. Tile matches concrete in durability, surpasses it in appearance and cost.
Drainage systems
Quick drainage of excess water is essential to the health of plants, even those that need abundant moisture. In places where the soil remains constantly soggy, an underground drainage system is needed to expedite removal of water.
DESIGNS AND MATERIALS
A simple system to drain waterlogged soil consists of a perforated drainpipe or loose draintiles set in a trench, covered with roofing felt and encased in 6 inches or more of coarse gravel, with the drain sloped at least 1 inch in every 15 feet. If the water problem is severe, drainage tiles may be needed to carry water to a storm drain or to more permeable soil.
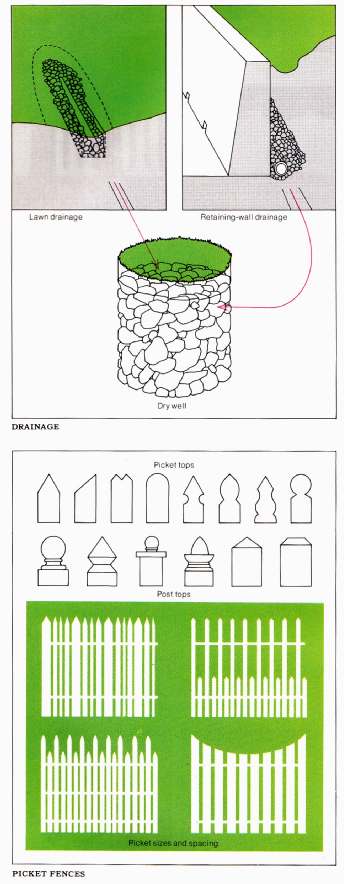
In such soil, the water can be directed into a dry well, a straight-sided hole 36 to 48 inches deep filled with stones and rocks 2 to 4 inches in diameter. If the problem is slight, it may be solved with a shallow ditch filled with stones, then covered with soil. Run the ditch at a slight slope down from the wet area, taking care that the flow is directed away from your neighbor’s property.
An accumulation of water behind a retaining wall is hazardous. Gravel or rock backfill will help drain that area. Weep holes—drainage holes made by inserting pipes or cop per tubing at even intervals into the wall—also help keep water pressure from building up. But drainage tile behind the wall will channel water to a point where it will do no harm. A shallow surface gutter of Concrete or tile in front of the wall can be used to keep water from spilling from the weep holes onto the lawn.
If you build a wooden fence in soggy ground, set the posts atop a bed of 4 to 6 inches of gravel and surround them with a 2- to 3-inch ring of gravel. Anchor them with concrete collars extending above the ground. Don’t put concrete under posts; water trapped between post and concrete would rot the wood. Use caulking compound to waterproof the space between the concrete collar and the post.
DRY WELL See Drainage systems
Fences
Fences can be constructed in a seemingly endless variety of patterns for a number of purposes. They can provide privacy, serve as windbreaks or sun traps, even protect plants from the neighbor’s dog or keep your own at home. A boundary fence is commonly low and open; a privacy fence is designed to block the view in and generally is at least 6 feet tall, depending on the terrain.
DESIGNS
Any fence requires a framework of posts and rails. (Some types of wire fencing come with a ready-made framework.) Steel posts usually can be driven directly into the ground. But wood posts must be set in gravel-filled holes and may need concrete collars for stability. Wood rails usually are simply nailed to the posts.
Once this basic framework is in place, the slats, boards or pickets that complete the design are attached. The picket fence, long associated with colonial architecture, is made of evenly spaced, standard-sized strips such as 1-by-is, 1-by-3s or 1-by-4s, in heights generally lower than 5 feet. Popular picket tops include triangular, rounded, saw- toothed, angle-cut, spearhead shaped and spade shaped.
The rail fence, with its low, horizontal design of rough- hewn posts and connecting rails, is used to mark boundaries where privacy is not a consideration. In a split-rail fence, the rail ends are inserted into holes in the fence posts. In a lapped-joint fence, the rails are nailed to the sides of the posts. In a mortised-joint fence, the rails fit into notches in the posts called mortises.
There are several styles of high-level fences (5 feet tall or more). A grape-stake fence is made of rough redwood boards about 2 inches square and up to 6 feet long. Originally used to hold grapevines, grape stakes can be used vertically or horizontally, nailed onto the rails like pickets or onto the posts, or fitted into a frame to make a panel. Slat fences, made of redwood or cedar in 1-by-1 or 1-by-2-inch slats, are used where a more formal look is needed.
Louver fences, with louvers running either vertically or horizontally, can be angled to control the amount of light or wind admitted to the garden. Placed horizontally, louvers give almost total privacy but they tend to warp and invite climbing. Placed vertically, louvers give passersby a chance to peek through. Louver fences require more lumber than almost any other kind of wood fence.
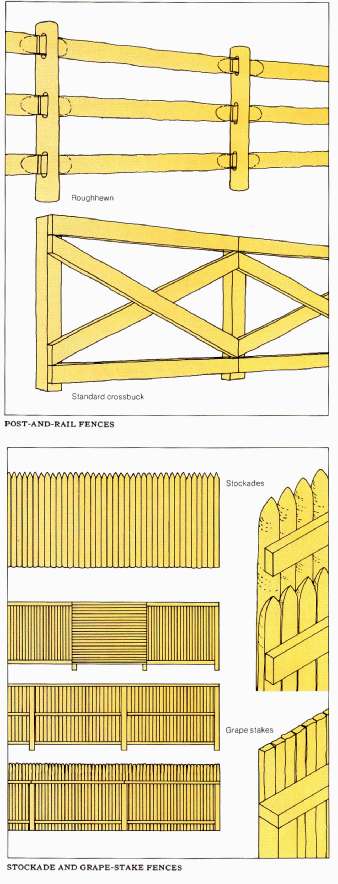
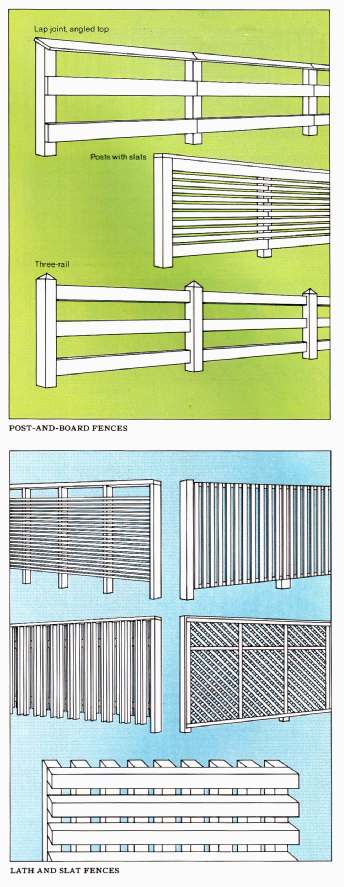
STOCKAD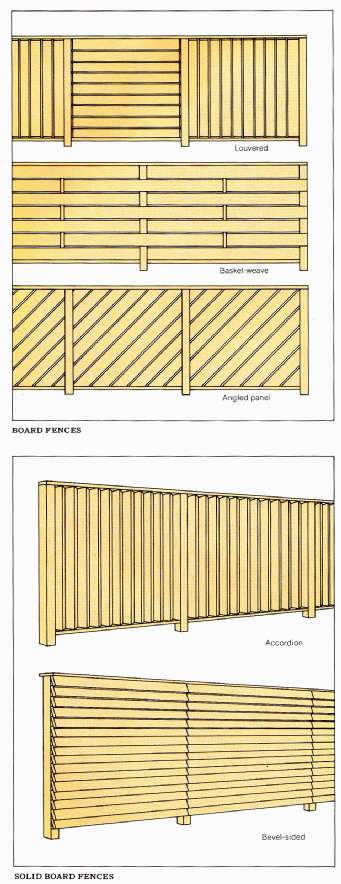 E AND GRAPE-STAKE FENCES; POST-AND-BOARD FENCES; LATH AND SLAT
FENCES; POST-AND-RAIL FENCES
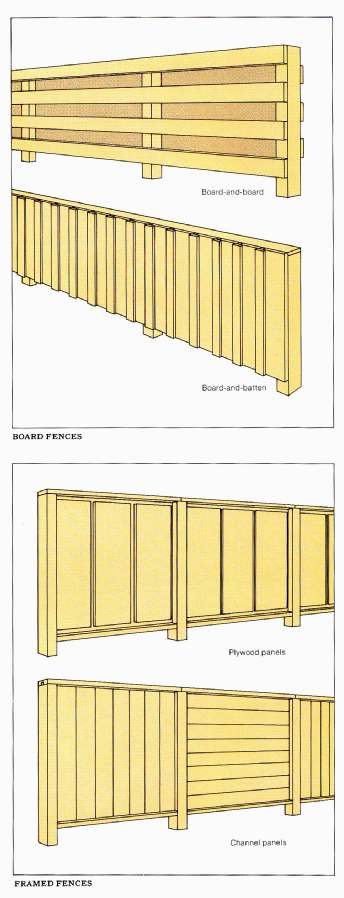
BOARD FENCES; BOARD FENCES; SOLID BOARD FENCES; Channel panels; FRAMED FENCES
The solid board fence can be built with a vertical, horizontal or diagonal pattern. A vertical pattern makes a long, solid fence seem shorter. A horizontal pattern makes a short fence seem longer, stretching a small area visually. Solid board fences provide maximum privacy, but they may not stand up in areas of strong wind. A variation, the board-and-board fence, is built with alternating boards on opposite sides of the fence frame. Set vertically, a board-and-board fence is an effective windbreak. Set horizontally, it also provides privacy, but it can be easily climbed.
Basket-weave designs are attractive from either side of the fence. Prefabricated woven patterns are available in panels. Individual boards can also be woven into a fence framework. Latticework and trelliswork fences make a crisscross pattern for climbing vines, with the tightness of the spacing deter mining how much privacy it gives.
Solid panel fences commonly are made of exterior-grade plywood or tempered hardboard, a bonded wood fiber. A panel fence gives total privacy but the large, flat surface requires strong structural support against the wind.
MATERIALS
Wood is the most popular fencing material. Other materials that are used in home gardens include tempered glass, plastic, asbestos board, aluminum, wire and wrought iron. Panels of tempered glass, available in many patterns and colors, block the wind without obstructing the view, but they are heavy, expensive and difficult to install. Never use plain untempered clear-glass panels that someone might inadvertently walk through. Plastic panels make a practical, easy-to- handle fence and are less expensive. Plastic panels come in flat, corrugated or ribbed sheets in a wide array of colors, patterns and textures. Plastic generally looks best in combi nation with wood posts and rails.
Asbestos board is waterproof, fireproof and rot-proof. But it’s difficult to cut and its extreme weight—a 4-by- 8-foot panel ¼ inch thick weighs 80 pounds—requires very strong sup porting posts. Aluminum panel fencing is lighter and requires little maintenance; it comes in many designs that mimic wood fences—post-and-rails, louvers, solid panels.
Chain-link wire fencing offers maximum security. It’s usually sold as a complete package including posts, rails, mesh, gates and installation. Chain-link fencing of galvanized steel or aluminum is available in heights from 3 to 9 feet and in many colors. It’s also sold with a green or black plastic coating to moderate the fence’s harsh look. Plastic, metal or wood strips can be laced through the links for privacy and to provide a less institutional appearance. Metal picket fences, available in rolls or strips 36 to 48 inches high, are used to border flower beds.
FOUNTAINS See Pools
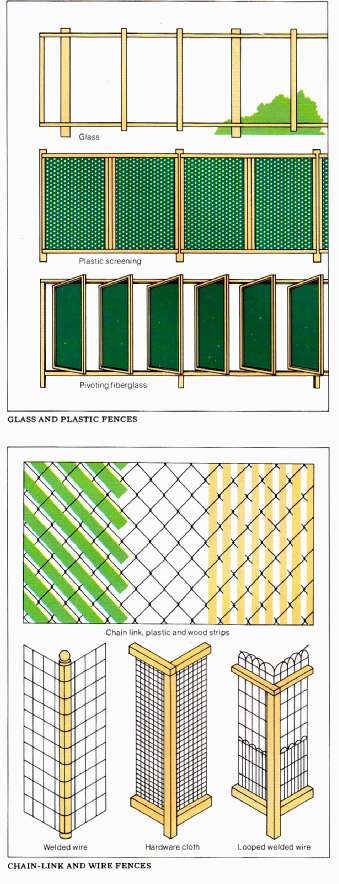
CHAIN-LINK AND WIRE FENCES: Welded wire; Hardware cloth; Looped welded wire
Gates
While many gates serve the purely practical function of closing in small children and pets or asserting the right of privacy, gates frequently help set the mood of a garden. Low, open and inviting or tall, solid and imposing, a gate can, complement the adjacent fence or contrast sharply with it.
DESIGNS
When you design a gate, consider the traffic that will flow through it and the abuse it will need to withstand. The gate’s width, its weight, its latch and hinges and its posts are all important design factors. A gate should be wide enough to accommodate two people walking abreast, one person carrying a large package, or one wheeling a piece of garden equipment like a wheelbarrow or a lawn mower. But gates more than 4 feet wide often sag of their own weight if they are not firmly supported. For a wide span, consider a two- part gate that opens at the center.
Choose the latch and hinges before you start to build the gate. The weight of the latch and the way it operates must be compatible with the design of the gate and the materials of which it will be constructed. Decide in advance how much security you really need and how much stress the latch should be able to withstand.
Flimsy or poorly attached hinges are a primary cause of gate failure. Hinges can be built into masonry posts and fastened onto the adjacent gate, or they can be attached to surfaces of both post and gate. Either way, they must be strong enough to support the weight of the gate and take the abuse of frequent swinging and slamming. Squarely constructed masonry gateposts will form right angles with the gate. If the gateposts are of wood, they need to be stronger than the other fence posts. They can be set in concrete collars bolted to metal anchors set into concrete piers, or sunk at least one third of their length into the ground.
Metal gates or fittings should be primed and painted to prevent rust. To keep the gate from sagging and binding, keep hinge screws tight. Reset leaning posts, or pull a hinge post back into place with a turnbuckle and wire by running the wire from the top of the gatepost to the bottom of a nearby fence post.
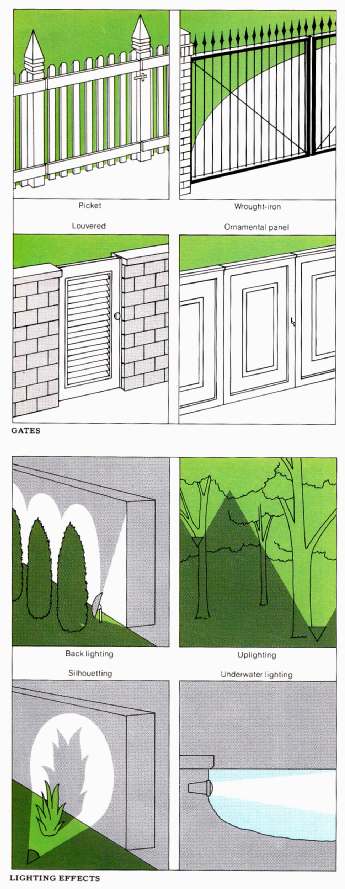
above: GATES; LIGHTING EFFECTS
MATERIALS
A gate similar in materials and design to its fence will blend in with it, while one made of contrasting materials will stand out and may seem more inviting. Wooden gateposts should be 4 by 4 inches for gates up to 5 feet high, 6 by 6 inches for taller gates. Any lumber that is used in gate construction needs protection against rot. Simple wooden latches can be made in your workshop; a wide assortment of metal latches ranging from hooks and hasps to locks with sliding bolts are available at hardware stores.
GAZEBOS See Overhead Structures
HANGING BASKETS See Planters
HOTBEDS See Cold Frames and Hotbeds
LATH HOUSE See Overhead Structures, Storage
Lighting
By illuminating trees, shrubs, plant beds, walks, steps and terraces, outdoor lights extend the enjoyment of a garden into the evening hours. When skillfully placed, they can have a dramatic effect.
DESIGNS
A well-designed lighting system places emphasis on the effects that are produced by the lights, not on the lights them selves. A variety of effects can be produced by aiming the light sources in different directions. A light placed behind a tree and aimed upward will silhouette the tree; a light that is positioned in front and aimed upward will cast a shadow pattern on a wall behind it. Downlighting can call attention to a single plant or produce a soft, diffused effect over a broad area. Downlighting is also the best for illuminating steps and walks to ensure safety.
To make the garden seem as large as possible (and to draw insects away), place some lights at the perimeter. For an area such as a terrace where bright light is only occasionally required, a waterproof dimmer switch is desirable. Water proof submersible light fixtures are also available for use in pools and fountains.
MATERIALS
Two systems are available for garden lighting. One uses the standard 120-volt house current; the other, a low-voltage system, employs a transformer to reduce the current to only 12 volts. A high-voltage system produces brilliant light but its installation outdoors is complicated and can be hazardous. Low-voltage lighting is safe; the fixtures are small, light weight and easily concealed in the garden; the cost of operating the system is low.
The simplest kind of low-voltage transformer plugs into any outdoor receptacle. The amount of current that a transformer emits, usually between 72 and 330 watts, determines the number of fixtures and the length of wire that can be used. Transformers of 126 watts are adequate for most gar dens. This system can be turned off by pulling the plug, but it’s more convenient to have the outdoor receptacle con trolled by an indoor switch. Some low-voltage systems are controlled by photoelectric cells, so the lights automatically go on at dusk and off at sunrise.
The cables of both the 12-volt and 120-volt systems are buried, but your building code will probably require that 120-volt cable be sheathed in waterproof metal conduit or heavy plastic, and be buried at least 18 inches deep. The cables used for low-voltage systems need be buried only deep enough to keep them from being accidentally cut.
In either case, garden lights can be positioned anywhere you want them if you use branching cables to supply power; the objective is to have effective light sources but make the fixtures unobtrusive. If a low-voltage fixture is mounted in a tree, the cord is just stapled loosely to the trunk where it’s least likely to be seen. Low-voltage fixtures set in plant beds should have an extra foot or so of wire buried next to them, so they can be moved without rearranging the whole system.
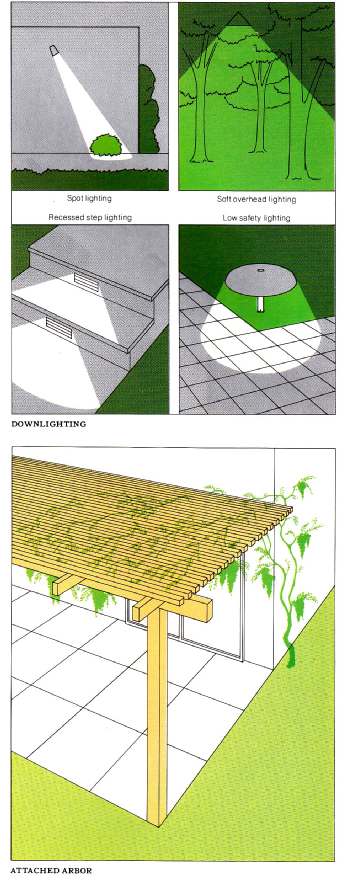
ATTACHED ARBOR
Overhead structures
Elevated shelters protect plants and people from sun, wind and rain. They can cover terraces and decks that adjoin a house or that stand alone in a garden. In such classic forms as arbors, lath houses, pergolas and gazebos they provide private and tranquil garden retreats.
DESIGNS
The arbor, a freestanding open structure of overhead and side pieces that resembles an inverted “u,” supports climbing vines and shrubs with its latticework. Elaborate arbors may include pillars and intricate roofs; they are sometimes attached to houses. When the overhead lattice strips are parallel and side and end panels are added, an arbor becomes a lath house. The pergola is an open overhead structure built with heavier beams and rafters. It will support vigorous climbing plants like grapevines and wisteria and is some times used to lead from one part of a large garden to another.
The gazebo, a romantic structure often associated with the Victorian age, is a small roofed pavilion that is open on all sides, though it may be screened. It’s especially useful for providing shade where there are no trees. It can be rustic, even made of roughhewn logs with a thatched roof, or it can be elegantly formal.
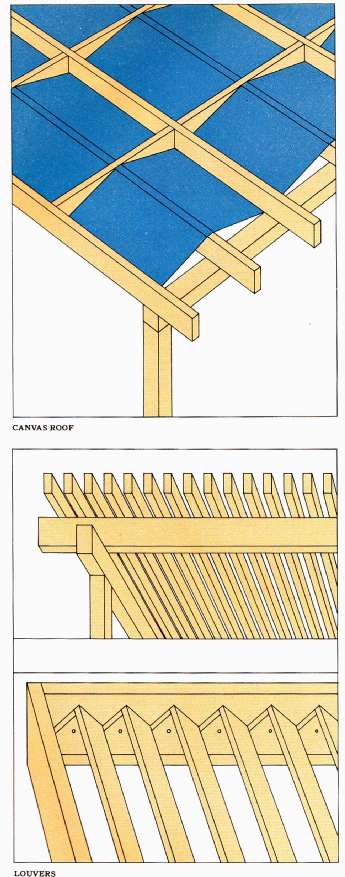
above: LOUVERS; CANVAS ROOF
FRAMEWORK
Most overhead garden structures have frameworks of posts, beams and rafters. The framework for a roof that covers a terrace is attached on one side to a board called a ledger, which in turn is attached to the house; the other sides of the framework are supported by posts. A freestanding structure is supported only by posts. The weight of the roof often determines the materials used in the frame; a lace-on canvas roof can be supported by light 3 pipe; a heavy wood grid requires strong 4-by-4 wood posts or steel supports.
Preservative-treated wood posts can be sunk directly in the ground where building codes and a mild climate permit. In northern areas, where frost heaving is a problem, such posts should be set in concrete for stability. Posts 11 feet long can have 8 feet above ground to give comfortable head room and 3 feet below ground. When the posts are set, the beams are attached to them with metal T braces, then the rafters are nailed to the beams. A closed roof should slant at least ¼ inch per foot so rain and melted snow will run off. The structure must be strong enough to support your weight as you build or repair it.
ROOF MATERIALS
The overhead frame can be covered with a variety of materials, including wood, reed, bamboo, wire screening, canvas, plastic shade cloth or panels of plastic, fiberglass or aluminum. Select a covering that suits the house design, meets the shade requirements of plants below and is easily maintained.
Wood offers the widest range of roof possibilities. A simple but elegant overhead can be made from short pieces of lumber set between rafters in an open eggcrate pattern. Lath or batten strips, in crisscross patterns, will support climbing plants and increase the strength of the structure. Heavier pieces of lumber can be slanted as louvers, either fixed in place or bolted with wing nuts to make them adjustable. Treat wood structures with a preservative and be prepared to renew paint or stain every few years.
Woven reed or bamboo shades make an inexpensive cover for an overhead structure. They can be left free to be rolled up or down to provide varying amounts of shade and can be taken down for the winter. As a terrace roof, canvas blocks so much light that few plants will thrive under it. Panels of plastic, flat or corrugated, come in many shades and tints of colors that permit you to select the amount of light transmit ted. Plastic can be left in place year round but tiny surface scratches will trap dirt and reduce light transmission.
PATHS See Walks
PATIOS See Terraces and Patios
PERGOLAS See Overhead Structures
Planters
Placed in front of a window, a planter seems to bring the outside in. A round planter backed by a low wall accentuates the natural curves of a garden. A hanging planter adds vertical dimension. Additionally, by raising plants off the ground, planters usually make weeding and transplanting easier and deter many garden pests.
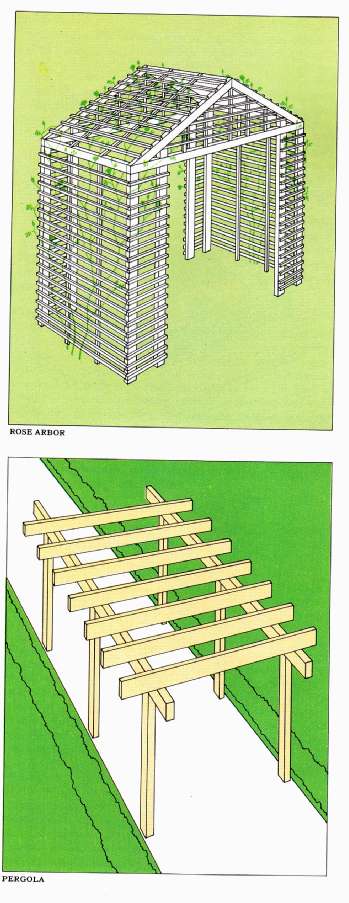
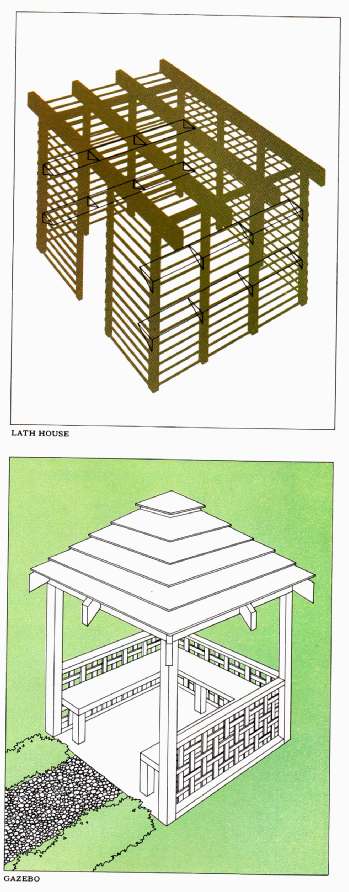
GAZEBO; ROSE ARBOR; LATH HOUSE
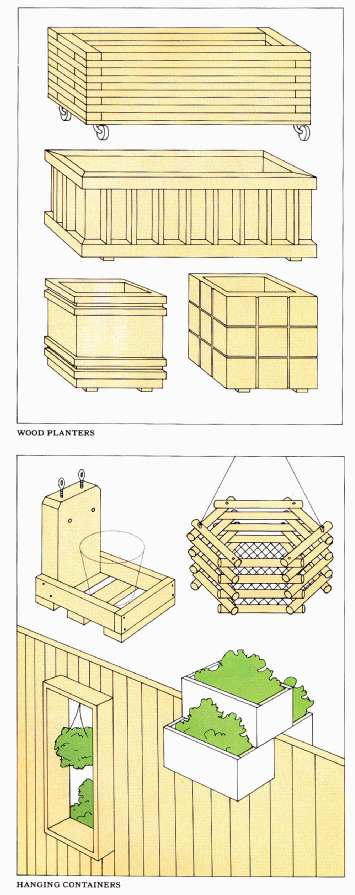
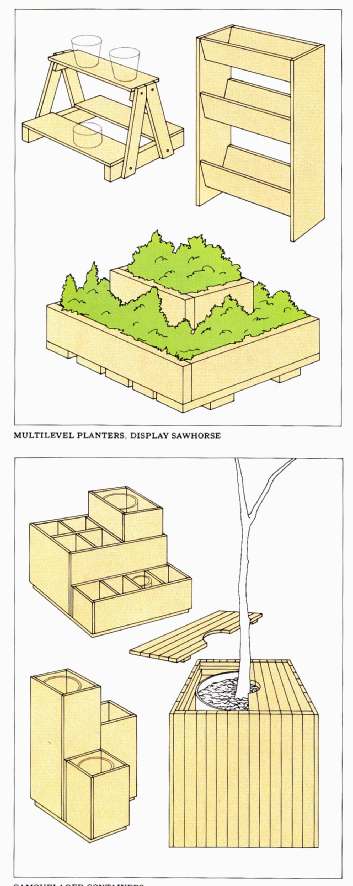
WOOD PLANTERS; MULTILEVEL PLANTERS DISPLAY SAWHORSE; HANGING CONTAINERS; CAMOUFLAGED CONTAINERS
DESIGNS
When designing a planter, bear in mind how and where it will be used. A long brick planter for the edge of a terrace should be low and unobtrusive, about seat height. A wooden planter for a dwarf tree should not be so small that the tree will quickly outgrow it. As a general rule, the more elaborate a plant’s foliage, the simpler its container should be. Use square and octagonal shapes for narrow trees and plants, oblong shapes for plants with horizontal spreads of foliage.
Permanent planters can be built in even, geometric shapes or with irregular curves. A window box is converted to a portable planter with a set of casters; it also can be set on the ground, mounted on wood cleats that will provide enough clearance for ventilation and drainage.
Most off-the-ground planters are suspended from wires, but they can also be built onto the top of a fence, placed on a shelf, bolted to a fence or post or set in a window that has been cut into a fence. Staging devices such as a sawhorse with shelves or raised planting troughs can also be used to gain height in a flower display.
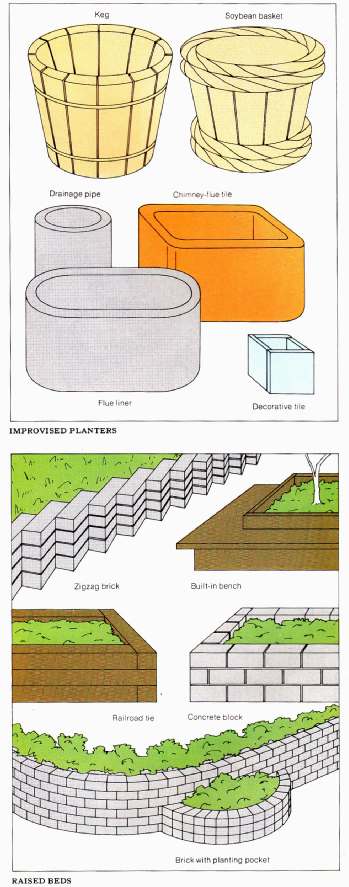
above: Keg; Soybean basket; Drainage pipe; tile; liner; IMPROVISED PLANTERS; Decorative tile; RAISED BEDS
MATERIALS
Wood and masonry are the most popular planter materials. Cedar and redwood are popular because they are naturally rot-resistant; pressure-treated timbers can be used for large- scale constructions. Fasten wood joints with galvanized nails or screws. Permanent masonry planters can be made from a variety of materials, including brick, concrete block or tile. All require poured-concrete foundations. Smaller, portable planters also can be made from materials originally intended for other uses. An oak keg or soy-bean basket will hold a large plant or small tree. Concrete drain or sewer pipes and chimney tiles are also easily adapted as planters if they are lined with wire mesh to hold in soil.
Pools
When a garden needs a focal point, it’s almost impossible to go wrong with a small, imaginatively designed and well- placed pool, especially one that contains aquatic plants.
DESIGNS
Pools with clearly defined geometric shapes best suit a for mal garden; those without perpendicular sides or sharply defined edges are more easily fitted into a casual setting.
A pool that is set into the ground can be protected with a
2- or 3-inch lip to keep rain water from running into it; a small spillway on one side will direct any overflow. In a pool raised above the ground, the water level can be maintained with a drainpipe or a small pump. A pool for plants or fish should be at least 18 inches deep and get at least four hours of direct sunlight daily. If there are toddlers around, a pool this deep should have a safety screen a few inches beneath the water’s surface, secured to pipes, pegs or bricks.
MATERIALS
Any watertight container such as half a barrel or an old horse trough can be used to make a small pool that you fill and empty by hand. Many manufacturers offer molded plastic shells. A larger, more permanent pool can be made with concrete poured over a framework of wire mesh. If such a shell is painted a dark color, the pool will look deeper.
Nearly as permanent as concrete and much easier to build is a pool that is simply an excavation in the ground lined with a sheet of polyvinyl chloride (PVC) plastic reinforced with nylon. When the pool is filled, the weight of the water molds the plastic to the excavation; a border of rocks or bricks conceals the plastic edges and holds them securely in place. A small electric recirculating pump will turn any small pool into a fountain. A pump no larger than a softball will lift a continuous stream of water several feet into the air.
POTTING SHEDS See Storage Structures
RAILINGS See Decks
RAISED BEDS See Planters
RAMPS See Steps
RETAINING WALLS See Walls
ROOFS See Overhead Structures
SCREENS See Fences, Overhead Structures, Walls
SHADE See Overhead Structures, Fences, Walls
SHEDS See Storage Structures
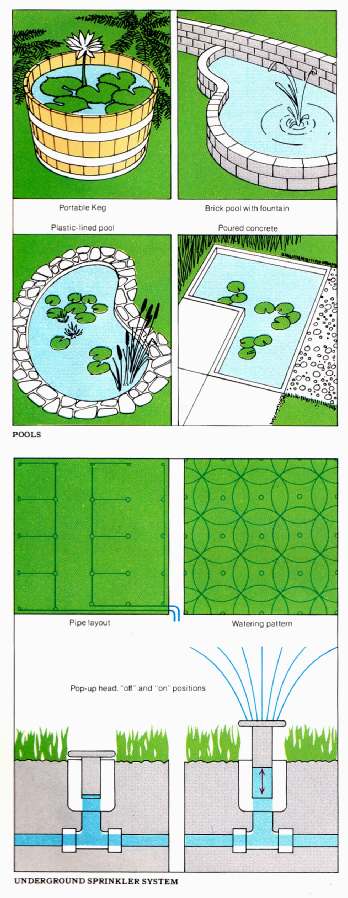
above: POOLS; Waterer pattern; UNDERGROUND SPRINKLER SYSTEM
Sprinkler systems
An underground sprinkler system, connected to the house water supply, can be arranged in a precise pattern so that it will spray all of a lawn evenly, freeing a gardener from hours of watering with a hose.
DESIGNS: To determine the number of sprinkler heads needed, draw a scale plan of your yard. Then place a sheet of thin paper over the plan and plot the spray pattern with a compass, overlapping the circles by a quarter of the diameter. Locate quarter-circle heads at corners and half-circle heads at edges.
MATERIALS: A system of polyvinyl chloride (PVC) pipes and plastic sprinkler heads that pop up when water is turned on can be laid out aboveground to check spray patterns before the pipes are buried. Such PVC piping is less expensive than galvanized iron, is noncorroding and carries more water than galvanized pipe of the same diameter.
PVC pipe is easy for the home handyman to install, since it’s simply set in a narrow slit trench. Installing metal pipes requires the use of heavy wrenches; a wider, deeper trench must be dug to work with them comfortably. Sprinkler heads must be flush with the sod when they are off so they won’t impede a lawn mower. Drain the sprinkler pipes before the first frost to prevent freezing water from bursting metal pipes or cracking PVC.
STAIRWAYS See Steps and Ramps
Steps and ramps
If you need to connect one level of a garden with another, a flight of steps or a ramp is the most obvious solution. But beyond their primary functions, they can also serve as retaining walls, or as bases for planters, or as supplemental seating space. Steps can be one of the most arresting features in a garden’s design, leading the eye straight ahead, at right angles or around a gentle curve.
DESIGNS: Steep, narrow steps discourage access, while wide steps with a gentle rise seem to issue an invitation to stroll through the garden. As a general rule, the smaller the riser of a step, the wider the tread should be. For safety, outdoor steps need an absolute minimum tread width of 12 inches and a maxi mum riser height of 6 inches. Twice the height of an outdoor riser plus the width of the tread should equal 26 inches.
Rarely used steps can be as narrow as 2 feet, but a minimum width of 4 feet is needed to accommodate one person carrying a plant tray, and 5 feet is more comfortable if two people ascend at the same time.
When you plan steps that will rest directly on sloping ground, fit the slope to the steps. Otherwise you may create a hazardous, unequal tread-riser relationship. Cut the bank or fill under the steps as necessary to achieve a comfortable, well-designed incline.
If the change in level is slight and space is not limited, a ramp may offer an easier passage. A ramp is necessary for a wheel chair, safer than steps for the elderly or the handicapped and a convenience for any gardener moving wheeled equipment from one level to another. A ramp should have a slope no greater than 5 to 10 per cent, which means a rise of 6 to 12 inches for each 10 feet of horizontal distance. Like stairs, ramps can rise straight, turn or curve.
MATERIALS: Any material chosen for steps should be harmonious with the garden. Natural materials—wood rounds, stones or even rail road ties—give an informal appearance, while brick, concrete or clay tiles offer a formal, more structured look. If you want steps that will be inconspicuous, use materials found elsewhere in the garden; if you intend the steps to be a garden accent, use contrasting materials.
The simplest steps to build are those that use only graded soil for treads. Wood, brick or concrete risers can be held in place with stakes or pipes. The treads can be paved with gravel or wood chips, or planted with a low ground cover, if you use grass for this purpose, make sure the treads are wide enough to permit easy mowing.
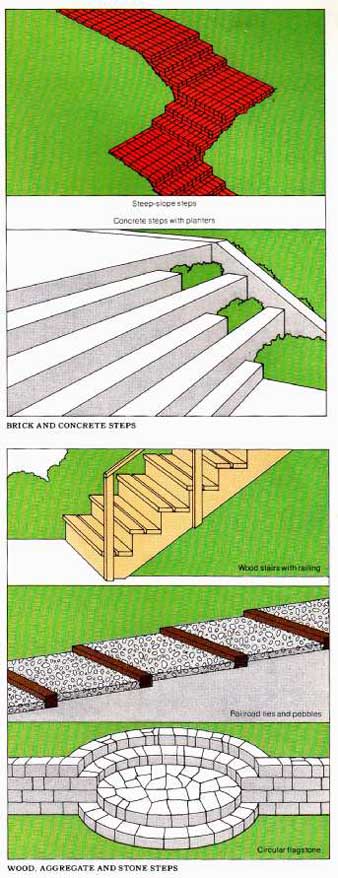
above: BRICK AND CONCRETE STEPS; WOOD, AGGREGATE AND STONE STEPS
Storage structures and work centers
Storage structures help to keep tools in good condition, and a well-organized work center for potting also makes gardening more fun. Although the sizes, shapes and designs of storage structures vary as much as they do in home architecture, most provide floor space for large equipment such as lawn mowers or wheelbarrows, shelves for smaller items like pots and sprayers, and a wall on which to hang small tools.
DESIGNS: Choose a convenient location for your storage structure. It might be attached to a garage with a compost bin and cold frame close by. Incorporated into a fence, or built as a long, narrow unit, a storage structure can do double duty as a screen to hide a service area or unsightly view. Built at one end of an existing terrace, a storage structure can create a sheltered corner and serve as a hideaway for barbecue equipment and patio furniture as well as garden tools. Pot ting areas, sometimes equipped with running water, are frequently incorporated into storage structures, though they are often built as separate units. Bins to hold bulky soil mixes and fertilizer as well as locked cabinets for the safe storage of poisonous substances can be included. Storage structures are generally small enough to merge easily into the landscape.
Before beginning construction, check your local building codes. To get a permit, you may need only a simple sketch, a list of the materials to be used and foundation plans.
The first step is to build the foundation. Excavate the area, put in a drainage layer and then the paving surface (see Walks). A finished floor of a permanent paving material such as brick or concrete should be at least 4 inches above the surrounding ground. A quick-draining floor of a loose paving material such as gravel or wood chips should be at least 4 inches deep. Corner posts, beams and wall studs are put up next, supported by temporary braces until rafters are put into place. Most structures will use 4-by-4 posts for support; these should be set firmly in the ground, at least 6 inches below the expected frost depth, and should be given concrete collars. Beams and rafters, which connect the posts and give stability to the structure, may be nailed to the posts or attached with special metal hangers. Wall coverings, applied next, are usually attached directly to posts and 2-by-4 wall studs. Roofing, with a slight pitch for drainage, follows. Finally, install shelves, hooks and bins.
MATERIALS: While storage structures and potting sheds can be built of either wood or masonry, wood construction is more common since it’s less expensive and easier to handle. Redwood and cedar are popular because of their natural rot resistance; exterior plywood is used because of its versatility and the speed with which construction can be completed.
The material used to roof a storage structure depends on how it’s to be used. Lath, bamboo screening or snow fencing admit light, air and rain but moderate the heat and glare of the sun. Where more security or protection is desirable, solid roofing materials are used. Those available include plywood, hardboard, asbestos board and asphalt or wood shingles. Plastic, glass or fiberglass offer protection from the weather while admitting light. Plywood, hardboard, sheet metal, asbestos board or tile are all possible materials for potting- bench surfaces, which must withstand spilled liquids. Flooring can be made of brick, concrete, gravel or bark chips.
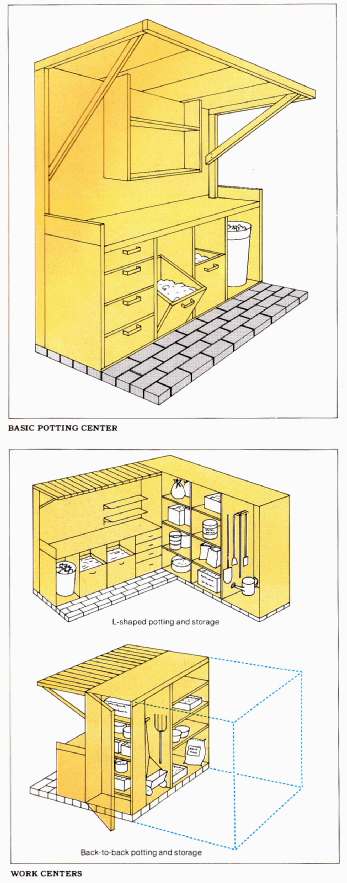
above: BASIC POTTING CENTER; WORK CENTERS
Terraces
Whether you call it a terrace or a patio, a hard-surfaced outdoor living area increases the spaciousness of your home by providing additional room for working, dining and entertainment. Terrace designs range from a small and sheltered area outside a bedroom to a major transition space melding house and garden. A terrace broadens gardening possibilities, too, by providing a place near the house for container-grown plants and either raised or sunken planting beds.
DESIGNS: Size and site influence the design of a terrace and determine whether it’s left open on all sides or is embellished with an overhead structure or shielded from view with a fence. The terrace floor can be divided into intimate spaces with islands of plants or with low walls and raised beds that double as seats. If space is limited, a small terrace can be made to appear larger by extending the flooring around a corner or by rounding the outer edges of the terrace area.
Fences or overhead structures may be useful in some locations for wind control and shade. Overheads are often needed for terraces placed to the south of a house, where they get many hours of sun. A west-facing terrace is cool in the morning but may be uncomfortably hot later in the day if not shaded. A terrace with a northern exposure is coolest, since it receives little direct sunlight. An eastern exposure may be the most desirable location of all; it’s warm in the morning, cool in the afternoon and seldom needs shade.
MATERIALS: The choice of a flooring material for a terrace depends on cost and anticipated use. Loose aggregates like crushed rock and gravel are inexpensive, but they are best suited for a lightly used area where they won’t need frequent grading or replenishing. A solid paving material is more durable.
Bricks provide a comfortable, non-glare terrace floor. They can be mortared to a concrete slab or set loosely in a bed of sand or soil. Because they are small and uniform, bricks seem to enlarge an area. Larger payers such as flagstone, which may need wide mortar joints, make an area seem smaller. Flagstone is available in both regular and irregular shapes. It, too, can be placed on top of soil or sand or mortared to a slab of concrete.
A poured concrete slab is durable and, compared with brick or tile, inexpensive. But unless it’s given a decorative finish, a concrete slab may look more like a parking lot than a terrace. Tile is smooth, colorful and expensive. It can be set in mortar on a concrete base or laid atop sand. Tile can create decorative insets in floors of other materials.
Wood, in squares or rounds, can be set in sand. Wood is glare-free and handsome, but even when preservative treated, it tends to warp or rot in wet locations and crack in heavy frost. Wood planks can be used to build a terrace floor if they are raised a few inches off the ground for drainage.
Adobe bricks laid on sand may crumble around the edges in moist regions if not made with an asphalt stabilizer; they are most widely used in the Southwest.
TOOL SHEDS See Storage Structures
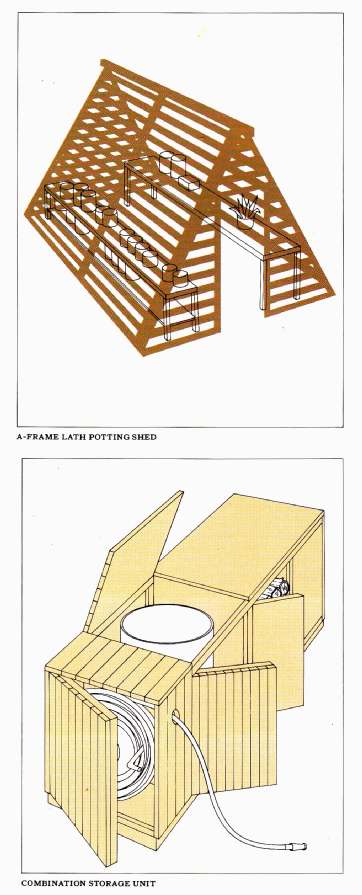
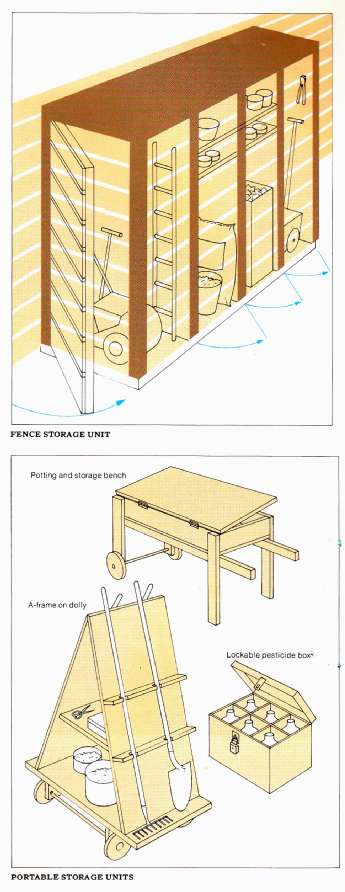
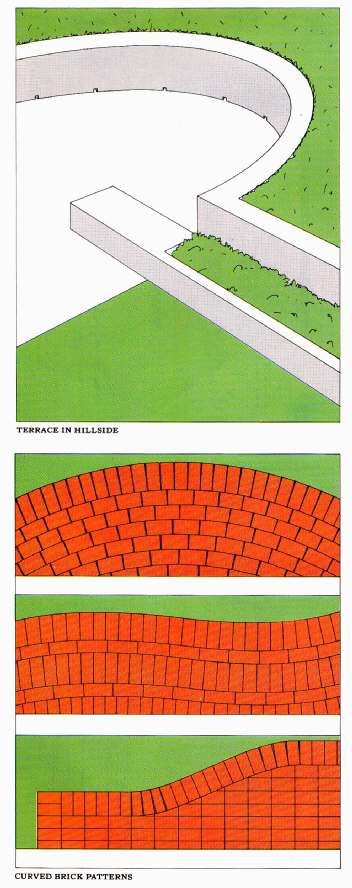
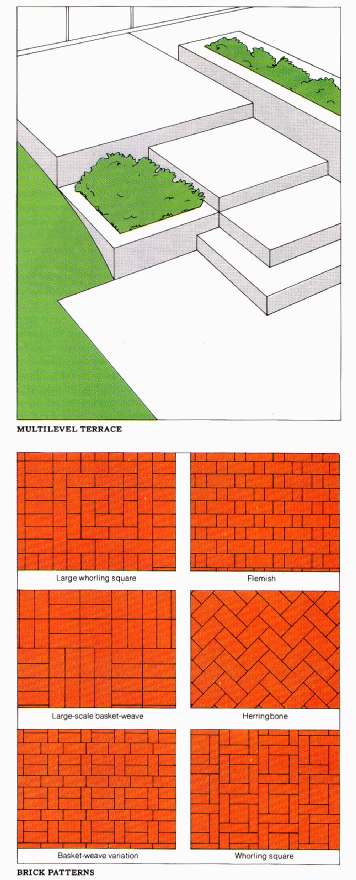
above: BRICK PATTERNS; TERRACE IN HILLSIDE; MULTILEVEL TERRACE; CURVED BRICK PATTERNS
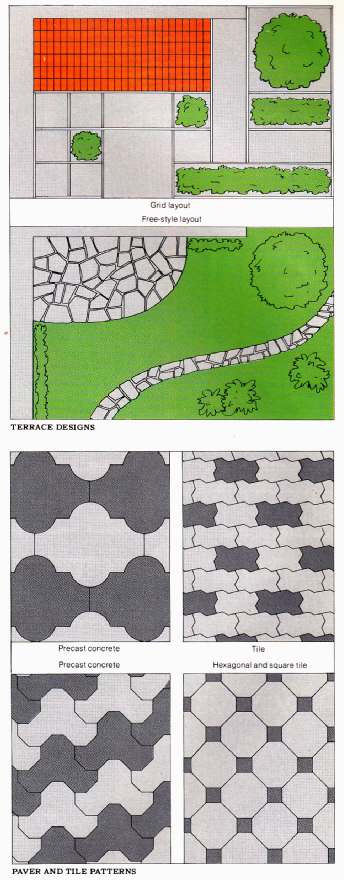
above: TERRACE DESIGNS; PAVER AND TILE PATTERNS
Trellises
A vertical structure designed to support climbing plants, a trellis can also serve as a windbreak or privacy screen, sup port greenery that will soften a long, bare expanse of fence or wall, accent an entrance or provide an interesting back ground for flower borders and other plantings.
DESIGNS: Most trellises consist of crisscrossed strips of wood nailed to frames; a network of string or wire that supports a climbing plant is also considered a trellis. A trellis can be a permanent structure on posts set in the earth or a self-contained, movable unit incorporating a planter from which vines can climb and spread. When overhead latticework is added, a trellis becomes an arbor. A portable trellis can be stored for the winter, but a permanent trellis should be attractive enough to stand inspection while it’s bare.
If heavy, woody vines are grown, sturdy latticework of 1-by-2s or 1-by-4s is required. A trellis of 2-by-4 crosspieces nailed to 4-by-4 posts can support a tree being espaliered, or trained to grow flat. A trellis mounted against a wall should be set 3 inches or more from it to allow ventilation and to prevent damage from reflected heat.
A trellis modeled after those used in commercial vineyards can be constructed from plastic-coated wire strung between T-shaped supports made of 2-by-4s and anchored to a wood en planter. Such a trellis is easily moved to provide optimum light conditions.
Trellis lathwork can be crisscrossed in the traditional diamond and rectangular weaves, in a free-form pattern, or set horizontally or vertically.
MATERIALS: Most trellises are made from strips of lath 1 1/4 inches wide. Other types of wood strips—grape stakes, battens or fur ring—can also be used, as can dowels ½ to 1 inch in diameter, commonly sold in 3-foot lengths. For a sturdier structure, use 1-by-2s, 1-by-4s or 2-by-4s.
Trellis kits containing ornate metal framework should not be used; such framework absorbs heat that can injure tender vines. However, wire mesh and hardware cloth can be used to support plants with tendrils.
Soak lumber to be used in a trellis in a nontoxic wood preservative, or use a naturally rot- and insect-resistant wood like redwood or cedar. Assemble the trellis with galvanized fasteners and waterproof glue. The wood can be stained, if desired; painting is not recommended since plants must be removed every time repainting becomes necessary. Unfinished redwood and cedar will weather to a silvery gray color.
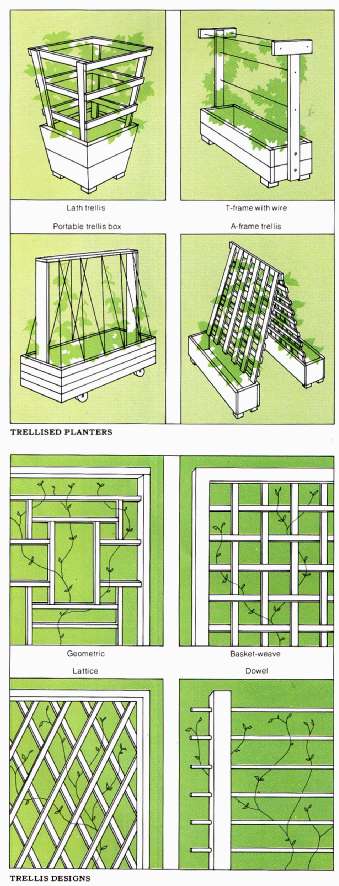
above: TRELLIS DESIGNS
Walks
Walks connecting the house and various parts of the garden can define spaces within the yard, make movement easy from one area to another, and provide the gardener ready access to all parts of the garden with wheelbarrows, lawn mowers or other implements. A walk can be as simple as a wood-chip pathway or a grassy strip between flower beds. More often a walk is a durable surface designed for heavy traffic between such areas as the driveway and the house.
DESIGNS: In planning, consider 4 feet the minimum width for a walk. A walk that must accommodate two people side by side should be at least 5 feet wide. Don’t overlook drainage. Combined with alternate freezing and thawing, poor drainage can cause paving to be heaved out of the ground and broken. Since clay or other heavy soils are the most difficult to drain, it may be necessary to install drain tiles under a base of gravel, cinders or sand before building walks in such soils. In lighter soils, a base of loose aggregate alone is usually sufficient. To make sure that the walks will also shed water quickly, they should be set slightly above ground level and crowned so that water will drain to the sides. The center of a 5-foot walk , for example, should be about an inch higher than the edges.
Temporary paving, such as gravel or shredded bark, is generally contained between edging strips or headers made of wood or bricks. The walk area is excavated shallowly, a sheet of plastic is laid to inhibit weed growth, headers are installed and sand or gravel is spread evenly between them. Perforate the plastic at intervals to provide drainage.
In building a permanent walk of brick, flagstone or blocks, first outline the site, then excavate the area to accommodate both the drainage material and the paving. The paving may be laid dry without mortar on a well-drained base of 3 inches of gravel topped with a 1-inch layer of sand. Tamp each layer thoroughly and moisten the sand before positioning the bricks or blocks. Fill the cracks with more sand, sweeping it in at an angle to the joints. When paving with flagstone, keep in mind that the smaller the top surface of the stone, the thicker the stone must be for stability. When you are laying the stones, keep a straightedge along the outside of the walk, and place the larger stones toward the outer edge.
Brick, stone and block can also be mortared together on a concrete slab. Never mortar them without a solid base, how ever, or the walk will heave and crack. Whether a concrete slab is used as a base or as a finished surface, it should be at least 3 inches thick. If the concrete is used as a base, let it cure for at least 24 hours, then lay the paving material in a 1-inch bed of mortar. Tamp tiles or other paving materials lightly with a trowel handle until they are level; allow the mortar to cure for seven days before subjecting the walk to a heavy load. If the concrete is the final walk surface, finish it off in the desired texture and score contraction joints deeply at least every 8 feet to allow for settling and cracking.
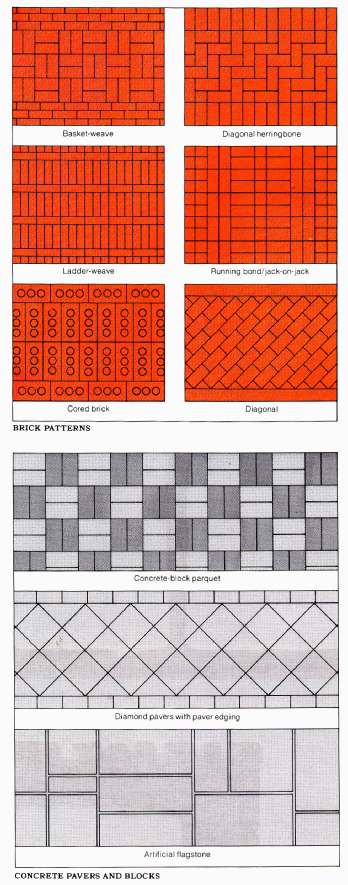
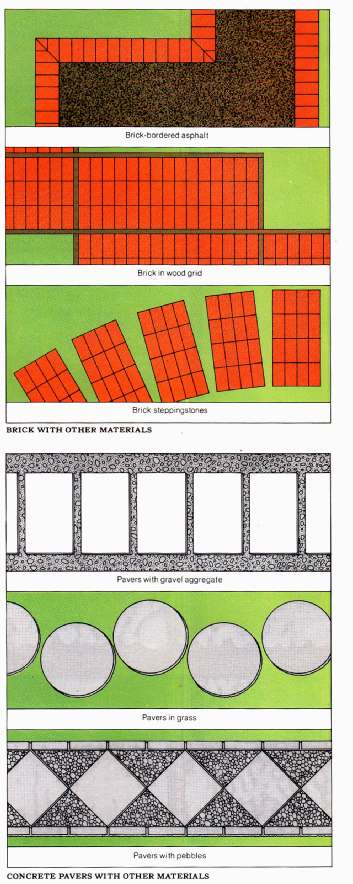
above: Payers with gravel aggregate; Payers in grass; Payers with pebbles; CONCRETE PAVERS WITH OTHER MATERIALS; Brick steppingstones; BRICK WITH OTHER MATERIALS; CONCRETE PAVERS AND BLOCKS
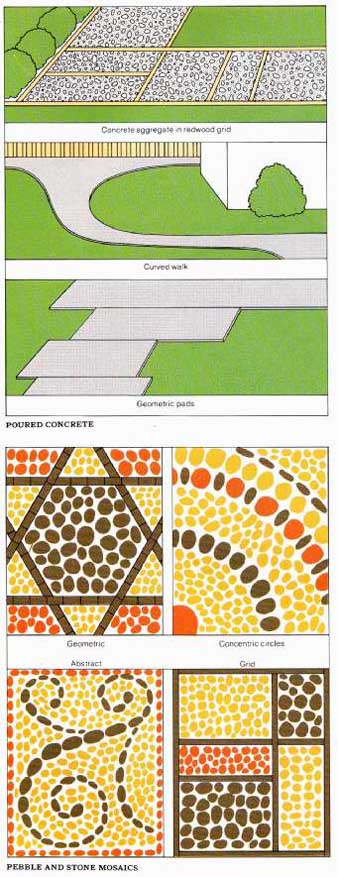
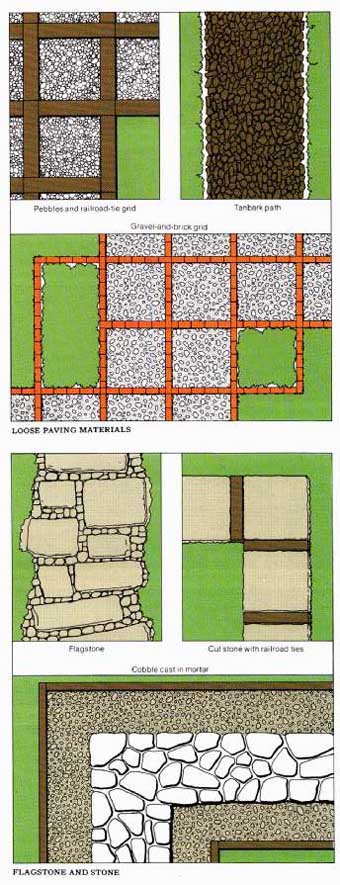
above: FLAGSTONE AND STONE; Curved walk; POURED CONCRETE; LOOSE PAVING MATERIALS; PEBBLE AND STONE MOSAICS
MATERIALS
The great variety of paving materials available can generally be classified as temporary or permanent. Permanent pavings include bricks, blocks, concrete, asphalt, tile, flagstone and wood. Temporary pavings are loose materials that are useful for low-traffic areas, when a feeling of informality is desired or when you plan to build a more permanent walk later. Loose materials range from wood chips to rocks and gravel. Wood chips, bark chunks and shredded bark are popular organic paving materials that can do double duty as plant mulches. Loose inorganic materials like crushed rock, red rock, crushed brick and gravel are more costly than organic materials. They are available in chunks as large as an inch in diameter and as finely pulverized material that is laid down in two layers, each moistened and compacted.
Although temporary materials are less expensive than permanent paving, they must be replenished. Temporary pavings can also be difficult to walk on, may become weedy and, if used next to a lawn, can create a hazard when mowing.
The choice of paving material for a walk should be influenced by the amount of traffic expected, climatic conditions and harmony with its surroundings. Frequently used walks require a material that is easy to walk on, provides sure footing, does not become slick when wet, cleans easily, does not get tracked into the house in wet weather and does not require frequent repair or replacement. Weather conditions such as snow, frost, heavy rainfall or extreme temperatures may dictate the exclusion of some materials or designs.
Both the paving material chosen and the design into which it’s incorporated contribute to the effect the walk creates in the landscape. Wood rounds or steppingstones placed off- center impart an informal look, while bricks laid in symmetrical patterns conjure up images of formal colonial gardens. Wood makes a more permanent walk than loose materials but is not as long lasting as masonry and will eventually rot. It’s best used in dry climates or on top of a 4- to 6-inch layer of drainage material. Choose naturally rot-resistant woods or those that have been treated with wood preservatives.
The color, texture and pattern of any paving material should harmonize with the house as well as the landscape. Brick, small in scale, is effective in repetitive patterns, as is tile. Concrete is a versatile material, and walks that are made of it need not be limited to cement-gray. Concrete can be colored, textured and formed in almost any shape. Pebble mosaics set in concrete can turn a walk into a work of art.


WOOD WALKS; STEPPINGSTONE
Walls
Once used mainly for fortification, freestanding walls now serve more benign functions. Like fences, they can define property lines, screen out unsightly views, act as windbreaks, muffle noises and create shade. Low walls often add bonus seating to outdoor living areas. Retaining walls on sloping sites create level areas and prevent soil from washing away.
DESIGNS
Since a wall is a permanent and usually dominant outdoor structure, great care should be taken in coordinating design with material. The size of a wall and the material that is used in it should be in scale with other nearby structures and landscape features. Concrete blocks are larger in size and scale than bricks , for example, and thus are less suitable than bricks for low walls. The color, pattern and texture of the wall material and design should also be compatible with the surroundings. Contrasting materials used in part of a design can relieve monotony, but combinations must be made judiciously. Ridged blocks will create interesting shadow patterns; bricks and blocks can be laid in patterns that create the same effect. Where a high masonry wall is not practical, a low wall can be topped with a lightweight fence.
Choose the site of the wall carefully, avoiding large trees whose strong, wide-ranging roots could damage footings. Early in the planning of a property-line wall, make sure you won’t be encroaching on a neighbor’s property. If you have any doubts, have your lot surveyed. (Many gardeners build walls a foot or two inside property lines to allow easy maintenance access.) Check local building codes for any restrictions that may affect height, material, size, setback and footing and for the necessity of obtaining a building permit. After the preliminary checks, plan the wall’s thickness, height, reinforcement, footing, slope or taper, and coping.
The thickness, height and reinforcement of a wall are interrelated. With a sound foundation, a brick wall only 1 to 2 feet high can be a single brick thick—about 4 inches. Taller walls or retaining and seat walls built of brick should be two or three bricks thick and reinforced with vertical steel rods. (A serpentine wall is an exception; although only a single brick thick, it can be built as high as 6 feet without reinforcement, gaining stability from its curving design.) Concrete- block walls up to 4 feet tall can be built one standard block thick without reinforcement; higher walls need the added support of vertical rods. Freestanding walls of reinforced cast concrete 4 to 6 inches thick can rise 6 feet or more. Mortared ashlar stone walls up to 4 feet tall should be 8 to 18 inches thick, while mortarless rubble stone walls, called dry walls, must have a base thickness equal to half their height.
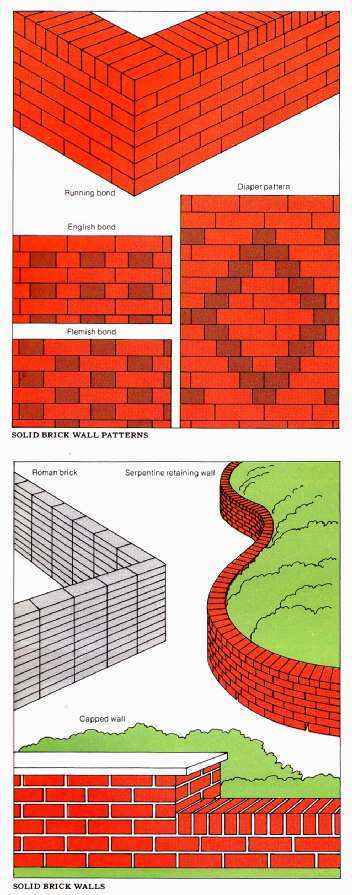
above: SOLID BRICK WALLS; etc.
A footing provides a solid foundation and an even base for any wall. Footings should rest on firm ground below the frost line if possible (map). Poured-concrete foundations provide the most stable base. Even in warm climates where frost heaving is not a problem, the soil may be so unstable that footings are needed. Brick walls less than a foot high can be laid in mortar on a poured-concrete foundation or on a bed of sand 6 to 8 inches deep. Taller brick walls or those built of concrete blocks need concrete footings that extend twice the thickness of the wall below the frost line.
Concrete footings for brick walls should cure for 24 to 48 hours before the bricks are laid, while concrete blocks can be set on either a wet or a dry foundation; the wet foundation method (the concrete still somewhat soft) produces a sturdier wall but is difficult for the amateur since the first course must be completed before the concrete sets. Poured-concrete walls require a footing twice the width of the wall. Dry stone walls are usually set on a bed of sand 5 to 6 inches deep.
Stone walls taper from the base to the top. Freestanding mortared stone walls usually slope inward 1 inch for every foot of height; dry stone walls need a slope of 1 to 2 inches for every foot of height; stone retaining walls need a slope of at least 8 to 10 inches for every 5 feet of height.
Masonry walls need a coping, or cap, at the top to give them a finished appearance and to keep water from seeping into and damaging the masonry or mortar. The coping usually extends at least an inch beyond the wall on both sides. Cast-concrete walls can be capped with a stiff mortar curved with a template; a masonry sealer can also be used.
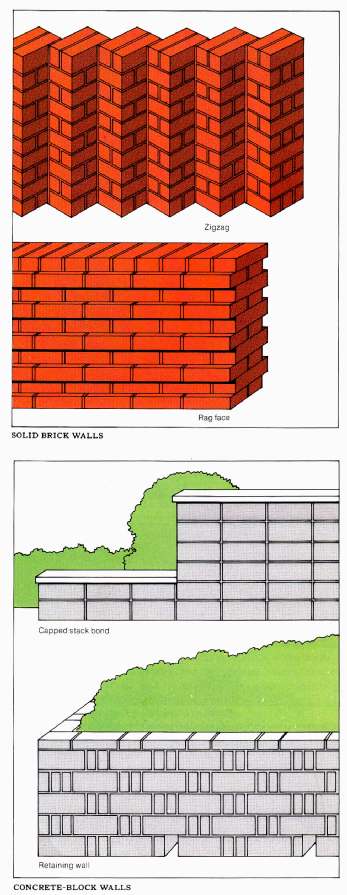
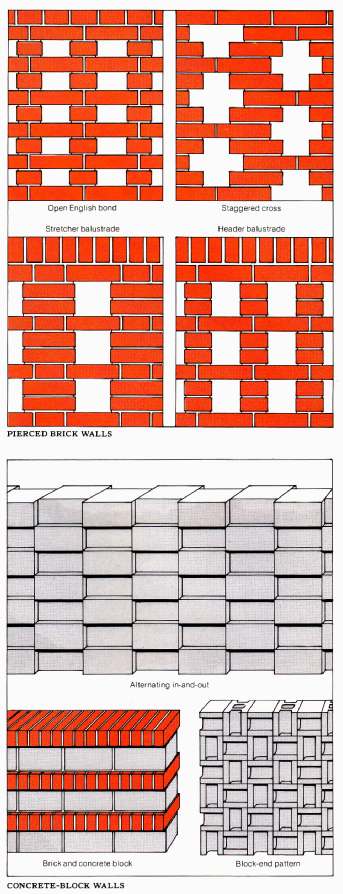
SOLID BRICK WALLS; Rag lace; Capped stack bond; CONCRETE-BLOCK WALLS
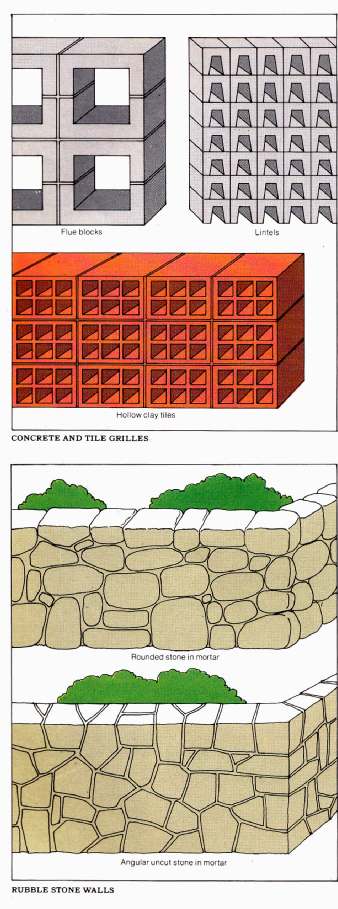
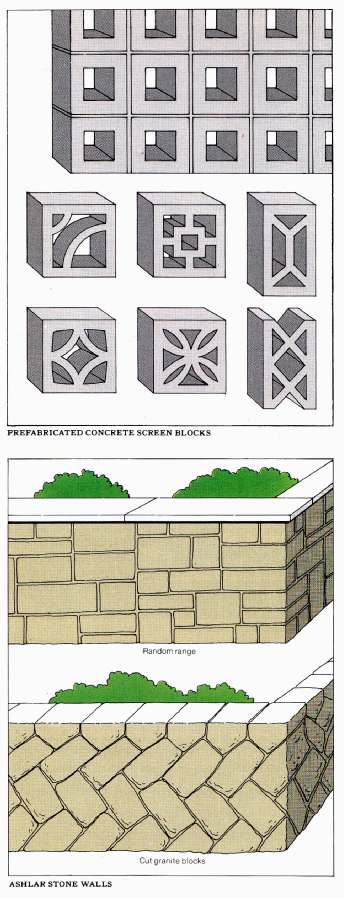
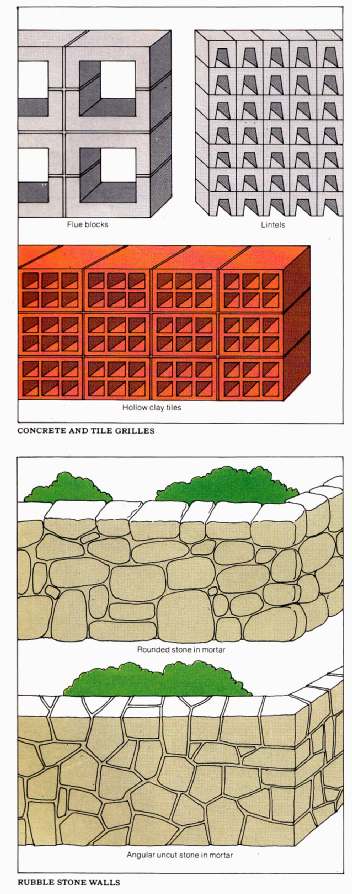
Lintels; Hollow clay tiles; CONCRETE AND TILE GRILLES; PREFABRICATED CONCRETE SCREEN BLOCKS; RUBBLE STONE WALLS; ASHLAR STONE WALLS
Building a solid, safe retaining wall that won’t overturn or slide forward, especially during rainy weather, is no easy task. A low retaining wall (3 feet or less) that won’t be under great stress can be built by an amateur. For a taller structure, it’s advisable to seek the help of a professional. The most important consideration in constructing a retaining wall is to provide for adequate drainage, either through or around the wall. Ditches, gutters, weep holes and drain-tiles must be incorporated into the design. When retaining walls are expected to hold back substantial amounts of heavy, wet soil, special anchors called “dead men” are installed so they extend into the soil behind the wall.
The first step in building a brick or block wall is to lay out the wall line with stakes and string. Then dig a foundation trench twice as wide as the wall width. If you are using footings of poured concrete, prepare the wood forms first, then pour and level the concrete, insert vertical reinforcing rods and let the concrete set. Before beginning actual construction, lay out a test course (one layer of bricks or blocks) on the foundation to check fit and alignment. Remove this course and lightly spray the foundation and the bricks or blocks with a garden hose. Secure the first course with mortar and check to be sure it’s level.
Build up the corners first, stepping them down toward the center. Attach a guide line to keep the courses straight and level and check for plumb every three or four courses. Use a mortar that is carefully made, with ingredients measured accurately and mixed thoroughly. Put down a small amount of mortar at a time, covering the abutting surfaces of bricks, stones or blocks. Tap each piece level with a trowel handle and check with a taut string. Scrape off excess mortar. Space around vertical reinforcing rods should be mortared at each level. If work on the wall must be interrupted, cover completed work with a tarpaulin or plastic sheet. As the wall is constructed, you may want to attach gate fittings. (Hinge bolts can be set right in the mortar joints as you are building the wall; the bolts will be anchored more firmly than if they were sunk into pilot holes made after the mortar has hardened.) Attach the top course and smooth the joints along the face of the wall to a desired shape. Wet down the completed wall and keep it moist for several days until the mortar has cured. Then clean off mortar stains and drippings with a solution of 1 part muriatic acid to 9 parts water; wear rubber gloves while applying the solution with a stiff-bristled brush.
Casting a concrete wall is similar to casting a footing. In both cases, the forms should be thoroughly coated with oil so they can be easily removed when the concrete has hardened.
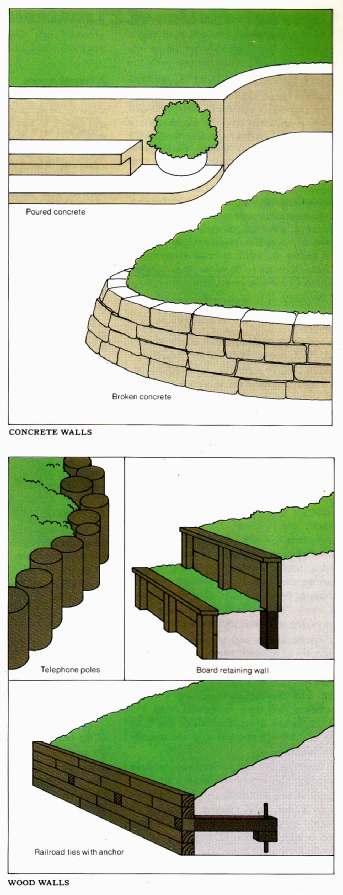
above: WOOD WALLS, etc .
MATERIALS
Brick, block, stone and poured concrete are most frequently used in constructing masonry walls. Straight or curving brick walls can be built in a variety of attractive patterns. The relatively small and uniform size of bricks makes them easy to work with, but they require more construction time than larger units. A multitude of patterns is possible when walls of concrete blocks are constructed in various colors, shapes, sizes and textures. Their larger size makes construction go more quickly, but since they weigh up to 50 pounds each, concrete blocks can be awkward to handle.
Natural or shaped stones can be laid either dry or with mortar. Construction is a challenge, however, because of the uneven shape, size and weight of the stones. Poured concrete can be used in any design for which a form can be constructed, but to be safe, walls higher than 3 feet require professional skill and the use of heavy equipment. Among wood products, railroad ties, timbers and utility poles are all used for retaining walls.
Coping materials used to cap a masonry wall include special coping blocks, bricks laid in a soldier course (with their narrow ends exposed), flagstone, cast concrete and wood.
WATERING See Sprinkler Systems
WINDBREAKS See Fences, Walls
WORK CENTERS See Storage
Articles in this Guide are based on now-classic Time-Life Encyclopedia of Gardening Series from the 1970s ... a timeless series, some titles of which are still available in libraries and bookstores ... see our Amazon Store for purchasing options.