Few sights are as compelling as a dramatically lit garden, the trees, shrubs and flowers awash with the glow from artfully concealed fixtures. Some gardeners illuminate plants just to enjoy the theatrical effects, while others use light to extend the number of hours during which they can continue gardening or outdoor entertaining. Lighting is but one of several finishing touches you can add to your garden to make it more usable, more attractive or more fun. Beyond such basics as putting down steps and paths or building a fence or shelter, you can also make garden furniture, add a cooling pool or fountain and devise plant containers that are as attractive as those that are commercially available, but that cost far less.
A building-supply yard is a good source of inexpensive containers. Hollow concrete blocks , for example, make serviceable containers for small plants. Simply fill the holes in the block with potting mix and plant some colorful flowers that will bush out or spill down the sides. If you object to the bare look of a gray concrete block, paint it with exterior masonry paint. Some special blocks have darker hues or decorative pebbles cast in the surface.
You can use various kinds of pipe sections as planters, including the terra-cotta tiles used to line chimney flues and the larger terra- cotta or cast concrete sections made for storm drains, sewers and water mains. Sections range from 6 inches to more than 2 feet in diameter and from 1 foot up in length.
Set on end, sections of pipe can be grouped for massed plant displays; using various lengths will produce a stepped effect. Larger pipe sections, including those with flared ends, make good individual plant urns. Large pipe sections are heavy, however, and once they are filled with soil they are difficult to move.
To avoid drainage problems with a bottomless pipe section, place it on a bed of gravel, bricks laid in sand or spaced wood decking, or fill the lower third of the pipe with gravel.
---
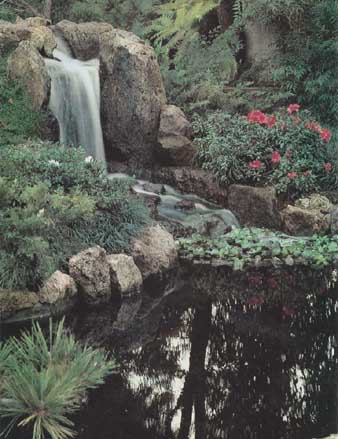
A scaled-down scene of lush semitropical splendor is completed by a man-made waterfall flowing into a pond used to grow water hyacinths. The waterfall’s actual size is indicated by the azaleas on the right bank.
---
A FAST-DRAINING PLANTER
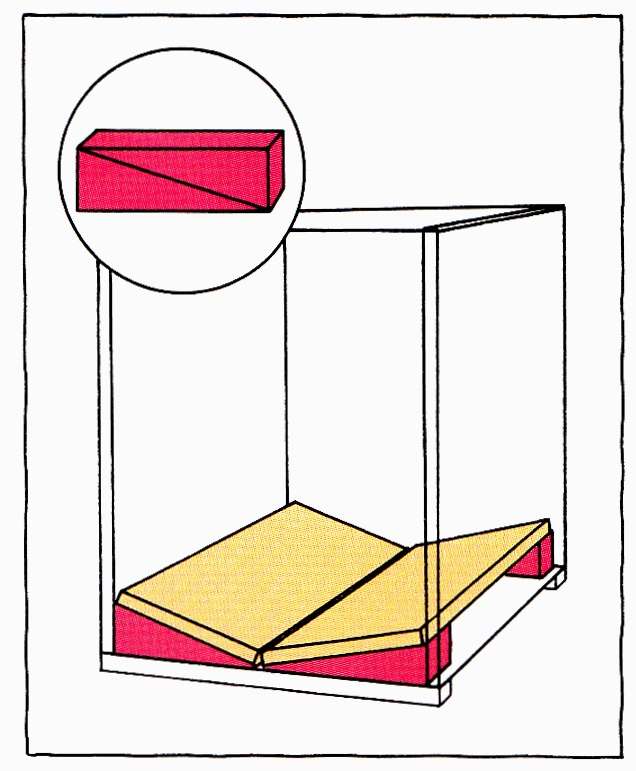
A wooden outdoor planter that will drain quickly and evenly after a heavy downpour can be built by gluing and nailing a pair of bottom boards to wedge-shaped blocks cut from scrap lumber (inset) so a shallow V shape is formed. Excess water will run down the boards and out of the planter through the ¼-inch slot between the boards. (A piece of mesh screening will prevent soil from running out with the water.) To provide roots with good ventilation and drainage, raise the bottom of the planter off the ground by nailing 1-by-1-inch cleats or runners along the bottom edges, as shown.
---
Some garden centers sell old whiskey barrels and wine kegs. A 52-gallon oak whiskey barrel sawed in half will hold a large flowering shrub or small tree. (The lingering aroma can make working with an old barrel a heady experience and possibly dangerous as well, since concentrated fumes can be explosive; leave the barrel in the sun and air until the fumes dissipate.) If hoops are loose or there are gaps between the staves, fill the barrel with water for a day or two so the wood will swell and tighten, then fill it with soil.
BOXES TO HOLD PLANTS
Rather than relying on ready-made containers, you can build plant boxes and tubs, shaping them to your own needs. Containers of wood are the easiest to make and are suitable for any patio or terrace. Wood has a high insulating value and tends to keep soil and plant roots cool and moist, even on a hot city balcony exposed to drying winds. Frequent watering makes wood used in planters prone to rot and insect attack but you can minimize these problems by using a naturally resistant wood like redwood or wood that has been treated with a preservative not toxic to plants.
Wooden plant containers can be as fancy as your carpentry skills permit. The simplest to build is a bottomless box, used to conceal less attractive containers or to unify a potpourri of pots. Make several such collars of boards 1 inch thick and 4, 6 or 8 inches high, depending on the size of the containers to be hidden. Nail the pieces together at the corners, or join them with angle irons for greater rigidity. Stain or paint the frames and they are ready to use.
To convert such a plant collar into a planter you need only nail on a bottom of boards or plywood. Low rectangular boxes are useful at ground level along the edge of a terrace or deck or attached to window sills or deck railings. Big, square containers will hold flowering shrubs or small trees. The larger the container, the stronger it must be. Lumber that is 1 inch thick is adequate for a small planter, but a container for a large specimen plant should be of 2-inch lumber joined with screws or lag bolts so it won’t buckle under the weight of plant, soil and water.
Attractive large containers can also be made of exterior-grade plywood. To conceal the raw look of plywood edges, cover them with pieces of solid wood trim. If space is limited, attach trellises to planters so you can grow vines and such vegetables as peas, cucumbers, beans and tomatoes on them.
Any wood container will last longer if you use waterproof glue and screws to make tight, waterproof joints. Protect joints by painting them with wood preservative. To shield the entire inside of a planter, paint it with tree-healing paint or a nontoxic waterproofing compound. Use noncorroding fasteners to prevent rust streaks.
---
A BETTER COMPOST BIN
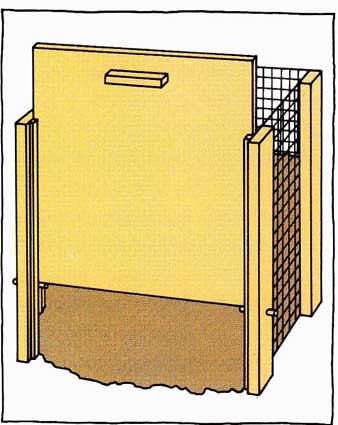
A compost bin with a sliding door permits easy removal of the well-aged material at the bottom of the bin. Set four preservative-treated 2-by-4s about 2 feet into the ground to form a square 3 feet on a side. Staple 1-inch mesh wire to the posts to form three sides. Make the door of ½-inch exterior plywood treated with preservative. To form channels for the door, nail two 1-by-1 strips on the inside edge of each front post. Drill a hole through each channel about 1 foot from the ground. When you want to shovel out compost, push short dowels through the holes to hold the door open.
---
---
BUILDING A BASIC BENCH
You can build a simple garden bench from an 8-foot length of 2-by-12 redwood (or other rot-resistant lumber) and a 4-foot length of 2-by-4. Saw two 15-inch lengths from the plank to make the legs. Glue and nail the legs to the 2-by-4, used as a crosspiece, or fasten them together with lag screws. Then toenail this assembly to the underside of the plank top and the bench is ready for use.
---
OUTLETS FOR EXCESS WATER
For drainage, it’s essential that you drill ½-inch holes every 4 to 6 inches in the bottom of the container; punch holes in any plastic liner you use. If the bottom is made of several boards, space them 1/4 inch apart. Cleats or casters that raise the container off the ground will improve drainage still more. You can fill a shallow container directly with potting soil if you first staple rustproof insect screening over the drainage holes to keep the soil mixes from washing through. If the container is more than a foot deep, place an inch or two of drainage gravel on the bottom before filling with soil.
It’s not a big step from building planters to making other furniture for a terrace or garden. You may want to build some of the basic pieces yourself—perhaps a table and benches—that you can leave outdoors the year round; for real comfort you can buy a few well-designed chairs or lounges to sink into.
A great variety of benches and tables can be built of wood. Even a novice can easily make a bench from a single 8-foot piece of 2-by-12 redwood and a 4-foot length of 2-by-4 for a crosspiece. Simply cut two 15-inch lengths from the end of the 8-foot plank for the legs, then glue and screw them to the 4-foot crosspiece. Toenail the entire assembly to the underside of the plank and you have an attractive and serviceable bench (below).
Another easily built bench can be made of several 2-by-4s or 2-by-6s laid flat and spaced about 1/4 inch apart. Nail 2-by-4 crosspieces to the undersides of the boards, then set this seat on a pair of concrete blocks placed near the ends so the crosspieces butt against the blocks. A more elegant bench calls for 2-by-4s laid on edge. Lumber has great structural strength when set on edge, and this technique is often used to make a continuous seating surface around a raised deck. If the bench is 1½ to 2 feet wide, it can substitute for a railing on a deck where the drop is less than 3 feet. On higher decks, you can build the bench into the structure of the deck but you need to attach a wide back-rest board for safety.
Low benches will suffice for informal buffet meals outdoors but if you dine frequently on your terrace or deck you may want a dining table too. An inexpensive table can be fashioned from an ordinary hollow-core door bought at a building-supply yard, sealed with a water-repellent stain and set on a pair of 2-by-4 sawhorses finished to match. You can make a more substantial table of redwood or cedar planks, nailing crosspieces to 6-foot planks of 2-by-6s or 2-by-8s, then resting the finished top on sawhorses or on large rectangular flue tiles set on end.
CONVERTIBLE PLAYGROUNDS
Play structures for children are as easy to put together as other garden furnishings. By planning them carefully to merge with your overall garden design, you may be able to convert them to horticultural use when your children have outgrown them. In any event, it’s better to provide an equipped area for children than to nag them about playing tag in the tomato patch or Tarzan on the rose trellis.
A sandbox probably provides more pleasure for toddlers than anything else in your yard. You can build a sturdy one with four pieces of 2-by-10-inch lumber, each 4 to 6 feet long, joined at the corners with vertical wood cleats or galvanized angle irons and screws. Dig out a rectangle of sod and soil to a depth of about 3 inches and set the frame into this excavation. Shovel in a 2-inch layer of gravel to ensure good drainage, then add 5 or 6 inches of sand. Play sand is clean and white, but builder’s sand costs less. A seat along the edges can be provided by nailing 2-by-6-inch boards on top of the sides. As with any play structure, bevel and sandpaper exposed edges to minimize the danger of splinters and scrapes.
If you build the sandbox of a decay-resistant wood, you can convert it into a plant bed by substituting soil for the sand. You could similarly convert any sandbox framed with weathered railroad ties, preservative-treated landscape timbers or concrete blocks.
If you have a terrace or ground-level deck floored with a grid of individual squares, you can make a pleasant sandbox simply by leaving the flooring material off one square, boxing it in and filling it with sand instead. When not in use, such a sunken sandbox, with its shovels, pails and other paraphernalia, can be concealed with a removable cover set flush with the surrounding floor. In a wooden deck, such a cover made of spaced 2-by-4s will blend in so well it will be all but invisible—and sturdy enough to walk or sit on. A cover also keeps neighborhood pets from making a mess of the sand. Filled with soil later, the inset becomes a place to display a bed of flowers or to plant a tree.
One of the unquestioned joys of summer for small children is a backyard wading pool. Plastic pools of many shapes and sizes are widely available at little cost; all you have to do is fill them with the garden hose and let the children splash to their hearts’ content. But if the pool is so garish you feel obligated to empty it and put it out of sight every evening, you might try framing it with boards, just as you would frame a sandbox. With only a little more effort, you can combine a sandbox and a wading pool into a single unit. This backyard beach can have sand and water containers separated by a low platform of 2-by-4s, with the boards spaced ¼ inch apart for drainage (below). The platform gives the children their own private sunning and sitting deck. If you like, this platform can be hinged with a place beneath for storage of pool and sandbox toys.
For many children, backyards invite climbing. If you are fortunate enough to have a strong tree with low branches, you can set a treehouse in it. A frame of 2-by-4s or 2-by-6s holding a platform of ½-inch exterior-grade plywood makes a joyful retreat. Be sure to provide a strong safety railing, with corner posts holding wire fencing to prevent falls. For the sake of the tree, drive as few nails into it as possible, since any break in the bark invites disease. Where you can, lash the frame to the tree with ¼-inch nylon rope threaded through holes drilled in the platform frame. Don’t use wire; it could girdle a branch and kill it. For access, use a ladder securely attached to the frame instead of nailing climbing slats to the tree. A bed of tanbark on the ground is an added safety measure.
---
A BACKYARD BEACH FOR TODDLERS
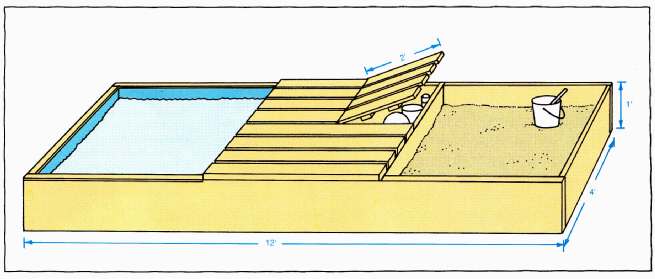
A combination sandbox-and-pool play area, designed to be converted later into a raised planter, is built within a rectangular framework of redwood. Build the frame of 4-foot and 12-foot lengths of 2-by-12s, joining them with galvanized angle irons and screws. Divide the framework into three segments with 2-by-12s nailed 4 feet from each end, in the center, make a deck of 2-by-4s, spacing them ¼ inch apart. One section can be hinged to provide a storage bin below, in the sandbox, put a 2-inch layer of gravel, then fill with play or builder’s sand. Line the pool side with polyvinyl chloride (PVC) plastic stapled in place.
---
If your children climb on your trellises, to your dismay and the detriment of your climbing vines, build them a climbing trellis of their own; you can convert it to plant use later. Instead of using laths, likely to give way quickly under the assault of a vigorous child, make the climbing crosspieces of 1-by-2s or dowels an inch or more in diameter. Attach these to 4-by-4-inch posts set in the ground like fence posts ( -- 66). Paint or stain the trellis to match other structures in your garden, and again, spread a thick layer of tanbark on the ground below to cushion tumbles.
HIGHLIGHTS AFTER DUSK
Most gardeners, as they improve their gardens and make them more comfortable, find they want to use them after dusk for entertaining as well as for doing chores. Artificial light not only makes possible the indoor-outdoor continuity many homeowners enjoy during the day, but also eliminates the need for drawing curtains to avoid the “black mirror” look of windows at night.
Garden lighting also brings out dramatic effects often not evident during the day. For example, a clump of trees can be given a new life at night by washing the trunks and leaves with lights hidden among low plantings below. Flower colors may seem twice as vivid with the addition of one or two shaded fixtures set on short poles among the plants. Leaf patterns can be silhouetted from behind or made to cast intriguing shadows on a fence or wall.
Many a homeowner is content to mount a couple of sealed-beam floodlights under the eaves of the house, pointing them down toward the garden. This will illuminate the garden, of course, but with a harsh, flat light. A garden should be lit more like a stage set, with dominant lighting on the stars, secondary lighting for featured players and fill-in lighting for the other members of the cast. Here are guidelines to follow in planning garden lighting:
• First, make sure that any area intended to be used after dark is adequately lighted for safety. The most critical nighttime hazards are paths, steps, low walls or other changes in ground level, and garden pools or streams.
• Place some light fixtures well away from the house, perhaps even at the perimeter of the garden. They can be used to call attention to particularly attractive plants and other decorative features; they also make the garden seem larger by extending the visible space.
• Take care that the bulbs of these fixtures, and any other lights in your garden, are concealed from direct view and don’t shine into your eyes—or those of your neighbor.
• To highlight a major point of interest, such as a specimen plant or a piece of statuary, and at the same time to give it a three-dimensional look, place the light source a few feet in front of and below it, slightly to one side. To keep a spotlight from making its subject appear to float disconcertingly in a sea of darkness, supply a lower level of light elsewhere, particularly in the dark middle ground between the terrace and any lighted feature toward the back of the garden. This can be done with several low-wattage lights scattered in the secondary areas, or with floodlights concealed in trees and pointing down to wash large areas with soft light.
• Consider silhouetting patterns of branches and leaves. Let the pattern appear in dark outline against a lighter background, such as a wall or fence that is washed with light from a fixture at its base. Or, silhouette in reverse, by lighting the pattern of leaves in front of a dark background; place the lights behind the pattern, aimed up so the leaves of plants become translucent.
• Interesting textures can be emphasized with grazing light. To call attention to the three-dimensional texture of a stone wall, a deeply patterned fence or a rough tree trunk, place the light source a few inches from the surface and aimed parallel to it.
• Avoid using colored lights; the results can easily become too theatrical, if not downright garish. Red light , for example, makes green foliage look a sickly brown. When in doubt, stick to white.
---
LOW-VOLTAGE LIGHTING
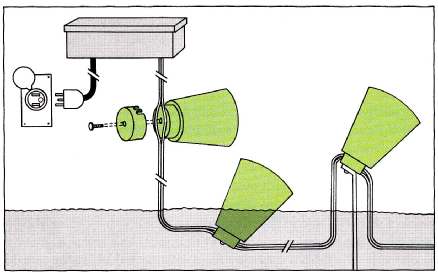
A complete low-voltage lighting kit for garden use includes a transformer, between 100 and 150 feet of weatherproof electric cord, and about half a dozen lighting fixtures. Mount the transformer at least a foot above ground level, close by a grounded (three-hole) exterior outlet that can be switched on and off. Wherever you want to attach alight, simply make a 3- inch cut between the electric cord’s two wires, remove the waterproof back of the fixture and place the split cord in parallel slots. When the back is replaced, prongs penetrate the wires to make the connection. Bury the cord 4 to 6 inches deep; some fixtures may be partially buried as well.
---
Before you buy outdoor lighting fixtures, walk around your garden with a portable light source, perhaps a hooded mechanic’s light or a photographer’s floodlight with a long extension cord. Test the light in various locations while you study the effects it gives. Then check the building-code requirements in your community; if you use standard 120-volt wiring and fixtures, you may need to hire a licensed electrician to install the lights, and the wiring may have to be sheathed in heavy conduit. But if you select a low-voltage system that uses a transformer to reduce house current to 12 volts, you probably need neither electrician nor permit. Such a system is economical, virtually shockproof and easy for amateurs to install. Low-voltage lighting is commonly sold in kits that contain several spike-mounted light fixtures, 100 feet or more of waterproof cord and a transformer that connects to a house outlet. The cord can simply be strung out along the ground and tucked out of sight in plant beds, while the fixtures are moved around to try various effects. Once the lights have been positioned to your liking, you can bury the waterproof cord in a shallow 4-to 6-inch trench. Remember where it is, though, so you don’t accidentally cut it with a spade.
In addition to outdoor lighting, one of the most pleasant finishing touches you can add to your garden is a simple fountain or pool. Even a small birdbath adds sparkle and movement to an outdoor setting, and you can make one from any number of ordinary, inexpensive items, even the top of a plastic garbage can, so long as you raise it far enough off the ground to discourage cats.
A WATER-GARDEN SETTING
A larger garden pool need not be a complex undertaking either. Several companies manufacture rigid pool liners of formed, rein forced plastic that can be set directly in excavations in the ground.
Or you can make your own pool liner, more economically, by using a flexible plastic sheeting such as polyvinyl chloride woven with nylon for added strength. PVC sheeting designed for such use is available in sizes as large as 20 by 20 feet, colored a vivid blue on one side but gray on the other in case you prefer a more neutral effect.
To make a small pool with a plastic liner, first outline its shape on the ground with a piece of rope or a length of garden hose—or stakes and string for a more formal, rectangular pool—adjusting the outline until it seems right. Dig inside this outline to a depth of a foot or more, sloping the sides upward to form a rounded dish shape. Remove rocks or other sharp objects such as sticks or roots that could snag or pierce the plastic, then line the bottom of the excavation with a smooth layer of about an inch of sand. To determine the size of the liner you will need, measure the length and width of the excavation—in the case of an irregularly shaped pool the smallest rectangle that will encompass the outside dimensions—and add twice the maximum depth of the pool to each dimension. Thus a pool 5 feet wide, 7 feet long and 2 feet deep will require a liner measuring 9 by 11 feet.
Stretch the liner over the excavation, weight its edges firmly with smooth stones, concrete blocks or bricks, then start filling the center with water from a garden hose. The weight of the water will gradually mold the liner to conform to the bottom of the hole. When the pool is full, trim off excess liner material, leaving a flap 6 to 8 inches wide around the edge. Conceal the flap with a permanent edging—fieldstones if it’s an irregular woodland pool, bricks or concrete payers for a more formal rectangular one. You will need to add fresh water periodically to compensate for evaporation.
---
AN EASY GARDEN POOL
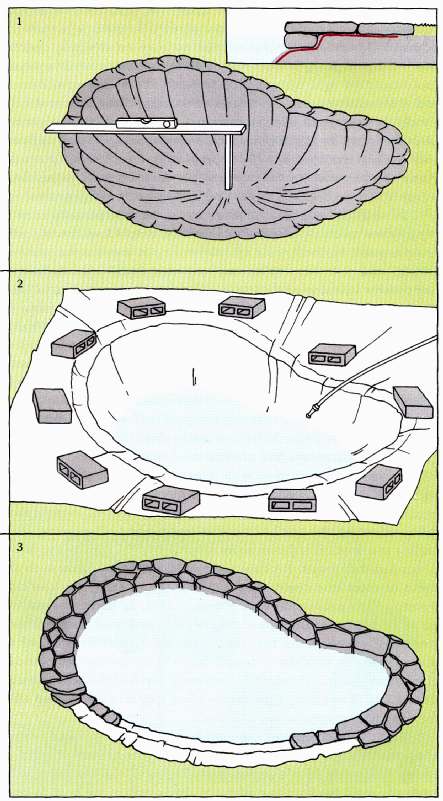
1. To make an inexpensive garden pool without plumbing, outline it with a rope or garden hose, then excavate to a depth of a foot or more, sloping the sides toward the center. As you dig, check the depth frequently with an L-shaped jig and a carpenter’s level. Remove rocks, sticks and roots, then compact the earth by bouncing and rolling a spare tire in the hole. Cut a shallow step at pool edge (inset) so you can completely conceal a plastic liner beneath the water and under a rock edging.
2. Line the excavation with a durable pool liner made of polyvinyl chloride (PVC) reinforced with nylon, laid over a 1 -inch layer of sand. To determine the size of the liner needed, measure the smallest rectangle that will encompass the excavation and add twice the depth of the pool plus 1½ feet for an edge lap to both length and width of the rectangle. Stretch the liner over the excavation, holding the edges in place with bricks or stones. Fill with a garden hose; the weight of the water will mold the liner to the shape of the excavation.
3. When the pool is filled to within 3 inches of overflowing, trim off excess liner material, leaving a 6- to 8-inch edge flap. Hide the flap with a permanent edging of stones or, if you prefer a more formal look, use bricks or paving slabs. Add fresh water periodically to replace water that has evaporated. Drain the pool with a siphon, pump or bucket.
----
When you need to clean out the pool from time to time, or empty it for the winter, you can use a simple suction pump such as the kind that attaches to an ordinary electric drill. Alternatively, if you have a place in your garden lower than the pool, or a nearby basement with a floor drain, you can siphon the water out with a length of garden hose. Immerse the coiled hose in the pool. When it has filled, leave one end under the water and cover the other with your palm while carrying it to the lower position; uncover the end and the contents of the pool will be pulled out through the hose.
You can set off such a garden pool, or any of the other pools shown in the encyclopedia, with lighting, a fountain, aquatic plants, or all three. A single low-voltage bulb in a waterproof fixture will give the water gemlike luminescence at night; you can conceal the fixture below a lily pad—or buy a fixture that itself resembles a lily pad. Similarly, you can place a small self-contained submersible electric pump in the pool, propping it up with stones so the fountain tube protrudes just above the surface. Many garden centers sell such pumps, which include waterproof cords sealed into the units, plus lengths of plastic fountain tube with valves for adjusting the height and pattern of the jets; the package may also contain plastic pool liner. Most pumps operate on 120-volt current, so you will need regular weatherproof wiring and an outlet to plug the cord into.
GROWING AQUATIC PLANTS
Garden pools also offer a chance to discover the pleasures of plants that thrive in or around water. Water hyacinth, which floats on the surface, is easy to grow and a favorite for beginners. It multiplies profusely, soon filling much of a small pool with its violet- and-yellow blossoms; its dangling roots are a good spawning ground for goldfish. Water lilies are also favorites, though they need a small container of soil at the bottom of the pool and abundant sunshine.
Once you have experimented with water-growing varieties, you may want to plant compatible species at the edge of the pool— elephant’s-ear, ferns or creeping primrose , for example, or horsetail, whose tall green stems make an elegant background for a pool. You may even want to group house plants around the water during the summer, giving them the benefit of the moisture and the sun. As you sit admiring their reflections—and the other improvements you have made in the structure of your garden— you will doubtless conjure up visions of other worthwhile projects yet to come.
Articles in this Guide are based on now-classic Time-Life Encyclopedia of Gardening Series from the 1970s ... a timeless series, some titles of which are still available in libraries and bookstores ... see our Amazon Store for purchasing options.