REPAIRING OLD FLOOR SURFACES
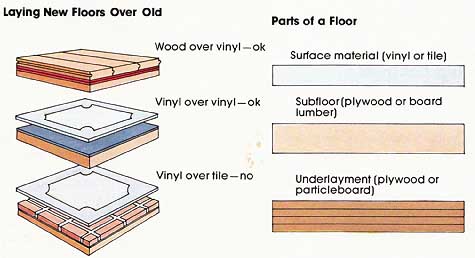
Old floor coverings do not always have to be removed in order to install a new floor surface. If you want to lay new flooring on top of your present floor, the old surface must be absolutely clean of old wax, polish, dirt, and glue. It is also imperative that your old floor be smooth and even enough to accept a secure bond between it self and the new floor. Wood can be placed over vinyl, for instance, and vinyl can be placed over vinyl, if the old vinyl is smooth and even; but vinyl cannot be laid over ceramic tile because tile has as uneven surface.
Repairing surface flooring. If your old floor is sheet vinyl or vinyl tile, reset any loose sections, and use a premixed floor filler or spackling compound to fill in gaps caused by broken or missing areas. If the floor is curling or buckling, smooth it by re-gluing and nailing with 5d ring shank nails; or remove damaged sections altogether and fill in the missing pieces with floor or spackling compound. In all your repairs to your old surface, you are merely trying to achieve as smooth and even a surface as possible, so that your new surface will be received easily.
Laying a new subfloor over tile. If you want to avoid tearing out an old ceramic tile floor, you can simply lay a new subfloor of plywood over the existing surface. It will add about 3/8 inch to your present floor, so if the bathroom door swings into the room, you will probably have to remove it, plane its bottom, and install a threshold. But you will still save time. However, you should add a sub- floor in this fashion only if you know your present sub- floor is sound and without rot.
Underlayment. Wherever your surface floor is seriously damaged, shows signs of leakage around a fixture, or seems to “give” when you press or step on it, you should remove a section of the finished surface, and use a screwdriver to probe the underlayment (the material between surface flooring and subfloor— usually plywood or composition board). The screw driver will sink readily into damaged or rotting underlayment, while strong underlayment will resist. If the underlayment is in need of repair, you must fix it before laying a new surface floor. Out of sight may be out of mind, but a rotting floor will continue to rot, whether you see it or not. The most common floor damage in the bathroom occurs around the toilet, but the instructions that follow are equally applicable to other parts of your floor
Tools: screwdriver; circular saw; drill; saber saw; hammer; prybar.
Supplies: spackling compound; glue; 5d ring shank nails; common nails; ½- or 3 plywood.
- Wood over vinyl—ok
- Vinyl over vinyl — ok
- Vinyl over tile — no
- Surface material (vinyl or tile)
- Subfloor (plywood or board lumber)
Parts of a Floor:
- Underlayment (plywood or particleboard)
- Premixed floor filler
- Use 5d ring shank nails for curling and buckling. Re-glue, then nail
- Fill in with putty or filler
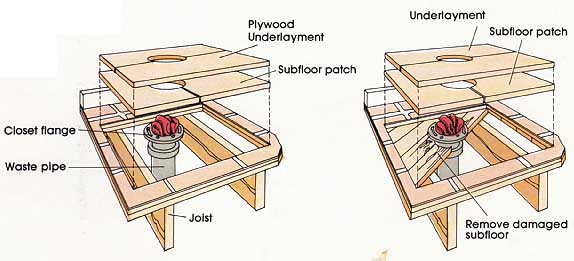
1. Remove a section of finish flooring large enough to uncover sound underlayment all around the damaged area. Take out the screws that hold the closet flange to the floor, but do not remove the flange or lean on it; undue pres sure may weaken or break the joint between the flange and the drainpipe beneath it.
2. Using a circular saw set to the depth of the underlayment, cut out the section of underlayment you have uncovered. Remove the underlayment, being careful around the flange. It will probably be necessary for you to remove the underlayment in sections rather than all at once.
3. If the subfloor immediately below the underlayment is sound, cut a piece of plywood the same size and depth as the piece you removed. With a drill and a saber saw, cut a hole to fit around the flange, and nail the underlayment in place. You will probably have to install your new underlayment in sections rather than as a single piece.


4. If the subfloor immediately beneath the underlayment is also rot ten, turn off all the electricity leading to the bathroom and connect your circular saw to an outlet elsewhere, using the correct heavy-duty extension cord. This is a precaution against sawing through live wires. If the subfloor is plywood, set your saw to the depth of both underlayment and subfloor, and cut out a section large enough to reach the nearest joists. Then replace the subfloor with new plywood of equal thickness. Cut a hole in the patch to accommodate the flange, and nail the section to the joists. You’ll probably want to cut the patch into two sections. Next, replace the damaged underlayment, but if you have to cut it, make sure its cut line will be perpendicular to the cut line in the subfloor patch.
5. If the subfloor is tongue-in- groove, cut each rotted board back to the nearest joist and pry up the boards. Remove any protruding tongues, and replace the boards with plywood and underlayment patches as in Step 4. Re place the flange screws to secure the flange to the floor.
- Plywood Underlayment
- Underlayment
- Waste
- Joist
- Remove damaged subfloor
REMOVING TILE FLOORS
If your surface flooring is too damaged to repair in patches, if you have more than one layer of flooring material, or if you don’t want to add an entirely new sub- floor, you should remove what is there now. It can be a messy job, but you need the results — a smooth surface.
Supplies: old towel.
Tools: Molding—prybar; screwdriver. Tile — mallet or hammer; cold chisel. Vinyl — household iron; putty knife; utility knife.
1. To remove all old surface flooring, begin by removing all baseboard moldings. Pry out wooden quarter-round with a small prybar or a screwdriver. This piece of molding is quite fragile and liable to snap, so it you expect to reuse it, be careful. Pry the molding out ‘4 inch all along the wall; then go back to the beginning and pry it out some n Repeat until the molding is free. Follow the same procedure with the some what less delicate baseboard.


Pry molding gently, put wedges in, and continue to end of strip; Heat the
tiles to melt the glue ; Cleared area
Plastic cove moldings will almost certainly have to be replaced in any case, so you can probably work with less delicacy and more speed — just pry them loose with a prybar and chip away at whatever small pieces remain behind.
2. If you are removing ceramic tile, start from an edge, using a mallet to tap gently on a cold chisel, removing one tile at a time. If there is no edge you can reach, you will have to make one, by breaking up a tile or two. Work gently, both to salvage as much of the old tile as possible and to minimize damage to the floor surface underneath.
3. If you are removing vinyl or similar sorts of tiles, you may be able to loosen the old adhesive by heating the tiles with an ordinary household iron. Use an old towel or similar cloth between the iron and the tile to protect both items. If you must pry up your old tiles, plan for a rather time-consuming and often tedious process. Use your prybar.
4. If you are removing sheet vinyl or linoleum, follow the same procedure described in Step 3. You will find it easier to remove this type of floor if you first slice the surface into strips or sections of a size you can handle simply. Use a utility knife with a fresh, sharp blade, keep your fingers out of its way, and then remove the sections as you would remove tiles, When you have removed all your surface flooring, scrape up the little odds and ends of flooring material that want to stay behind, as well as any mastic or adhesive on the underlayment. This surface must be smooth and even.
Cold chisel; Wedges; mallet and chisel, putty knife, and any other stiff-bladed scraper you may require, and try not to damage the underlayment below.
Next: Wall Coverings
Prev.: Washbasins & Vanities

