Bathroom washbasins, known as lavatories, may be wall mounted, set into counters, or free standing. Removal is identical for all types, except as noted below. The task is slightly more difficult than removing a toilet, but is still basically a job for one person with a little assistance. Turn off the water supply, either at the shutoff valves or at the main water valve. If you have a wall-mounted or counter-top basin, place a bucket underneath the trap, which is the curved pipe leading from the basin’s drain into the wall. If you have a pedestal basin, keep the bucket handy.
Tools: wrench; plumber’s, or basin, wrench; screw driver; rubber mallet.
Supplies: bucket; length of rope; two sections of 2 by 4; masking tape.

1. Turn the faucets on and drain the supply lines. Disconnect the water
supply lines, first at the top (near the basin) and then at the bottom (near
the shutoff valves), and seal the lines with tape until you are ready to
install your new basin. If space under the basin is too cramped for you
to reach the coupling nuts at the top of the supply line, use a basin, or
plumber’s wrench.
2. If the trap has a clean-out plug, unscrew the plug and allow the contents of the trap to drain into the bucket. Then unscrew the slip nuts that connect the drain trap with the tailpiece. If there is no clean-out plug, remove the trap, and tilt it into the bucket to drain it.
3. If your basin is installed below a counter top, set a section of 2 by 4 (several inches wider than the basin) across the top opening. Tie a wire or a piece of clothesline around the wood, and drop the line through the drain hole. Tie it around a second block of wood, leaving as short a line as you can between the two pieces of wood. Twist the bottom block until the wood is pressed firmly against the tailpiece under the basin. This will secure the basin until you are ready to move it. Then remove the lug bolts and clips that secure the basin to the counter. Finally, holding the basin from the bottom, slowly allow the line to unwind until the basin is loose. Then re move the basin through the counter-top hole.
- Wall
- Faucet
- Overflow
- Pop-up assembly
- Tailpiece
- Shutoff valve (angle stop)
- Trap
- Wall bracket
- Clean-out plug
- Drain extension
- Shutoff valve
- Lug bolt
- Support clip
4. If you have a wall-mounted basin, disconnect all the plumbing lines, remove bolts, lilt the basin straight up from its wall bracket, and set it aside.
5. Remove the faucets by placing the basin upside down on a towel and unscrewing the retaining nuts from the faucet stems. Turn the basin right side up and knock the faucets gently with a rubber mallet or the base of a screwdriver to break the putty seal that holds them to the basin. Lift the faucet assembly from the basin.
6. If you want to retain your old basin but replace the faucet and handles, turn off your shutoff valves. Place a bucket beneath the supply lines and faucet connection. Then remove the supply lines. Using a basin wrench, unscrew the nut that secures the faucet. Plan to exert some force. The faucet assembly should pull right out. Faucet handles will simply unscrew from the top. Your new faucet and handles go in by reversing this whole procedure, including reconnecting the supply lines and opening the shutoff valves.
Removing Cabinets
For the most part, removing cabinets is fairly straightforward work. The only unusual difficulties you are likely to encounter in this process will come from improperly hung cabinets. The cabinet, the wall, or both may be damaged when you remove the unit. Save the cabinet if you can, but repair the wall with spackle, plaster, or new pieces of wallboard. Be sure you have removed all fixtures and fittings before you begin.

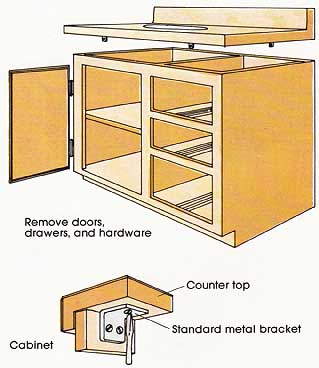
Counter top; Cabinet; Standard metal bracket
Tools: screwdriver; prybar.
Supplies: spackling compound (for patching dam aged wall).
1. Remove any drawers and doors so they won’t swing open as you carry the unit away.
2. Remove the counter top (including the basin, it is a one-piece molded unit). Whether your counter-top material is plastic laminate or tile, the surface material is applied to a plywood deck. You want to remove this entire deck, not just the finished surface. You can determine how the deck is attached to the vanity merely by looking up from underneath the counter top. Remove any screws. If the counter top is glued to the base, you may have to pry it off, and some older cabinets may need to be dismantled on the spot.
Next: Floor Surfaces
Prev.: Shower Stalls

