If the plumbing in your stall shower is on a partition wall, you have to do some tricky work around the pipes. For specific information, see our guide Basic Plumbing Techniques or call in professional assistance. On the other hand, if the plumbing in your stall shower is located on a structural wall, at least two and perhaps three of the remaining shower walls are essentially partitions. If these walls are not encumbered with wiring, pipes, and duct work, you will be able to remove them without difficulty. However, most of the original walls in a house are likely to have some wires, pipes, or ducts, so you should turn off all systems and work carefully to minimize the possibility of damaging whatever components are lurking there. There is no certainty that a wall that is blank on the out side is also blank on the inside. The wall(s) you remove will throw up a good deal of dust, so you should wear goggles, work gloves, and a dust mask. Before you begin, turn off the water supply to your shower.
Tools: screwdriver; prybar; cold chisel; hammer; sledgehammer; circular saw; tin snips or wire cutters; hammer.
Supplies: goggles; work gloves; dust mask.
1. Unscrew the fittings—faucets, showerhead, and controls—and set them aside. Then “skin” the wall by removing its surface materials.
2. Use a prybar to remove plastic or fiberglass surrounds from the walls. You probably will not be able to salvage this material in any useful condition, but exercise special care not to damage the pipes when working on the plumbing wall.
3. Remove tiles from the wall with a cold chisel.
4. The inside of a shower partition is essentially the same as that of any small, nonbearing wall. It will be made of some combination of waterproof wallboard, plaster, studs, and lath. Break up the wall by pounding it with a sledgehammer. Work on only one side of the wall, and only between the studs. Whenever necessary, pull sections of the wall apart with your hands or prybar. If the wood lath resists, you can cut through it with a circular saw; if the lath is metal, use tin snips or good wire cutters. Hammer along the studs to free any exposed wallboard, plywood, or lath supports, and push the wall through to its far side.
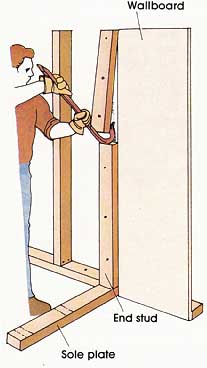
5. When nothing remains of the partition wall but its frame, saw through all the studs except those at either end of the frame, and push and pull each half-stud until it comes free from the top or bottom part of the frame.

above: Dismantling the Old Bathroom
6. Cut through the end studs and use your prybar to pull them free from the walls to which they are attached. Work cautiously, and try not to fracture the wall surfaces of any adjoining rooms. Pry up the top and sole plates to complete removal.

Removing Shower Doors
If you have an attached shower door, you will have to remove this before you remove your shower stall or tub/shower combination unit. If you have a shower stall with a hinged door, you need only unscrew the hinges from the wall, remove the door, and unscrew the rest of the frame. Any parts that have been set with putty or other sealant will have to be knocked or pried loose. Sliding glass doors are not appreciably more difficult, though there is less chance of breaking the glass if you have an assistant hold them while you work.
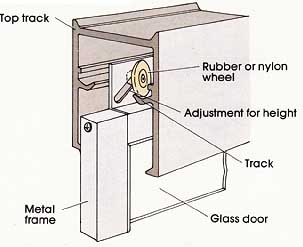
The doors slide on wheels set into tracks on the upper part of the frame. If possible, lilt the doors off their tracks one at a time before doing anything else, and set the glass aside in a safe place. If it is not possible to lift the doors out of their frame, one person can raise the upper bar of the frame just far enough so a second person can lift the door from its track at the bottom of the frame. When the door is free from the lower track, lift the top wheels from their tracks. Carefully set the door aside. l with the second door. You are left with a simple metal frame screwed or glued into the tub surround. You can lift the top bar completely free of the frame, then unscrew, knock, or pry loose the bottom. Top track and side bars.

Tools: screwdriver; hammer. Metal frame

Next: Washbasins & Vanities
Prev.: Bathtubs
