A cool basement is an ideal place to store wine, which favors a constant temperature of 55° - 60° F and minimal direct light. You can store wine in a variety of rack styles, but the bottles should be stored on their sides. Standard shelves will work fine or you could use bins or cubicle units set on their sides.
Here’s an easy-to-build wine rack that you can make as a portable unit or a cabinet. Or you can expand it in any direction, even floor-to-ceiling if you like. To increase the height or width of the wine rack, change the front and back crosspiece measurements in increments of 2¼ inches and the height of the side panels in 3½-inch increments.
Oak and cherry are beautiful woods for this project, but it may be difficult to find 11½-inch boards that are not warped. Redwood or stained pine are easier to work with and less expensive. The closet dowels are usually available only in fir, but you can stain them to match a darker wood.
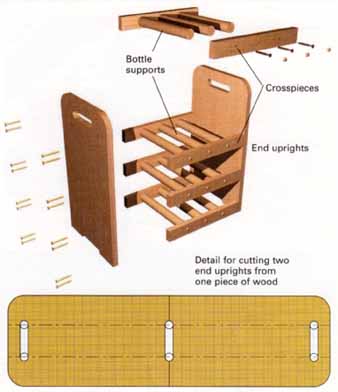
Cut the two end pieces as a single unit from one piece of 1x12. Draw a line through the middle of the board, perpendicular to the long edge. Drill two 1-inch-diameter holes on this line, each 3 inches from either edge. Be sure to clamp a scrap board to the back of the good board while you drill to avoid tearing out the wood when the bit goes through. Draw lines on both sides of the circles to connect them, Cut the board down the centerline, then use a jigsaw to cut along the lines between the two now half-circles. Use a compass or large coin to draw the rounded edges on the top corners, then cut them with the jigsaw. Sand and smooth all the rounded edges.
If you wish to cuts slots for hand grips, as shown, drill two more sets of 1-inch-diameter holes, connect them, and cut them out with the jigsaw.
Cut the eight crosspieces from 1x2 hardwood or rip them from another piece of the 1x12 stock you used for the ends. Take care that these pieces are cut perfectly square and exactly the same length.
The bottom crosspieces should be 1 inch above the bottom of the end pieces. Position each additional crosspiece 3½ inches above the previous one. Use bar clamps to hold the end pieces to the top and bottom crosspieces while you drill pilot poles through the end pieces and into the ends of the crosspieces. Counterbore the holes if you want to conceal the screwheads. Fasten these four crosspieces in place with 2-inch brass or pan-head screws. Position and attach the remaining crosspieces in the same manner.
Cut sections of 1¼-inch dowel stock for the bottle supports, again making sure that the ends are cut perfectly square. Position the supports equally across the crosspieces, drill pilot holes (with counterbores if you want to conceal the screws), and insert screws to hold the supports in place.
To add strength to the rack, cut rectangular mortises in the end pieces for all the crosspieces to fit into and counterbore holes in the crosspieces for the bottle supports.
To conceal the screws, use a plug cutter to make plugs out of the same wood stock or buy precut tapered plugs that match the wood. Glue them into the counter bored holes; when dry, sand them flush with the surface. Sand the entire unit and finish with stain, oil, or varnish.

Detail for cutting two end uprights from one
piece of wood.
MATERIALS LIST |
|||
Item |
Material |
Dimensions |
Qty |
End uprights |
1x12 hardwood |
20” |
2 |
Crosspieces |
1x2 hardwood |
12 ¾” |
8 |
Bottle supports |
1 1/4 dowels |
9 3/4 |
12 |