A storage shed in your yard makes good sense. It may even be a necessity if you don’t have a garage or if you have only a small, single-car garage. A simple shed with 2x4 stud walls and rafters is a relatively easy construction project for the above-average do-it-yourselfer. Starting from the ground up is a good way for a beginner to gain experience in carpentry. If you aren’t seeking carpentry experience, numerous easy-to- assemble prefabricated shed kits are available on the market.
Prefabricated sheds include traditional wood models, metal units, and high-impact
vinyl. The kits come with materials precut and ready to assemble. With basic
skills, a tape measure, level, hammer, screwdriver, and a helper, you can
erect one in no time.
The kits come with detailed instructions specific
to the model, so the steps shown here are general in nature to give you
an idea of just how easy it is to put a kit shed together.
PREPARE A FOUNDATION AND FLOOR:
Most shed kits do not include floors; they can be purchased as an option, or it’s easy to build your own. A solid floor and foundation beneath a shed will prolong its life.
There are two basic options for floors: a concrete slab or a plywood floor constructed on top of 4x4 treated timbers, which in turn rest on a gravel base. In either case, lay out the area with batter boards and mason’s lines. Remove the sod from the area, taking about 4 inches around the perimeter of the shed.
If you’re going to pour a concrete slab floor, add a 3-inch sand base on the earth. If the shed is extremely large, check with local building codes for foundation and footing requirements. Pour the concrete into 2x4 forms so the top of the slab is 3 - 4 inches above ground level. You may have to place anchor bolts in the concrete for the shed walls, depending on the manufacturer’s instructions,
For a plywood floor, excavate an additional 4 inches and place 4 inches of gravel on the earth. Set three or more (depending on the size of the shed) 4x4 pressure-treated timbers on the gravel, making sure they are level in all directions, Using pressure-treated 2x4s, build a floor frame on top of the timbers with joists spaced 16 - 24 inches on center, depending on the size of the shed.
Nail / pressure-treated plywood on top of the floor frame.
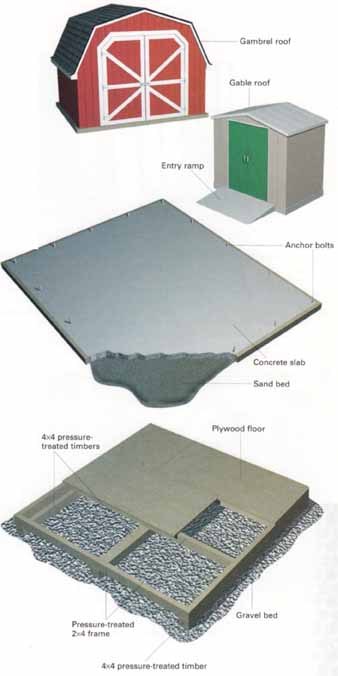
Gambrel roof; Gable roof; Entry ramp; Anchor
bolts; Concrete slab; Sand bed; Plywood floor; 4x4 pressure-treated timbers;
Gravel bed; Pressure-treated 2x4 frame
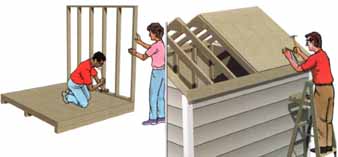
(left) Raise the walls: Raise one of the
wall units, nailing it to the plywood floor or bolting it onto the anchor
bolts in the concrete. Set it vertical and brace it. Install the adjacent
wall in the same manner, then connect the walls according to the manufacturer’s
instructions. Depending on the style of the shed, you may have to install
the gable ends on top of the end walls, or they may be a part of the end
walls. If you’re building a metal shed, wear gloves to protect yourself
from sharp edges. (right) Install rafters and roof: Roof installation varies
by manufacturer and style. With a typical gable roof, rafters may come as
truss units, or you may have to tie them into a ridge beam that connects
the two gables. Install the rafters, then cover the roof with shingles over
a plywood sheathing. Or attach metal roofing panels with special sheet-metal
roofing screws that have rubber washers to prevent leaks.
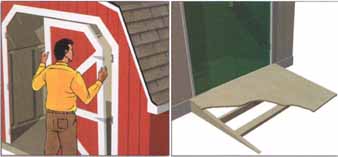
(left) Install doors: door styles vary by
shed style; you also may have a choice of door type with individual models.
Single or double doors can be mounted on hinges to swing open or on tracks
to slide open. Some models also have roll-up doors similar to garage
doors, but these limit your access to storage space in the gable area
of the shed when the door is open. Hinged doors are the easiest to install.
With most kits, you simply install the hinges on the door jams and hang
the doors. (right) Add a ramp: Whether you use a concrete or a plywood
floor, the shed will sit 3 - 6 inches off the ground. This ensures the
items in the shed will remain dry. To make access easier, add a ramp in
front of the door. Extend the ramp out from the shed 2-3 feet, depending
on the slope you want. Use pressure-treated 2x6s, ripped to the appropriate
angle and covered with pressure-treated plywood. Set the ramp on a gravel
bed so water drains away from the wood.