Technological innovations make home offices more productive all the time. Whether your at-home work space bristles with high-tech gear or simply offers a quiet place to answer mail, it presents a distinct storage challenge.
• If you use an office only for keeping track of bills and personal records, you can think small: a simple desk or table with drawers.
• At the next level, you may bring work home occasionally and need a well-organized space where you can attend to it. Or you may need room for a computer and accessories for personal, business, or school use.
• At the extreme, a growing number of people have home-based businesses, which may require a full-blown office space.
THE PERSONAL TOUCH
If your office needs are only of a personal nature, you may find sufficient space in a corner of a bedroom or the kitchen.
• A SMALL FIREPROOF STORAGE BOX or safe is a good investment for storing important documents. These boxes provide safekeeping as well as out-of-sight storage.
• TWO-DRAWER FILING CABINETS take up little room, but they swallow up reams of paper and pounds of would-be clutter.
• CARDBOARD BANKERS’ BOXES, wide enough for file folders, are handy for storing records you don’t need to retrieve often.
Any of these containers will help you organize bills, legal documents, health and tax records, insurance papers, and warranties.
A tackle box or drawer organizer will give you an orderly place for pens, pencils, paper, and other office supplies. It sure beats digging through a disorderly drawer stuffed with random tools and scraps.
Finding space for a computer is tougher. A dining room or other quiet, central space often works well if the computer is to be used by adults for records, by children for school work, and by everyone for entertainment.

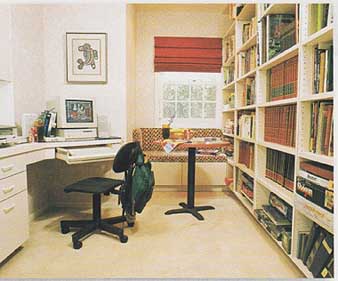
Home offices don’t have to be separate rooms. A corner can get the
job done, as in this family room. Built-in furniture works well in these
instances, and you can design the storage spaces to fit your needs.
STRICTLY BUSINESS
While the idea of working at home may be appealing, it can be difficult to execute. A successful business office at home requires careful planning. It should be somewhat secluded for privacy, should have ample, uncluttered surfaces for equipment, and must have storage space for files, supplies, books, catalogs, and anything else relevant to your business. Here are some things to consider when locating and organizing a home-based business office:
• Unless you expect to have frequent clients visiting your office, your space need not look elaborate, In fact, many people find they work best in spartan surroundings.
• Even if your office is simple, pay attention to details. Check the natural lighting from windows. If it’s not sufficient, plan to add some. Make sure you have enough electrical outlets and telephone jacks to handle the equipment you require— a separate telephone line, computer and printer, fax machine, calculator, and perhaps a personal copy machine.
• Office machines require plenty of space. Plan plenty of desktop or countertop room for a computer, printer, fax machine, telephone, and copier.
• Protect sensitive equipment from environmental hazards: dust, pets, coffee or soda spills. Dust covers are a good investment. Office furniture that closes up and hides equipment while not in use is good, but make sure when the desk units roll out or open up that the machines have space to “breathe” so they don’t overheat.
• Zone storage space around your desk according to how often you use the items. Find space in a primary zone—within 24 to 30 inches of your desktop—for items you use frequently, such as pens, notepads, a dictionary or other reference books, the telephone, or file folders for current projects. Items that you don’t use every day should be allocated to shelf or drawer space a medium distance from your work surface. Last, find a place for things you use rarely, such as permanent files, records, and only occasionally used reference books.
• Use space above and below your work surface efficiently. Build shelves above the desk for zone-one items. Lateral files below or alongside your desk take up less space than traditional three- or four-drawer file cabinets. Shelves or files on an adjacent wall are fine for zone-two and -three items.
• Take advantage of the many commercial accessories to keep clutter off your desktop. Many of these storage devices are designed to mount on walls or the side of desks.

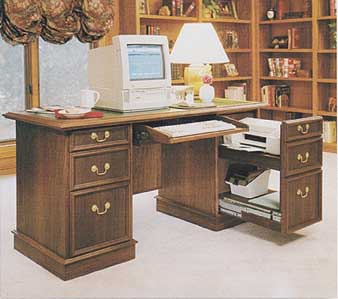
Many desks are designed with the home office in mind. This one
hides away the computer’s printer when it isn’t in use.

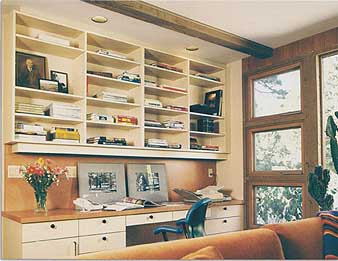
This office storage is set up perfectly. The primary zone is the
desktop. Drawers serve as secondary storage. And the wall bookcase holds
reference books used only occasionally.
CONSTRUCTING A DESKTOP COMPUTER CENTER
This easy-to-build desktop computer center saves space and organizes your computer and its ever-increasing number of accessories.
With today’s advancing technology, you probably will upgrade your computer, fax, and printer every few years. So it makes little sense to build a shelf system designed to fit precisely the machines you now own. A simple desk with open shelves is usually best. This desktop unit is designed to sit on top of pair of two-drawer file cabinets so it can be moved easily or rearranged with changes in equipment. Or you can mount it between taller pieces of office furniture, such as a shelf system or a three- or four-drawer file cabinet. Make the desk between 24 and 36 inches deep (here it’s 30 inches), and be sure to attach it to units sufficiently deep and strong enough to support it.
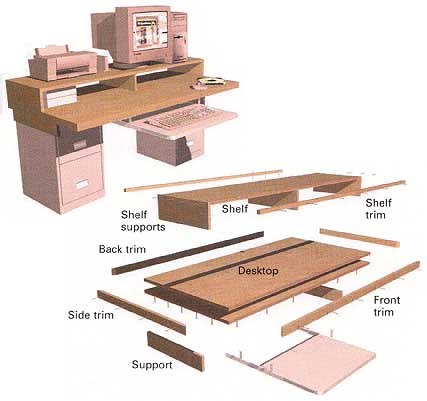
STYLE AND STRENGTH: The desktop is made out of a double layer of ¾” cabinet- grade birch plywood to provide a strong base for the equipment and a smooth writing surface that won’t warp. The two 20-inch side supports keep the top from sliding off the file cabinets. Attach them to the bottom piece of plywood before gluing the two pieces together. Cut the plywood to size, and attach the side supports to the good face of the bottom piece with flat- headed screws driven through the rougher side. Place the good side of the second piece of plywood face place the piece with the side supports on top of the first, with the supports facing upward. Drive in 1¼-inch oval-head screws around the perimeter to tie the pieces together. Take care not to drive the heads below the surface or they may poke through the finished side. Miter the 1x2 solid birch trim and attach it to the edges of the desktop with glue and 6d finish nails.
The shelf that holds the monitor and printer can be constructed of the same birch plywood. Attach 1x1 trim to the front and back edges of the shelf with glue and 6d finish nails. Use 1x6 or larger solid birch for the supports. The width of the supports depends on how much you want to store under the shelf and how high you want the monitor to be off the desktop. Cut 3/8” rabbets into the top edges of the end supports. These will strengthen the joint and eliminate the need to apply trim to the ends.

Parts of a computer center: Side trim, Support, etc.
CUBICLES: If you like little storage cubicles, you can add center supports to further divide the space below the shelf.
The shelf is designed simply to sit on top of the desktop. If you’re concerned that it might get bumped off, attach it to the desktop with angle brackets at the rear of each support.
Fill all nail holes and other defects in the plywood, sand the pieces smooth, and finish to your preference. Place the desktop on file cabinets, then mount the slide-out keyboard tray where it works best for your typing style. Trays in many different styles are available at office supply or computer retailers.
MATERIALS LIST |
|||
Item |
Material |
Length |
Qty |
Desktop Shelf Front trim Back trim Side trim Shelf trim Shelf supports Supports |
¾” plywood ¼” plywood 1x2 birch 1x2 birch 1x2 birch 1x1 birch 1x6 birch 1x4 birch |
29¼x58½” 14½x59¼” 60 60” 30’ 60” 16” 20” |
2 1 1 1 2 1 3 2 |
1¼” #6 oval headed screws; 1¼” #6 roundhead screws; 6d finish nails; pull-out keyboard shelf unit; white carpenter’s glue; wood putty; paint, stain, or varnish as needed |
|||