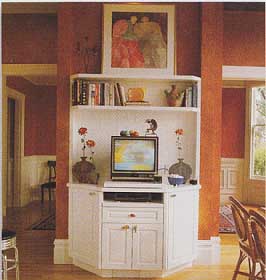
Family rooms rival kitchens as the centers of American households. With all the activity here, look to using wall spaces that are out of the traffic flow, as with the wall system in the photo at right.
Analyzing your entertainment habits is even more important here than in a formal living room. Are the components of an entertainment center the most important focus of this room? Are hobby activities the most important? Is it the hub of noisy activity, a quiet place to read, or both?

Display and functionality are central to this storage cabinet in
a family dining area.
The projects described here are informal in style, but you can dress them up by using good-quality hardwoods.
BUILDING AN INFORMAL MUSIC SHELF UNIT
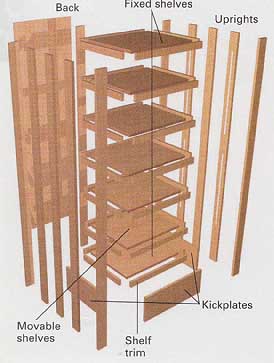
The top, middle, and bottom shelves of this music component rack are fixed to give it rigidity. The other shelves rest on adjustable hardware. While the unit is meant to be informal, be sure to select an attractive variety of solid wood that you can finish to match other pieces of furniture in your family room. Oak and birch are good choices.
Trim the fixed shelves with 1x2, leaving the lip on the top side. Use eight of the uprights to assemble the four corner units. To ensure these are flush, clamp the boards together and drill pilot holes. Then apply glue and drive 6d nails into the holes.
The top fixed shelf fits flush with the top of the unit; the bottom shelf fits 7 inches from the bottom to accommodate the kick-plates; and the middle shelf can be placed anywhere you want it.
Install these three shelves into the four corner units with glue and 6d nails.
Cut and install the metal shelf standards on four of the remaining side uprights. Make sure the slots and screw holes in the standards align on opposite sides. Install the side uprights to the three fixed shelves with glue and nails. Install the kickplates by driving screws from the inside into the uprights.
The plywood back adds rigidity. You could leave it off by adding two more uprights to stabilize the back side.
Before cutting and assembling the five adjustable shelves, check the interior dimensions of the unit to be sure the shelves will clear the metal shelf standards.

This in formal shelf unit is designed to hold nearly all types
of music components with a standard width of about 17 inches. Check the
sizes of your equipment and adjust the dimensions, if necessary.
MATERIALS LIST |
|||
Item |
Material |
Length |
Qty |
Uprights Fixed shelves Movable shelves Shelf trim Front kickplate Side kickplates Back |
1x3s ¾” plywood ¾” plywood 1x2s 1x8 1x8 ¼” plywood |
72 16½x20½” 16x20” varies 22” 17¼” 23x72” |
11 3 5 24 1 2 1 |
Metal shelf standards and clips, 6d finish nails, white carpenter’s glue, wood putty, stain or varnish |
|||
BUILDING AN INTERLOCKING SHELF SYSTEM
If you don’t like long rows of books that must be propped up with bookends, consider a shelf unit that uses interlocking boards, In addition to books, it can store audio and video tapes or compact discs or display collectibles.
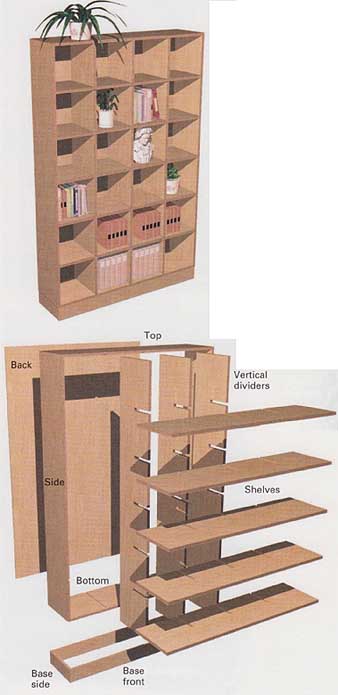
PREPARATION: From a sheet of ¾” plywood, rip three boards 12¼ inches wide. From these, cut the two end pieces 71¼-inches long and the top and bottom, each 47 inches long. Make a ¼-inch-deep, 3/8” rabbet along the backside of each of these boards for the plywood back.
In the top, side, and bottom boards, cut 3 dadoes for the other uprights and the shelves. For the cube system shown, these should be equally spaced.
Rip six other boards 12 inches wide. From these, cut three 70½-inch uprights and five 47-inch shelves. Carefully lay out the ¾” interlocking slots in each of these boards. Cut the slots 6 inches deep using a ¾” dado blade or a router bit. Dry-fit to make sure the face pieces are flush.
AN INSIDE TIP: Working inside the cubicles will be difficult after they’re assembled, so fill holes and sand the boards before you put the unit together. You may want to apply a finish at this point.
ASSEMBLY: Assemble the outside frame with glue and 6d finish nails. Lay the frame on its front edge and glue and nail the back into the rabbet, making sure the unit is square. Flip the unit over and insert the vertical uprights into the dadoes with the slots facing outward. Slide the horizontal shelves into the slots of the vertical uprights, applying glue to each joint.
Build the base unit, installing corner brackets to add stability. Attach it with glue and nails or use additional corner brackets and screw it to the bottom shelf from underneath. Apply veneer tape to the edges of the plywood. Then apply your final finish.

You can adapt the design of this interlocking shelf unit to create an
entertainment center by making the shelves deeper (typically 16 inches)
and varying the size of the cubbyholes. If you double the size of some,
cut dadoes on one side of the respective uprights or shelves instead of
cutting the interlocking slots.
MATERIALS LIST |
|||
Item |
Material |
Length |
Qty |
Top, bottom Sides Vertical dividers Shelves Back Base front, back Base sides |
¾” plywood ¾” plywood ¾”plywood ¾” plywood ¼” plywood 1x4 pine 1x4 pine |
12¼x47” 12¼x71¼” 12x70½ 12x47 47x72” 47¾” 12¼” |
2 2 3 5 1 2 2 |
6d finish nails corner; reinforcing brackets; veneer tape; carpenter’s glue; wood putty; stain or varnish |
|||