Because the living room usually is the most formal space in the house, the style you set for the room may well dictate what kind of storage systems you employ. A painted plywood unit might be suitable for a family room or den, but the living room may require something with finer craftsmanship and finishing. Thus, your best options in a living room are fine furniture items or built-in units planned and built by a professional woodworker.
Finding storage spaces in a formal room requires the careful planning outlined in the first section. Analyze the traffic pattern and furniture placement, then look for unused wall spaces away from these areas. Take advantage of spaces alongside a fireplace, in the corners of the room, under or beside windows, or on walls with no windows.
If you don’t have a separate family room, you’ll need to make some compromises. For example, if you want a formal look but still need to have your television, videotape recorder, and music systems within easy access, you can build or purchase an entertainment system cabinet that closes up to hide all the equipment when not in use.
Evaluating your entertainment habits helps you plan how best to use the living room space. If you have separate family and living rooms, you’ll want to divide the entertainment activities, and their associated storage requirements, between the rooms— for example, television viewing in one and reading or listening to music in the other.
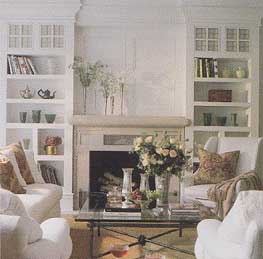
Fireplaces are natural focal points, so a fireplace wall often offers
opportunities for storing and displaying books and collectibles.
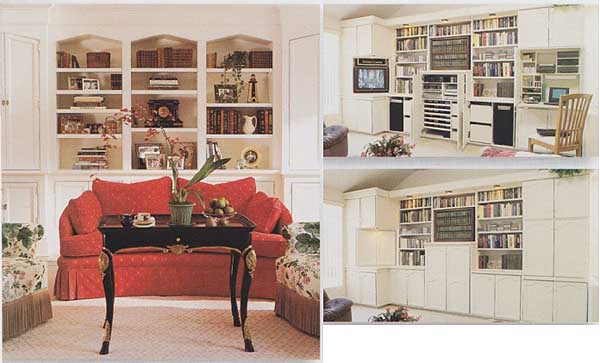
(left) A repeating arch over cabinet doors and shelving raises interest
in this handsome wall of storage, built into a formal living room. Decorative
treasures and favorite books grace the open shelves. The cabinets hide occasionally
used tableware and linens for the adjoining dining room. (right) Concealing
items behind cabinet doors can dress up an informal living space when the
occasion dictates.
MAKING YOUR OWN NICHE
Storage isn’t limited to everyday items that we need readily at hand, Mementoes, collectibles, and works of art deserve special places of their own. Your living room may provide an ideal place to display such an item in this arched wall niche. With patience, a minimum of materials, and basic skills, you can build it in a weekend. Complete the final taping and texturing in a few evenings, and you’ll have an architectural feature that you’ll be as proud of as you are of its contents.
The niche is designed to fit in the space between two wall studs, 14½ inches apart. Establish the baseline of the niche, then find the studs by carefully cutting away the drywall or plaster to locate the studs Mark the wall with vertical lines. Find out exactly how deep the niche can be by slipping a ruler into one of the holes you cut.
The key to making the niche look as if it were professionally crafted is taking plenty of time to apply and smooth the final coats of drywall compound. Blend the new material to the texture of the existing wall.
MATERIALS LIST |
|||
Item |
Material |
Length |
Qty |
Arch strips Cleats Blocking Bottom |
Matte board 1x4 pine 2x4 pine Drywall |
Varies 6” 14-15” 4x14” |
6 - 8 2 2 1 |
1½” #6 drywall screws; 6d box nails; paneling adhesive; white carpenter’s glue; 8 feet of flexible drywall corner bead; drywall tape and compound; paint. |
|||

Completed niche.
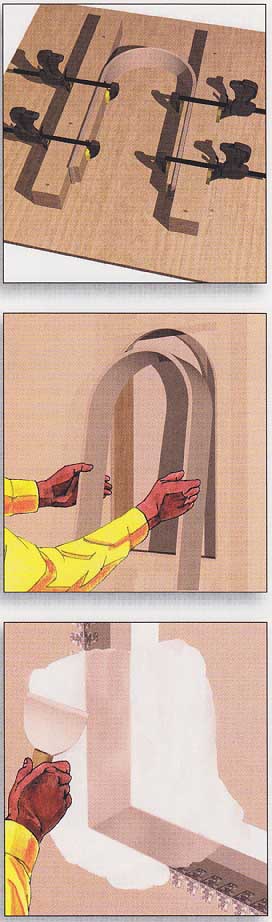
(top) Construct a jig of plywood and 2x4s spaced as far apart as the
distance between the studs. Cut six to eight strips of matte board the width
of the arch. Build up the layers by laminating the strips with glue and
sandwiching them between clamps and your layout form. (middle) After drying,
trace the outline of the arch on the wall. Cut the opening carefully with
a utility knife or drywall saw so you won’t have to do a lot of wall patching.
Install two cleats and 2x4 blocking to support the bottom of the arch. Place
blocking at the top, also. (bottom) Secure the arch in the opening with
paneling adhesive and add a piece of drywall on top of the bottom blocking.
Cover the outer edge with flexible corner bead and the inside corners with
drywall tape. Apply drywall compound, sand smooth, and paint to match the
wall.
