The floor system is actually a series of layers. Not all floors have all the layers, but it‘s important to understand how they fit together.
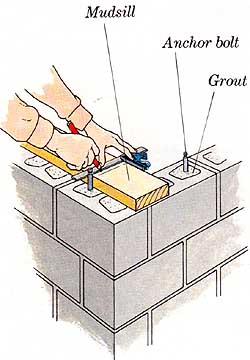
Mudsills
Mudsills are held to the foundation by anchor bolts and are the wood surface to which you nail the floor or kneewall framing. They are usually 2-by-6 and must be pressure-treated lumber or a durable species specified as foundation grade.
To attach the mudsill, drill holes ¾-inch in diameter for anchor bolts. Mark hole locations by laying sill on bolts and tapping or by setting sill against bolts and using a try square to measure and mark centerpoints. Check plans to see whether sill should be flush with exterior edge of foundation wall or let in slightly so sheathing will be flush with foundation wall.
If foundation is not level, mix small batch of mortar and trowel a thin layer onto low spots before laying mudsill.
For basements or heated crawl spaces, install a layer of fiberglass or rigid plastic foam insulation under mudsill.
In some areas a metal termite shield must also be installed under mudsill. Use aluminum flashing 10 inches wide. Roll it out over foundation so it laps 2 inches over outside edge and push it down over bolts as you draw it tight. Cover flashing with bed of roofing cement, especially around bolt holes and at any splices, just before installing mudsill.
After all holes are drilled, foundation is level, and insulation and /or termite shield is installed, set mudsill in place and straighten it as you tighten bolts.
Girders
The girder can be a solid beam (usually 4-by lumber), or it can be built up from three or four lengths of 2-by pressure-treated lumber nailed together on site. There should be at least 4 inches of bearing surface under each end of the girder and at intermediate posts. Line bottom and sides of foundation pockets with aluminum flashing to prevent contact between girder and concrete. For added rot protection, treat girder ends with approved preservative. Allow ½-inch clearance on each side of wood girder for expansion. If top of girder is not flush with top of mudsill, shim under it to raise it or cut slim notch out of bottom to lower it.
If girder is supported by wood posts, cut them slightly long before installing them on concrete piers. Then stretch string line between foundation walls where bottom of girder will sit and mark where it touches the post, or use a water level to transfer that point to post. Scribe cutting lines around post and saw carefully. Connect girder to post with metal post cap. Nail with galvanized 16-penny (16d) joist hanger nails. If girder rests on steel column, loosely bolt it to column flange. Then level it before tightening bolts, inserting shims above column if needed.
Joists
The joists are normally spaced 16 inches on center, but they can also be spaced on 12-inch centers to in crease the span.
Select the straightest joists for three outside edges and install them by toenailing to mudsills with 8d galvanized common nails. To ensure that floor will be square, measure two diagonals and adjust joists until diagonals are equal. Mark placement of field joists on rim joist and girder, starting from same end. Facenail each joist to rim joist with three or four 16d galvanized common nails and toenail to bearing surface with three 8d nails. Install joists with crown, or curved edge, up. Install blocking between joists over top of girder and at mid point of any spans longer than 8 feet. If joists are attached to girder with joist hangers, nail hangers to joists first, and then to girder, to ensure that tops will be flush. Double up joists under interior walls.
If new joists run perpendicular to the common foundation wall, bolt new 2-by ledger to rim joist and attach new joists to it with joist hangers. Allow for nonlevel house floor and for any differences in lumber dimensions.
If joists run perpendicular to the common foundation wall and parallel to the existing joists, remove old rim joist, lap new joists against old, shim new joists so tops are flush, and nail together with 1 6d nails staggered every 16 inches. Install blocking between them along top of original mudsill.
Attaching the mudsill
Subfloors
Subfloors are usually plywood or structural waferboard. Rough ply wood is fine for a wood finish floor, and most carpeting, but needs an underlayment for resilient sheet flooring or other thin material. Smooth plywood is more expensive but is all that's needed for any kind of finish floor except tile. (Tile should have a second layer of plywood for strength.)
Plywood subflooring is usually 5/8- or ¾-inch thick. Unless you are matching existing 5/8-inch plywood, choose ¾” plywood for a stronger floor, even though 5/8” plywood is allowed by most codes.
Use tongue-and-groove (T&G) plywood to eliminate need for blocking under edges.
Install plywood panels perpendicular to joists. Start by snapping a chalk line 4 feet in from outside edge of rim joist. Install a full panel first. To pre vent floor from squeaking, apply construction adhesive to joists with caulking gun before laying each panel. Nail with 8d ring- or spiral-shank nails every 6 inches along edges and every 10 inches inside. After finishing first row, stagger joints 4 feet on remaining rows.
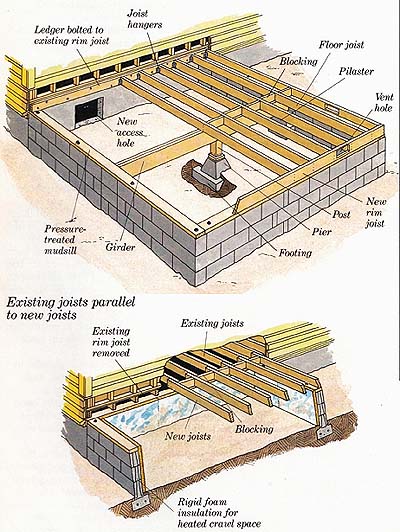
(top) Existing joists perpendicular to new joists: Ledger bolted
to existing rim joist; Joist hangers; Vent hole; (bottom) Existing joists
parallel to new joists: Existing rim joist removed; Existing joists;
Rigid foam insulation for heated crawl space.

Staggering plywood for sub-floor: Tongue-and-groove edges; Half
panel.