| Home | FAQ | Finishing | Sump Pumps | Foundations |
|
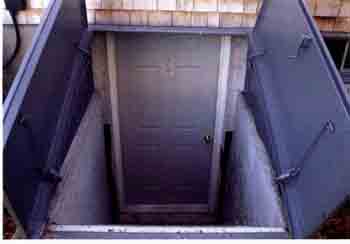
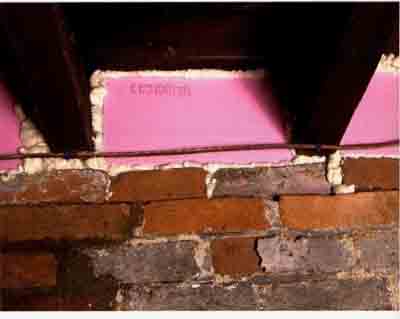
Tip! Seal leaks at the lowest level of your home to keep out radon, other toxins in the soil, and water vapor. Specifically… Stepped foundation walls are often built on hillsides in cold climates. The vertical parts of the steps are often particularly leaky. These can be sealed from inside or out with silicone caulking. Stuff in some fiberglass as a backing, or use spray foam (indoors) if the gap is large. The vertical joints where foundation walls are stepped often leak badly. Although air-sealing a home can theoretically increase radon levels, it's unlikely. Sealing leaks and slowing the stack effect is more likely to reduce the amount of soil gas — including radon — that's pulled into the house from underground. The only way to tell whether you have dangerous radon levels is to test your home. Because of the potential health risks, it's a good idea to test for radon before and after air-sealing. If elevated radon levels are confirmed by at least two tests, find a certified professional to install a mitigation system. After the attic, the basement or crawl space is the next most important area to seal for several rea sons. Like the top of a home, the bottom typically has the largest air pressure pushing air in or out of the house, so sealing those leaks results in larger energy savings. Second, though often smaller than attic leaks, basement and crawl space leaks tend to be larger than those in exterior walls. More important, in most climates, air leaks in from the bottom much of the year—particularly in cool or cold weather. This leaking air can carry radon gas, mold spores, gases from pesticide treatments, water vapor, and any other subsoil nasties that may become airborne. Sealing leaks at the lowest level of your home helps prevent these undesirable elements from entering your home. Finally, most pipe-freezing problems result from cold air leaking in around the sills, where the pipes are often located. Fig. 42-1: All service penetrations in a basement should be sealed with caulking (if the gap is small) or foam (if the gap is large). Basement walls As we noted earlier, if you have a concrete foundation wall, it's probably easiest to create a good air barrier between the basement and the outdoors by sealing the walls. This is true even if you intend to insulate the floor over the basement. There are four common leakage areas in basement walls: service penetrations, stepped-wall transitions, bulkhead doors, and the sill/band joist area. Service penetrations. Every home has basic service penetrations, including (at a mini mum) those for electricity telephone, and plumbing. Fuel lines and cable-TV services are also common. Often, these penetrations are made in the band-joist area, also called the box sill or ribbon joist in conventionally framed houses (in older homes, this may be one large sill beam). Sometimes, penetrations come through the foundation (especially plumbing drainpipes, which are always below grade). Seal all penetrations from the inside, the outside, or both with caulking or foam. Any below-grade penetrations must be sealed from the inside. And don’t assume that air can’t leak in from underground; soil is often surprisingly porous to air movement. If other joists are in the way, services that run through the band joist may be difficult to reach from the inside, so you may need to seal them from the outside. If your basement is finished, the exterior may be the only area to which you have access. Caulk or seal these openings, being careful to seal all the way around. Bulkhead doors. Another common source of basement leakage is the bulkhead door. Bulkheads are designed to keep out rain but not to stop air. If your basement is unfinished, the best way to deal with this is to install a new exterior door at the foundation wall inside the bulkhead. Use treated wood where the door contacts the foundation, and be sure to tightly seal between the framing around the door and the concrete. If your basement is fully or partially finished and already has a door inside the bulkhead, you may still have a large air leak at the top and sides. Be sure to put solid blocking in the gap between the door frame and the foundation, then caulk around all the edges. Sills and band joists. When we started doing blower-door testing in 2002 we didn’t expect to find a lot of air leaking in from the sills, particularly in relatively recently built houses. You may think, as we did, that the massive weight of a house would flatten out the framing in that area. We were mistaken! Even with all that weight, wood can really have a mind of its own. And, of course, the tops of foundation walls are often far from flat. Fig. 43-0: Here are three grades of caulking guns. From bottom to top, they sell for about $4, $8, and $20. You get what you pay for—stay away from the $3 guns. Fig. 43-1: Although a typical steel bulkhead basement door sheds water, it barely slows cold air from leaking inside. Fig. 43-2: An insulated, weatherstripped door is essential inside any bulkhead basement opening. Fig. 43-3: Be sure to seal between the door frame and the foundation wall. Remember to use only treated wood in contact with concrete. Fig. 44-1: Note the gap between the sill and the band joist. Even after this building is finished and the frame settles, there will still be a big leak here. Fig. 44-2: Sealing the band joist (in this case, with foam board blocks) from the inside is the most effective approach -- if you can reach it. The gaps may be small, but spread around the perimeter of a home, they really add up. Even recently built homes that have a foam sill sealer between the sill and the concrete may leak a lot of cold air at that location. There are usually three or four framing members that are stacked on top of each other between the foundation wall and the first floor’s subfloor, and each of those junctions can leak. You can seal this area from the inside or from the outside; if you have access, you may want to do both. Sealing the band joist from the inside, when done properly, yields the best results, but it may be difficult to reach. To do this, cut blocks of rigid-foam board (we recommend extruded polystyrene). A 2-in, thickness provides a good amount of insulation, as well as air-leakage control. Cut the blocks to fit snugly in height, but leave them about 1/2 in. narrower than the joist spacing. Wedge them into place, as close as possible to the band joist, then foam or caulk them on all four sides. Be sure to seal the area between each block at the bottom, where the joist rests on the sill. You can do the same thing on the gable ends of the house, using long strips of foam board that are sealed on all four sides. Blower-Door Testing Air-sealing is a job that requires much more labor than material, which often suggests a do-it-yourself approach. However, air-sealing does require attention to detail and (in many homes) a willingness to squeeze into difficult places. If these qualities don’t describe you, it may be worth hiring a building performance professional. Experienced professionals use a blower door to help find air leaks and measure the tightness of the building envelope. The blower-door fan blows air into (or out of) the house, measuring how well the building envelope contains pressure. This can be very handy, especially in a house with complex air leakage paths. You can make your own blower door if you can obtain a powerful fan (a regular box fan won’t work). You won’t be able to measure the air leakage, but you can use it to feel the air leaks. Set the fan to blow air out and you will be able to feel air leaking in from the basement or from elsewhere inside the house. If you do this, be sure to set any combustion appliances to pilot, so that they can’t turn on (don’t forget the water heater). If you have, or suspect, asbestos on pipes or ducts, don't use this method until it's properly removed. Fig. 44-0: A blower door is used to measure how airtight a house is. It’s also useful in helping identify where the air leaks are. ---------- Tip! If you want to use your basement as living space, you should plan to completely air-seal and insulate the exterior basement walls. Be Careful… When air-sealing a basement, be careful not to interfere with combustion air required by the furnace, boiler, or hot water heater. All combustion equipment needs enough air to provide oxygen for the fire, and sealing a house can sometimes interfere with that process. If the equipment is not working properly, it can lead to the production of deadly carbon monoxide. Also… In some cases, it’s possible to seal sills from outside by caulking the space between the bottom edge of the exterior sheathing and the foundation wall. In some places, there may be gaps so large that you need to fill them with foam instead of caulk Trim off the extra foam so you don’t create any ledges that can trap water running down the siding and direct it inside. Building Code… Code (and common sense) says not to use foam or other combustible materials around active chimneys or heating-equipment vent pipes. These penetrations can be sealed with high- temperature caulking; use metal flashing or duct board if you have large spaces to fill. Also, avoid using foam around heating pipes, particularly if you have steam heat. ---------- Sealing the floor deck Although it's typically more difficult than sealing foundation walls, sealing the floor deck between the basement and the first floor may make sense. If you want to use the basement as living space, it’s almost always better and easier to insulate and seal the exterior basement walls. But if the basement is not finished, sealing the floor may be the best option, especially if your house has a fieldstone foundation, which may be impossible to seal well. Even if the exterior basement walls are sealed and insulated, sealing the floor deck slows the path of air leaking into the main part of the house. It is also beneficial, particularly if the basement is damp or musty, to isolate it from the living space. If you plan to insulate the floor, seal it first. Note that sealing the floor deck can be very difficult if you have a finished-plaster or drywall ceiling in the basement. In this case, focus your efforts on the sill and the exterior foundation walls. The basic idea behind floor air-sealing is the same as attic air-sealing: to create an uninterrupted air barrier between levels. Typically, this is done at the subfloor. First-floor decks have many holes in the subfloor for plumbing drains, supply piping, wiring, ducts, and chimney chases. Bathtubs and showers often have large cutouts underneath the drain trap. Those holes require a material that can span large spaces. The materials listed for attic bypasses will work. Also, look for openings or penetrations under kitchen and bathroom cabinets and built-in furniture. Fig. 45-0: Most floors have many service penetrations, which make them difficult to seal well. Fig. 45-1: This tub trap is a big air leak from the basement into the house. Note that the duct chase (another big air leak) in the lower right corner should also be sealed. Fig. 46-0: Even better than regular poly are products such as Tu-tuf, Tenoarm, and Tuff-poly. These sheets are thinner but much stronger and more puncture resistant than regular polyethylene. (Tu-tuf and similar products are available from various dealers that sell energy-efficient building products). Fig. 46-1: The insulation on these crawl space walls was carefully sealed to the vapor barrier on the floor, creating a warm, dry space. ---------- Tip! For the best results, include a crawl space in the conditioned space by sealing and insulating the exterior walls— just like a basement. Tricks of the Trade… We often use acoustical sealant when we’re installing poly in a crawl space, particularly to seal it to the walls. While it's messy to work with, it sticks well to poly sheeting and works even better than high-quality tape. It’s also a good choice when the work area is dusty, because I’ve found that it sticks fairly well even in those marginal conditions. Specifically… If you have an older house with a plank subfloor instead of a plywood subfloor, air-sealing the floor can become quite complex. In addition to the obvious holes, be sure to fill the gaps between the plank boards, as well as the penetrations. You must also seal any gaps underneath the cabinets and anywhere else that lacks a finished floor. ---------- Crawl spaces Crawl spaces are nothing more than short basements. usually just deep enough for the footings to be below the frost line. Unlike basements, they often have exposed dirt floors. Building code requirements for vapor retarders are typically inadequate, even when they are followed properly. Crawl spaces can be pretty nasty places; they often have footing drainage that's inadequate. Building codes that require these spaces be vented to the outdoors may make matters worse. The best treatment for a crawl space is to include it in the conditioned space by sealing and insulating the exterior walls, just like a basement. Of course, any standing water must first be eliminated. Install a sump pump if necessary. Next, where code permits, existing crawl space vents should be closed; we recommend cutting a piece of 2-in.-thick polystyrene to fit in the vent from inside the crawl space, then caulking it in place. Crawl spaces should have a superbly sealed vapor retarder. The earth is such a large source of moisture and other unwanted substances that you can’t expect a few pieces of poly scattered on the floor to do a good job. Use full sheets of 6-mil polyethylene or, better vet, one of the varieties of cross-laminated poly that are now on the market. This must be laid across the entire floor, with overlaps of 12 in. to 24 in., and taped at the seams with a good-quality tape. Seal around any penetrations, such as water pipes or support piers, with spray foam or acoustical sealant. Next, insulate the crawl space walls with 2-in. extruded polystyrene, tape or seal every joint, and then seal the vapor retarder to the insulation around the perimeter. In this case, the insulation around the walls is your primary air barrier, so be sure to caulk or seal the polystyrene insulation to the sill and seal the band joist carefully. Slab-on-grade If your home (or part of your home) has no basement or crawl space, it's probably a concrete slab-on-grade. Those homes are somewhat simpler to seal because there are fewer connections among building materials at the foundation. Your primary job with slab-on-grade construction is to caulk or otherwise seal the exterior walls where the house framing meets the slab. Caulk any gaps between the baseboard and the floor from the inside. With carpeting, this may be more complicated. If you pull up the edge of the carpet, you may have a tough time embedding it neatly in the tack strip around the perimeter of the room. You can also caulk the exterior, where the siding or sheathing meets the slab, but that may be difficult if the slab is very close to the ground. |
| Top of Page | Home | Prev: Attic Air-Sealing | Next: Sidewall Air-Sealing |