To control water-related problems you must first eliminate all sources of unwanted moisture. Plumbing problems such as leaking faucets, water sumps that are not covered, and moisture condensation on the toilet bowl or hot or cold water pipes can all contribute to excess moisture. To eliminate all moisture sources, take an inspection tour of your entire plumbing system and make the suggested repairs.
LEAKING FAUCETS
Water that leaks either from around the faucet body or through the faucet spout can contribute to indoor humidity from evaporation, and moisture condensation that drips on floors or cabinet bases can cause damage such as wood rot or decay to flooring or cabinets. Moisture that accumulates under a sink can also provide an inviting environment for household insects such as roaches, which will flourish wherever there is moisture, warmth, and food. Check around the sink at faucet bases for signs of leakage. Also check the faucets to be sure they shut off completely and don't leak from the spout. If leaks are evident around either the base or the spout of the faucet, don't crank on the faucet handle to force it to close. Applying too much pressure on a faucet handle can distort the faucet body and ruin the faucet. Instead, repair the faucet to ensure it's leak-free.
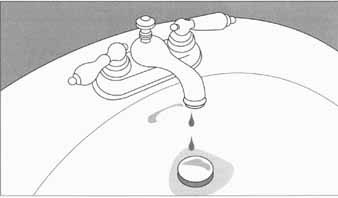
Leaking faucets waste water, stain fixtures, and add
humidity to the house.
There are a variety of faucet types, and it's likely that there are several different types in your home. Faucet types include stem or compression faucets, often found at tub or exterior bib faucets; ball-type faucets, cartridge faucets, and disc type faucets, usually found in bath vanity sinks or in kitchen sinks. Determine what type of faucet you have, and repair as indicated. If you can't determine which type of faucet you need to repair, take the manufacturer’s name from the faucet and ask your dealer to advise which faucet repair kit you need.
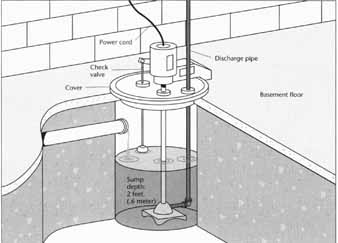
Evaporation: Sump pump is shown here with cover in place.
Open sumps, toilets, or any standing water can add humidity to the house.
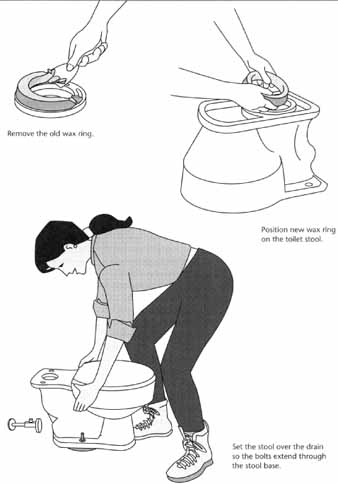
Replacing Toilet Wax Seal: Remove the old wax ring.;
Position new wax ring on the toilet stool. Set the stool over the drain
so the bolts extend through the stool base.
CLOTHES WASHER HOSES
Hot and cold water faucets near the clothes washer sup ply water to the washer via rubber hoses. Leaving these faucets turned on when the washer is not in use means there is always water pres sure in the supply hoses, and the hoses will be subject to the same pressure and potential leakage as water pipes. These rubber water hoses were never intended to be constantly kept under water pressure, and should be turned on when water is needed at the washer, then turned off when the laundry is done. Many homeowners have come home from a trip to find that during their absence the water hoses on the washer burst, flooding the basement or laundry room. If your water hoses are leaking, or there is a soft or spongy feeling when you squeeze the hoses, replace the hoses before they fail. Replacement hoses are available at most appliance or plumbing supply stores.
MOISTURE FROM EVAPORATION
Because moisture in any form will seek equilibrium with the ambient air, standing water will evaporate more readily in a climate of low humidity than in a high humidity area. To help control indoor humidity, attempt to block all sources of moisture evaporation, especially of standing water in toilets, sumps, or drains.
Toilets and Sumps
If high indoor humidity is a problem, always keep the toilet lid closed to minimize evaporation from the toilet bowl. Likewise, if you have a sump system that collects wastewater or water runoff from drainage tiles, cover the sump to minimize evaporation. Most sumps come complete with a hardboard or plastic cover, but they are often lost or misplaced. You can buy a replacement at plumbing shops or from your home center, or make your own from tempered hardboard.
Condensation on Fixtures
When a toilet is flushed, the standing water in the toilet bowl is flushed down the drain, and the toilet tank and bowl refill with cold water. This incoming cold water will cool the fixture, and if the bathroom is warm or humidity is high, the airborne moisture will condense on the toilet tank or bowl.
After condensing, the water will drip down the fixture, onto the floor, and under the toilet to wet the wood subfloor or underlayment. In houses more than 40 years old the subfloor may be 1 inch x 8 inch (2.5 centimeters x 20 centimeters) boards, which warp when wet. In modern houses, the subfloor is plywood. The moisture then can attack the adhesive that holds the wood plies together, causing the ply wood to delaminate and develop bulges under the floor covering or loosen it. The only remedy is to remove the existing floor covering and replace it. If the wetted subfloor has also decayed, it's essential to tear up the existing floor and replace the damaged subfloor, then install new floor covering.
There are three steps that can be taken to stop condensation on a toilet fixture. The first is to buy a terrycloth cover for the toilet tank. These covers warm the tank and toilet bowl to reduce condensation; the terrycloth or toweling absorbs any moisture that does condense on the fixture and prevents the moisture from dripping onto the floor.
Another cure for moisture condensation is to install a Styrofoam insulation kit inside the toilet tank. To install the insulation, shut off the water supply valve underneath the toilet tank, flush the toilet to remove the water from the tank, then use a towel to wipe and dry the inside of the toilet tank. Apply an adhesive to the inside surfaces of the tank, and install the Styrofoam insulation kit inside the tank. The added mass will also reduce water usage.
A third method to eliminate condensation is to have a plumber install a mixing valve to supply warm water to the toilet fixture. Rather than drawing water for the toilet from the cold water supply, a mixing valve will draw in and mix cold and hot water so that the water will be warm when it fills the fixture. Because the fixture is no longer cold, condensation will not form on it.
Toilet Wax Ring
Water accumulation around the base of the toilet stool may come from condensation; however, if no condensation is visible on the toilet fixture the source may be a leaking wax ring or seal between the toilet base and the drain pipe. If the problem is not corrected, the seeping water will wet and rot the subfloor or cause a bond failure between the subfloor or underlayment and the finished floor covering.
First mop up any water from the floor so you can follow the seeping water to its source. If the water reappears on the floor and seems to be coming from under the base, the problem is a faulty wax ring. The wax ring is a doughnut-shaped device that seals the joint between the drain pipe and the toilet base.
If you determine that the water source is a leaking wax ring, turn off the water sup ply valve, located under the toilet tank. Then flush the toilet twice: the first flush will empty the toilet tank and the second flush will drain the water from the toilet bowl. There will be no water in the bowl to leak until the water to the fixture is turned on again.
To remove the toilet tank from the base, remove the nuts from the two hold-down bolts at the bottom of the tank, under the toilet bowl.
Next, remove the nuts from the two hold-down bolts at the bottom of the toilet bowl, at floor level. Carefully lift the bowl away and turn it over a pail to catch any water remaining in the U-trap of the stool. Remove the old wax ring, clean the area, and install the new ring by pressing it into the base, being sure to center the ring over the drain hole. Then set the base over the two hold-down bolts and rock the bowl side-to-side to seat the ring. Replace and tighten the nuts on the bolts, replace the tank over the toilet bowl, and secure it in place with the two bolts that connect the two units. To test for leaks, turn the water back on and flush the toilet. Caution: don't caulk the crack between the toilet base and the floor. Caulk at this point will seal any leaking water under the base, and may rot the floor before you are aware of a leak.
Condensation on Water Pipes
At locations where cold water pipes pass through a humid area such as a basement or a laundry room, condensation often occurs on the cold pipe surfaces. Conversely, during cold winters, cool, damp basement air may condense on hot water pipes. To prevent condensation on water pipes, buy pipe insulation at a home center, and insulate both cold and hot water pipes.
One type of pipe insulation is available in foil-faced rolls of fiberglass, which are simply wound around the pipe and secured in place with duct tape. This insulation is useful where the pipes are not a straight run.
A second type of pipe insulation is tubular foam plastic. The foam insulation is available in lengths of 4 feet (1.3 meters), and with a variety of hole diameters to fit any household water pipe diameter. The foam tubes are split down the side and are slipped over the pipes. To ensure that the insulation is not interrupted, fit the ends of the foam insulation tube together carefully, and use duct tape to hold the insulation in place.
Tubular foam insulation is the best choice when you are trying to insulate pipes in close quarters, where there is no working room to wrap the insulation batts around the pipes, such as when insulating a water pipe that runs from the basement up into a wall cavity. In this case the insulation can be fitted over the pipe at the lower end and slipped upward into position in the restricted area.
PLUGGED PLUMBING DRAINS
Of all plumbing problems, the most frustrating and damaging may be a plugged drain. To minimize the danger of drain backup and flooding in the sink or basement, follow these preventive maintenance tips.
To prevent plugged drains, first avoid putting potential plug materials into the drains. Use plastic drain strainers, available at any home center, in the kitchen and lavatory sinks and the bathtub drain.
To eliminate plugs from lint in laundry tub drains, slip a mesh-type strainer onto the water discharge hose of the clothes washer. To ensure its efficiency, replace the strainer frequently.
When cleaning up after a do-it-yourself project, don't flush repair materials down the drain. Materials such as patch plaster, wallboard cement, and concrete patchers are soft and pliable when flushed down the drain, but will set up or harden in the drain pipes and create a drain plug that will be difficult to remove. Instead, mix patching products in disposable paper containers, available at paint stores, and let the leftover patchers harden in the containers. Then dispose of the container and waste in the trash receptacle. Or, mix repair materials in a plastic pail and let leftovers harden in the pail. After the material has hardened, flex the sides of the plastic pail to pop out the hardened materials. Dispose of the hardened materials in the trash.
Garbage disposal frequently cause blockages. To ensure plug-free drains, run water in the sink until you are sure you have flushed all the food waste completely out of the small-diameter sink drain pipe and into the larger main sewer pipe. Neglecting this flushing period can permit food particles to accumulate and plug the small-diameter sink drain pipe.
The chief cause of plugged bathroom drains is the accumulation of soap particles or human hair in drain pipes. When a bar of soap is reduced to a sliver, dispose of it in the bathroom wastebasket. Do not continue to use the soap until it breaks into small fragments that can plug the drain.
Human hair does not deteriorate from moisture exposure, so when hair enters a drain it often will cling to the walls of the drain pipe. To reduce hair accumulation in the shower or sink, comb or brush your hair before you shampoo, then deposit the hair in the wastebasket. To catch falling hair while shampooing, place a plastic strainer over the tub drain.
Be sure to dispose of all paper products in the waste basket. Toilet paper is made to degrade when wet, but other paper products are not.
Drain Maintenance
When the main sewer drain plugs up and floods the house or basement floor, the result is a nightmare. Do not wait until a sewer backup occurs to have your main sewer pipes cleaned. Instead, consider sewer cleaning to be preventive maintenance.
Tiny tree roots seek moisture in the earth, so they often grow into the joints between main sewer drain pipes. If there is a tree sitting over or near the sewer drain, have the drain cleaned by professionals to check for root buildup in the pipes. Tree roots can plug the pipes and cause a sewer backup, as well as growing so large that they will crack and collapse the drain pipes. The remedy then involves excavating a trench to the street sewer pipe and installing new sewer pipes. This is an expensive project that can easily be avoided by keeping the sewer drain clear.
The frequency of sewer cleaning maintenance depends on the number of people living in the house and other factors such as the proximity of trees to your drains. Ask your sewer serviceperson to suggest how often you should have sewer drain pipes cleaned.
To inspect for sewer blockage, some city works departments will run small TV cameras down street sewer mains and advise homeowners of potential problems. To avoid the mess and damage of a flooded basement or bathroom floor, heed their advice and set up a regular drain cleaning schedule. Contact your city utilities department to see if this service is available.
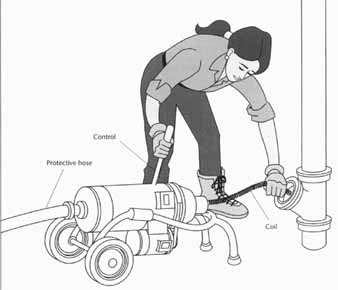
Clean the Main Drain: have a pro clean the main drain
periodically to avoid major sewer backup.
BATHTUB AND SHOWER LEAKS
Water can cause serious dam age behind a wall if it leaks through a crack between ceramic tiles, or through the joint where tub and ceramic tile meet. The water may cause wood decay, or may soak or wick up through the tile substrate and cause a complete failure of the tile job.
To prevent future water damage to tiled surfaces, when building new or remodeling, provide a concrete base for the ceramic tile installation. A concrete tile base will not soak up water and loosen tile. Ordinary wallboard or plaster can soak or wick up water from the crack between the tub and tile. This water may penetrate upward from the tub/tile juncture for a distance of 1 foot (0.3 meters) or more. When subjected to continuously wet conditions, the plaster or plaster core in wallboard will deteriorate to a soft, pulpy mass. When this happens, the plaster will soften and no longer have the strength to support the tiles, which fall off. At this point the only remedy is completely tearing out the old tile and walls and building anew—a large and expensive job. To prevent future water damage to a new bathroom, have the tile setter use wire lath and concrete to build a concrete base or substrate for the tile. Another option is to use wallboard screws to secure reinforced concrete panels such as Durock onto the stud wall, as a base for installing the tile.
Water can penetrate between the ceramic tile and the substrate through neglected grout joints between the tiles. Inspect the tiled areas carefully for cracks or deteriorating grout. Re-grout the tiles to seal the grout joints and ensure a water proof tile barrier. Use a grout saw to clean the old grout from the joints between tiles, then use a sponge or rubber squeegee to apply the grout over the entire tile surface. By using the squeegee you will leave grout between the tile joints, and can wipe excess grout away from the tile surfaces. Because grout becomes brittle when dry, don't use grout to seal the joint where the tub and tile meet (see below).
When the grout is slightly set, use a damp sponge to clean the grout residue from the face of the tile. To clean and shine the tiles, use clean towels to wipe the remaining dull haze from the tile surface when it's dry.
The most common crack in tile, and the crack at which water entry is most damaging, is at the point where the tub and tile meet. The tub will settle when the tub is filled with the combined weight of the bath water and the bather. This will cause a crack to open between the lip of the tub and the wall tile. To prevent this, use a caulk that will not harden, but will continue to stretch a bit after curing. Shop for tub/tile caulks at any home center or paint store.
To apply a tub/tile caulk, first clean any old caulk from the cracks between the tub and tile. Remove any debris, then clean the area with rubbing alcohol to remove any residual soap scum. Then apply the new tub/tile caulk to the crack, being sure to completely fill the crack. Use a wet forefinger to smooth and level the caulk. Let the grout and caulk cure as per label directions before exposing to water.
As extra insurance against water entry behind tile, after bathing and drying yourself use the bath towel to wipe water from the tile surface. As you dry the tile, inspect the tiled surface for cracks. To control bath room humidity, remove damp towels and bath mats from the bathroom when you have finished, and deposit them in the clothes washer.
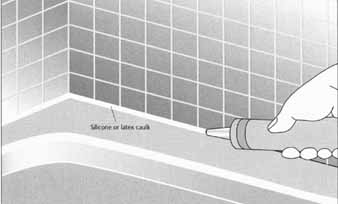
Bathtub Leak: A common source of water damage to tiled
walls is water entry through tile joints or at tile/tub cracks. Grout tile
joints often and use a flexible silicone or latex caulk to seal the joint
between the tile and tub.