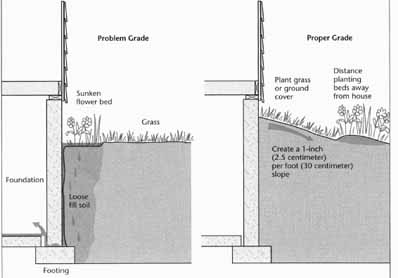
We discussed the roof gutter system earlier, i.e., the means by which you direct the water from rain or snowmelt off the roof and deliver it to ground level. After inspecting the gutters, and checking that the ground pipes are delivering the water at least 10 feet (3 meters) away from the foundation wall, we must be sure that there is a continuous slope or grade to the lawn adjoining the house. If this slope or grade is properly maintained, so there is at least 1 inch (2.5 centimeters) of drop for each foot (0.3 meters) of run away from the basement foundation wall, the water will always run downhill—away from the basement—and will never cause basement water problems.
IMPROPER INITIAL GRADE
Grade problems can result from a number of factors. First, the builder/landscape contractor may have been careless in grading around the foundation or perhaps over the entire lot, and from the day the house was new there may have been little slope to direct the water away from the foundation. Water will always follow the laws of gravity, i.e., will run downhill, and if downhill means toward the foundation, the result will be a basement water problem.
Again, keep in mind that a 1,500-square-foot (140-square-meter) roof catches 1,000 gallons (379 liters) of water in a 1-inch (2.5 centimeter) rain. Expressed another way, that's twenty 50-gallon (190-liter) barrels of water that, without proper gutters, will be deposited within a few feet of your basement wall or foundation. If you have a wet basement your gutter system should be upgraded so that it's adequate to manage and dispose of that large amount of water.
FOUNDATION PLANTINGS
In most cases, the builder has left the lot and lawn of the newly completed house with a slope or grade that will ensure that water will run away from the house. But often, the homeowner will act as his own landscaping expert and do his own foundation planting, thus disturbing the grade around the foundation. Keep in mind that soil that has never been disturbed will shed water rather than absorb it, but the soil around the basement was dug up and loosened during the basement excavation. After the basement was erected, the soil was backfilled, or pushed back against the basement walls. Given time, that backfill soil will settle and become increasingly resistant to water penetration.
However, if homeowners plant foundation foliage such as shrubbery or flower beds, they will weed and cultivate the soil, keeping it constantly loosened so that it will absorb moisture. During planting or cultivation, the loose soil may also be raked and flattened, which will eliminate the grade or slope of the lawn. Because there is no grade to encourage water runoff, the water will puddle near the foundation and easily penetrate to footing levels via the excavated soil. The result will be a basement wall that leaks, often at the point where the concrete wall meets the concrete basement floor or slab.
If water appears to be soaking into the flower beds at the basement wall, and running into the basement, the first step must be to correct the grade. To do this, you may have to dig up and remove any foundation plantings, add soil at the wall, then grade the soil so that it slopes away from the house foundation. To learn how this is done, refer to Foundation Treatment.
Foundation Treatment
When a proper grade has been established, at least 1 inch (2.5 centimeters) per running foot (30 centimeters), you must choose between two options. The first and most effective option is to eliminate any foundation plantings. Because grass will shed water rather than absorb it, it's best to lay sod next to the foundation for at least 6 feet (2 meters) away from the house. Then reestablish the flower beds or shrubbery groupings in islands at least 6 feet (2 meters) away from the foundation. This may seem an unusual solution and unlikely to provide the desired curbside view.
However, island plantings are as attractive as foundation beds, and they ensure that water can't penetrate loose soil and enter the basement.
One common misconception is that covering the planting area with plastic sheeting, then filling flower beds or planting areas with decorative rock or tree bark will help to solve a basement water problem. However, unless a proper grade is first established, neither the plastic sheeting, rock, or tree bark present any barrier to water entry.
So, if you must have foundation plantings, first ensure that there is a proper grade or slope within the planting area, then install a plastic water barrier over the area of the planting beds.
Lay a sheet of 6 mil poly (plastic sheeting available at lumber yards or building centers) at least 6 feet (2 meters) wide, or as wide as the bed, over the properly graded soil. Secure the plastic sheeting in place by using an acoustic caulk or adhesive to seal the edge of the plastic sheet to the foundation. Acoustic caulk will adhere well to plastic vapor retarders—better than other caulks. It’s stickier. Also, acoustic caulk stays flexible when it cures, while others harden and crack. Overlap any joints by at least 8 inches (20 centimeters), and seal the joints with caulk so the plastic sheeting presents an uninterrupted barrier to water entry. Then lay out the garden or shrubbery placement, and cut holes through the plastic sheeting where flowers or shrubs will be planted. These holes should be no larger than necessary to permit the planting, and should be limited to a maxi mum diameter of 12 inches (30 centimeters) or large enough to insert the root ball. Plant through the holes in the plastic. Then spread decorative stones, tree bark, or wood chips over the plastic. The decorative stones or chips will be attractive and will hold the plastic water barrier in place so the plastic sheeting will not become damaged or windblown. Use a hose or watering can to water the plants through the holes.
PAVED SLABS
Another critical portion of the lot is any area that's paved over concrete or asphalt. A grass turf will often absorb a 1-inch (2.5 centimeters) rain—or more, depending on the type of soil—holding the water back so that it does not flow and cause a problem. But because no water is absorbed on a paved surface, all the water that falls on it must run off, and in many cases the direction of that flowing water is toward the basement.
How-to texts for home owners often advise that when pouring a slab such as a patio or walk the forms must be level, but this is bad advice. Any paved slab near a structure should be formed and poured so that the finished slab will slope away from the basement area. Hundreds of gallons of water may fall on a large drive, walk, or patio, and this water must be diverted away from the house. If the poured slab is level, much of the water that falls upon it will flow toward the basement. It is absolutely critical that there be a slight slope away from the basement, especially for slabs that are immediately adjacent to the basement wall.
An inspection of any slab adjacent to a basement may reveal that the slab has sunk on the house side so the slab has tilted toward the basement. Because the soil is excavated when the basement is dug, then pushed back to fill the hole without sufficient tamping of the soil, the soil will eventually settle. As the coil settles near the house, the slab settles toward the basement. Then any water that falls on that slab will run into the basement. This settling of the slab is commonly seen on walks, porches and steps, patios, and garage aprons that have been poured on fill soil that's not compacted.
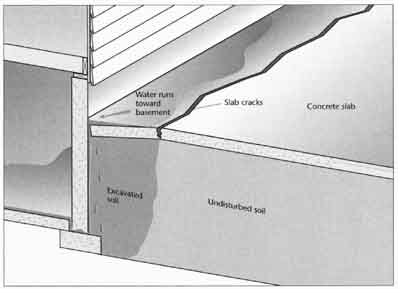
Excavation Settling: Slabs poured over unsettled soil
will crack as the soil settles. Do not pour concrete slabs such as drives
or patios until the soil has settled.
To prevent slabs from settling or tilting toward the basement, it's important to take care at the time of construction. Any backfilled soil must be compacted or settled. One easy way to compact loose soil is to soak it with water. This process may require repeated soaking of the loose soil before the soil is finally compacted. As the water percolates into the loose soil, it displaces any air bubbles or voids so the soil is firmly compacted
To compact loose soil, contractors also may use mechanical compacting machines that tamp the soil with repeated blows. These machines can also be rented at most tool rental outlets. Choose either the water method or power tamping to compact soil, and never pour a concrete or asphalt slab over loose fill soil. If you use water to compact the soil, be sure to let the area dry before you pour a slab on top.
When pouring a new slab, set the concrete forms so there is sufficient grade or slope away from the foundation. This slope should be at least 2 inches (5 centimeters) over a 12-foot-wide (4-meter) patio or drive. If you begin with an initial slope of 2 inches (5 centimeters), you can still retain sufficient slope on the newly poured slab, even if the slab edge toward the basement wall settles slightly. Having a slope on the slab will also prevent water from standing, and ice from forming on the slab during winter.
When pouring a concrete slab adjacent to a basement wall, install an expansion strip at the juncture between the slab and the concrete wall. When the concrete has cured, keep the expansion strip joint caulked using acrylic latex caulk to prevent water entry between the slab and the wall. Because caulk weathers and cracks, you should inspect the joint in the spring and fall, and re-caulk as needed to ensure the joint is watertight and will not permit water entry.
If you have an existing concrete slab that has tilted toward the basement, you may be able to correct the slab slope without breaking it out and starting over. A concrete raising system, called mud-jacking, bores holes into the slab before pumping concrete into the holes and under the sunken slab, raising it into position. For a contractor who specializes in raising concrete, look in the Yellow Pages or online for “Concrete Contractors”.
Finally, gutter down spouts and ground pipes should not deposit roof water directly on any slab that's adjacent to the basement wall, unless that slab has a pronounced slope away from the foundation. Where possible, position the ground pipes so that water is deposited on grassy turf, where it can be absorbed or will run off. Redirecting the water flow may be as simple as replacing the ground pipe angle so water is deposited parallel to but at a distance from the wall, rather than being deposited directly in front of the wall.
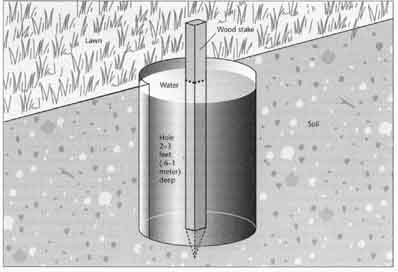
Soil Percolation Test: Fill hole with water and let set
until water is absorbed; repeat. Refill hole with water and mark water
level on the stake. Check in one hour; water level should drop at least
1 inch (2.5 centimeters).
LOT DRAINAGE
On a grassy lot, the turf and topsoil will absorb a great deal of water before being saturated, so the water will not run off and create a problem. Below the topsoil, the ability of soil to absorb water depends on the type of soil. Loose loam or sandy soil will absorb water easily, while heavy black or clay soils retain water and don't permit further absorption. The ability of the soil to absorb water is called the percolation rate. If you dig below the topsoil and squeeze the soil into a ball in your hand, soil with a high percolation rate will crumble, even when wet. Any soil with a poor percolation rate—i.e., black or clay soil— will resemble a ball of Play-Doh when squeezed in the hand.
To test the percolation rate of your soil, dig a hole that's 2 to 3 feet (0.6 to 1 meter) deep. Fill the hole with water and let the water percolate until the hole is empty. Repeat this procedure a second time. Then drive a wood stake, long enough to extend above the ground level, into the bottom of the hole. Again fill the hole with water and mark the water level on the wood stake.
Let the water sit in the hole for one hour, then check the water level. If the water level has dropped 1 inch (2.5 centimeters) or more, you have good water absorption or percolation. If the water level has dropped very little, the soil will not absorb or hold much water, and the lawn will show water runoff during even a light to moderate rain.
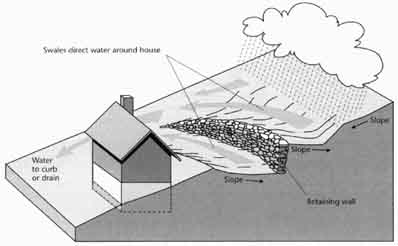
Excavation / Retaining Wall: One solution to drain a
hilly lot. Swales—shallow trenches—direct water to storm sewers or drainage
areas.
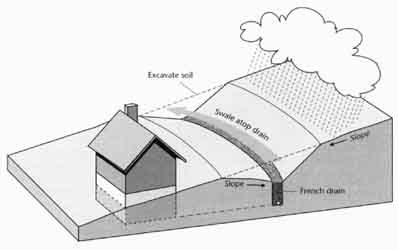
Excavation / Drain: French drain with swales to divert
the water away from the house.
To drain a hilly area, an alternate solution is to excavate the soil to create a slope away from the house, then build a
If you can't manage to control the water by absorption after taking the other steps recommended here, consider hiring a professional landscaper. He or she will either amend the soil by mixing it with peat moss or sand, or will remove it and replace it with soil that can absorb water more readily.
Perhaps one side of your lot slopes upward toward a hill, so that all the water that falls on the hill runs down toward your basement. You must manage that water runoff so that it's either held back or is diverted into slight ditches or swales that are created at least 10 feet (3 meters) away from the basement.
To hold back the water runoff from a hill, you can build one or more terraces or retaining walls down the hillside. Build the retaining or terrace walls of stone or wood landscaping timbers. Be sure the terrace or retaining walls are built so there are drainage holes that allow the overflow water to flow through to the next level, and excess water can't back up behind the walls.
Then, to ensure that the turf will absorb water, cultivate the soil behind the retaining walls and establish planting areas for flowers or shrubs. Do not cover the soil in these planting areas with plastic sheeting, because the goal is to have the water that flows into the area be absorbed into the soil, rather than being diverted to run down the hill toward the basement.
Landscaping features such as grass, flowers, shrubs, and trees will absorb or retain a large amount of water. If you plant large shade trees be sure to keep them trimmed and the tops thinned out, so that sunlight can penetrate through the tree canopies to the lawn. After a rainfall, the sunlight will help evaporate excess water from the lawn.
Another technique is to divert water around the house via a slight depression called a swale. The swale is dug so that it's parallel to, and at least 10 feet (3 meters) from the basement wall, then curves along the two sides of the house so water is diverted toward the street at the front of the house and into curbside gutters or storm drains. (See Swales)
To build a proper swale, the lot first must be surveyed with a transit, the swale diversion area laid out, and the soil graded with a tractor. Care must be taken so that the swale does not divert the water onto a neighbor’s lawn, thus creating a drainage problem on an adjacent lot. Swales are usually projects for landscape or excavating contractors. To find a contractor, look in the Yellow Pages or on the Internet for Excavating Contractors.
When the swale is completed the area should be covered with sod. Grass seed, tends to wash to the bottom of a slope before taking root.
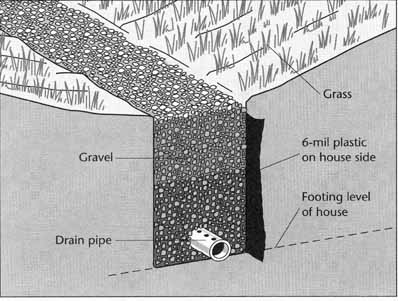
French Drain: To build a French drain, dig a trench 2 feet
(.6 meter) wide and deep enough so the drain pipe is level with or below
the house footing level. Fill the trench with gravel or crushed rock.
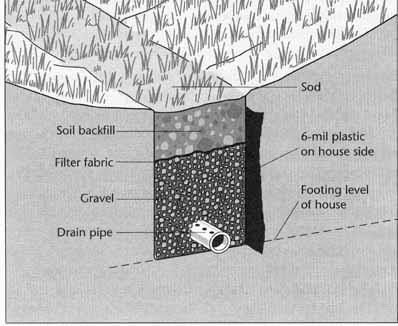
Curtain Drain: If you prefer grass to the gravel of a French
drain, build a curtain drain. Basic construction is the same, but a curtain
drain is topped with soil and sod. Note the depression or swale atop the
drain.
STANDING WATER
During or immediately after a rain, check your lot for puddles or large areas of standing water. Use wood stakes, driven into the soil, to define the perimeter of puddles of standing water. Fill and level small puddle areas with a wheelbarrow of black dirt.
If you have large areas of standing water, consider having a contractor survey the area, then either fill the low areas with soil so water will not stand, or install perforated plastic drain pipes that will collect the water and divert it to the street or storm sewers. (See French Drain and Curtain Drain illustrations, opposite).
hwmmp_33-0.jpg Swales: Swales are shallow trenches that direct water away from a house foundation to drainage areas. Call a landscape contractor for this project.