An existing basement is a prime candidate for expanding the living area in your home. (This means a full-size basement under at least a portion of your house. If there is only crawl space it’s generally more practical to build an addition aboveground than to excavate under the house.) One obvious advantage is that the basement is already enclosed with a rough floor, outside walls, and ceiling joists. Access usually isn’t a problem because most basements already have a stairway. The basement is often as large as the living area on the first floor, so the potential for converting the space is great.
Many basement remodelings, however, run into complications. These typically include excess moisture, masonry walls and floors, and an assortment of exposed pipes and ducts. This section describes a number of techniques you can use to overcome these problems and prepare the basement for finishing.
Code limitations for a basement conversion are similar to those for attics. Before you begin, check your local code regarding ceiling heights and stairways. The in tended use of an area is often the key factor. If you don’t plan to use the basement as habitable living space, the ceiling restrictions are usually less demanding.
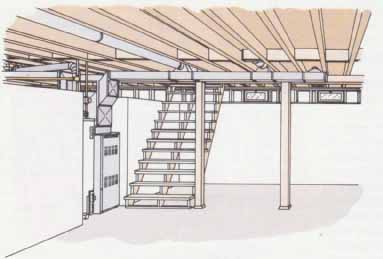
An unfinished basement
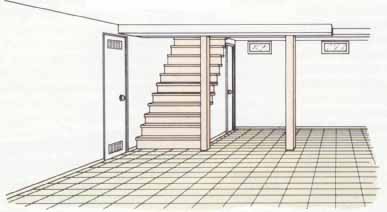
A finished basement
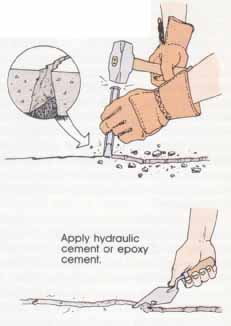
Patching Cracks in Concrete: Make the crack wider beneath
the surface to hold the cement more securely. Apply hydraulic cement or
epoxy cement.
Eliminating Excess Moisture
The most critical problem in any basement remodeling is excess moisture. This has to be resolved satisfactorily before you can proceed with your plans. If your basement has a moisture problem, start with an outside inspection. Check all downspouts and gutters to be sure they’re in good working condition. If you don’t have splash blocks or extensions to carry the water away from the house, buy some. Check the perimeter of the house to be sure the grading slopes away from the foundation. Look for low spots where water can accumulate, especially around window wells. Check the seal around the bottom of doors and basement windows and re-caulk as necessary.
From the inside, examine the basement walls and floor for cracks. To repair cracks, dig out a 1/2- to 1-inch groove with a cold chisel. If possible, make the inside of the groove slightly wider than the outside. This prevents the patching material from falling out too easily With a stiff wire brush, clean away loose material from the opening. Wet down the sides so the surrounding material won’t leach water from the new mortar. Then apply a small batch of hydraulic cement, mixed according to the manufacturer’s instructions. This is readily available from most hardware stores and building suppliers.
The joints between the walls and floor are a common problem, so inspect these areas carefully. If the joint is the source of leaks, widen it slightly and fill with an epoxy cement. Once the epoxy has dried, cover with patching cement.
If the mortar between concrete blocks is loose and crumbling, the joints should be repainted. Use a ready-mix mortar or mix your own with 1 part masonry cement and 3 parts fine sand. With a cold chisel dig out about 1/2 to 3/4 inch of the old mortar. Then wet the joint and pack in as much new mortar as you can. A special tuck- pointing tool works best. The mortar will cure better if kept moist, so cover it with damp burlap, or spray it lightly several times a day for 4 or 5 days.
Alter all these repairs, coat the wall and floor with a waterproof sealer. This could be an alkyd-based cement paint or a sealer made of silicone or epoxy Most sealers go on like paint and can be applied with a brush or roller. If you cover a large surface with epoxy, be sure to provide adequate ventilation.
If you find no cracks but the basement is obviously damp, the problem is either seepage or condensation. Cut a 12-inch square of heavy plastic or aluminum foil and tape it to the basement wall below ground level (below grade). Leave it in place for several days and then remove it. If you find that the area under the square is wet, the problem is seepage. If the area underneath is dry, but the surrounding wall is damp, the problem is condensation.
Solving a seepage problem is not always possible from the inside. You can try coating the walls and floor with a waterproof sealer, but the results can’t be guaranteed. If the moisture problem persists, the job may re quire a more radical solution. Your best bet is to call a contractor who is familiar with the moisture problems in your area. You may need to excavate and waterproof the exterior of the foundation. If the soil is clay or another material that drains poorly, a system of drainage tiles may be needed to carry excess water from the house. If the water table is too high, nothing much can be done except to install a sump pump and forget about finishing the basement.
If the problem is condensation, there is too much humidity in the air. First remove any obvious sources of moisture. For example, a clothes dryer in the basement should be vented to the outdoors. To prevent pipes from sweating, insulate the cold-water pipes with wrapping tape or neoprene sleeves. Leave the basement windows open when the weather allows, or improve the ventilation by installing a ventilating fan in a window opening. If these efforts aren’t enough, install an electric dehumidifier to remove excess moisture from the air.
A note of caution: with any remedy for a moisture problem, wait several months or through a rainy sea son before you assume a permanent cure. The problem should be completely solved before you begin your remodeling.
Preparing the Floor Surface
If the concrete floor in the basement is dry and reason ably smooth, you may be able to apply the finish floor directly over the concrete. Ceramic tile, indoor/outdoor carpet, and some types of resilient tiles, for example, are suitable for use below grade over concrete. Minor pits and low spots should be filled first with patching cement. With the application of a waterproof sealer, the floor is ready for finishing.
In many cases, however, a new subfloor should be built over the concrete. A new subfloor is required if:
• The existing floor is damp due to condensation and high humidity.
• The concrete is rough, uneven, sloped, or badly cracked.
• Other types of finish flooring are desired, such as sheet vinyl, most types of carpeting, and wood flooring.
• You prefer a subfloor above the concrete to make the finish floor warmer and more comfortable to walk on.
Two techniques can be used to install a subfloor over concrete. Both methods are similar—the choice is primarily a matter of preference and may depend on the materials you have at hand.
Installing a Basement Subfloor
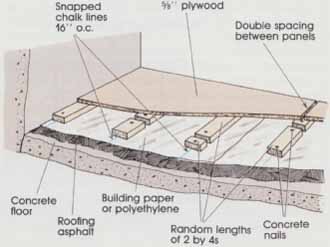
Installing the subfloor. Sweep the floor clean and then spread a layer of roofing asphalt over the entire surface. Make this about ‘/4 inch thick (the depth need not be exact or the layer perfectly smooth). Lay heavy building paper or sheets of 6-mil polyethylene over the asphalt. Overlap the edges about 6 inches. Snap chalk lines 16 inches on center across the width of the floor. Then lay lengths of 2 by 4s along the chalk lines. These can be random lengths or scraps you’ve been saving. (Be sure the thicknesses are the same.) The wood should be treated with preservative beforehand. Leaving 1/4 to 1/2 inch between the ends of the 2 by 4s to allow for air circulation, secure them to the floor with concrete nails. They won’t be tight, but the nail points will dig into the concrete enough to keep the sleepers from sliding around once the plywood is applied. At this point you’re ready to apply a 5-plywood subfloor. Be sure to double the recommended spacing between panels to allow for the extra humidity in the air.
An alternative technique. Sweep the floor clean and then apply a waterproofing sealant with a brush or roller. When the sealant is dry, snap chalk lines 16 inches apart across the width of the floor. Along these marks, apply a mastic suitable for bonding wood to concrete. The easiest method is to buy mastic in a tube and use a caulking gun. Lay random lengths of 1 by 2s over the mastic (1 by 3s or 1 by 4s can also be used). Treat them with preservative first or use pressure-treated lumber. Leave a 1/4 to 1/2-inch gap between ends and drive concrete nails into the floor every 24 inches. When the entire floor is covered, spread a layer of plastic (4- or 6-mil polyethylene) over the sleepers. Overlap the joints 6 inches. Then add a second layer of untreated 1 by 2s and nail them to the sleepers below. Once this is completed lay the plywood subfloor as described previously.
Preparing the Walls
In most instances it’s desirable to cover the basement walls with a finish material such as wallboard or paneling. The advantages are twofold: improved appearance and added insulation against the cold exterior walls. In mild climates the dead air space between the finish wall and the masonry is sufficient. In colder areas you should plan to add batts or rigid panels to improve the insulation. If you do, the finished basement will be more comfortable and your heating bills will be lower.
Before the walls can be finished, however, you must add a nailing surface over the masonry. This can be accomplished with furring strips—normally 1 by 2s laid flat against a wall—or with a new false wall built in front of the existing foundation wall. The choice depends on a number of factors. In general, furring strips can be used in the following cases.
If the walls are flat and plumb. Check the foundation with a plumb bob or a long level and straight 2 by 4. If the walls are reasonably straight and plumb, fine. Minor problems can be corrected with shim stock behind the furring strips. Otherwise it’s more practical to frame a new wall in front of the old.
If you don’t need to install more than 3/4 inch of insulation. Purring strips laid against the wall usually allow a 3 space for installing rigid insulating panels or l 1/2-inch batts compressed to fit. Check the necessary R-value in your area. If you need additional thickness, use a false wall instead of furring.
If there have been no serious moisture problems. Attaching the strips to the wall with nails or screws could aggravate problems such as leaking cracks or seepage and cause new leaking.
Installing Furring Strips
If you’re using insulation batts or no insulation at all, first cover the wall with a plastic moisture barrier. The barrier should be 4-mil polyethylene sheets with the joints overlapped and taped tight. Cut the sheets an extra inch or two long and trim the bottom later. Staple the top to the edge of the sill. Next snap vertical chalk lines 48 inches on center. Along each line attach 1-by-2 furring strips with 1 1/2-inch concrete nails every 16 inches. Or you can use lead or fiber expansion shields and wood screws instead. Position these 36 inches apart. Snap horizontal chalk lines 16 inches apart. As you install these short pieces of furring, leave a 1/4-inch gap between the ends to allow for air circulation. Be sure to fur completely around any window openings. If you are using insulating batts. install the paper or foil vapor barrier facing toward the inside of the room. If the batts are unfaced, add a vapor barrier of plastic sheets after the insulation is in place.
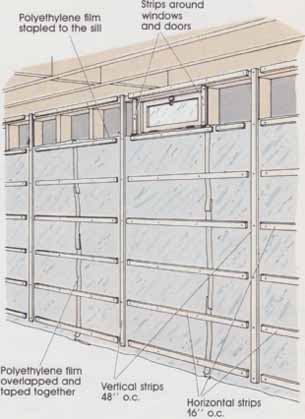
Installing furring strips
If you’re using rigid insulating panels, install the fur ring first. The space between the furring can be modified to fit the dimensions of the panels, but keep in mind you also need a nailing surface for the finish wall. Glue the panels to the foundation wall according to the manufacturer’s instructions. Then apply a plastic vapor barrier over the strips and panels. Because this furring is in contact with masonry, it should be redwood. pressure treated, or coated with some wood preservative before installation.
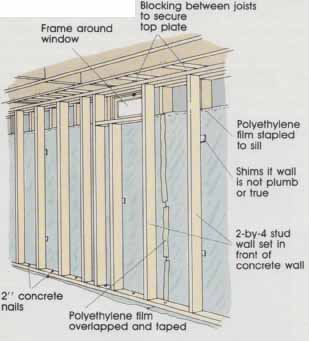
Building a False Wall
If you choose to build a false wall in front of the existing foundation, review the instructions for erecting a new wall. This process varies from new wall construction in only a few ways.
First cover the foundation wall with a plastic moisture barrier stapled to the sill. Cut the sheets long enough to lap under the sole plate.
If the foundation is out of plumb or not flat, use shim stock or 1-by-2 blocks behind the wall.
If a pipe runs along the exterior wall, use 1 -by-2 or 2-by-4 blocks to clear the obstruction.
If the floor is concrete, attach the sole plate with 2-inch concrete nails 16 inches on center. If a new subfloor has been installed, 10d common nails are sufficient.
Building a False Wall
Framing Around Ductwork
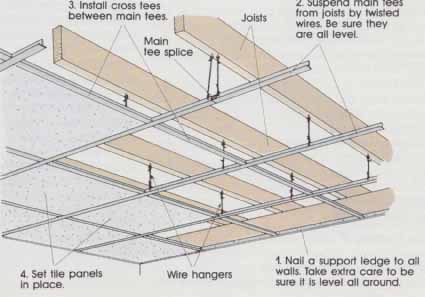
Installing a Suspended Ceiling: 1. Nail a support
ledge to all walls. Take extra care to be sure it's level all around. 2.
Suspend main tees from joists by twisted wires. Be sure they are all level.
Hiding Pipes and Ducts
If you’re fortunate, the exposed overhead pipes and heating ducts run between the joists, tucked above the bottom edge. If you’re not so lucky, the pipes and ducts hang below the joists, which creates a problem in finishing the ceiling. In some cases you may be able to reroute or raise the offending pipes between the joists. As a rule this isn’t practical if more than one or two pipes are involved. Often the ductwork is so large it can’t be moved elsewhere anyway.
The easiest solution to the problem is a suspended ceiling. Installation is simple, and when you buy the components complete instructions are generally pro vided by the manufacturer. The process involves nailing a metal molding around the perimeter of the room and suspending two or three main runners from the joists with screw eyes and wire every 4 feet. Cross tees fit into slots on the runners to complete the grid. Ceiling tiles, usually 2 by 2 or 2 by 4 feet, are slipped into the framework and rest on the edges of the tees and runners. If necessary, a portion of the grid can be dropped even lower than the rest of the ceiling to accommodate a particular group of pipes or ducts.
In basement remodeling, three advantages recommend a suspended ceiling over a conventional wall board ceiling. (1) Because the tiles can be removed and replaced in a matter of minutes, all the pipes and ducts remain accessible. This is essential if emergency repairs to the plumbing or heating system become necessary (2) Because the grid is suspended from the joists rather than nailed to them, the bottom surface of the joists doesn’t have to be smooth or level. (With an irregular surface a wallboard installation requires furring strips and shimming.) (3) The tiles add a level of sound- proofing that can be beneficial in a workshop or recreation area.
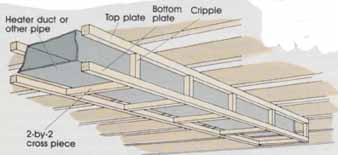
A suspended ceiling does have one disadvantage: it takes up about 3 to 4 inches of ceiling height. If head room is at a premium, you may need to box in certain pipes and ducts instead, but the box must be at least 6 feet 8 inches from the floor. The process is much like building a small partition wall. One technique is to cover a long duct hanging below the joists by building two identical frameworks from 2 by 2s, as illustrated, Each is complete with a top and bottom plate and short cripple studs 16 inches on center. Attach each frame to the ceiling by nailing the top plate to the bottom of the joists. Cut short lengths of 2 by 2s the width of the duct and nail them between the two frames.
An alternative technique is to assemble all three sides on the floor. Then with a helper lift and nail the unit in place. The frame can be covered with ceiling tiles, wallboard, or paneling. The size of the framework can vary—simply make it strong enough to support the finish material. You may be able to box some pipes or ducts with wooden lattices constructed from 1 by 2s or 1 by 3s.
Use the same type of framework to cover vertical pipes in a corner or along the wall. Nail the plates to the ceiling and floor as you would a full-size wall. With some imagination and slightly more effort, you can also build a storage closet or bookcase to fit around the pipes. These solutions do double duty: they camouflage the pipes and are functional as well. Room projections must be a minimum of 6 feet 8 inches from the finish floor.
When finishing the walls and ceilings, keep in mind that all shutoff and drain valves, cleanout plugs, meters, and electrical junction boxes must remain accessible. Building an access panel in a wallboard surface is simple. First cut out an opening with a wallboard or keyhole saw. Then cut a piece of 1/4-inch plywood 2 inches larger than the opening. For example, if the access hole is 10 inches square, make the plywood 12 inches square. Hold the panel in place and drill for Molly bolts at each corner. Once the panel is secured to the wall, it can be removed and replaced at any time simply by un screwing the Mollys. If the plywood is painted to match the rest of the wall, it will be barely noticeable.
Before any pipes are covered, it’s a good idea to inspect the entire plumbing system. Make sure there are no leaks or corrosion that can stain the finish surfaces. Overlooking even minor drips means trouble later on, so taker care of repairs before finishing begins. You should also insulate cold-water pipes to prevent condensation and hot-water pipes to save energy.
Building an Access Panel:
1. Cut a hole in the wallboard.
2. Cut 1/4” plywood 2” larger than the hole.
3. Secure the plywood with molly bolts and paint it to match the wallboard.
Molly bolt; 1. Drill a hole the same diameter as the molly and insert it all the way. 2. Tighten the screw until the molly has expanded against the inside of the wall—when the screw no longer turns easily. 3. Back the screw out, insert it through the plywood and reinstall it in the molly.