Though not as widely used as it could be, the post foundation has a lot to recommend it. It is by far the easiest for the do-it-yourselfer to construct, and has the great advantage of low cost and extreme flexibility. No equipment is needed, except for tools to dig the holes and a saw to cut and trim the posts. No concrete or mortar is necessary. An absolute minimum of site preparation and excavation is needed, and site disturbance is practically nil. As with piers, the above-grade lengths of the posts can be set to suit any sort of topography. Construction time is short, and once the posts are in the ground you’re ready to commence building the structure. Posts, like piers, will also support a tremendous amount of weight, and if properly set in good firm soil, they are unlikely to settle; in any case they can be footed with large stone punch pads. Their biggest drawback is a susceptibility to rot or insect attack, but this can be almost completely eliminated by the use of posts properly pressure-treated with preservative. A good post foundation can be expected to last for many decades.
There are a number of possibilities for post materials. Large beams work well. The mini mum size to use is 8- x -8-inch. If you can locate them, 12- x -12-inch is the best for most purposes. New railroad ties work well, as do new telephone poles and pilings; the biggest chore is to find them. Whatever you select, make sure that the material is commercially pressure-treated with preservatives in a density suitable for direct burial in the ground. Trying to treat your own logs for this purpose is not recommended, for two reasons. First, the best preservatives, like creosote and pentachlorophenol and the arsenic-type solutions, are no longer available for public use; only licensed companies can buy and use them. And second, only pressure-treating is effective for this purpose, a process well beyond the capability of any do-it-yourselfer. Also, don’t be fooled into buying used poles or railroad ties. Most are old, were not as effectively treated as they are nowadays, and have been taken out of service because they are nearing the end of their safe usefulness.
The initial proceedings for building a post foundation are the same as for either of the two pier foundations just discussed. The holes, however, should be dug to a minimum depth of 2½ to 3 feet into the ground; 4 feet is even better. The hole diameter should be just a little bit bigger than the post cross-section. The holes should be dug fairly straight. This can be done with a posthole bar and posthole shovel, or with a one- or two-man power auger, or by an auger-bit posthole digger mounted on a tractor. The latter method is by far the easiest, but is also the toughest on surrounding vegetation. The hand-held power augers will lead you a lively dance in rocky soil and don’t really work very well in those conditions—but then, neither does anything else.
Set the posts in place (tip down for tapered poles), shovel a few inches of dirt around them and tamp the earth down firmly with a posthole bar or tamper. Check the plumb and alignment, add another foot or so of dirt, tamp that down, and soak it. Continue filling, tamping, and soaking, all the while keeping a sharp eye on plumb and alignment, until you have filled to slightly above grade level. The more you tamp and compact the soil, the better.
You have two options regarding the setting of the posts so that the tops come out level and aligned. One is to cut the posts to the required length, and then adjust the bottom level of the posthole to the proper depth by scooping out a little soil; adding some and tamping can be done if you dig down too far, but is something to be avoided. The second method is to cut all the posts a little oversize so that they stick up beyond the level lines. Bed the posts firmly, then trim them off to accurately match the level lines (Fig. 4-26). It’s a toss-up as to which involves more work, but the latter method is likely to result in more accurate leveling, provided your saw cuts are square and true.
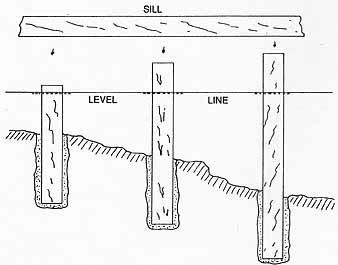
Fig. 4-26. A post or pole foundation can be set in uneven topography and trimmed to level.
A modification sometimes used is to add punch pads which act as footings beneath the posts, creating a larger bearing surface. In this instance, the posthole must be considerably larger than the post. A large hard rock (granite, for instance), flat on the top and bottom faces, is dropped into the hole first. Poured concrete footings could also be used to accomplish the same purpose, of course, and would be made in the same way as for the poured concrete piers. But unless the punch pad is considerably larger in surface area than the post end, there is no point in bothering. Often it's better, or just as easy, to use more posts with out punch pads than fewer posts with them, to carry identical loads. And under most circum stances the post alone is sufficient, and because of the substantial holding power of the post sides against the soil it's unlikely to move much.