Unless yours is a daylight basement (a basement with at least one wall exposed to the grade), it probably does not have much by way of windows. For a recreation room or a home office this is not a problem— simply wire the room so that it has plenty of artificial light. When it comes to bedrooms, however, building codes come into play.
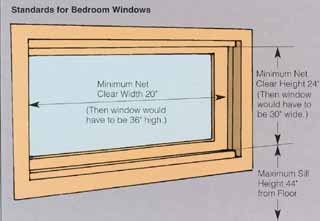
Building Codes and Basement Windows. A bedroom
egress window is used as an emergency exit. The net clear opening can't be less than 5 sq. ft.

Secondary Wall Framing. In places where a secondary wall
meets a window, the framing can be detailed to support finished wall
surfaces.
Building Codes and Basement Windows
Whether or not a window has to be added to a basement is not entirely a matter of personal preference. All bedrooms, including those in a basement, require a means of emergency exit.
If there is a door that leads directly outside (and not to a bulkhead door), it can be considered an emergency exit, If there is no door, however, each bedroom must have at least one egress window. The requirements for such a window specify its minimum size, its net clear opening,” and the maximum distance between the sill and floor. The net clear opening essentially is the square footage of space avail able for a person to climb through once the window is fully open. It is measured between obstructions, such as window stops, that block passage. The minimum net clear opening for bedroom egress windows is 5 square feet.
Replacing a Wood Window
One problem with wood-framed basement windows is that they are susceptible to rot and insect damage. In some cases the affected wood can simply be cut away and repaired with epoxy wood filler, but extensive dam age calls for replacement of the entire window. Measure the size of the rough opening (the hole in the wall in which the window sits) and check local window sources to see whether replacement windows are readily available. If not, you must order a custom-built window. This may take some time, so don't remove the old window until the new one is on hand. Replacement methods vary, depending on how the original window was installed, so pay attention as the old one is removed.
Window Details
If the inside of the foundation is to be insulated, the window frames must be “boxed-out” to match the combined thickness of insulation and finished wall surfaces. Given the variety of window sizes, frame types, and locations, there is no one best way to do this. If the window is an egress window, however, check with local building officials before proceeding— boxing-out a window sometimes affects its accessibility. The following are some options to consider.
Secondary Wall Framing. For wood-framed walls that are built to insulate the foundation, there are several ways to finish the area around foundation windows. The simplest way is to treat the window as if it were in a standard frame wall. A 2x4 sill nailed between studs forms the rough opening, while the ceiling butts into the top of the window. The new jambs and sill may be finished with paneling or drywall. Remember to consider their thickness when installing framing.
An alternative to boxing-out a recess is to bevel the windowsill. This takes planning and some carpentry skills but results in a brighter basement because the light is reflected into the room rather than blocked off.
(1) Framing the Wall. In order to provide clearance for the beveled windowsill, the framing immediately beneath the window has to be shorter than it would be otherwise. For a 45-degree bevel, the framework must be shorter by the width of the studs (3 inches, for example, if framing with 2x4 lumber). For a steeper bevel, the framework must be shorter. Frame the wall; tip it into place; and fasten it to the floor and the underside of the joists.
(2) Installing the Blocking. Cut 1x4 blocking to the width of the window, and attach it to the foundation using concrete screws. (Avoid masonry nails when working this close to the edge of the masonry.) Cut a 45-degree bevel on a length of 1-by or 2-by stock that's the same length as the first piece, and nail it to the top of the framed wall. (It provides support for the sill panel.) The top edge of the blocking can be beveled as well, if desired.
(3) Installing the Sill Panel. The sill panel can be plywood, drywall, or even paneling to match surrounding paneling. In any case, cut a piece to fit beneath the window, and tack it temporarily in place. (It may have to be trimmed slightly after the finished wall surfaces have been installed.)
(4) Trimming Out the Bevel. After you have installed the finished wall surfaces (usually drywall or ply wood paneling), trim the sill panel as necessary for a good fit. Put insulation behind the panel, and then nail it to the support and the blocking underneath. Add a sill to cap the top of the panel. Use corner bead or wood trim to cap the bottom.
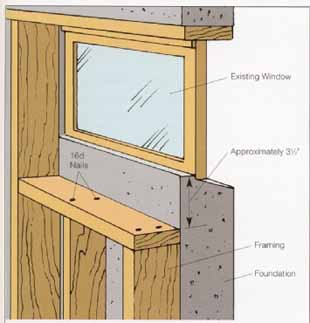
1--To provide support for beveled sill panel, frame the wall
below the window so that its top plate will be lower than it would be
otherwise.
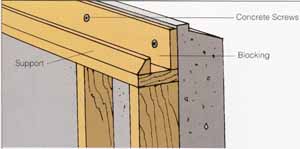
2--Secure blocking to the foundation, and nail a beveled support
to the wall plate. The support must be beveled at an angle equal to that
of the sill panel to follow.
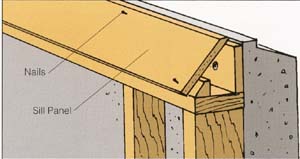
3—Cut the panel, and tack it in place temporarily; size can
be adjusted later.
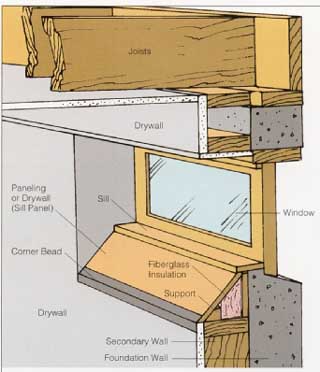
4--Cut the panel to a finished size – add insulation behind
it; nail panel into place. Trim out beveled area as needed to cover the
edges of the sill panel.
Window Wells
It is possible to fit a small window at the top of a foundation wall and still maintain the mandatory 6 inches above grade (the code minimum). This code is intended to protect wood building elements from rot by keeping soil away from them. If the windows are too close to the soil, try to lower the nearby grade level. (Make sure it still slopes away from the foundation.) The soil that's removed can probably be used elsewhere in yard. If you can't lower the grade, you’ll have to install a window well.
A window well works like a dam to hold soil away from a window that's located partially below grade. Though a well can be built with concrete block, many people find it easier to use a galvanized steel product purchased from a home center. The ribs in a well give it strength, and flanges at each end allow it to be bolted to the foundation walls. Wells come in various sizes. Choose one that's at least 6 inches wider than the window opening and deep enough to extend at least 8 inches below the level of the windowsill.
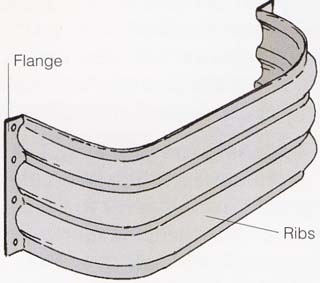
Window Wells. Choose one that's 6 in. wider than
the window opening and deep enough to extend 8 in. below the level of
the windowsill.
--
Window Trim
After you have boxed the window, consider the finishing touches. Small windows generally look best with simple frames of mitered casing without a window stool or apron (called “picture frame” trim). For large basement windows, many types of casing details are possible, nearly all of which use some version of the two basic joints: the miter joint and the butt joint. A miter joint occurs in places where two pieces of wood are joined at an angle (typically 90 degrees). This joint often is used in places, such as a corner, where trim changes direction. A butt joint is the simplest joint of all. Both of the mating pieces are cut square and one is simply “butted” into the other. This joint often is used in places where trim pieces that have different thickness or shapes meet.
--
(1) Digging the Hole. Place the well next to the house, and use it as a template to mark the perimeter of the hole. Do not try to dig a precise hole. Allow several inches of leeway to maneuver the well into position. Then wash dirt off the newly exposed portions of the foundation. To allow room for gravel, dig 4 or 5 inches deeper than the depth of the well. (Remember, the top of the well must be approximately 6 inches above grade.)
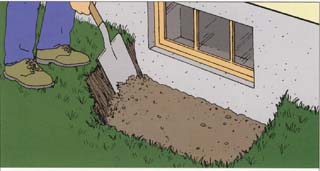
1--Dig hole big enough to contain window well. Allow several
inches leeway to maneuver well into place.
(2) Attaching the Well. Hold the well against the foundation, and mark the position of the mounting holes. Drill the foundation to accept masonry fasteners. Coat the contact areas with asphalt mastic, and install the well. Backfill with pea gravel; then shovel 4 or 5 inches of pea gravel into the well itself (to improve drain age). To keep out accumulations of snow and debris, cover the well with a clear plastic cover.
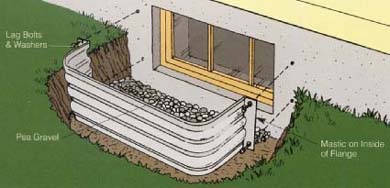
2--Use the well as a template to mark bolt locations on the foundation;
then drill for masonry anchors. After installing the well, backfill with
pea gravel and place a layer of gravel in the bottom for drainage purposes.