Fixing any broken window used to be a fairly standard procedure involving a piece of glass, glazier's points and putty. But new developments in window construction-such as double glazed aluminum casements and plastic panes-require that you know more about your windows before attempting repairs. These innovations also afford you more alternatives; for example, a heat-stealing single-pane door can be fitted with an energy-efficient double pane.
The age-old problem with window panes remains the same-they break. Antique leaded-glass panes often loosen and rattle. Modem panes exhibit some modem problems as well-a double pane may fog if moisture gets between its layers, and a plastic pane yellows or crazes over time. The Troubleshooting Guide at right lists typical problems and directs you to corrective procedures in this chapter. The tools you need to work on windows are few and simple. The Glazing Alternatives chart below lists the types of window fittings available, and their features and uses. The National Glazing Code requires that shatter resistant panes be used in certain applications, such as doors.
Check with a professional glazier or window dealer before replacing a pane. If you plan to install a double or triple pane, order the unit in advance; it may have to be built to size.
You can cut your own glass or plastic single pane.
When cutting glass, wear work gloves and safely goggles.
Practice cutting a scrap piece first, and work on a level surface padded with layers of newspaper or a piece of thin carpet
Cutting a plastic pane is safer, but take care not to scratch its relatively soft surface. Panes in modem windows-especially metal ones-are installed with specialized sealants, gaskets, clips or moldings. When you buy a new pane, consult with the dealer to choose installation materials compatible with both the pane and the window-bring a simple of the old materials with you as reference.
Window screens are easy to repair and replace. Fiberglass screening is easy to install, but tends to sag. Aluminum screening is more expensive but stronger, though it eventually oxidizes in humid climates. Both types of screening are replaced the same way.
TROUBLESHOOTING GUIDE
SYMPTOM
Single-pane window cracked or broken
Glass pane rattles
Double- or triple-pane window cracked or broken
Double- or triple-pane window foggy
Acrylic pane cracked or yellow
Screen torn
DEGREE OF DIFFICULTY:
ESTIMATED TIME:
PROCEDURE
Cut glass or acrylic and re-glaze (wood window; metal window; leaded window; jalousie window): replace single pane with an insulating unit
Replace deteriorated glazing com pound (wood window: leaded window: steel window) or worn gasket)
Re-glaze
Re-glaze--Cut glass or acrylic and re-glaze (wood window; metal window)
Patch or replace screen (wood window or door: metal window or door)
Easy; Moderate; Complex; Less than 1 hour; 1 to 3 hours; Special tool required
-----------
GLAZING ALTERNATIVES
TYPE
Float glass Laminated glass Tempered glass Wired glass Double-pane or triple-pane glass Low emissivity (low e) glass Acrylic
CHARACTERISTICS
Untreated and least expensive.
Bonded to an internal core of polyvinyl chloride film.
Broken pane remains in one piece.
Strengthened by heating and cooling.
If broken, shatters into small, blunt-edged pieces.
Wire mesh is embedded in the glass.
Cut and installed like regular glass; wire must be snipped after glass is cut.
Panes of glass are separated by a spacer bar to form an insulating airspace.
Metal coating is baked onto glass surface; applied to single or multiple panes to reduce heat transfer.
Lightweight, tendency to yellow, scratches more easily than glass. Installed like regular glass, using elastic-type glazing compound.
APPLICATIONS
May be single-strength for small windows or double-strength for large windows, storm windows and storm doors.
Safety glass for doors, skylights, bathrooms and solariums.
Safety glass for doors, most commonly in bath rooms and solariums.
Basements and other areas with high risk of damage.
Any door or window requiring control of heat loss or gain.
Any door or window requiring control of heat loss or gain.
Safety pane for storm and shower doors, and for skylights.
CUTTING A RECTANGULAR WINDOW PANE
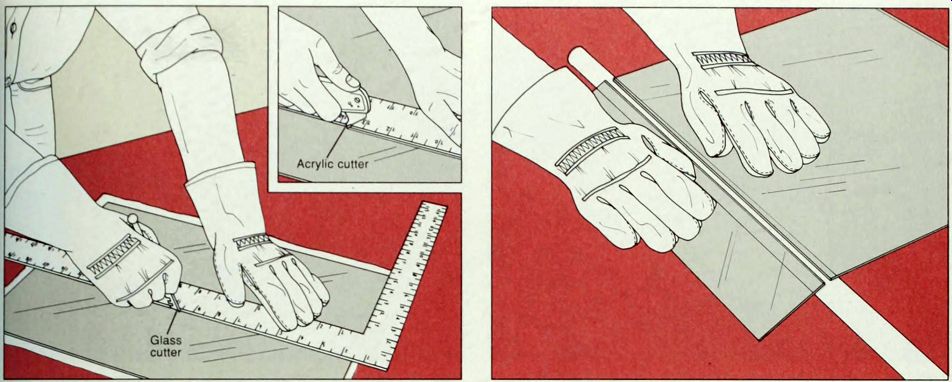
1. Scoring a straight line. Lay the glass on a surface padded with newspaper or an old piece of carpet. Wearing gloves and using a straightedge as a guide, score the glass once with a glass cutter that has a carbide cutting wheel. Dip the wheel in kerosene or light machine oil, then grasp the cutter between the index and middle fingers as shown. Starting at the far edge of the glass, pull the cutter toward you in one steady stroke (above). Apply even pressure until you reach the end of the cut: do not allow the cutter to slide away from the straightedge. Use an acrylic cutter to cut an acrylic pane (inset): retrace the line several times to deepen the cut.
2. Dividing the pane. Deepen the score line by tapping along M the line from underneath (below, step 2). Then place a wood dowel, broomstick or other thin rod at least as long as the score line directly under the line. Press down firmly on both sides of the glass to snap it (above). On a small piece of glass or stained glass, position your thumbs on top-one on each side of the score line-and your fingers underneath. Push up with your fingers while you twist your thumbs apart. Use the edge of a worktable to break an acrylic pane after it has been scored.
CUTTING A CURVED PANE OF GLASS

1. Scoring a curved line. Trace the shape of a curved pane onto a piece of cardboard and trim it with scissors to make a pattern.
Using the pattern as a guide, score the glass as described in step 1, above, drawing the glass cutter closely and steadily around the edge of the pattern (above) to score a well-fitting pane.
2. Deepening the score lines. Score several straight lines radiating from the curve to the edge of the glass. Then deepen each score by lifting the glass and tapping lightly along the line from underneath with the ball end of the cutter (above).
3. Snapping the curve. Use glass pliers to snap off the scored segments (above). If any jagged edges remain along the curve, nip away about 1/16 inch at a time with glass pliers until the edge is uniform. Smooth any roughness with fine sandpaper.
REPAIRING A BROKEN WINDOW IN A WOOD SASH
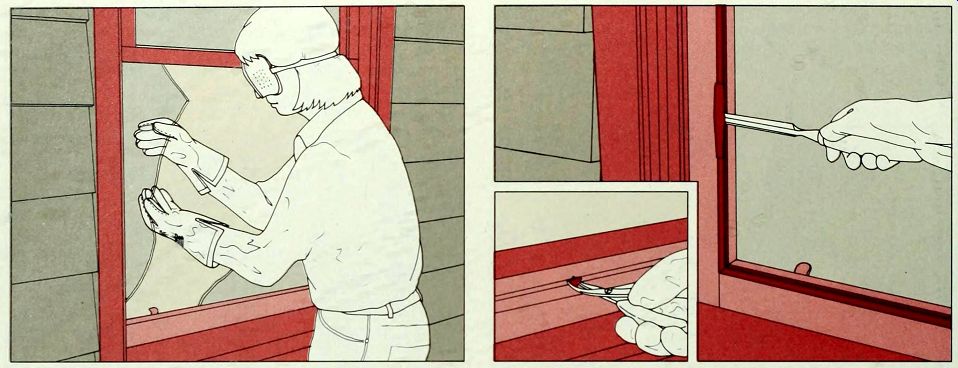
1. Removing the glass fragments. Wearing heavy work gloves I and safety glasses, start at the top of the window to remove shards of glass (above). Pull each shard straight out of the sash; gently wiggle stubborn fragments free. Place the fragments in a card board box for disposal. Remove glass from muntins-strips that divide the panes of a window-with care. Muntins are delicate, and their replacement requires a carpenter.
2. Removing the old glazing compound. Using an old chisel or a narrow, stiff putty knife, pry old glazing compound out of the sash (above). Hardened glazing compound may first require softening. To soften unpainted putty, coat it with linseed oil and let it saturate for 30 minutes. Soften painted compound using a soldering iron with a 1/4- to 1/2-inch tip; be careful not to burn the surrounding wood. Once the glazing compound has been removed, pull out the glazier's points with long-nose pliers (Inset)
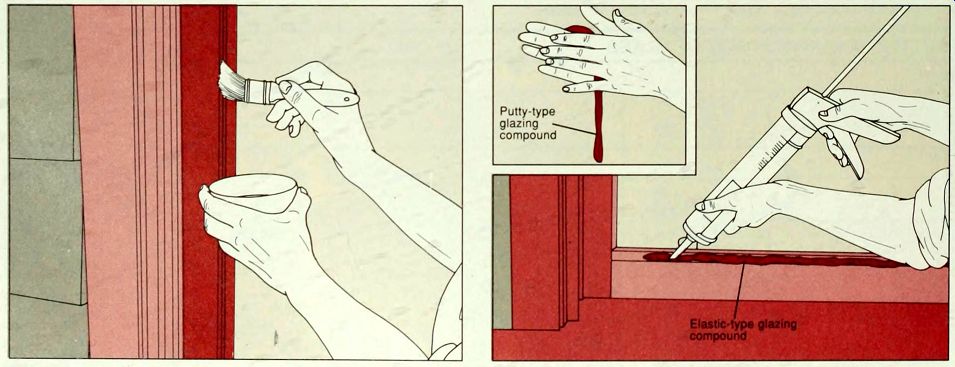
3. Preparing the channel. Before installing a new pane, clean the sash channel by carefully brushing it with a wire brush. Remove splinters with medium-grit sandpaper
If you are using putty, prime the channel with linseed oil, as shown. Follow manufacturer's instructions for elastic-type glazing compound.
To fit a replacement pane, measure the opening inside the window frame and subtract 1/8 inch from the length and width for glass expansion. Have the replacement pane cut or cut it yourself.
4. Preparing the "bed." Make a "bed" for the glass by lining the sash channel with a thin bead of glazing compound. If you are using an elastic-type glazing compound in a tube applicator, apply the compound in a uniform 3/8-inch bead using a caulking gun (above). Glazing putty, however, generally comes in a tin; remove it from the container and roll into a snake-like shape between the palms of your hands (inset). Then press it into the channel around the edge of the sash.
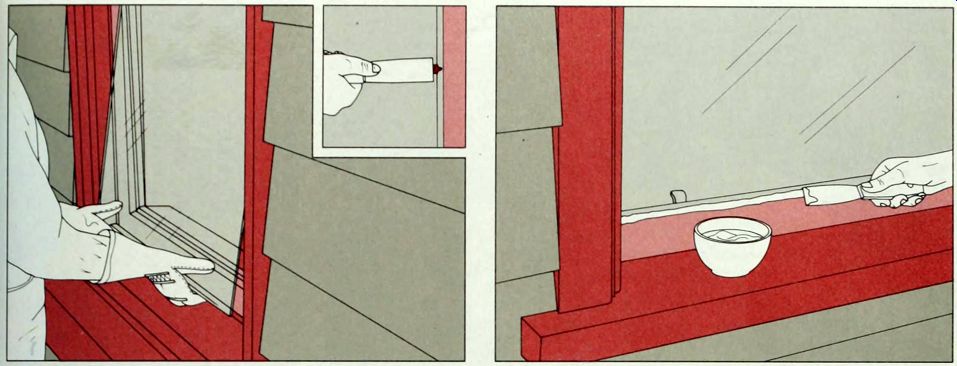
5. Installing the glass. Lift the pane and set it m place, as shown.
Since a properly cut pane will be approximately 1/4 inch smaller than the frame, position it with equal space on each side. Press glazier s points into the sash flush against the glass-two to a side on a small window and about every 6 inches on a larger one. Then use a stiff putty knife (inset) or a mallet and an old screwdriver to insert them halfway into the sash.
6. Covering the glazier's points. Apply glazing compound to the joint between pane and frame in the same manner as in step 4. If you are using a tube applicator, cut the nozzle opening a little larger for a larger bead. For a neat appearance, dip a putty knife in water or light machine oil and draw it over the bead to create a bevel of approximately 45 degrees (above). Seal the corners well and trim off excess compound inside and out. When the glazing compound is dry-it no longer shows a thumbprint-paint or varnish it.
REPAIRING A BROKEN WINDOW IN A METAL SASH
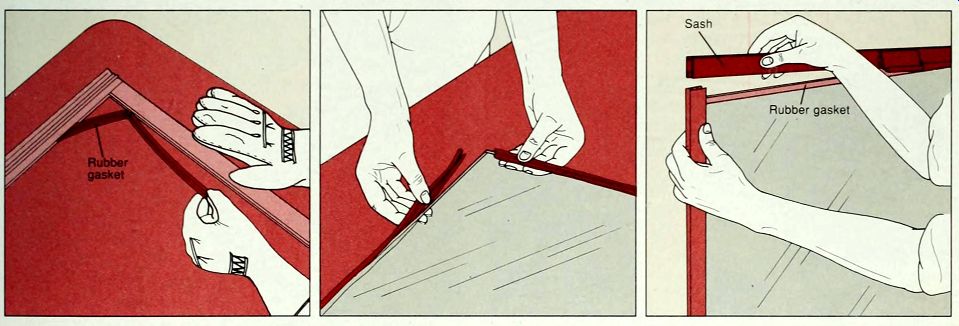
------------ Replacing a broken pane. Remove window fragments from the metal sash and lay the sash on a work table. Many metal storm sashes can be re-glazed simply by prying out the rubber strip or spline that secures the pane to the sash, inserting the new pane and pressing the spline back in under the sash with your thumbs. Other metal sashes, such as the sliding window shown here, must be disassembled to fit the new pane. Measure the length and width of the opening from the inside edges of the frame. Then pull out the rubber gasket (above, left), and measure its width.
For a glass pane, add twice the gasket width to the frame's inside length and width; for plastic use the same measurements less 1/8 inch each. Buy a pane cut to size or buy and cut your own. To disassemble the sash, remove any framing screws that hold the sash pieces together and pull them apart. Replace a dried or cracked gasket with a new gasket cut to the length of the pane's perimeter. Fit the gasket around the edge of the window (above, center), snip ping it partway at each corner. Reassemble the sash by reversing the disassembly steps (above, right). Replace a pane in a steel casement window as described for a wood sash. but use spring clips and prepare the channel with rustproof paint before bedding the pane with elastic-type glazing compound.
REPAIRING A LEADED WINDOW
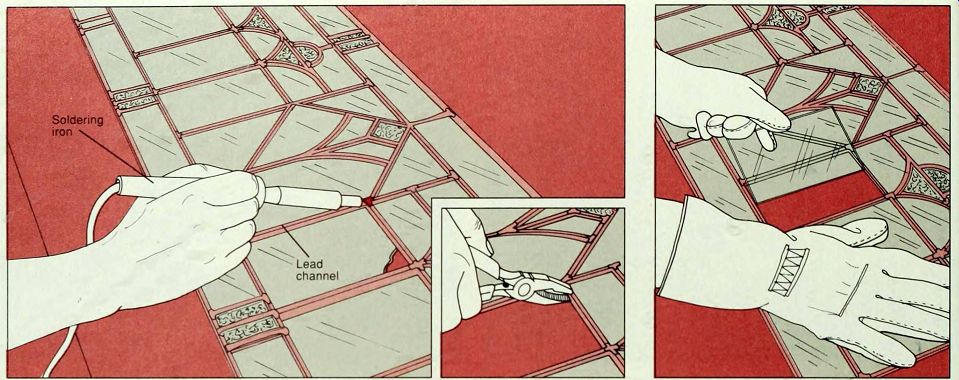
--- 1. Removing the damaged pane. Remove the window and glazing compound from the sash. Check a metal window for spring clips, and remove them. If the glass is secured by molding, use a stiff putty knife to pry the molding away. Melt solder at the joints with a narrow-tipped soldering iron (above), then use glass pliers or a wide putty knife to lift the lead flanges around the perimeter of the broken piece (Inset), Wearing gloves and safety glasses, remove any glass fragments from the window. On difficult-to-remove pieces, score a crisscross pattern with a glass cutter, fracture the glass with the ball end of the cutter and wiggle the fragments loose. Use a small wire brush to clean the lead channel.
2. Replacing the glass. Place a piece J of cardboard under the space in the window and trace its shape to make a template, then add 1/8 inch to the width and length and cut it out. Trace the template onto replacement glass, then cut the pane. Slide the new pane into position (above); you may have to wiggle the glass as you push it in.
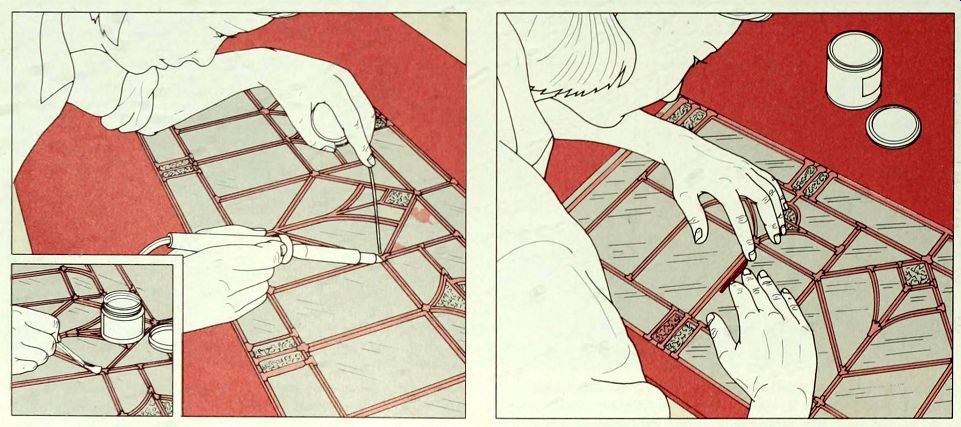
3. Resoldering the Joints. Press the upper flange of the lead channel back into position, forming a rim over the glass. Use a soldering iron to re-secure the joints. Heat the iron and apply a drop of flux to the joint (inset). Then hold the iron over the joint, coat it with solder and let a small amount melt onto the lead (above). If the solder does not adhere, roughen the lead with the point of a nail or knife, add more flux, then resolder.
4. Sealing the rattling section. After the solder has cooled, fill the spaces between the lead and glass with glazing compound. Roll out a very thin bead of putty and, using your finger, push it between the lead and the glass on all sides, front and back. Trim excess compound using a utility knife or the point of a nail. Finally, sprinkle whiting over the surface of the glass to pick up the oil residue, then brush the surface clean.
INSULATING WINDOWS
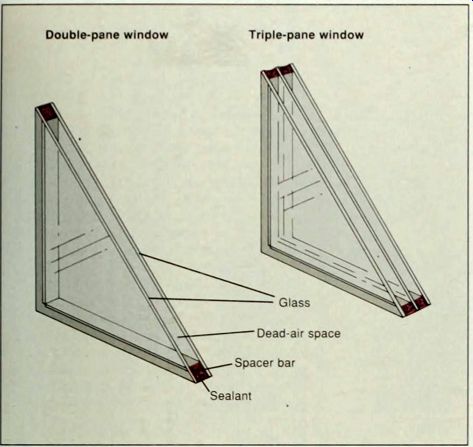
-------- Double-pane window, Triple-pane window An insulating window is composed of two-or sometimes three-parallel sheets of glass. The sheets are separated by metal or plastic spacer bars around their edges. An elastic sealant around the perimeter of the pane holds the glass and spacers in place, as well as sealing the air space between the glass sheets. It is this dead-air space that works as an insulator, preventing heat from passing through the pane.
The efficiency of an insulating window is directly related to the width of the dead-air space. The insulation value of the space in creases up to about 5 8 inch, then decreases as the space gets wider.
The spacer bars in an insulating window often contain a dessicant-chemical granules that absorb moisture-to prevent condensation between the glass sheets. If the edge seal breaks, however, excess moisture will cause internal fogging, and the pane will have to be replaced. Twisting or racking of the pane are major causes of edge-seal failure and glass breakage; an insulating window must be installed perfectly flat and square, with room to expand.
REPLACING A BROKEN INSULATING WINDOW
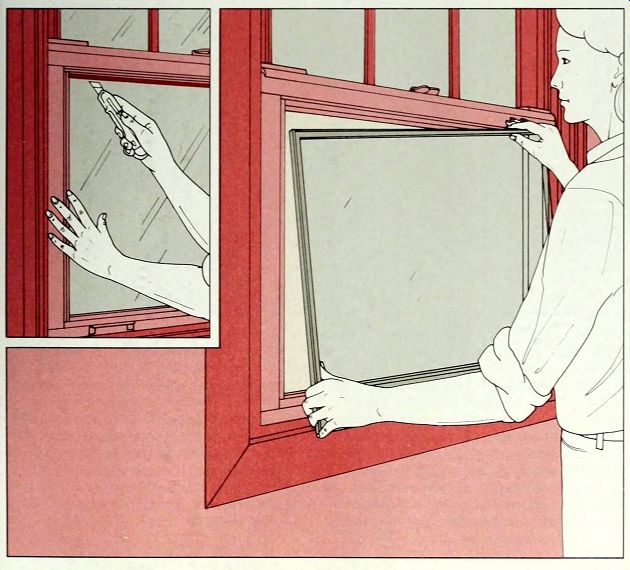
---------Replacing a broken insulating window. Most insulating units are held in place by a snap-on glazing bead or by wood molding screwed, nailed or glued to the frame. To determine the size of a replacement unit, measure between the moldings and add an inch to each measurement. If your insulating window is secured by wood molding as shown at left, slip a utility knife between the molding and the window to cut the sealant (inset). Then unscrew the molding or pry it free with a stiff putty knife. (In some cases, the frame must be disassembled to re-glaze the window: remove the sash and look for screws or clips holding the corners of the sash together.) If the window is in one piece, lift it out of the frame (left), wear work gloves and get help if it is heavy. # If the glass is broken, the seal around the edge may continue to hold the pieces together.
Otherwise, remove the broken pieces carefully, then remove the edges from the sash. Scrape old glazing compound from the sash and molding. Place the new window in the sash and. if it had a sealant, apply a new bead that is compatible with the edge seal; check with the dealer. Resecure the molding to the sash, using wood screws spaced 8 to 10 inches apart. Make sure the screws do not touch the window.
FITTING A SINGLE-PANE DOOR WITH AN INSULATING WINDOW
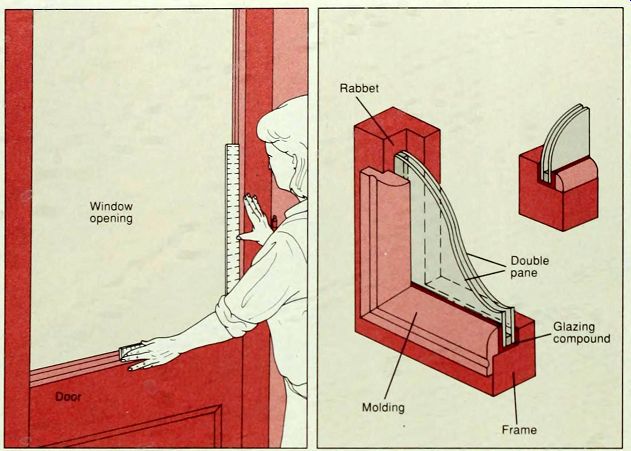
--- 1. Preparing the door. In order to be fitted with a double-pane insulating window, an exterior door must have solid wood stiles and rails at least 1 3/4 inch thick.
Check that the hinges are strong and tight; correct any problems. Use a carpenter's square to make sure the door frame is square (far left): a door that is racked or warped will break a double-pane unit.
The double pane sits in an L-shaped groove called a rabbet cut into the edge of the door frame (left). The pane edges are cushioned by neoprene rubber setting blocks, sealed with an elastic-type glazing compound and held in place by a wood molding screwed to the door frame.
Measure the height and width of the window opening in the door and add 1 inch to each-this is the size double-pane window to order. It is better to order a window slightly too big than too small-the new rabbet will be cut to fit the window. After the double pane has arrived, remove the molding and glazing compound from around the window and, wearing work gloves, lift out the old pane.
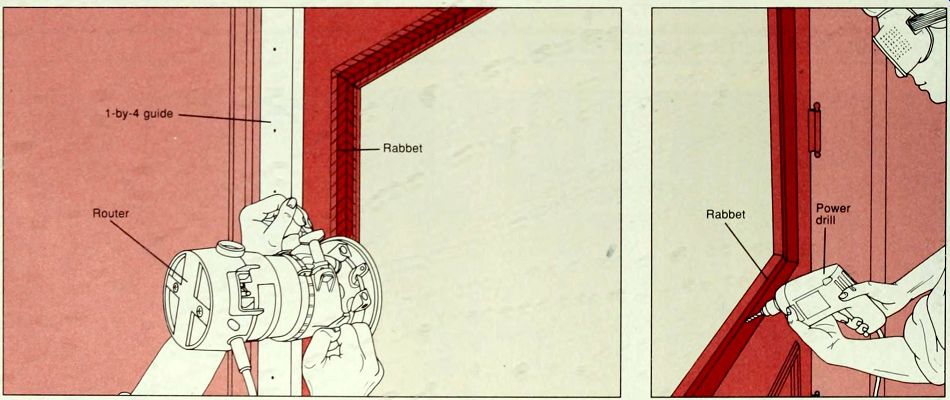
2. Enlarging the rabbet. To cut the new rabbet, use a router fitted with a rabbet bit. First, measure the exact width of the double pane, add 1/2 inch for setting blocks and for expansion, and subtract the width of the existing window opening. Divide the result in half to determine the width to cut each side rabbet. Calculate the width of the top and bottom rabbets the same way. Choose rabbet bits of the right size to cut these widths.
Then measure the exact thickness of the double pane, and add 1/4 inch for glazing compound and 1/2 inch or more as needed for the finish molding.
This is the depth you should cut the rabbet. Use a straightedge to mark a line for the edge position of each side rabbet on the door frame. Nail or clamp a perfectly straight 1-by-4 parallel to the rabbet line to guide the router. Set the router bit to cut 3/8 inch deep, turn on the motor and move the bit into the wood, running the baseplate firmly along the guide (above).
Deepen the rabbet in increments of 3/8-inch or less to its final depth. Cut the other side rabbet and the top and bottom rabbets the same way. The router bit will leave the corners rounded; cut them square with a sharp wood chisel.
3. Preparing the rabbet. Using a power drill, make drainage holes about 1/4 inch in diameter at 6-inch intervals through the side edge of the rabbet (above). Angle the holes down toward the outside. Brush sawdust out of the rabbet. Lay four 2 inch rubber setting blocks, 1/8 inch thick and 1/8 inch wider than the double pane, at equal intervals along the bottom edge of the rabbet.
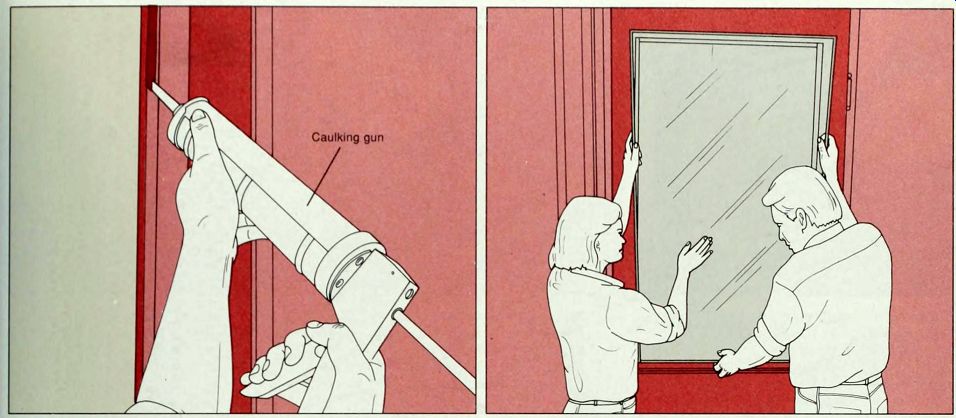
4. Installing the window. Choose an elastic-type glazing compound compatible with the compound used to construct the window: check with the window dealer. Using a caulking T gun. apply a 1/4-inch bead of compound along the back edge of the rabbet (above, left), leaving no spaces. With a helper, lift the window into the bottom rabbet (above, right) and. resting its bottom edge on the setting blocks, push its top edge into the top rabbet. Center the window and gently press its edges into the glazing compound.

5. Trimming the window. Slip setting blocks around the perimeter of the
window, about every 8 inches (above, left). Fill spaces between the blocks
with glazing compound. Mea sure and cut molding trim to fit around the
window, and set it aside. Apply a bead of glazing compound to the joint
between window edge and rabbet all around, and install the molding over
it. Tack the molding in place with finishing nails, then screw it to the
door frame every 8 inches. Be sure that nails or screws do not contact
the glass. Test the operation of the door; if it sags, replace weak hinges
with stronger ones, or re-plug worn screw holes and install longer screws.
PATCHING A SCREEN
--------

Patching a fiberglass screen. Repair tiny holes in a fiberglass screen by applying a few drops of acetone-based glue. To repair a larger hole, make a patch from left-over screening that is large enough to cover the hole. Coat the edges of the patch and the area around the hole with a thin coat of the glue (above), and press the patch in place. Wipe off excess glue with a clean rag.
Patching an aluminum screen. Tiny holes in aluminum screens can be sealed with a few drops of waterproof glue. To repair a larger hole, first use scissors to cut the hole square. Then cut a patch of matching screening about 2 inches wider than the hole. Pull several strands of wire out of each edge of the patch and bend the remaining wires down on all four sides (above, left).
Position the patch evenly over the hole and work the wires through the screening. Turn the screen over, pull the patch tight and bend the wires down against the screen (above, right).
REPLACING SCREENING ON A WOOD DOOR
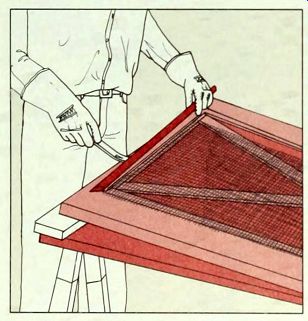
1. Removing molding and screening. Unscrew the door hinges from the jamb and remove the door. Lay it on a flat work table. Use a utility bar to lift the molding around the screening; start in the middle and work toward the corners. Then, with an old screwdriver, pry loose the tacks or staples that hold the screen to the door. Wearing gloves if working with metal screening, pull the screening off the frame. Place a block under each end of the door and attach C clamps to the frame at its midpoint. Bow the door by tightening the clamps.
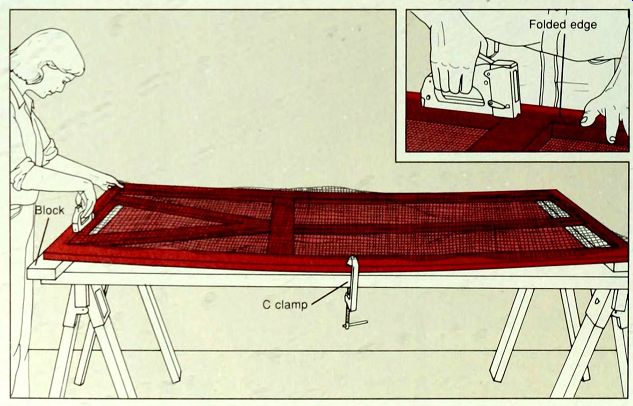
2. Stapling new screening to the frame. Cut new screening 4 inches wider
and longer F than the opening in the door. Lay the screening on top of
the door, aligning the weave with the frame. Using a staple gun, staple
the screening to the frame at one end (above), driving staples 3 inches
apart at a right angle to the frame. On fiberglass screening, fold the
edge for extra strength before stapling (inset). Staple the screening at
the other end the same way. keeping it taut and straight.
Release the clamps to pull the screening tight, and staple it along one side and then the other. Trim excess screening with scissors or a utility knife, and replace the molding.
REPLACING SCREENING IN A METAL FRAME
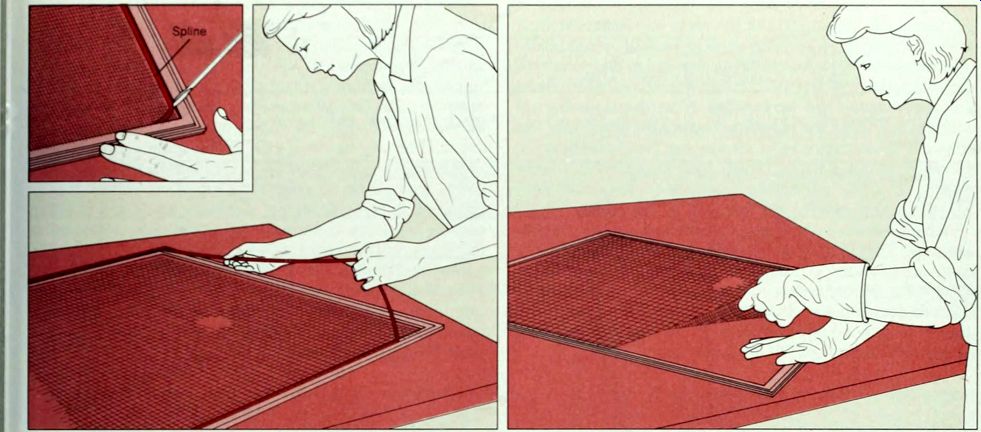
1. Removing the spline. Metal screen doors and windows use a I rubber or plastic strip called a spline to secure the screening to the frame. Remove the door from its hinges or slide the storm window free of its frame and lay it on a flat surface. To remove the spline, use an old screwdriver to dig up one corner (inset). Pull the spline gently out of its channel: do not tear or stretch it (above, left).
If the spline is cracked or stiff, take it to a hardware store and buy a roll of matching spline. Cut the new spline a bit longer than the old one. Wearing work gloves, pull the old screening free from the spline channel. Lay the new screening over the frame and cut it so that it extends 1 inch beyond the channel. Trim the corners of the screening diagonally so they don t bunch up in the corners of the channel.
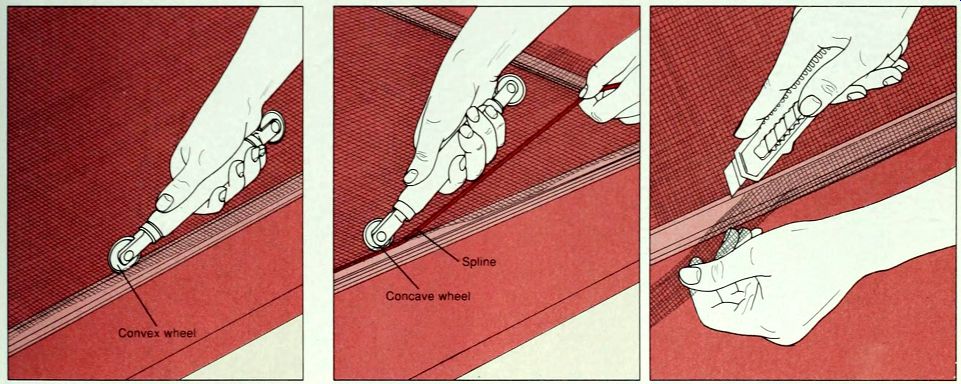
2. Creasing metal screening. If rescreening with fiberglass, go to step
3. The edges of aluminum screening must be bent and pushed into the channel.
Roll the convex wheel of a splining tool back and forth along the edges
of the screen, creasing it into the channel (above). Repeat on all sides.
3. Installing the spline. Using the concave wheel of the splining tool, force fiberglass screen and spline together into the channel (above, left). If installing aluminum screening, force the spline into the channel over the screening you creased in step 2. If the frame is long and narrow, cut the spline and install the two short sides first. If it is nearly square, install the spline in one piece. The action of the spline pushing the screen into the channel should tighten the screen. Cut off excess spline, then use a utility knife to trim the screen close to the spline (above, right).