Over time, a window or door may become so damaged or inefficient that replacement of the entire unit is the simplest, least costly repair. A prehung window or door, which comes complete with finish frame, can be inserted in one piece into the rough opening left by the old window or door. Some prehung windows can be installed in the jambs of the old window; in a sense, the old jambs become the new frame. The new unit doesn't have to be custom made--the addition of boards to the rough frame, called blocking, and the insertion of shims between the rough and finish frames, will make up for a unit that is a bit too small.
Prehung windows and doors are made in hundreds of styles and sizes. They may be wood, aluminum, steel or even vinyl.
Each manufacturer's product comes with instructions for installation; the procedures in this chapter cover taking out a standard double-hung window and replacing it with a typical double-hung wood replacement unit. The steps for replacing an exterior door are nearly the same.
Installing a prehung door or window requires careful planning. First, check your local building code. Before ordering a prehung unit, consult a reputable window and door dealer for advice. Shop around for the unit closest to the size and style you need-a window, especially, should be well matched to others in the house. Measure the opening precisely, following the guidelines. Expect installation to take at least a day, and be prepared to install plastic sheeting or a plywood panel over the opening in case it takes longer. Work with a helper, even when installing a small window; it is often necessary to post one worker inside the house and the other outside. If you must work on a ladder, follow the safety tips in the Tools & Techniques section. The exterior siding and sheathing of a house may be cut away with a circular saw to fit the brickmold of a window or exterior door, or to accommodate a longer replacement window. If modifications must be made to a brick or stone house, consult a mason.
-----------
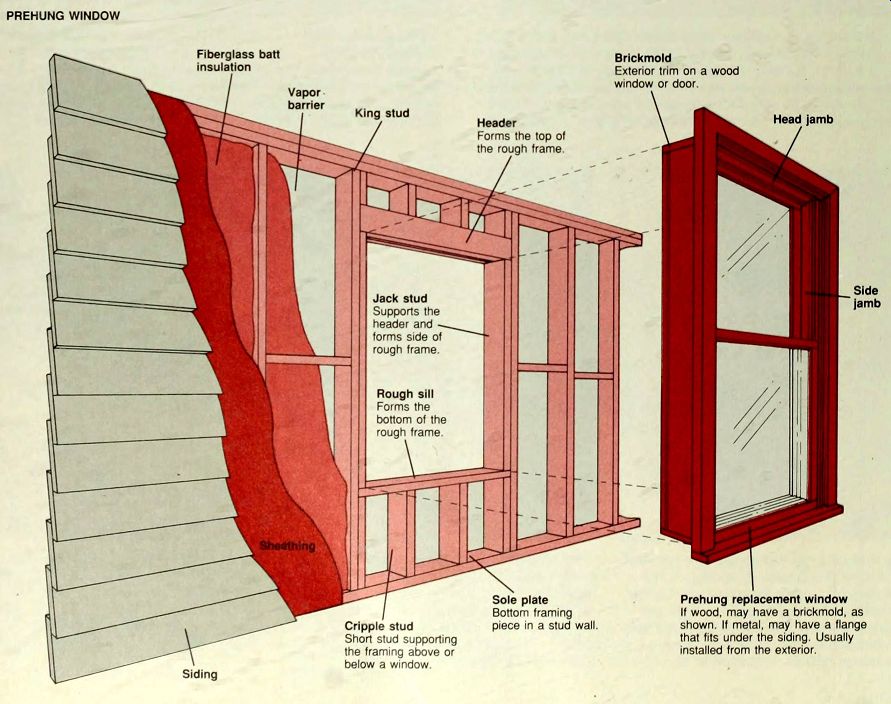
PREHUNG WINDOW
Fiberglass batt insulation
Vapor barrier
King stud
Header--Forms the top of the rough frame
Jack stud--Supports the header and -- forms side of rough frame.
Rough sill Forms the bottom of the rough frame.
Siding
Brickmold
Exterior trim on a wood window or door.
Head jamb
jamb
Cripple stud
Short stud supporting the framing above or below a window.
Sole plate Bottom framing piece in a stud wall.
Prehung replacement window
If wood, may have a brickmold, as shown. If metal, may have a flange that fits under the siding. Usually installed from the exterior.
-----------------
TROUBLESHOOTING GUIDE
SYMPTOM
Window or door finish frame damaged beyond repair Window or door finish sill rot ted Window or door rough sill rot Window cripple studs or sole plate rotted
POSSIBLE CAUSE
Age; poor maintenance
Water pooling at threshold; gutter or downspout faulty, weather stripping faulty
Chronic dampness; window or door frame rot spread to rough framing
Window frame rot spread to wall framing
PROCEDURE
Remove old window or door; block if necessary (rough frame; finish frame and install prehung unit (window, door)
Inspect and repair gutter and downspout; if rot is minor, remove rot and patch with epoxy and replace weather stripping; if rot is extensive, replace sill (window; door; If minor, remove rot and patch with epoxy; under a window, replace rough sill, or rebuild under sill; under a door, call for professional service.
Remove and replace affected cripple studs and sole plate; if jack studs are affected, call for professional service
----------------
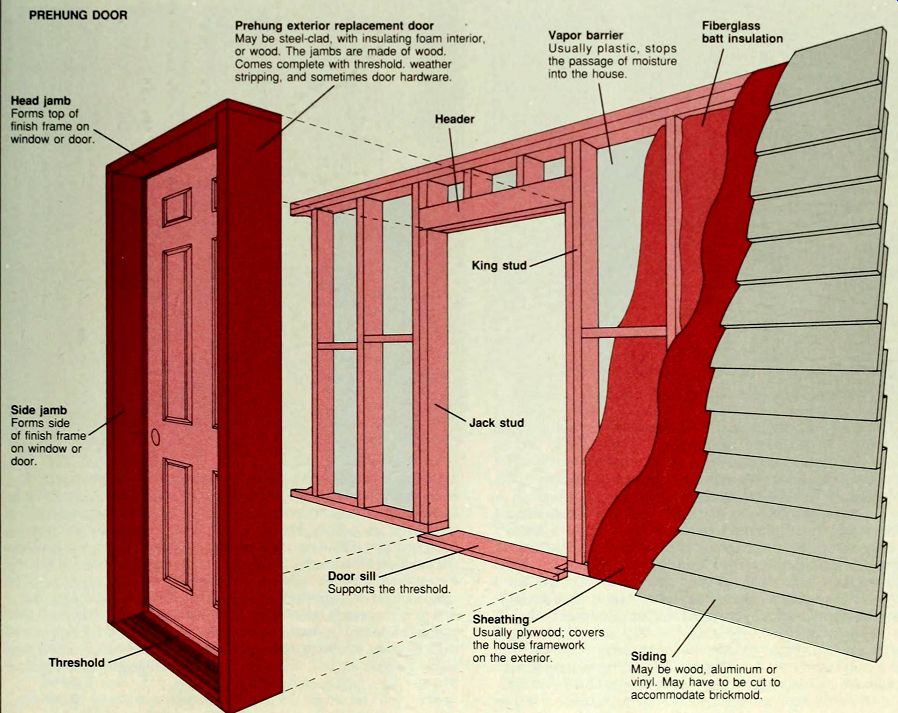
PREHUNG DOOR
Prehung exterior replacement door
May be steel-clad, with insulating foam interior, or wood
The jambs are made of wood.
Comes complete with threshold, weather stripping, and sometimes door hardware
Head jamb Forms top of finish frame on window or door.
Side jamb
Forms side of finish frame on window or door.
Prehung exterior replacement door
May be steel-clad, with insulating foam interior, or wood
The jambs are made of wood.
Comes complete with threshold, weather stripping, and sometimes door hardware
Vapor barrier
Usually plastic, stops the passage of moisture into the house.
Fiberglass batt insulation
Door sill
Supports the threshold.
Sheathing
Usually plywood; covers the house framework on the exterior.
Siding
May be wood, aluminum or vinyl. May have to be cut to accommodate brickmold.
------------
MEASURING FOR A PREHUNG WINDOW OR DOOR
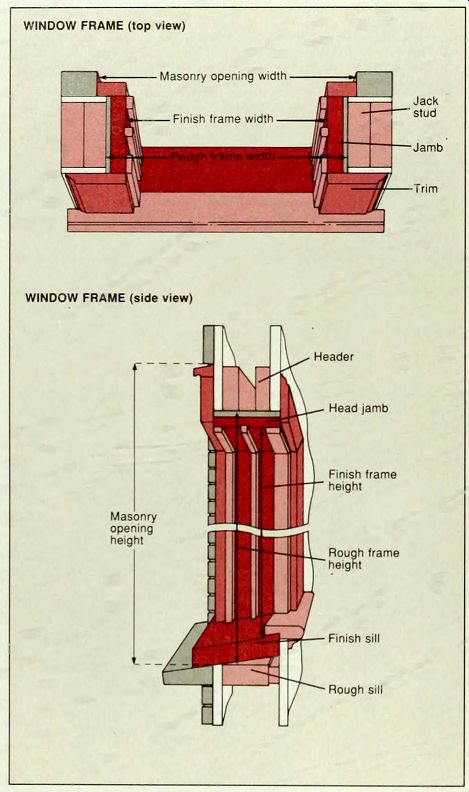
WINDOW FRAME (top view)
WINDOW FRAME (side view)
------------Measuring for a replacement unit. Most prehung windows and doors are built to be installed in the rough frame. To measure the rough opening for a window or door, remove the interior trim and measure its height between the rough sill and the header, and its width between the jack studs (above). Measure each dimension at three different places; note the smallest measurements for height and width. To measure for a window or door in a brick or stone house, measure the masonry opening as well; go outside and measure the height between the stone or brick lintel (which serves as the header in a masonry house) and the rough sill, and the width between the side edges of the masonry opening. For an exterior door, if you can't reach the rough sill, measure to the finish sill and add 1/2 inch. Consult the specification sheets of several window or door manufacturers (right) and choose the prehung unit that matches your measurements as closely as possible. Some prehung windows and doors fit into the jambs of the old unit, particularly metal window or door kits that are used to replace an old wood window or door.
For this type of installation, measure from the head jamb to the finish sill and between the side jambs in several places, and note the smallest width and height.
DOUBLE-HUNG WINDOW
EXTERIOR DOOR
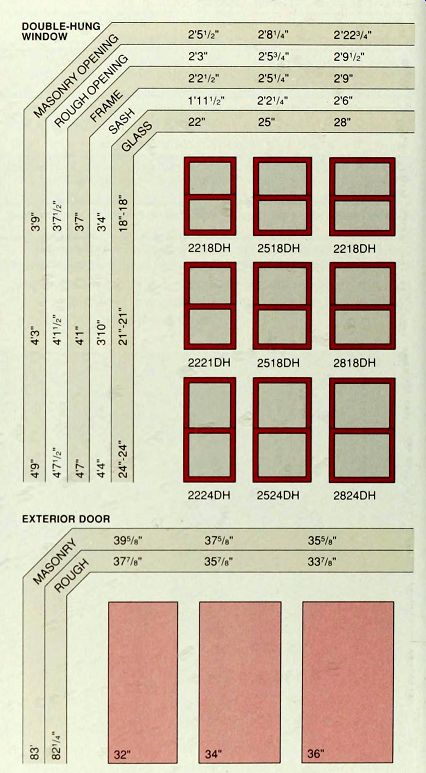
----------Reading a specification sheet. To help you order a prehung door or window of the right size, manufacturers supply specification sheets to their distributors and to the consumer, listing measurements for the units they make. Study the typical specification sheets for a double hung window and an exterior door, shown above. The numbers across the top indicate the width of the unit and the openings needed for it; the numbers down the side indicate height. The diagrams in the center represent the unit type, with its order number. Match the measurements of your rough opening to rough opening measurements on the sheet. Notice that the measurements for the frame are 1/2 inch less than those for the rough opening; this allows for shimming when you install the prehung unit. If you cannot find a prehung window or door that fits your rough opening, choose one that is 1 1/2 to 2 inches smaller; you can reduce the size of the rough opening by blocking it with 1 -by-4 boards.
---------------
REMOVING AN OLD WINDOW
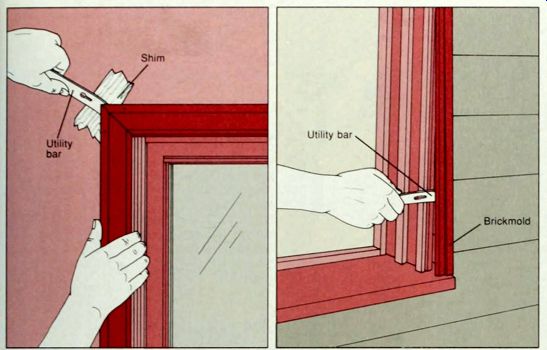
1. Removing trim. With a utility knife. I slice through any paint sealing the trim to the wall and jambs Slip a utility bar between trim and wall at a nail location and, inserting a shim to protect the wall, carefully pry up the trim about 1/4 inch. Repeat at each nail location on each side trim piece.
When the side trim is separated from the wall, work on the top corners. If the corners are blind-nailed together, use a utility bar to lift each corner in one piece (far left). If necessary. first use a hacksaw to cut the face nails. To take out the window from the inside, remove the exterior trim, or brick mold (near left), as you did the interior trim.
Pull nails from re-useable trim. To install a prehung unit in the rough frame, remove the stool and apron or the door sill. For a metal flange mounted window, continue to step 2. For a wood window or a door, go to step 3.
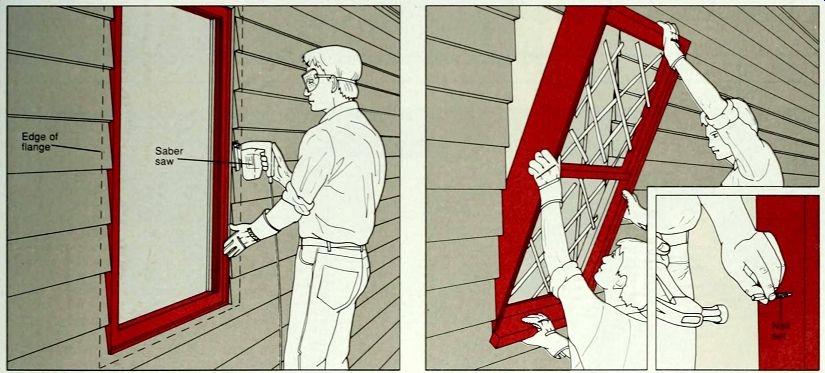
2. Freeing a metal flange-mounted window. Many metal win Windows have flanges that fit between the siding and the sheathing.
Since the nails that secure the flanges to the sheathing are hid den beneath the siding, you must saw the window free. If the new prehung window doesn't have flanges, cut through the flanges of the old window, using a saber saw fitted with a metal-cutting blade. First drill a pilot hole at the bottom of each side flange of the window.
Wearing safety goggles, put the tip of the blade into one of the pilot holes and move up the side of the window, cutting close to the siding (above). Cut through the other side and then along the top and bottom of the window. If the prehung unit is flange-mounted, use a circular saw to cut through the siding 1 3/4 inch from its edges, leaving the flanges of the old window intact.
3. Removing the window. To install a prehung window in the finish frame remove the stops, parting strips and sashes, leaving the frame in place, and block it if necessary. A window and finish frame you don t intend to reuse can be removed by collapsing the jambs. To take out a window and its finish frame without damaging them, inspect the jambs and sill for screws or nails; unscrew screws and punch nails through (inset), or cut them with a hacksaw. Lock the window and tape the glass with nylon filament tape for safety. With a helper, lift out the old unit from the outside (above). Pull out nails protruding from the rough frame and sweep away debris before installing the new unit. A high window can be removed from inside: first pry off the brickmold (step 1).
Examine the rough sill for rot and. if minor, patch with epoxy. If the rot is extensive, you may have to replace the rough sill or rebuild the wood framing below the window before installing the prehung window.
COLLAPSING THE FINISH FRAME
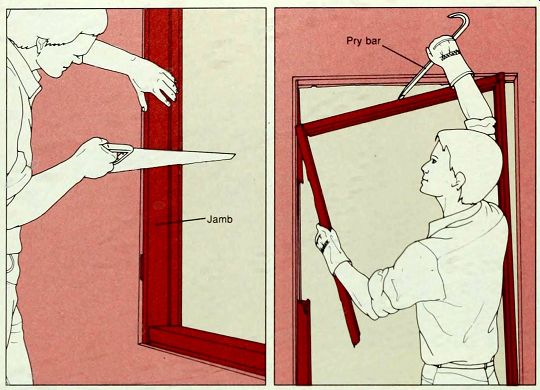
-------Demolishing the jambs. If the window is too fragile to take it out intact, and you do not intend to use the finish frame, collapse the jambs. If you plan to reuse the trim, first detach it carefully. On a double-hung window, pry off the interior stops and parting strips, then remove the window sashes. Unfasten the hinges and operator of a casement or awning window. Using a cross cut saw, cut through a side jamb near the middle (far left). Pull the upper jamb segment loose and work the head jamb free with a pry bar (near left). Saw through the other jamb and the sill and pry them free. Discard the broken pieces of jamb, sill and shims, and pull out nails protruding from the rough frame.
Sweep away debris from the rough frame and block the frame (below) or install the new unit.
BLOCKING THE FRAME
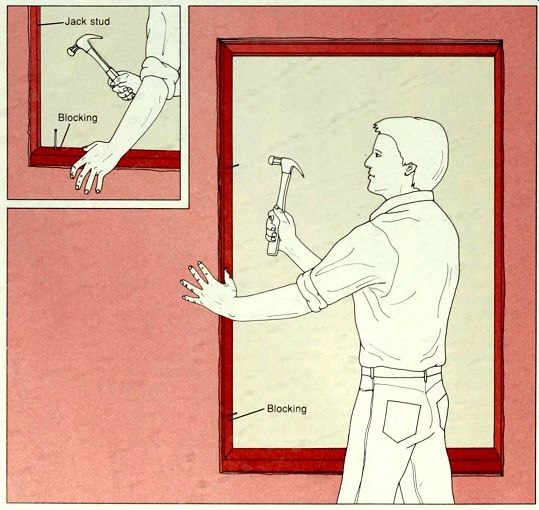
-------Blocking a rough frame. Remove the old window in one piece or by collapsing the finish frame (above). Measure the height and width of the rough frame and sub tract the height and width of the prehung window (plus 1/2 inch for shimming); the result is the thickness of the blocking you need. For example, if the width difference is 1 1/2 inch, add a 3/4-inch-thick board to each side jamb 1 -by-4s will do. Block the jack studs equally on both sides. Do not block the header more than 1 inch, to keep the top of the window in alignment with other windows in the room. Do not add more than 2 1/2 inches to the rough sill or jack studs, or re-trimming will not cover the extra width. To make the blocking for the rough frame, use a crosscut saw to cut the boards to length. Block the rough sill first (inset), then block the header, and finish by blocking the jack studs. Use a hammer to drive nails through the blocking into the rough frame (left) at intervals of 12 inches.
BLOCKING THE FRAME (continued)
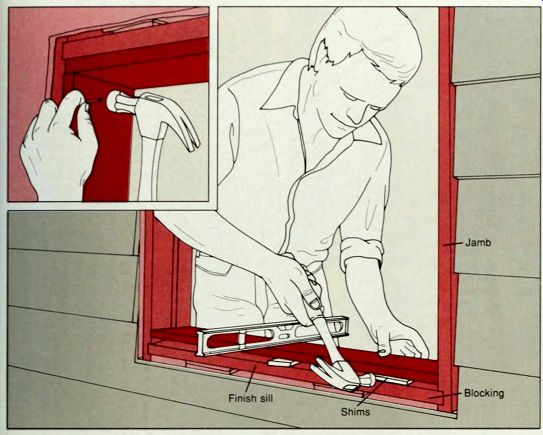
---------Blocking a finish frame. After removing the stops, parting strips, sashes and balance system, measure the finish frame for blocking as you would a rough frame. If the finish sill is angled, level the sill blocking by inserting shims beneath its outside edge (left), tapping them in with a hammer until a carpenter s square shows that the blocking is level. Nail the blocking to the finish sill through the shims. Block the head jamb, then the side jambs, as you would for a rough frame.
INSTALLING A PREHUNG WINDOW
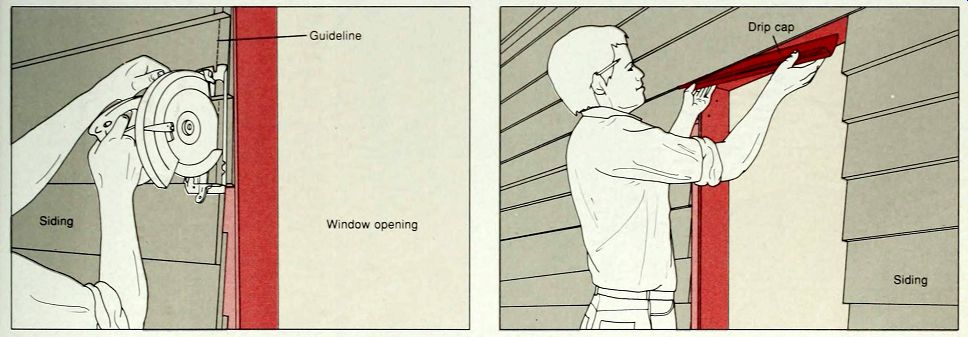
---------- 1. Cutting the siding. If the new window has a wood brickmold I or a metal flange, you may need to cut away a strip of siding around the frame to fit the window against the sheathing. With a helper, lift the replacement unit into the window opening and center it. Trace the edge of the brickmold or flange on the siding and remove the window. Fit a circular saw with a metal-cutting blade for aluminum siding: use a crosscut blade for wood or vinyl siding. Set the depth of the blade to the thickness of the siding. Wearing safety goggles, cut about 1/8 inch outside the guideline, moving the circular saw up the left side and around the frame (above)
------------2. Installing a drip cap. Windows and doors with a brickmold that are set into houses with siding will need a drip cap to keep rain from leaking through the space between the head jamb and rough frame. Measure the thickness of the brickmold and the width of the window opening and buy a drip cap or piece of flashing to fit. cut ting it to the correct length yourself with tin snips. Slip the edge of the drip cap between the siding and sheathing above the window opening, as shown.
INSTALLING A PREHUNG WINDOW (continued)
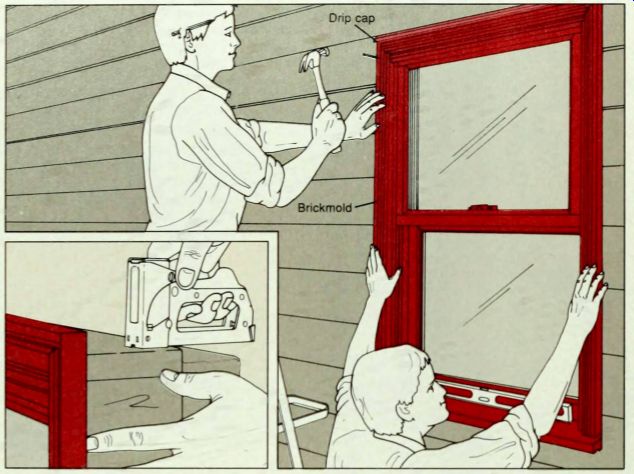
3. Installing the window. Before installing a window, apply a plastic vapor barrier around its finish frame. Cut a piece of vinyl sheeting long enough to wrap around the jambs and sill. Its width should be about double that of the jambs. Staple the plastic to all four sides of the window frame (inset): when the window is installed, the free edge will be stapled to the interior wall covering (step 6). If you are installing a metal window with a thermal break (a strip of wood or plastic running along the center of the jambs), staple the vapor barrier to it. As an alternative to vinyl sheeting, inject polyurethane foam after installing the window. Working from the outside with a helper, lift the window into place and slip the brickmold under the drip cap. Butt the head jamb against the header and check with a carpenter's level which top corner is lower. Tack the brickmold of the lower corner to the sheathing temporarily with a finishing nail (left) lower the other corner until it is level with the first, and tack it in place as well.
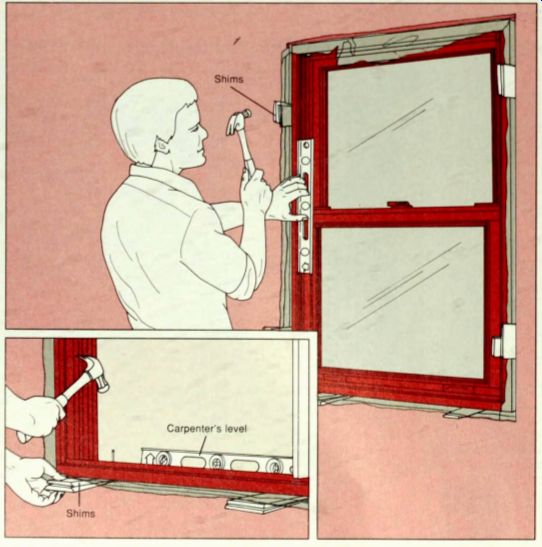
4. Shimming the window. Working from inside, shim with cedar shingles be T tween the finish frame and the rough frame to level and plumb the window. First, shim the finish sill; insert the thin ends of the shingles under the sill near each end and tap the thick ends with a hammer. Set a carpenter's level on the sill to check that the sill is level. Drill pilot holes through the sill and shims and drive finishing nails through the holes into the rough sill (inset), leaving the nail heads exposed. To shim the side jambs, insert the thick end of a shingle into the gap between the jamb and jack stud near a top corner. Then wedge the thin end of a second shim against it until snug. Fit a similar set of shims near the bottom, and at the middle if the window is taller than 4 feet. Insert shims on the other side, and at the top. Tap in the shims with a hammer (left), while checking for plumb with a level along the sides of the jambs and along their faces. If you notice the jambs bowing in even slightly, pull out the shims partway. Drill holes and drive finishing nails as for the sill. When the window is square, level and plumb, countersink the nails. Use a utility knife to score the shims flush with the frame and break them off by hand. Reinstall the stool, apron and trim. If you blocked the frame, cut a new stool and apron and trim.
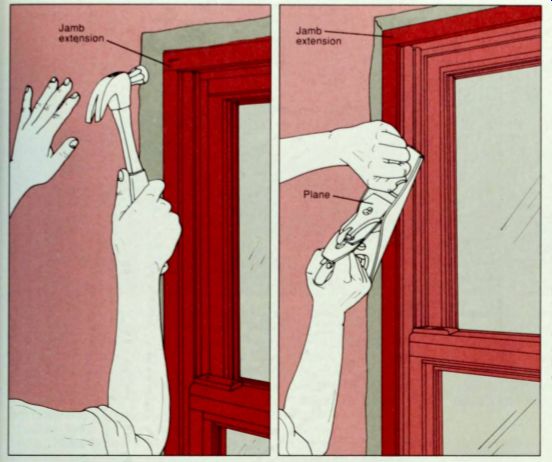
-------- 5 Extending the jambs. If the front edges of the window jambs are not flush with the interior wall, extend the jambs by adding strips of wood. Measure the length and thickness of each jamb. If you are not planning to add a stool, also measure for a sill extension. To determine the depth of the jamb extensions, measure the distance between the jamb faces and the wall surface in several places and sub tract 1/8 inch from the largest measurement. Cut strips of the correct size from dimensional lumber. If you plan to varnish or stain the wood, make sure it matches the new window. Fasten the smooth milled side of the jamb extensions against the jambs with carpenter's glue and finishing nails (far left), and countersink the heads. Using a bench plane (near left) or a block plane, smooth the surface of the jamb extensions to match any variations in the wall surface. Older walls are seldom flat; the shaping of jamb extensions allows the trim to fit against the interior wall. Forcing jamb extensions or trim to fit can twist the window or door frame or break the trim.
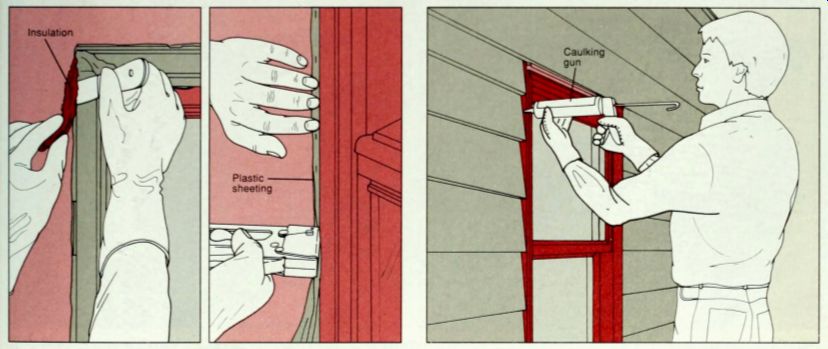
6. Insulating the frame. Insulate the gap between the jambs and the rough frame with strips of fiberglass batt. (Wear a respirator, work gloves, long sleeves and- safety goggles when working with fiberglass. Cut the insulation into strips with a utility knife and use a putty knife to push it between the plastic vapor barrier and the rough frame, loosely filling the gaps between the shims (above, left). Then fold the vapor barrier over the insulation and staple it to the raw edge of the interior wall (above, right). Cut away excess plastic with a utility knife.
7. Caulking around the window. Choose an exterior sealant and cut a small hole in the tip of the tube at a 45-degree angle. Using a caulking gun, lay a fine bead of sealant along the joint between brickmold and jambs. Then cut the tip for a wider bead and apply sealant along the joint between brickmold and siding (above) or exterior masonry.
REBUILDING BELOW THE SILL
-----------
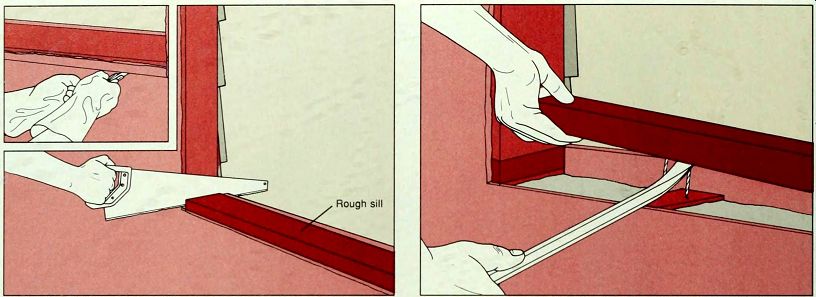
1. Cutting the rough sill. After removing a window for replacement, examine the rough sill for rot Patch small spots with epoxy if most of the sill is soft and spongy, re place it. Draw a horizontal line 1 1/2 inch below the top of the rough sill, and cut away the wall across the front edge of the sill, using a utility knife for drywall (inset) or a cold chisel for plaster (step 4). Saw through the sill with a crosscut saw at each end, flush with the jack studs (above).
2. Prying up the rough sill. Use a pry bar to pry up the sill w (above), lifting carefully to minimize damage to the interior wall surface. Twist the sill free of any nails securing it to the sheathing. Pull out exposed nails, or cut them off with a hacksaw. Rot may have spread to the wood framing below the window. Telltale signs are the smell of mildew and discoloration of the interior wall surface.
Inspect the tops of the cripple studs. If the cripple studs look healthy, install a new rough sill (step 9), patch the wall and install the replacement window. If the cripple studs are rotted, replace them. The frame may have a double rough sill; if it too is rotted, remove it as you did the first and examine the cripple studs.
---------3. Removing the baseboard and shoe molding. Using a utility knife, slice through any paint sealing the trim to the wall, or the shoe molding to the baseboard. Check a corner of the room where the trim beneath the window begins.
If the end of the trim to be removed is tucked behind the adjacent trim, you must remove the adjacent trim first. Near one corner, push the blade of a putty knife between the shoe molding and the floor.
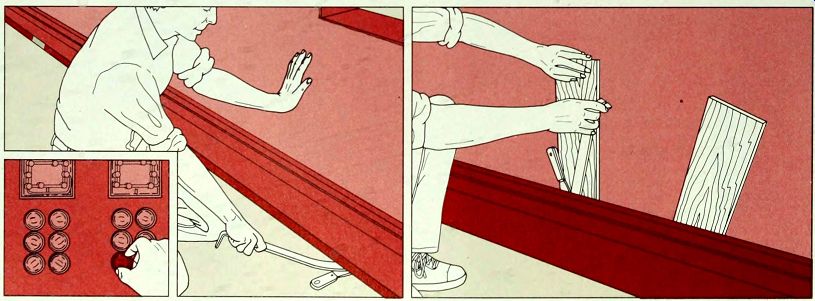
Gently insert the end of a pry bar between the knife and the shoe molding and ease the molding up (above, left). Continue along the length of the molding.
If a hard-to match shoe molding breaks, save the pieces; they can be glued back together. Near one end of the baseboard, insert a putty knife blade between baseboard and wall. Push in a wood shim behind the knife and work the end of a pry bar between them (above, right). Pry out the baseboard 1/2 inch and wedge a second shim behind it about 2 feet away. Insert the putty knife in front of the second shim, work the pry bar between them and continue prying off the baseboard. After removing the molding, use a nail puller to work nails out from the back (step 2). Before cutting into the wall, disconnect electrical power to the room at the fuse box (inset) or circuit-breaker panel.
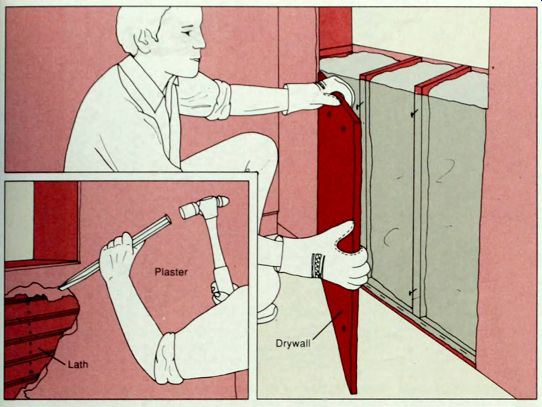
---- 4. Cutting away the wall. Using a level , draw a vertical line from each lower corner of the rough frame to the floor. If there are any electrical outlets in the wall, make small exploratory holes below the window to check cable positions before cutting.
To cut drywall. score along the lines with a utility knife, then cut through the drywall with the knife or a keyhole saw. Lift away the cut drywall. as shown. You may have to break the drywall to free it from the nails or screws that fasten it to the studs. Some fasteners may come out with the drywall; others may remain in the studs. If the drywall is glued to the studs, chip it off with a cold chisel. If the wall contains fiberglass insulation, wear a respirator, work gloves, long sleeves and safety goggles to cut away the vapor barrier that covers the insulation, and pull out the batts.
To chip away a plaster wall, use a cold chisel and ball-peen hammer (inset), and a sharp wood chisel and mallet to cut the lath.
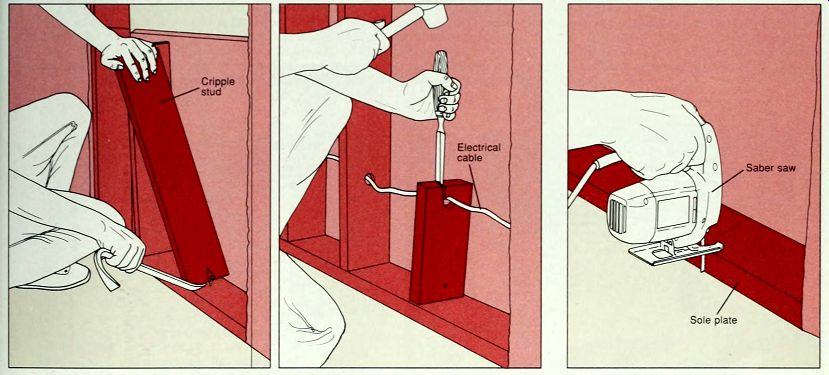
----5. Removing rotted cripple studs. If a jack stud below the window is rotted, call a building inspector or contractor before you proceed. A cripple stud is nailed to the sole plate and sometimes to the exterior sheathing as well. To remove a rotted cripple stud, insert a pry bar between it and the sole plate and twist it free of the nails (above, left). Use a nail puller to cut any nail shafts protruding from the sheathing.
To remove a cripple stud with an electrical cable or pipe running through it, shut off power to the cable's electrical circuit (step 3). Using a saber saw. cut through the stud an inch above the cable or pipe. If necessary, finish the job with a sharp wood chisel and rubber mallet. Pull the top part of the stud free. Then use the chisel to split the wood where the cable or pipe passes through (above, right). Twist out the stud as above, without damaging the cable or pipe.
6. Removing a damaged sole plate. If the sole plate is healthy, go to step 8. To cut out a rotted section of sole plate, cut through the plate with a saber saw 2 inches outside the damaged area at each end (above). Use a sharp wood chisel and rubber mallet to cut through the last bit that the saber saw can't reach. Use a pry bar to lift out the damaged section and a nail puller to pull or cut any protruding nails.
REBUILDING BELOW THE SILL (continued)
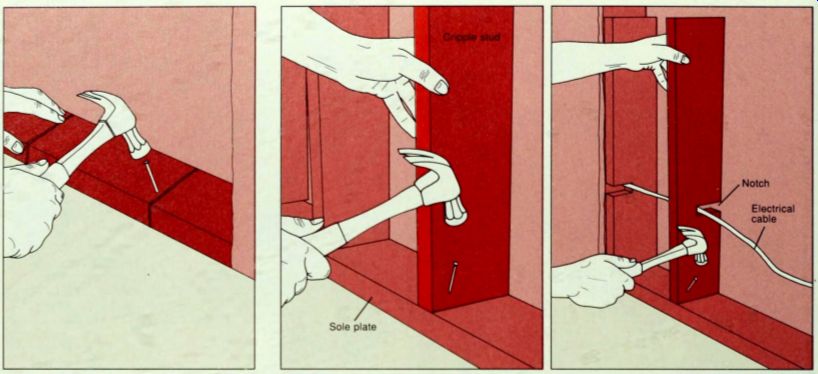
---7. Replacing a section of sole plate. Measure the length of the gap between the cut ends of/the sole plate and use a circular saw to cut a matching board to size. Fit the new piece of sole plate into the gap and toenail it to the ends of the existing sole plate, as shown. If the floor beneath the sole plate is wood, drive several nails through the face of the plate as well.
8. Replacing cripple studs. The length of the new cripple studs will determine the height of the new rough sill. If the replacement window is longer than the old window, you must replace all the old cripple studs with shorter ones. Measure for the length of new cripple studs from the sole plate to 1 1/2 inch below the planned rough sill height; if you are replacing a double rough sill, measure to 3 inches below its planned height. If you are rebuilding the sill to its original height, measure to the bottom of the old sill position. Use a circular saw to cut the studs to size. Nail one cripple stud against the jack stud at each side. Position the others 16 inches apart, center to center, and toenail them to the sole plate (above, left).
If a cable or pipe runs through the wall, use a saber saw to notch each stud at the appropriate height. Alternate the notch positions, as you install the studs (above, right).
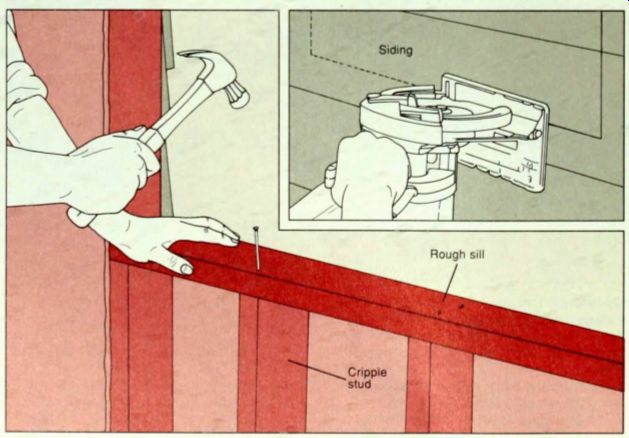
9. Replacing the rough sill. Measure the width of the window opening and use a crosscut saw or a circular saw to cut the new sill to size. Fit the rough sill snugly between the jack studs and nail it to the top of each cripple stud.
Then toenail the sill to the jack studs. If replacing a double rough sill, cut a second identical piece and nail it on top of the first.
With the rough sill in place, refinish the inside wall. If you lowered the sill height for a longer window, use a circular saw to cut the exterior siding and sheathing down to the new level: Measure the distance between the top of the rough sill and the top edge of the exterior wall. Go outside and, using a level, draw a vertical line extending this distance down from each bottom corner of the opening. Draw a horizontal line joining their ends.
Wearing goggles, use a circular saw with the appropriate blade to cut through the siding and sheathing (inset).
REFINISHING THE INSIDE WALL
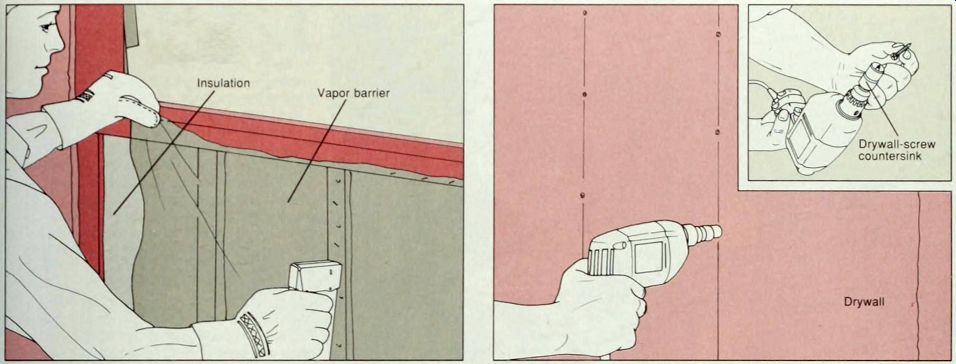
-------------
1. Installing insulation and a vapor barrier. Wear a respirator. I goggles, work gloves and long sleeves when working with fiber-glass insulation. Cut batts to fit between the cripple studs; Place a batt on the floor and compress it with a board along the line to be cut. Using the board as a guide, slice through the fiberglass with a utility knife: it may take several passes. Fit the insulation between the studs. Cut plastic sheeting to make a vapor barrier large enough to cover the area under the sill. Staple the plastic to the faces of the studs and rough sill.
2. Installing new drywall. Measure the opening and draw its outline on a piece of drywall. Using a straightedge, score each line with a utility knife, then snap the drywall along the scored line and cut through the paper backing. Mark lines indicating the positions of the cripple studs on the panel. Place the drywall over the opening and use a Phillips screwdriver or a variable-speed power drill fitted with a drywall-screw countersink (inset) to secure the panel to the cripple studs with drywall screws. Beginning near the center of the panel, drive screws into the cripple studs at 6-inch intervals (above). Replace plaster and lath with drywall of the same thickness as the piaster and lath combined.
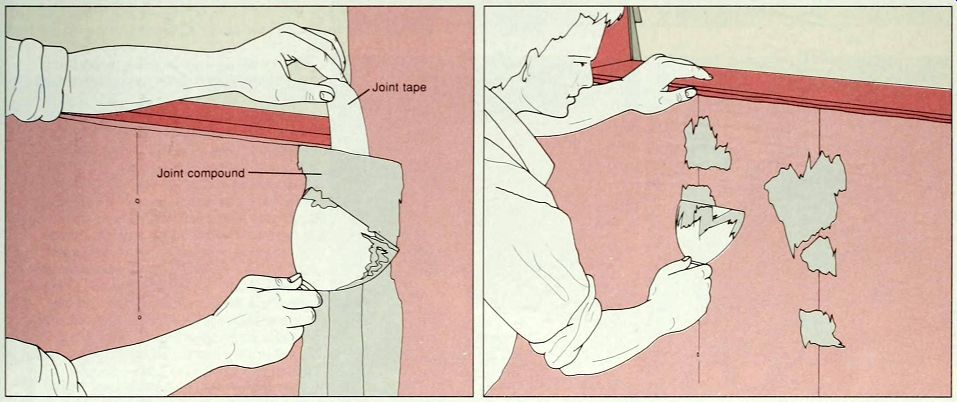
------3 Adding joint compound. Moisten a drywall joint with a wet sponge and spread a layer of joint compound along it with a putty knife. Press joint tape into the wet compound with a wide blade putty knife. Then spread a second layer of compound over the tape, as shown. Cover the screws with a layer of compound at the same time (above, right). Feather the edges of the compound so that it tapers smoothly into the wall surface and let it dry for 24 hours.
Then lightly sand the dried joint compound with medium-grit sandpaper on a sanding block and brush away dust. Add another layer or two of joint compound, feathering, drying and sanding lightly after each application.
When the compound is dry. apply primer to the drywall patch. After painting or papering the wall, reinstall the baseboard and shoe molding, and the stool, apron and trim, driving slightly larger finishing nails through the old nail holes where possible. If the old holes are too large, fill them with wood putty or spackling compound and drive the nails elsewhere. If the old trim pieces broke on removal, or the gap between the jambs and the wall surface was increased by blocking, add a new stool and apron and re-trim.
INSTALLING A PREHUNG DOOR
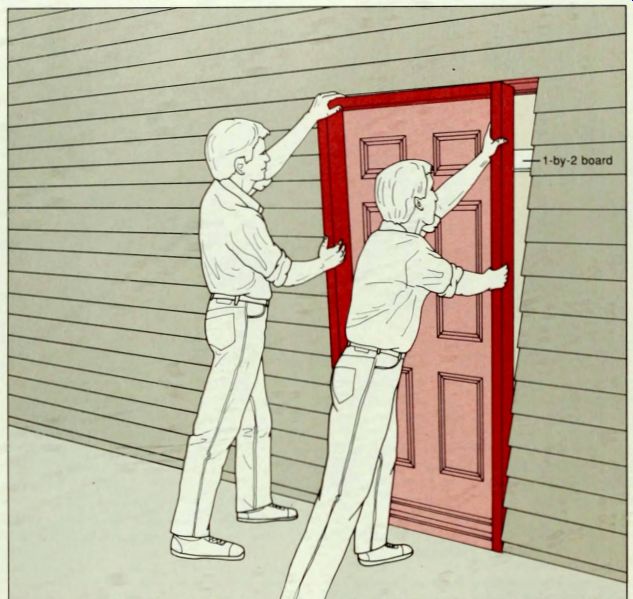
---------- 1. Positioning a prehung door. Read I the manufacturer's instructions that come with the prehung door. Also familiarize yourself with the procedure for installing a prehung window, many of the steps are the same for a door. Most prehung interior doors are installed n much the same way as the exterior door shown at left. Many, however, lack a thresh old and don't require weatherproofing in the form of a vapor barrier, caulk and drip cap. Prepare the door opening by removing the rim. Then take down the old door; if the door has fixed hinges, wedge open and unscrew the hinge plates from the door jamb. Remove door hardware for re-installation. Collapse the jambs and saw through the door sill to remove hem. Block a too-large rough opening. Staple a plastic vapor barrier to the side jambs and head jambs of the new unit. If you are installing an exterior door with a brickmold. trim the siding with a circular saw if necessary. If you are installing an exterior door without a brickmold (left), nail a 1-by-2 across the top of the opening on the inside to stabilize the door temporarily while you shim it. Run two thick beads of water proof exterior adhesive across the rough sill. Then, working from the outside with a helper, place the threshold in the rough frame and tip he door into place, resting its top end against he 1-by-2 as shown.
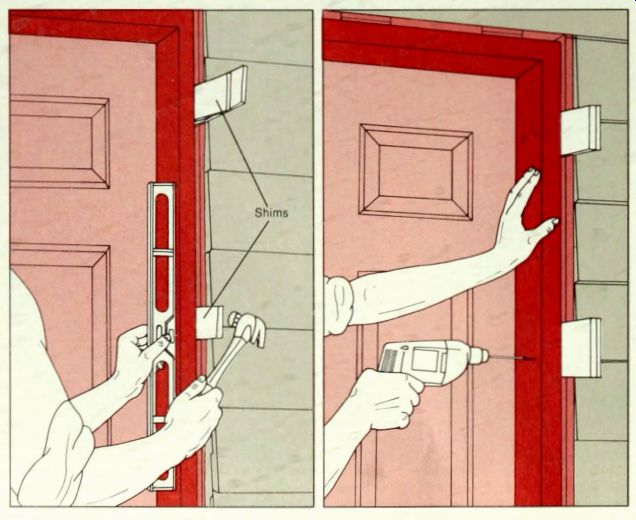
2. Leveling and securing a prehung door. On an exterior door with a brick mold, shim from the interior. Shim a door without a brickmold, such as the one shown, from the exterior. Check that the threshold is level by laying a carpenter's level along it. If necessary, use a pry bar to lift the threshold just enough to slip 1/8-inch shims under the lower side. Shim along the side jambs and head jamb with pairs of shims as described for shimming a window, inserting shims at about 20-inch intervals. Adjust the shims with light hammer taps (far left). Use a reversible power drill to make a pilot hole through the threshold and the jambs at each set of shims. Fit the drill with a Phillips screwdriver bit and drive 3-inch drywall screws into the pilot holes (near left).
Loosen and tighten the screws for final adjustment of the shims. After each adjustment check that the door opens and closes properly. Score the protruding ends of the shims with a utility knife and snap them off.
Install a drip cap and caulk around the exterior of the door as you would a window. Finish the job by reinstalling the trim around the door.
BUILDING A STOOL AND APRON
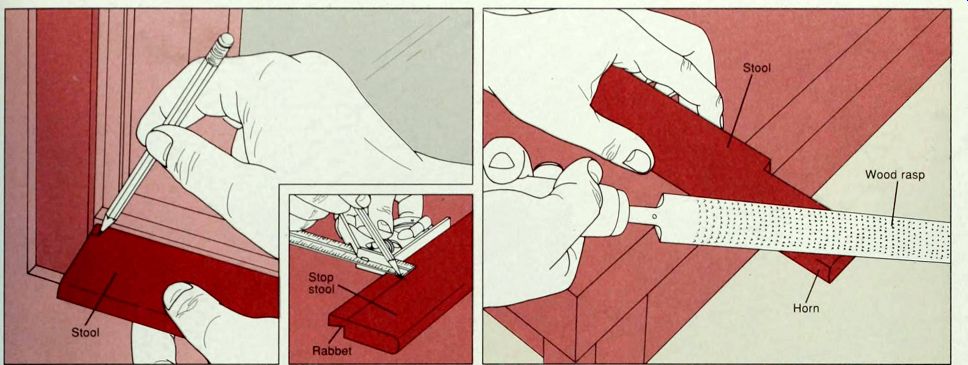
----------1. Measuring and marking the stool. Measure for the stool, apron and trim at the same time and buy them at a building supply store. Get stool material with a bullnose or fancier milled edge, and of the same wood as the window frame if applying a natural finish. Depending on the window's finish sill, choose either a straight stool (above) to butt against the finish sill, or a stop stool (inset) which is rabbeted to overlap an angled finish sill. To determine its length, measure between the marks on the wall where the outside edges of the side window trim were, and add 1 inch. To determine the width of a straight stool, measure from the inside edge of the finish sill to the wall surface and add 3/4 inch. For a stop stool, measure from the inside edge of the sill to the outside edge of the interior stop, and add the thickness of the trim plus 3/4 inch. To determine the width of the horn on a straight stool, subtract the distance between the wall surface and the finish sill from the width of the stool itself.
To determine the length of the horn on a straight stool, measure from the inside edge of the jamb to the outside edge of the side trim and add 1/2 inch. For a stop stool, measure the width of the horn by subtracting the distance between the wall surface and the sash minus 1/16 inch, from the width of the stool. Mark the lines for the horns on the surface of the stool (inset). The length will be the same as for a straight stool. Clamp the stool to a work table with C clamps padded with wood shims, and use a backsaw to cut out the horns.
If you wish to finish the stool's horns with mitered returns, go to step 2; otherwise smooth the ends of the stool's horns with careful, even strokes of a wood rasp. Stroke in one direction along the grain (above, right). Then sand the edge with progressively finer sandpaper to prepare for finishing.

-----2 Making a mitered return. To precisely match the horn end to a stool's milled front edge, finish the ends with mitered returns.
Use a backsaw and a miter box to cut the end of each horn inward at 45 degrees, as shown. Then mark the width of the horn on the milled edge of a piece of scrap stool. Place the scrap in the miter box and make a triangular wedge by cutting at a 45-degree angle at the mark. Make a second wedge the same way. Use carpenter's glue to glue the mitered edge of each wedge to that of the horn; the milled edge of the wedge will look like a continuation of the stool's milled front edge. Nail each wedge to the stool with a small finishing nail through the back.
3. Attaching the stool. Butt a straight stool against the finish sill, their top surfaces flush. Use finishing nails to toenail every 12 inches through the face of the stool into the finish sill and rough sill below it. Use a power drill to make pilot holes through the horns of the stool into the wall and rough frame. Then secure each horn with a finishing nail, as shown. Similarly, nail through the face of a stop stool into the finish stool below it. A stop stool's horns need not be nailed.
Countersink the nails, apply putty or spackling compound, and sand lightly.
BUILDING A STOOL AND APRON (continued)
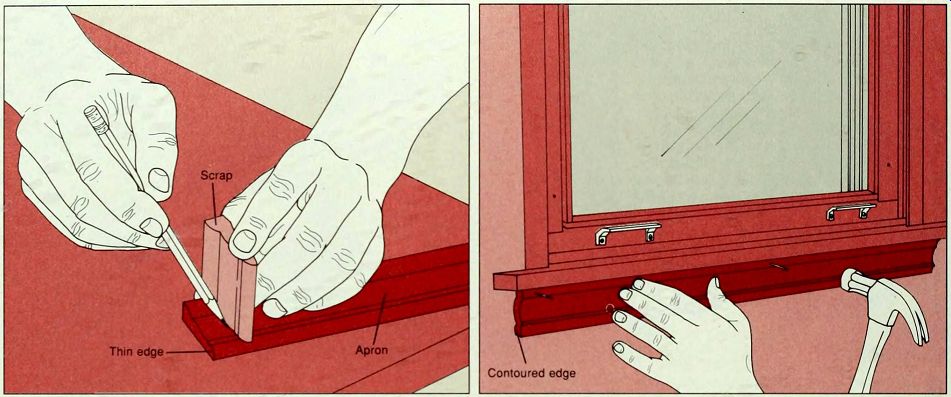
---- 4. A Making the apron. Make an apron from the same molding to be used for the side and head trim, if desired. Measure between the outer edges of the marks on the wall left by the old trim, and use a hacksaw to cut the apron to this length. For a decoratively con toured edge, place a scrap piece of the trim against the face of the apron and carefully trace the contours (above, left). Using a coping saw. cut along the curved line keeping the saw blade at a 90-degree angle to the molding. Sand the rough edges smooth. Secure the apron to the rough sill with finishing nails driven in at 12-inch intervals along the top and bottom edges of the apron (above, right).
RETRIMMING A WINDOW OR DOOR
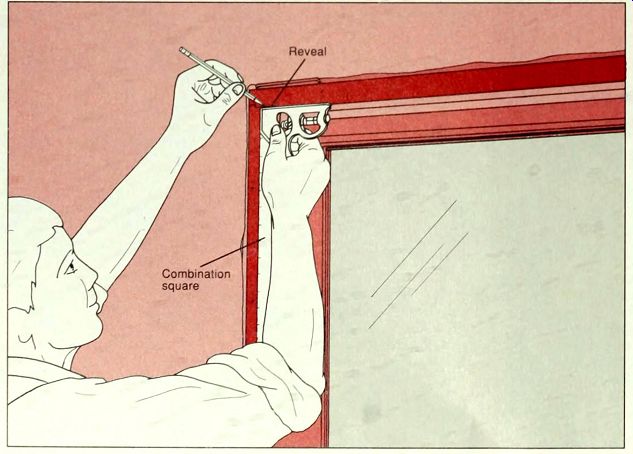
-----------1. Measuring and marking the trim.
To determine the width of trim you need to install, measure from the inside edge of each jamb to the outside edge of the marks on the wall left by the old trim. Buy enough trim molding of this width to re-trim around the interior of the window or door. Allow extra length for cutting mitered corners.
Using a combination square, draw a line along the face of the head and side jambs 1/8 inch from their inside edges (above). This marks the " reveal "--the amount of jamb that should show along the edge of the trim. For the side trim, measure between the top of the stool and the head jamb and add 1/8 inch.
Mark this measurement on the underside of the strips of trim at the thin edge, starting at least the width of the trim away from the end to allow for a mitered cut outward at 45 degrees for each side trim piece.
RETRIMMING A WINDOW OR DOOR (continued)
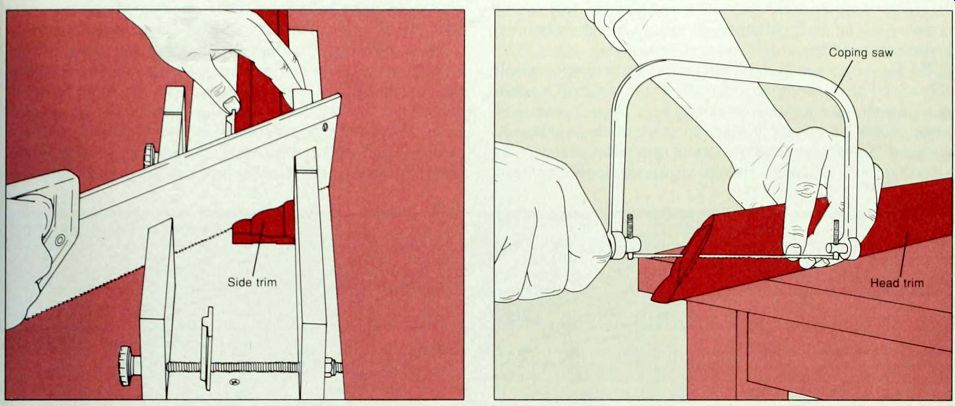
----------2 Mitering the trim. Place one of the side trim pieces in the W miter box and. using the measurements taken in step 1. cut a mitered corner from the thin edge outward at 45 degrees at one end (above): the thin edge of the trim will be positioned nearest the corner. Make a 90-degree cut at the other end. Repeat for the other side trim piece. Position the side trim with its inner edge resting on the reveal you marked in step 1. Use finishing nails to secure the trim, nailing it first to the jamb and then, with longer finishing nails, through the wall surface into the jack studs. Leave 6 inches from the mitered corner un-nailed. Install the other side trim piece the same way. Measure the distance between the side trim's top corners and mark these measurements on the thick edge of the trim stock. Use a backsaw and a miter box to cut the head trim slightly longer than these marks, fanning both ends outward at 45 degrees.
---3. Coping a mitered joint. Before attaching the head trim, use a coping saw to cut a small crescent out of the back edge of each mitered end, leaving 1/2 inch at the top and bottom edges uncut, as shown. This will allow the finished edges of the mitered corners to fit tightly over an uneven wall surface. Fit the head trim between the side trim pieces, so that their mitered corners are even. Nail the head trim in place with finishing nails as you did the side trim, stopping 6 inches away from the ends.

---4. Fitting the mitered corners. If the angled edges of a mitered corner do 1 not close tightly, cut through the corner with a backsaw to recut both edges simultaneously, as shown. Holding the two mitered edges together, nail near the end of each trim piece.
5. Securing the mitered corners. Lock-nail a mitered corner by tapping a finishing nail through each trim piece into the other. 1 inch from the corner (above, left). Use a nail set to countersink all nail heads. Fill the holes with spackling compound or wood putty, depending on whether the wood will be painted or stained. If a trim edge protrudes, use a sharp wood chisel to shave it. Carefully follow the original contours of the trim face (above, right). Then sand the corner lightly, if the exterior requires trim as well, make and install it in the same way. but first apply two coats of paint-compatible wood preservative to the trim pieces. If the rough frame was blocked, you may have to add strips of sheathing to fill the gap between the jambs and siding before installing the new trim.