A garage door is possibly the most neglected door in the house. As long as it continues to move up and down, few homeowners bother to inspect or maintain it.
The most common garage door is the overhead door, available in one-piece swing-up and multi- panel sectional models. A swing-up door has one or two springs on each side, and some models have a pair of overhead guide tracks. A sectional door runs on two overhead tracks and uses either extension or torsion springs. Extension springs run parallel o the overhead tracks-in pairs on a heavy door-and stretch and contract when the door is opened and closed. Each spring is fitted with a safety cable to prevent injury if an extension spring breaks.
Torsion springs, located directly over the top of the closed door, wind up like a window-shade spring; their repair or adjustment requires special tools and professional expertise.
Any overhead garage door can be fitted with an automatic opener, which may be operated by a remote transmitter, a key switch located on the outside door jamb or a push button or pull cord inside the garage. Most automatic openers have built-in safety control devices: an auto-reverse or auto-stop mechanism stops the door if it touches anything while closing, and an emergency-release cord attached to the trolley allows manual operation. The closing safety mechanism can be adjusted as described.
Weather stripping on the door protects the garage from the elements. Lengths of specially design weather stripping aluminum extensions fitted with vinyl inserts, are often nailed to the side and top door jambs. As protection for the garage floor and the bottom of the door, flexible tubular weather stripping (or sometimes a piece of hose) is nailed to the bottom of the door, creating a seal for an uneven surface.
The most common garage door problems can often be pre vented by regularly cleaning tracks, lubricating door hinges, oiling extension springs and checking for signs of wear or loose parts.
------------------
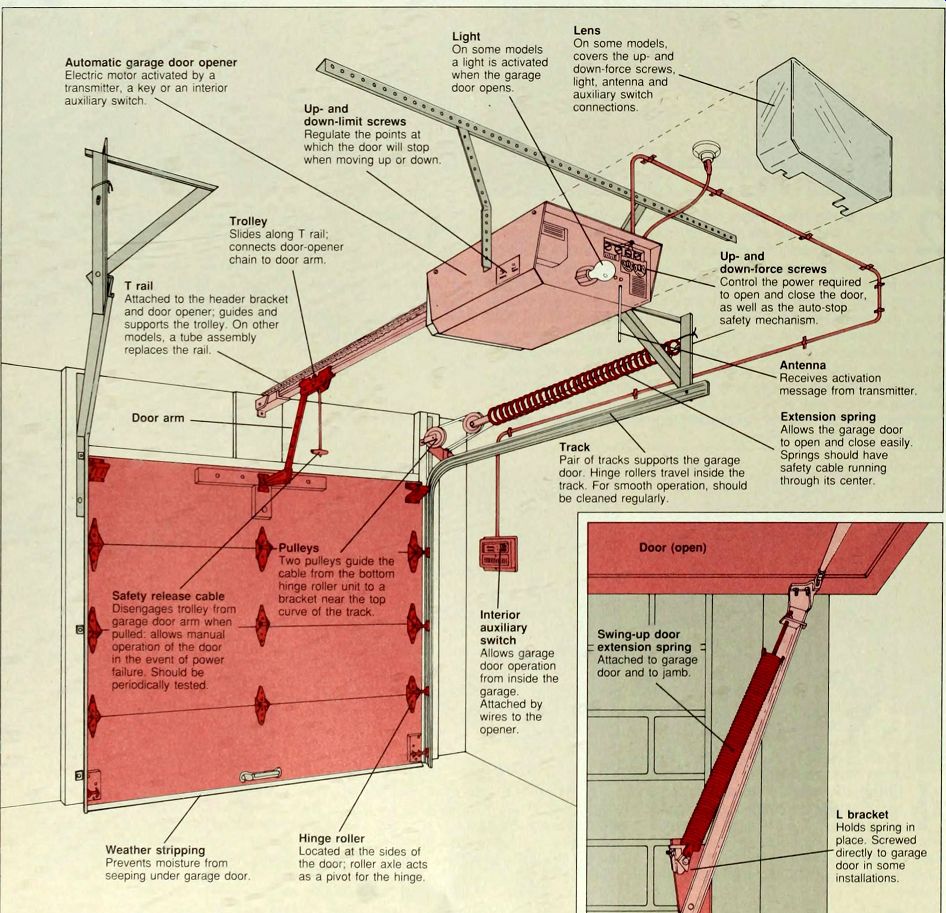
Lens--On some models, covers the up- and down-force screws, light, antenna and auxiliary switch connections.
Light--On some models a light is activated when the garage door opens.
Automatic garage door opener--Electric motor activated by a transmitter, a key or an interior auxiliary switch
Up- and down-limit screws--Regulate the points at which the door will stop when moving up or down.
Trolley--Slides along T rail; connects door-opener chain to door arm. Up- and down-force screws
Control the power required to open and close the door.
as well as the auto-stop safety mechanism
T rail Attached to the header bracket and door opener; guides and supports the trolley. On other models, a tube assembly replaces the rail Antenna Receives activation message from transmitter.
Extension spring--Allows the garage door to open and close easily.
Springs should have safety cable running through its center.
Door arm Track \ Pair of tracks supports the garage door Hinge rollers travel inside the track For smooth operation, should be cleaned regularly.
Pulleys / Two pulleys guide the cable from the bottom hinge roller unit to a bracket near the top curve of the track.
Door (open)
Safety release cable--Disengages trolley from garage door arm when pulled allows manual operation of the door in the even! of power failure. Should be periodically tested.
Interior auxiliary switch--Allows garage door operation from inside the Swing-up door
: extension spring :
Attached to garage door and to jamb.
garage.
Attached by wires to the opener.
L bracket
Holds spring in place. Screwed directly to garage door in some installations.
Hinge roller Located at the sides of the door; roller axle acts as a pivot for the hinge.
Weather stripping Prevents moisture from seeping under garage door o
-----------------
TROUBLESHOOTING GUIDE
SYMPTOM
Water enters garage under door Garage door difficult to open Garage door opens or closes too easily Automatic opener doesn't open or close garage door Automatic opener does not stop garage door when it contacts object Garage door with automatic opener reverses direction or stops before closing fully Opener reverses direction after door closes fully Garage door opens 5 feet, but not completely Garage door doesn't open 5 feet Motor hums when door reaches fully opened or closed position Chain rattles when automatic opener is activated
POSSIBLE CAUSE
Threshold not level weather stripping inadequate Dirt clogging tracks Door parts need lubrication Worn roller Loose track Dented track Loose hinges Broken spring Broken pulley Broken cable Door not balanced Power cord not plugged in Transmitter batteries dead Antenna not receiving signal Transmitter and receiver code key settings don't match Transmitter defective Down-force screw set improperly Object interfering with travel cycle Down-force screw set improperly Down-limit screw set improperly Up-limit screw set improperly Up-force screw set improperly Up- or down-limit screw set improperly Chain loose
PROCEDURE
Replace bottom weather stripping with heavy-duty tubular type o 108) BO Clean tracks o 105) DO Lubricate parts with light machine oil (p. 105) DO Replace roller (p. 105) BO Call for service Hammer out dent with mallet if minor, otherwise call for service Tighten or replace hinges (p. 105) BO Replace spring o 107) Replace pulley (p. 107) Replace cable o 106) Adjust spring tension (p. 106) BO Plug in power cord Change batteries Remove obstruction blocking transmitter signal Reset transmitter and or receive code keys Replace transmitter or call for service Adjust down-force screw counterclockwise (p. 104) DO' Remove object Adjust down-force screw clockwise (p. 104) DO Adjust down-limit screw clockwise (p. 104) CUO Adjust up-limit screw clockwise (p. 104) DO Adjust up-force screw clockwise (p. 104) DO Adjust up- or down-limit screw o 104) OO Adjust chain tension (p. 104) BO
-----------------
SERVICING THE CLOSING SAFETY MECHANISM
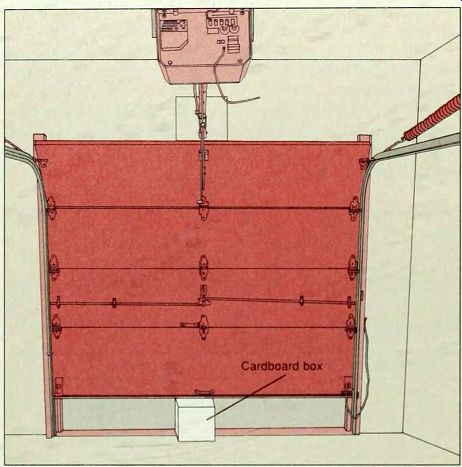
---- 1. Testing the dosing safety mechanism. For safe operation, test the mechanism every 6 months, as well as after painting the door or adjusting extension springs or limit screws (step 3). Open the garage door and place a cardboard box in the door s path (above). Then use the transmitter, push button or key switch to close the door. When the door' s bottom edge touches the box. a safety mechanism should activate by reversing the door direction on an auto reverse model or stopping it on an auto-stop model. If the door fails either to reverse or stop, adjust the down-force screw (step 2).
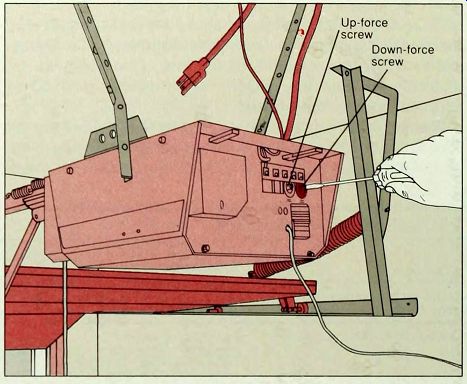
------ 2. Adjusting the down-force sensitivity. Unplug an auto-reverse unit and locate the down-force adjustment screw. (If the screw is located inside the unit, call for professional service.) Using a screwdriver, turn the down-force screw counterclockwise 10 degrees (above). Plug in the unit and repeat the cardboard-box test. Continue adjusting and testing until the door operates properly. If the door stops before reaching the fully open position-and there is no obstruction -adjust the up-force screw clockwise 10 degrees, or adjust the limit screws (step 3). An auto-stop door may have just one screw; adjust it for up force or down force as labeled, or call for professional service.
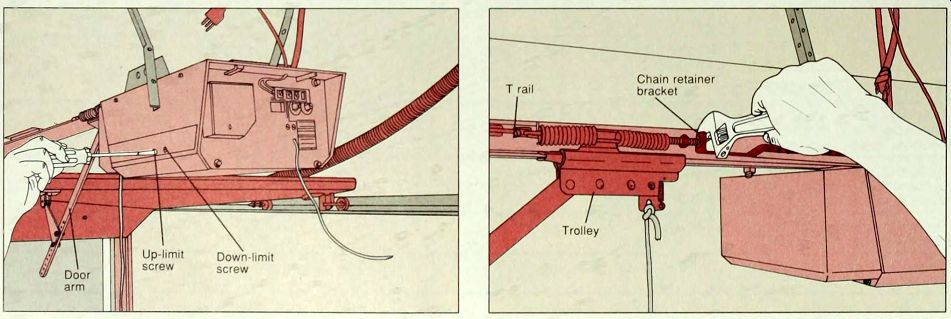
---------3. Adjusting the limit screws. If the garage door opens more than 5 feet but fails to open completely, unplug the opener and locate the up-limit adjustment screw-usually on the motor unit.
Turn the screw clockwise (above); one full turn increases door travel by 2 inches. Plug in the opener and run it through a complete cycle to check the adjustment. When the door opens and closes completely with out reversing or humming when opened or closed, it is adjusted properly. If the door does not close completely and the door arm is fully extended, unplug the opener and adjust the down-limit screw counter clockwise. Plug in the unit and check the adjustment.
----------4. Adjusting the chain tension. A chain that sags more than 1 1/2 inch below the T rail may cause a banging noise; tighten the chain. Using an adjustable wrench, turn the two nuts securing the chain retainer bracket to the threaded shaft on the trolley. First loosen the inner nut-closest to the trolley-and then tighten the outer nut by turning it clockwise (above) until the chain rests 1/2 inch above the base of the T rail; do not overtighten. Tighten the inner nut toward the chain retainer bracket until snug. On some models, the trolley moves along a tube support that contains an adjustment screw. Turn the screw clockwise to increase chain tension.
MAINTAINING A GARAGE DOOR
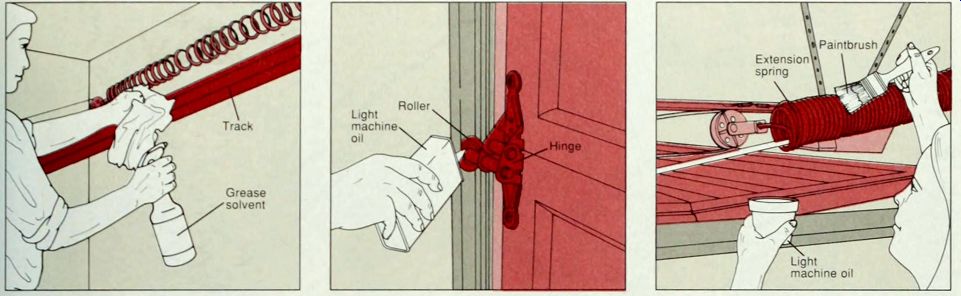
1. Cleaning the tracks. To keep the I garage door operating smoothly, dissolve grease and dirt inside the garage door tracks with a spray solvent: wipe the grime away with a cloth (above). Stand on a stepladder to clean the upper reaches of the tracks. Then lubricate the rollers (next step) and extension springs (step 3).
2. Lubricating door parts. As part of W an annual maintenance schedule, lubricate all moving parts of a garage door with light machine oil or powdered graphite. Spray the lubricant on metal axles and into roller bearings (above), and into pivot points on hinges and pulleys If squeaks or sticking persist, replace the parts (below).
3. Oiling the extension springs. Oiling the springs prevents rust and squeaks. Open the garage door to relax the ex tension springs. Standing on a stepladder. dip an old medium-width paintbrush in a container of light machine oil and coat each spring with oil.
REPLACING A WORN ROLLER
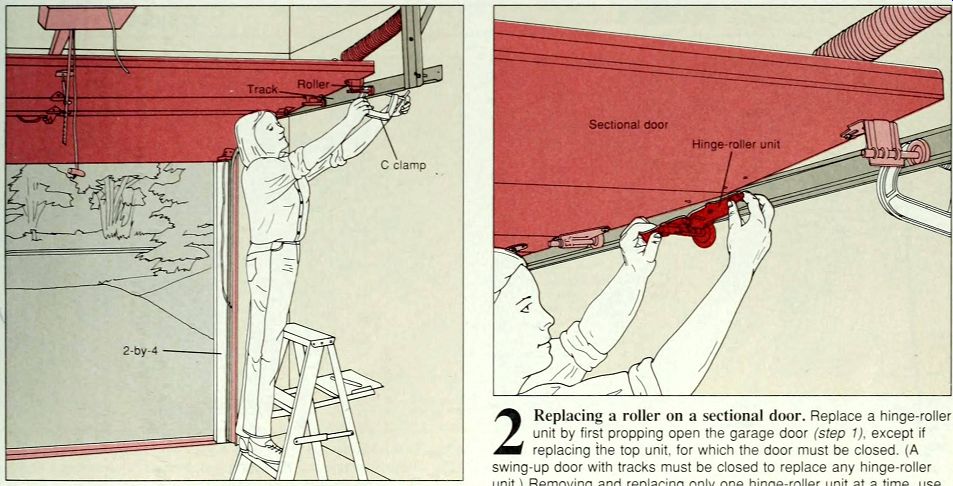
--------- 1. Propping open the garage door. Prop open the garage door by wedging a 2-by-4 snugly between a bottom corner of the door and the ground. As added reinforcement against accidental closure, firmly screw a C clamp to the track in front of the top roller on the garage door (above).
---2 Replacing a roller on a sectional door. Replace a hinge-roller f unit by first propping open the garage door (step 1), except if replacing the top unit, for which the door must be closed. (A swing-up door with tracks must be closed to replace any hinge-roller unit.) Removing and replacing only one hinge-roller unit at a time, use a screwdriver or wrench to undo the screws or bolts holding the hinge roller unit to the door. Twist the roller out of the track (above), fit the new roller in place and screw or bolt the hinge to the door. If the screw holes have become enlarged, use bigger screws or fill the holes and use the original screws.
SERVICING A CABLE
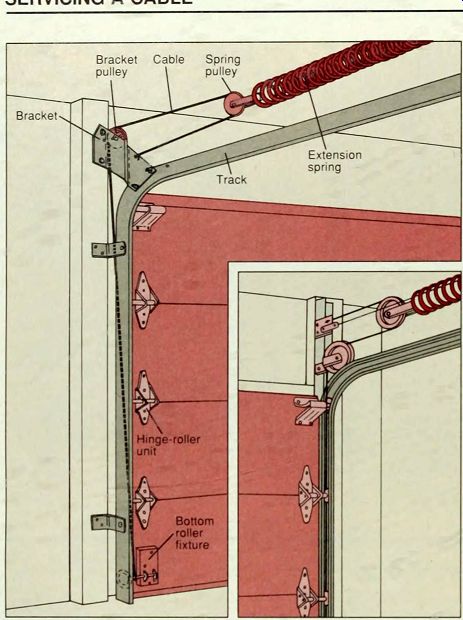
------ 1. Releasing this cable at the bracket end. On models such as the
one at left, the cable is knotted onto the bracket: on other models, it
may be tied to a plate above the bracket (left, inset). To release a cable
that is attached to the bracket, prop the door open to relax the extension
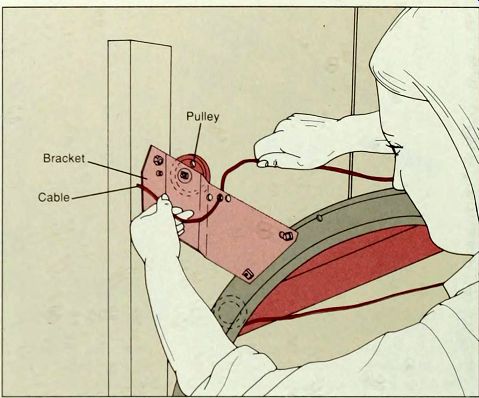
springs and use a screwdriver to lift the cable off the bracket pulley.
If the pulley is worn, replace it. If the cable tension needs adjusting,
go to step 3. If the cable has shiny patches or is otherwise worn, replace
it. Note how the cable is threaded, then untie the knot, unthread the cable
from the pulleys (above) and release its spring end as shown in step 2.
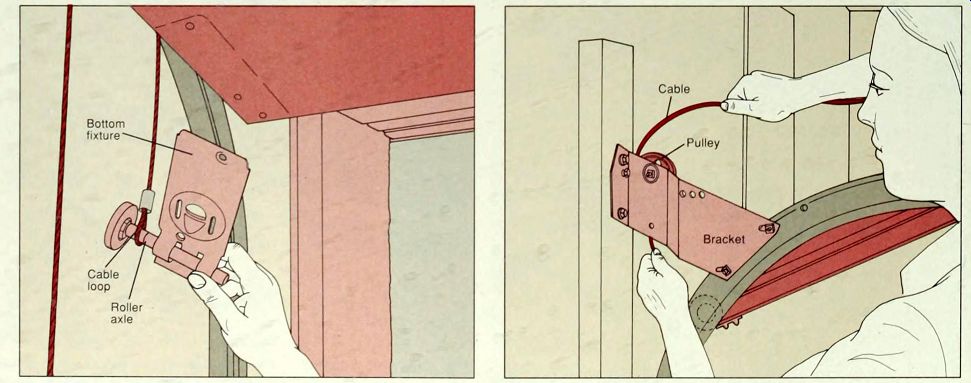
---2. Releasing the cable at the spring end. With the door propped open, use a screwdriver or wrench to unfasten the screws or bolts attaching the bottom roller fixture to the bottom of the door. Slide the roller out of the fixture (above) and slip the reinforced cable loop off the roller axle. Replace the roller, if worn.
---3. Rethreading the cable and adjusting the spring tension. Secure the cable at the spring end, then run it back to the bracket as originally threaded. Tie a knot to secure the cable to the bracket. Then adjust the spring tension: Increase tension by untying the cable knot, pulling the cable tighter to take up the slack, then re tying the knot. Test the tension by opening and closing the door; it should move easily on both sides. Adjust the other spring if necessary.
SERVICING A PULLEY
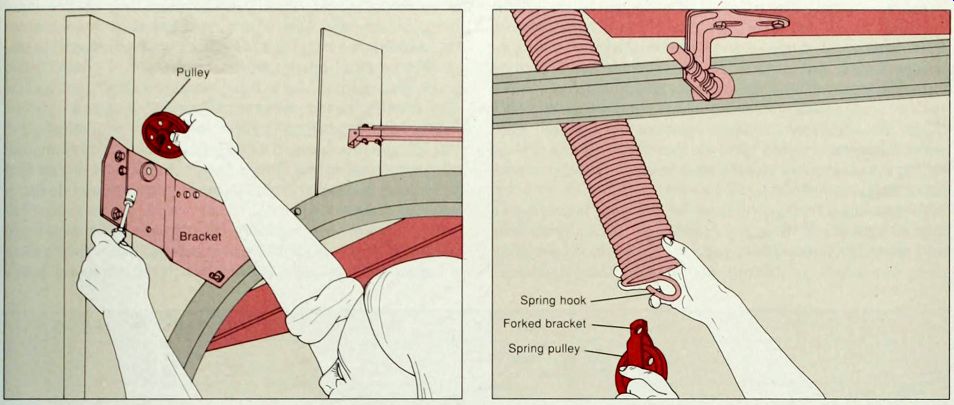
------1. Replacing the bracket pulley.. With the cable removed from the bracket pulley, use a wrench or nut driver to release the bolt holding the pulley on the bracket (above). The pulley may be held in place with a forked bracket; in that case, slip the pulley wheel out of the bracket after it has been unbolted. Replace the worn pulley with a new one, using the new bolts that came with it.
---2 Replacing a spring pulley. With the cable released, unhook the forked bracket of a worn spring pulley from the spring, and replace it (above). If the replacement does not have a hole on the bracket, slip the spring hook into the space between the pulley and the closed end of the forked bracket. Rethread the cable.
REPLACING SPRINGS
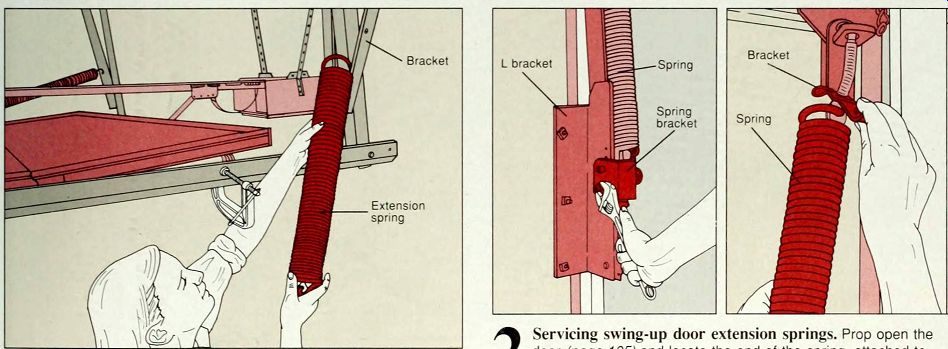
----1. Replacing sectional door extension springs. If the spring coils gap more than 1/2 inch or the springs sag when the door is open, replace both springs. With the door propped open detach the cable from the bracket pulley and release the front end of the spring. Next, unhook the worn spring from its bracket, eye hook or hole at the back of the track (above). Attach the new spring at the back of the track, thread the safety cable through it, and attach it to the spring pulley. Replace the other spring, then adjust the spring tension.
-----2 Servicing swing-up door extension springs. Prop open the door and locate the end of the spring, attached to a movable bracket mounted on an L bracket or in holes on the L bracket. To adjust spring tension, remove any bolts (above, left). Increase tension by moving the spring bracket up on the L bracket; decrease tension by moving it down. If the L bracket is attached to the door, increase tension by moving the spring bracket down and decrease it by moving it up. Adjust both springs. If spring coils gap 1/2 inch in the open position, replace both springs. Remove each spring at its L bracket end. then twist the other end out of its bracket (above, right) or hole. Install new springs and adjust the tension.