Windows and doors are the most likely source of air leakage into and out of the home. Seemingly minor gaps between sashes and jambs, or doors and thresholds, add up to a major energy drain. In fact, a crack just 1/4 inch wide and 4 feet long can let in as much cold air as a fist-sized hole. Insulation -- such as double-pane windows or an insulating door --will reduce direct heat transfer, caused when warm air contacts a cold surface. But to prevent the flow of air, all openings to the outside must be caulked with a sealant or weather-stripped.
To track down the gaps that let air into your house, tape a strip of light plastic film to a coat-hanger wire. On a windy day, move the wand slowly around each window and door, along trim edges, jamb stops, window-pane edges and sills.
Fluttering of the plastic indicates an area where air is leaking; mark it with chalk. The illustration below shows typical areas of infiltration and suggests remedies that are discussed in this chapter or other chapters in the guide. While checking for leaks, also examine the existing weather stripping or sealant.
If it is stiff, cracked, worn or deformed, replace it. The Troubleshooting Guide at right lists symptoms of air leakage and procedures for correcting them. Do not wait until winter to weatherproof your home; many weatherproofing procedures require that you open or even remove doors or window sashes.
To choose the best weatherproofing material for each situation, consult the sealant chart and the weather stripping guide. Sealants, available as caulk in a tube, work best on fixed joints: in cracks, along trim edges, or around window sashes that do not open. Choose a flexible sealant that is resistant to cold and moisture. Read the sealant manufacturer's instructions to determine its recommended surfaces, and whether it requires a primer. When applying sealant, work in a well-ventilated room, and wear safety goggles, rubber gloves and long sleeves. Never apply an exterior sealant indoors; the fumes are too toxic.
A special type of sealant, expanding spray foam, both closes a gap and insulates the space it fills. Available in small cans, the foam can be injected into a large space through a small opening. It is permanent, and should only be used in hidden areas. While being applied, the foam is extremely sticky and expands rapidly; practice first to get a feel for applying it. Do not overfill a gap: too much loam can open joints and push jambs apart.
Weather stripping provides a seal for movable joints, where two surfaces close against each other (a door and its stop) or slide past one another (a window sash and its channel).
Choose weather stripping to suit its job. Simple styles, such as V strips and door sweeps, are the least expensive and tend to develop fewer problems over time. Factory-installed weather stripping, such as the pile strip along the edges of a sliding window sash, can be replaced w hen won. Regular care and inspection of your home's doors and windows will keep them draft-free. Follow the maintenance procedures in this guide and, in areas with cold winters, install well-fitting storm windows, and doors.
----------------
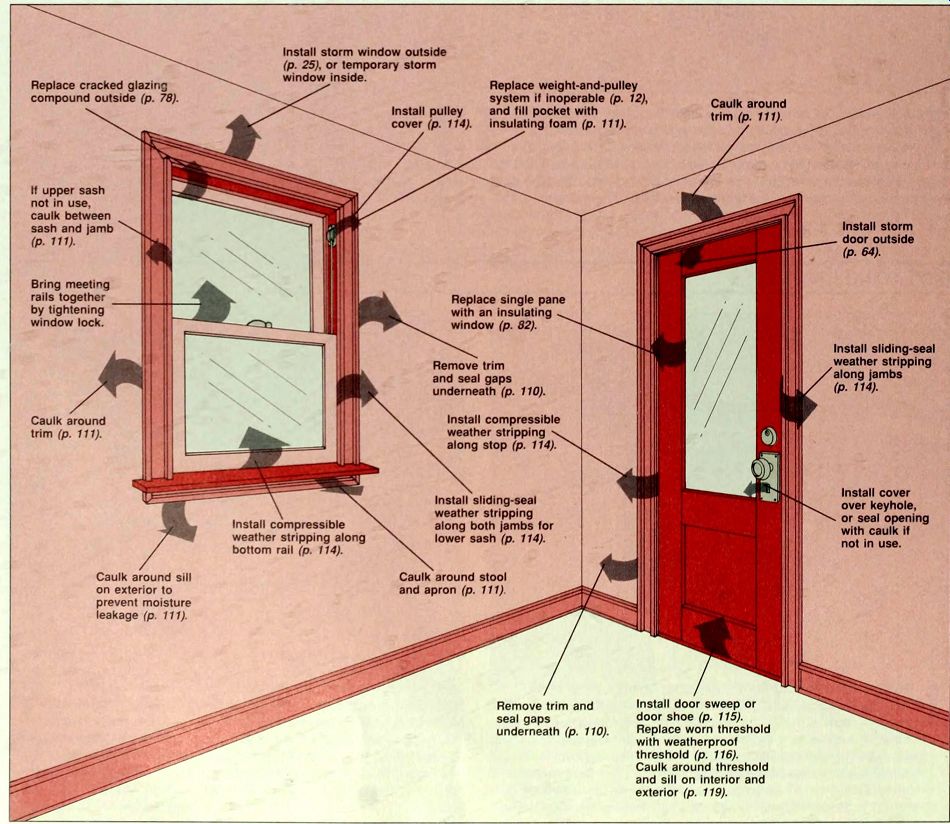
Replace cracked glazing compound outside.
Install storm window outside, or temporary storm window inside.
Install pulley cover.
Replace weight-and-pulley system if inoperable, and fill pocket with insulating foam.
Caulk around trim
If upper sash not in use, caulk between sash and jamb.
Bring meeting rails together by tightening window lock.
Caulk around trim.
Install compressible weather stripping along bottom rail.
Replace single pane with an insulating window.
Remove trim and seal gaps underneath.
Install compressible weather stripping along stop.
Install sliding-seal weather stripping along both jambs for lower sash.
Caulk around sill on exterior to prevent moisture leakage.
Caulk around stool and apron.
Remove trim and seal gaps underneath.
Install door sweep or door shoe.
Replace worn threshold with weatherproof threshold.
Caulk around threshold and sill on interior and exterior.
Install storm door outside.
Install sliding-seal weather stripping along jambs.
Install cover over keyhole, or seal opening with caulk If not in use.
----------------
TROUBLESHOOTING GUIDE
SYMPTOM:
Air leaking around door or window trim Air leaking around glass pane Air leaking between window sashes and jamb Air leaking between door and jamb Air or water leaking between window sash and stool or sill ir or water leaking between door and threshold Window or door rattling Condensation forming on inside of storm window
POSSIBLE CAUSE:
Small gap between trim and wall
Small gap between jamb and wall
Large gap between jamb and wall
Pane cracked or broken
Glazing compound deteriorated
Exposed pulley on double-hung window
Weather stripping worn or non-existent
Caulking cracked, worn or non-existent
Window warped or house settled
Weather stripping deteriorated or non-existent
Door warped or house settled
Weather stripping deteriorated or non-existent
Wood worn or rotted
Threshold worn, weather stripping deteriorated or non-existent
Sill worn or rotted
Weather stripping deteriorated or non-existent
Window or door warped
Weather stripping on interior window deteriorated or non-existent
PROCEDURE:
Caulk around trim (p. 111) DO Caulk behind trim (p. 110) HO Insulate with polyurethane foam (p. 111) HO Replace pane (p. 76) HO: or replace pane with insulating unit (p. 83} BOA Replace glazing compound (p. 78) HO Install pulley cover (p. 114) DO Replace or install weather stripping (p. 114) HO: install storm window (p. 25) HO Replace caulk at all fixed joints (p. 110) HO Reposition interior stop (p. 48) HO: install weather stripping (p. 114) HO; install replacement channels (p. 20) HOA; replace window (p. 86) Install weather stripping (p. 114) HO: install storm door (p. 64) HO Reposition door stop (p. 48) HO: install weather stripping o 114) HO Install weather stripping (p. 114) HO: install storm window (p. 25) HO Remove rotted wood and patch with epoxy (p. 123) DO: replace sill (p. 17) HO Install door sweep (p. 115) DO: install door shoe (p. 117) HO;
install weatherproof threshold (p. 116) HO Replace sill (p. 61) BO Install weather stripping (p. 114) HO Reposition stops (p. 48) HO: install weather stripping (p. 114) HO Install weather stripping (p. 114) HO; caulk interior fixed joints (p. 110) HO
-----------------------
---114------------------
SEALANTS
TYPE
Silicone caulk Acrylic latex caulk (water-based) Vinyl acrylic caulk (water-based) Acrylic caulk (solvent-based) Vinyl-acetate latex caulk (water-based) Butyl rubber caulk Closed-cell foam rod Polyurethane spray foam
APPLICATION Interior and exterior trim, sills, thresholds and glass panes.
Interior and exterior metal window frames and glass panes.
Interior and exterior trim, sills, thresholds and metal frames.
Exterior door and window trim, thresholds and sills.
Narrow joints between interior glass panes and wood or metal frames.
Exterior sill-to-masonry, or metal frame-to- masonry.
Cracks and small gaps behind trim.
Large gaps behind trim and weight pocket of double-hung windows.
DURABILITY
Very durable. Paintable type may be less durable.
Moderately durable.
Moderately durable.
Very durable.
Not durable.
Moderately durable.
Very durable.
Durable.
CHARACTERISTICS
Colorless. Strong odor during application.
Flexible; expands and contracts with joint.
May require a primer.
Available in colors, or paintable. For non shifting joints. Metal surface may require primer.
Odorless. Available in colors. For small joints with limited shifting.
Strong odor. Difficult to spread and touch up.
For exterior use only.
For non-shifting joints. Hardens and cracks.
For interior use only.
Paintable after curing for one week. For exterior use only.
Good insulator. Must be sealed over with caulk.
Good insulator. Expands on application.
Must be covered and protected.
--------------------
CAULKING GAPS BEHIND INTERIOR TRIM
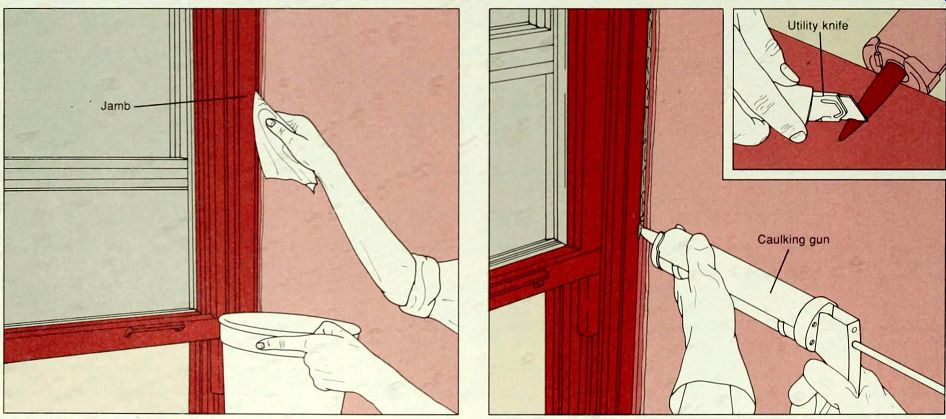
--------1. Preparing the surface. To stop air leakage around the window frame, look for gaps behind the trim. Score the paint between the trim and the wall, and carefully pry off the trim with a utility bar. Using a wire brush or a utility knife, scrape old caulk and paint off the exposed surface, and out of any gaps between the window jamb and wall. Clean the area with a mild detergent-and-water solution (above). Allow it to dry, then wipe the surface thoroughly with a clean cloth dampened with alcohol to remove all traces of moisture and adhesive. Seal gaps of 1/2 inch or less with a bead of caulk (Step 2). Fill larger gaps with insulating foam (step 3).
---2. Sealing a small crack. For gaps between 1/4 inch and 1/2 inch wide, first insert closed-cell foam rope or rods into the opening.
Use an old screwdriver to push it in, until the foam is flush with the wall. Cut the tip of a tube of water-based acrylic or silicone caulk slightly smaller than the crack width (inset). Hold the gun perpendicular to the crack, and squeeze the trigger, forcing a continuous bead of caulk along the crack. Move the gun steadily, completing one entire side of the window at a time. Turn the plunger handle down or snap the release lever to stop the flow. Reinstall the trim, driving slightly larger finishing nails through the old holes.
CAULKING GAPS BEHIND INTERIOR TRIM (continued)
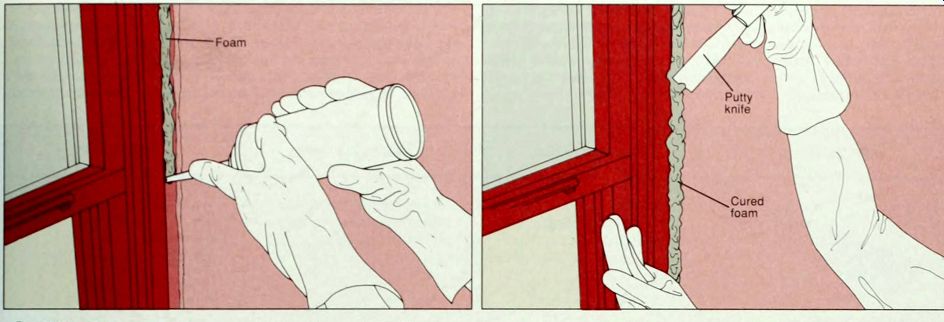
----------3 Filling large gaps. Fill gaps wider than 1/2 inch with polyurethane spray foam. Open the window for ventilation, and put on rubber gloves and safety goggles. Attach the applicator tube to the nozzle, shake the can. and turn it at a 45-degree angle (or upside down if indicated). Insert the applicator tip into the gap and press the trigger nozzle lightly: the foam will quickly swell to fill the gap (above).
Draw the applicator steadily along the gap Release the nozzle about 5 inches before the end of the gap but continue to move the applicator to the end. then pull it up. Do not apply more foam: it will continue to expand to fill the remaining space in the gap. Allow the foam to cure for 8 hours, or overnight if possible. It will change in consistency from whipped cream to solid sponge. Trim off excess foam with a very sharp putty knife (above) or utility knife, and sand lightly.
CAULKING AROUND INTERIOR TRIM
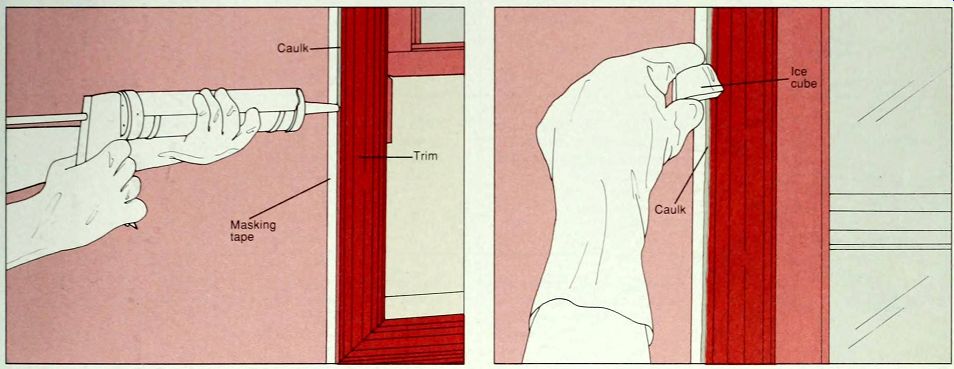
1. Applying caulk around trim. To seal air leaks around the window without removing the trim, caulk the joint between trim and wall. Clean the outer edge of the trim using a mild deter gent solution, rinse and dry. Then wipe the joint with a cloth dampened with alcohol. Stick lengths of masking tape on each side of the joint, as shown, to maintain a straight edge Prepare a tube of caulk, cutting the tip at a narrow 45-degree angle, and lay a continuous bead between the trim and the wall (above). Pull the gun rather than pushing it to make a neater bead. Seal miter joints and stool and apron joints as well.
2. Smoothing the caulk. Wait until the caulk is no longer tacky, but has not yet formed a skin. Then, wearing rubber gloves, gently slide an ice cube over the center of the bead of caulk (above) to make a slightly concave surface. Alternatively, smooth the caulk using a gloved finger moistened with a detergent-and-water solution. If you applied masking tape pull it off. and cut away excess caulk with a sharp utility knife.
WEATHER STRIPPING
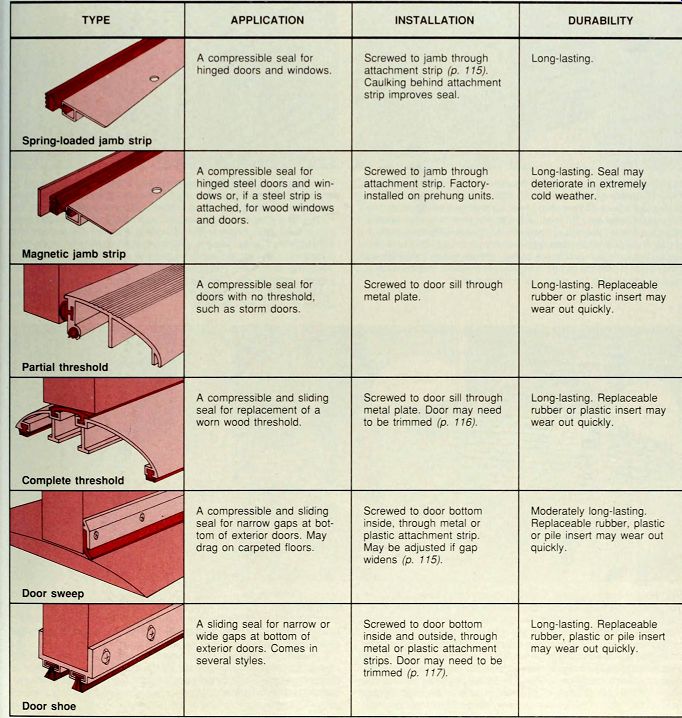
Weather stripping must provide an airtight seal between the moving parts of a door or window, yet allow them to open and close repeatedly without losing its shape or resilience. To fulfill this dual role, weather stripping should be carefully matched to its job. Listed below is a wide variety of weather-stripping products, along with their recommended applications, installation procedures and relative durability.
For best results, weather-strip all contacting surfaces of windows and doors. Use a sliding seal, such as a V strip, in areas where two parts slide past each other, such as a sash channel. Use a compressible seal, such as a foam strip, where two parts press against each other, such as a door stop. Give special attention to the bottom of the exterior door. Space between the door and threshold not only lets in air, but also water and dirt. The simple addition of a door sweep will close off a narrow gap An even better seal can be obtained by installing a door shoe. or replacing a worn threshold with a weatherproof threshold.
After choosing weather stripping, take time to prepare the surface and install it correctly. Carefully remove all traces of old caulk or weather stripping with a utility knife or single-edge razor blade.
Use rubbing alcohol or mineral spirits to remove old adhesive.
Wash the surface with a mild detergent-and-water solution; residue from mineral spirits will damage many synthetic products Finally, install the weather stripping carefully to ensure a snug, permanent fit. and inspect it periodically for damage.
--------------
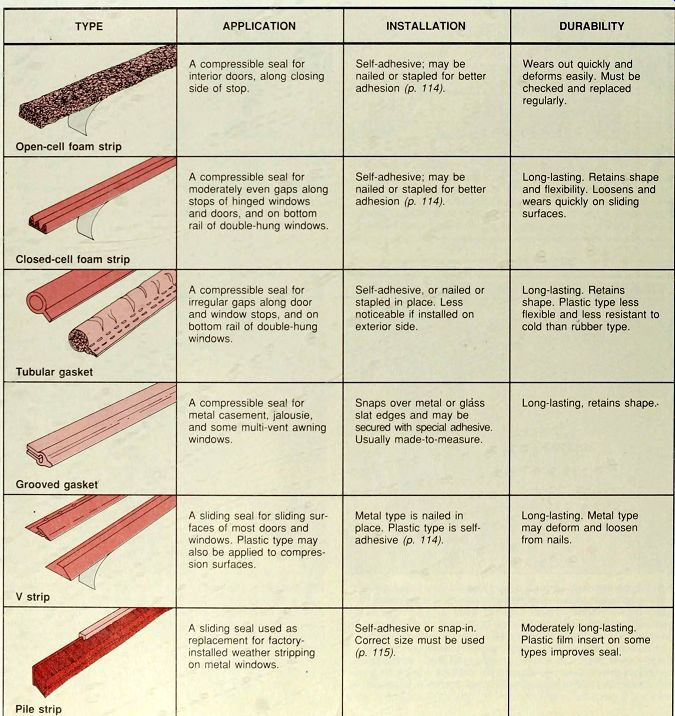
TYPE - APPLICATION - INSTALLATION - DURABILITY
TYPE
Closed-cell foam strip
Open-cell foam strip
Tubular gasket
Grooved gasket
V strip
Pile strip
APPLICATION
A compressible seal for interior doors, along closing side of stop.
A compressible seal for moderately even gaps along stops of hinged windows and doors, and on bottom rail of double-hung windows.
A compressible seal for irregular gaps along door and window stops, and on bottom rail of double-hung windows.
A compressible seal for metal casement, jalousie, and some multi-vent awning windows.
A sliding seal for sliding surfaces of most doors and windows. Plastic type may also be applied to compression surfaces.
A sliding seal used as replacement for factory installed weather stripping on metal windows.
INSTALLATION
Self-adhesive; may be nailed or stapled for better adhesion.
Self-adhesive; may be nailed or stapled for better adhesion.
Self-adhesive, or nailed or stapled in place. Less noticeable if installed on exterior side.
Snaps over metal or glass slat edges and may be secured with special adhesive.
Usually made-to-measure.
Metal type is nailed in place. Plastic type is self adhesive.
Self-adhesive or snap-in.
Correct size must be used.
DURABILITY
Wears out quickly and deforms easily. Must be checked and replaced regularly.
Long-lasting. Retains shape and flexibility. Loosens and wears quickly on sliding surfaces.
Long-lasting. Retains shape. Plastic type less flexible and less resistant to cold than rubber type.
Long-lasting, retains shape.
Long-lasting. Metal type may deform and loosen from nails.
Moderately long-lasting.
Plastic film insert on some types improves seal.
----------------
----------------
TYPE
Spring-loaded jamb strip Magnetic jamb strip Partial threshold Complete threshold S Door sweep
Door shoe
APPLICATION
A compressible seal for hinged doors and windows.
A compressible seal for hinged steel doors and windows or, if a steel strip is attached, for wood windows and doors.
A compressible seal for doors with no threshold.
such as storm doors.
A compressible and sliding seal for replacement of a worn wood threshold.
A compressible and sliding seal for narrow gaps at bottom of exterior doors. May drag on carpeted floors.
A sliding seal for narrow or wide gaps at bottom of exterior doors. Comes in several styles.
INSTALLATION
Screwed to jamb through attachment strip.
Caulking behind attachment strip improves seal.
Screwed to jamb through attachment strip. Factory installed on prehung units.
Screwed to door sill through metal plate.
Screwed to door sill through metal plate. Door may need to be trimmed.
Screwed to door bottom inside, through metal or plastic attachment strip.
May be adjusted if gap widens.
Screwed to door bottom inside and outside, through metal or plastic attachment strips. Door may need to be trimmed.
DURABILITY
Long-lasting.
Long-lasting. Seal may deteriorate in extremely cold weather.
Long-lasting. Replaceable rubber or plastic insert may wear out quickly.
Long-lasting. Replaceable rubber or plastic insert may wear out quickly.
Moderately long-lasting.
Replaceable rubber, plastic or pile insert may wear out quickly.
Long-lasting. Replaceable rubber, plastic or pile insert may wear out quickly.
-------------------
WEATHER-STRIPPING WINDOWS AND DOORS
----
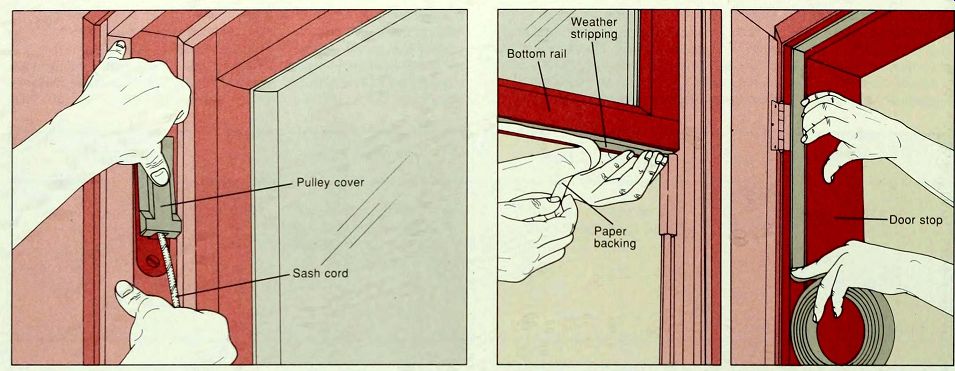
Installing a pulley cover. Clean the area around the pulley and wipe it with alcohol to ensure a clean, dry surface. Apply the self-adhesive gasket to the back of the pulley cover, leaving the backing paper on.
Position the cover over the pulley and snap the sash cord into the opening at the bottom of the seal (above). Trace around the cover with a pencil. Then peel off the backing paper and press the cover firmly in place. Make starter holes for the screws with an awl and a mallet, and screw them in until the gasket is slightly compressed. Pull the sash cord up and down a few times until it slides easily.
-------- Installing foam-strip weather stripping. Apply closed-cell foam strips to compression surfaces such as the undersides of bottom sash rails (above, left) and the stops of hinged doors and windows (above, right). Use a paint scraper to remove loose paint and old weather strip ping or caulk from the area you are working on. Wash the surface with a detergent-and-water solution. Rinse and dry it, then wipe with a cloth dampened in alcohol to remove grease and adhesive. To install the foam strip, start at one end of the sash or stop and slowly peel off the paper backing as you press the strip into position. Cut the strip with scissors after applying it to each straight surface. Secure the strip with staples for a longer-lasting grip.
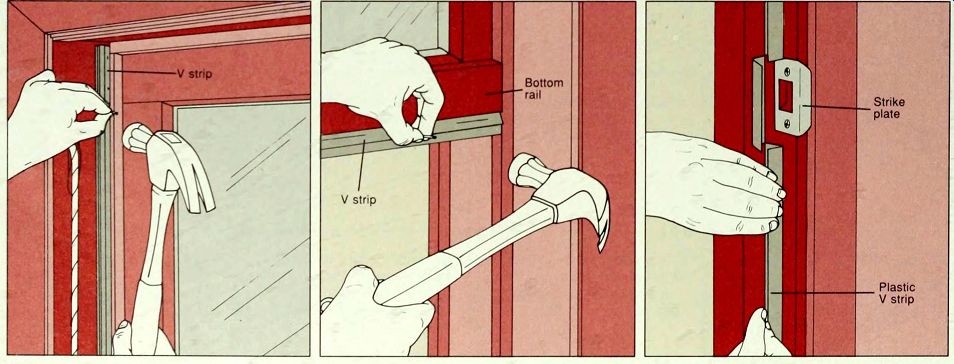
----Installing metal or plastic V strips. Remove the interior stop on one side of a double-hung window, and then the lower sash. If you plan to use the upper sash, remove it and weather-strip its channels as well. Otherwise, caulk the joint between the upper sash and parting strip. Prepare the surface as for foam-strip weather stripping (step above). Measure the sash channel from the stool to a point 2 inches higher than the bottom rail of the upper sash. Using tin snips, cut two pieces of metal V strip to this length.
Measure the bottom rail of the upper sash and cut one more strip to this exact length.
Position the strips in the lower sash channels, butting the V opening against the parting strip. Nail the strips in place, using small flat-headed nails spaced at 1-inch intervals (above, left). Position the shorter strip along the bottom rail of the upper sash, with the V opening downward (above, center), and nail it in place. Finally, reinstall the lower sash, and apply closed-cell foam to the underside of the lower rail.
If you prefer, install self-adhesive plastic V strip, and staple the strips in place for better adhesion. Plastic V strip can also be used on compression surfaces, such as the stop of a door (above, right) or the bottom rail of a lower sash.
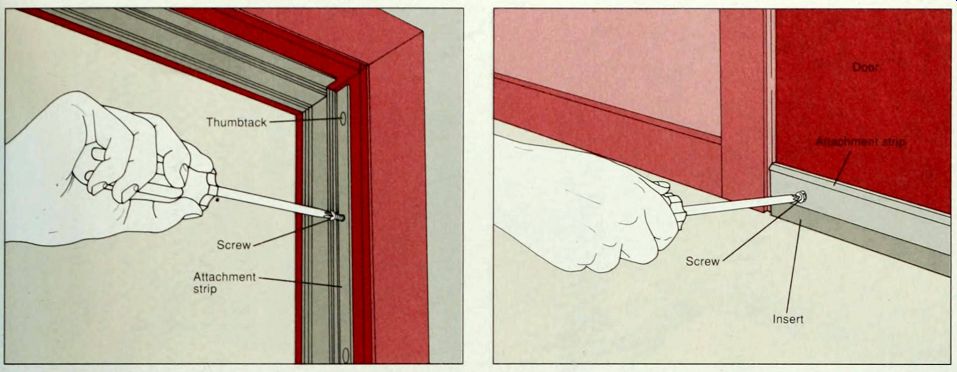
---------Installing spring-loaded weather stripping. Close the door and. from the interior, measure the height of the jamb Cut the strip to exact size with a hacksaw and miter box. With thumbtacks, position the attachment strip on the door jamb, the contact surface against the door. You may need to cut out a section of the weather stripping for the latch plate. Open the door to test the spring mechanism: it should depress one third of the way into its channel when the door closes. Reposition the weather stripping, if necessary. Then, removing one tack at a time, fasten the attachment strip securely to the jamb with the screws provided (above).Cut and position a strip for the head jamb using the same procedure.
---------Installing a door sweep. To block a narrow gap between the door and the threshold, install a simple door sweep with a replaceable insert. Buy one the exact width of your door or cut it to size using a hacksaw and miter box. Close the door and. from the interior, place the attachment strip against the door bottom, ensuring that the flexible insert covers the gap entirely. Mark the positions of the screw holes. Drill pilot holes, then fasten the sweep to the door with the screws provided (above).
REPLACING FACTORY-INSTALLED PILE STRIPS
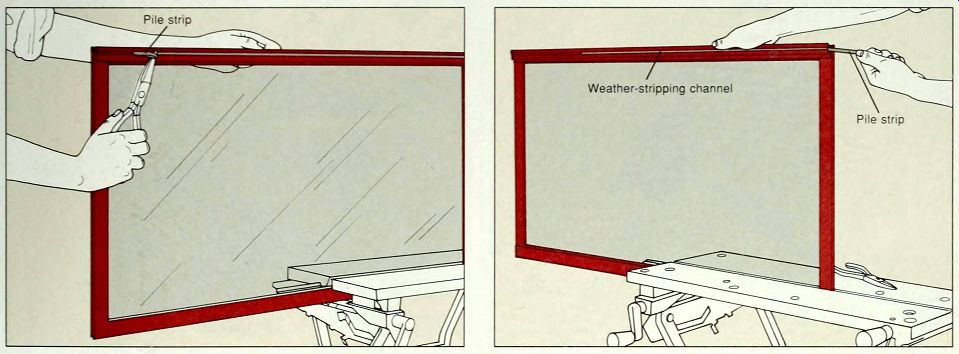
----1. Removing a factory-installed pile strip. Most metal windows I are available with pile weather stripping already installed. Replace it when the pile becomes matted or begins to look worn. Remove the sash from its tracks. Check both ends of the pile strip for two tiny metal tabs that may be securing it. Bend them up gently with an old screwdriver. Using long-nose pliers, grasp the strip and pull it out of its narrow channel (above). Take the strip to a window repair specialist for an exact replacement.
--------2. Replacing the pile strip. Clean the weather-stripping channel F with an old toothbrush. Cut the pile strip with scissors to the length of the channel. Feed a thick pile strip back into its channel from one end (above). Place a thin pile strip over the channel, then roll a splining tool along the pile to snap the strip back into its channel. Push the metal tabs back over the ends of the strip, and replace the sash in its track in the frame.
INSTALLING A WEATHERPROOF THRESHOLD
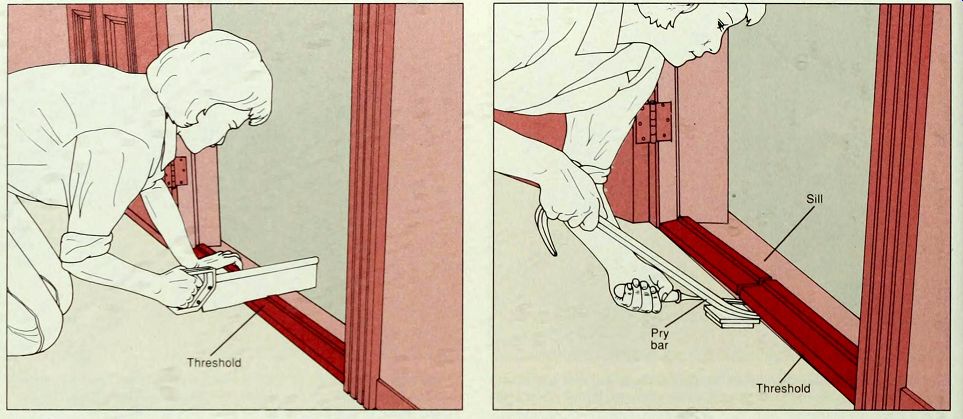
----------1. Cutting through the old threshold. Remove a worn wood I threshold and replace it with one that doubles as weather stripping. Cut away old caulk from around the threshold with a utility knife. If stops are nailed or screwed to the jambs, carefully remove them first. If you can. tap the threshold out with a mallet, then go to step 3. If the jambs have built-in stops, use a backsaw to cut through the middle of the threshold (above), taking care not to cut into the sill beneath it.
---2. Removing the old threshold. Push the end of an old screwdriver under the cut edge of the threshold, tapping it in with a mallet if necessary. Then fit the tip of a pry bar into the gap created, as shown, and remove the screwdriver. Place a block of wood under the pry bar to protect the sill, and ease up one cut end of the threshold. Pull the section out from under the door jamb by hand. Tap the other section out with a mallet. Use a hacksaw to cut off any nails protruding from the jambs.
 ----------3.
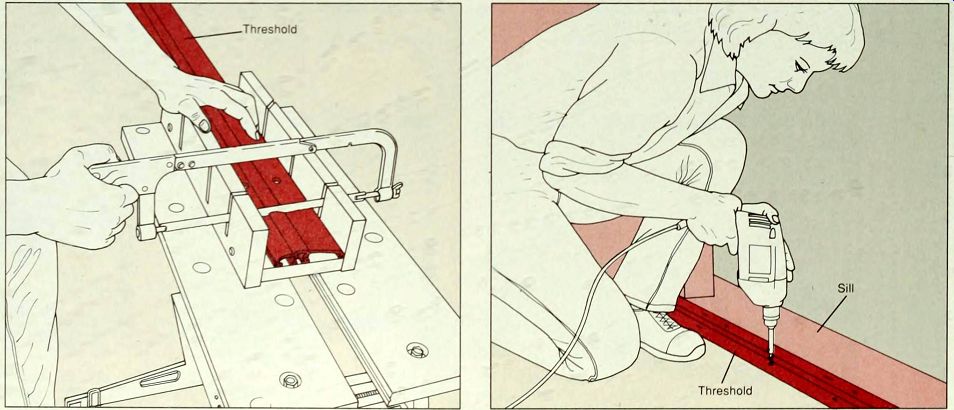
Cutting the new threshold. Measure the old threshold andmark the new one
to be cut to the same length and shape. Use a combination square to measure
and mark any notches that need to be cut. Place the new threshold in a
miter box and cut it with a hacksaw (above). Position the threshold on
the sill and close the door to ensure that the door contacts the rubber
or plastic insert. Re-cut or reposition the threshold, if necessary. Mark
the positions of the screw-holes with a pencil, then remove the threshold.
----4. Installing the threshold. Drill pilot holes for the threshold screws; wrap masking tape around the drill bit to gauge the depth of the hole. Apply caulk underneath the edges of the new threshold and reposition it on the sill. Fasten the threshold with the screws provided, using a power drill fitted with a screwdriver bit (above). If you removed the door stops, reinstall them.
INSTALLING A DOOR SHOE
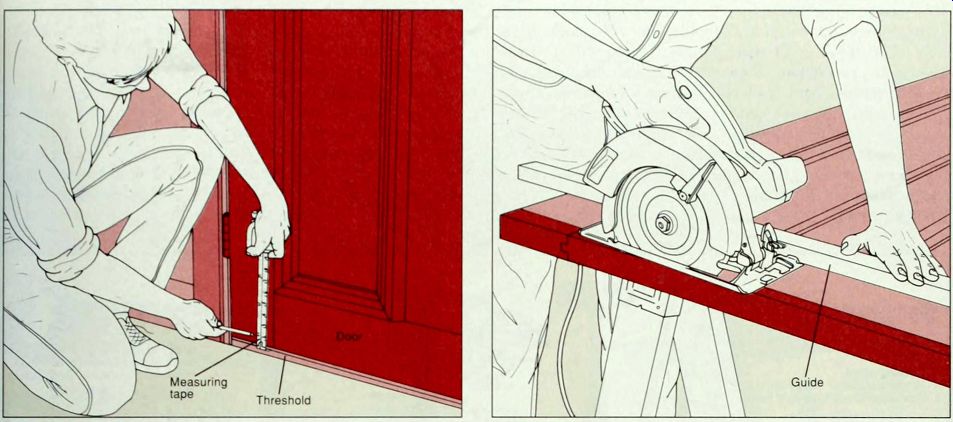
---------1. Measuring the shoe depth. If there is a gap between the door I and the threshold, install a door shoe to stop air and water leakage. For the style shown here, hold the door shoe in place on the door, and measure from the door bottom to the shoe bottom. Remove the shoe, close the door and mark this measurement on the door near each corner (above), measuring up from the threshold.
----------2. Cutting the door. Remove the door from its hinges (page 45) F and rest it across two sawhorses. Using a straightedge, draw a line connecting the two marks on the door. Clamp a straight piece of wood to the door, parallel with the line, as a guide for the base plate of a circular saw. Cut the door along the line. Smooth the rough edge with medium-grit sandpaper on a sanding block, and seal the bottom of the door with water-repellent preservative or varnish.
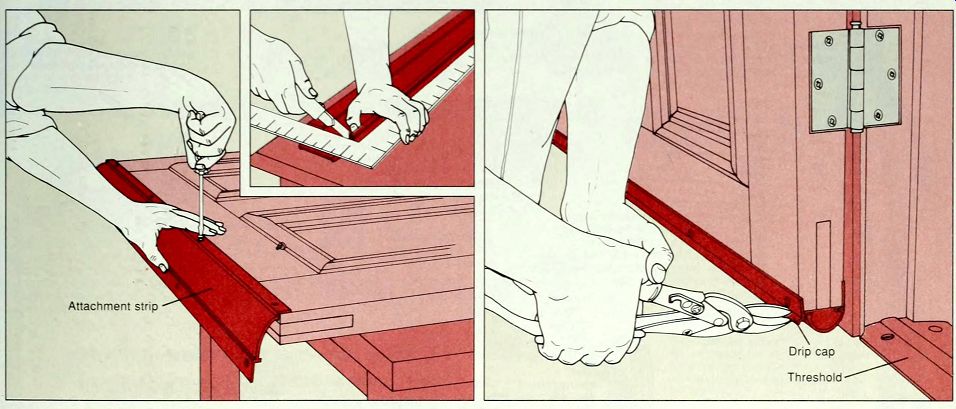
-----------3. Installing the shoe. Measure the exact width of the door and mark this measurement on the door shoe. Using a carpenter s square, cut through the rubber insert with a sharp utility knife (inset), then cut through the attachment strips with a hacksaw. Position the shoe on the bottom of the door, with the drip cap on the exterior side of the door. Make starter holes for the screws with an awl and screw the attachment strips to the door (above, left). Re hang the door. The shoe should fit snugly against the threshold and allow the door to swing smoothly. Loosen the screws to adjust the attachment strip at the screw slots, if necessary. Trim the drip cap at both ends with tin snips (above, right) if it impedes closing the door.