This section introduces tools and techniques useful for repairing windows and doors, from drilling holes to patching rot. You can handle most repairs with the tools pictured below.
Since many jobs fall into the realm of carpentry, you may need to do precision work with wood chisels or planes. If you haven't used them before, practice first to get a feel for them. Power tools make cutting and drilling much easier, and can be rented from a tool rental shop.
Accurate measuring is essential in carpentry. Use a carpenter's square to mark for square cuts and a combination square for marking 45-degree angles. A carpenter's level will help you to determine whether something is level (horizontal) or plumb (vertical). To operate a router, power drill or circular saw accurately, use a commercial guide or clamp a straight piece of wood to the cutting surface.
Avoid cheap tools and choose the right tool for the job. Clean metal tools with a cloth moistened with a few drops of light oil. (Avoid getting oil on the handles.) To remove rust, rub metal surfaces with fine steel wool or an emery cloth. Keep blades and bits well sharpened; a dull blade can be dangerous. Protect tools in a sturdy toolbox, with a secure lock if you have children.
Cleaning and inspecting doors and windows regularly keeps them operating smoothly. Repair minor damage immediately. Use epoxy to built up rolled wood; it penetrates the wood fibers and slops rot from spreading.
Adding sawdust to the mixture will help it blend with the wood; follow the manufacturer's instructions. Maintain a good coat of paint on doors and windows to prevent moisture from penetrating the wood.
A sturdy ladder is essential to reach high windows and skylights.
When climbing, always keep your hips between the two vertical rails. Don't reach over; move the ladder. Don't stand on the lop step of a stepladder, and keep your hips at or below the top step of a straight ladder. Before working on a roof, read the safely instructions.
To prevent accidents, keep the work area clean and uncluttered. Wear heavy work gloves to prevent cuts w hen working with sharp materials such as flashing, and rubber gloves when using chemicals. Wear safely goggles when working with power tools. When changing a bit or a blade, attaching a guide or making an\ adjustments, make sure the tool is turned off and unplugged. Always check for nails embedded in wood before using a power tool.
-------------
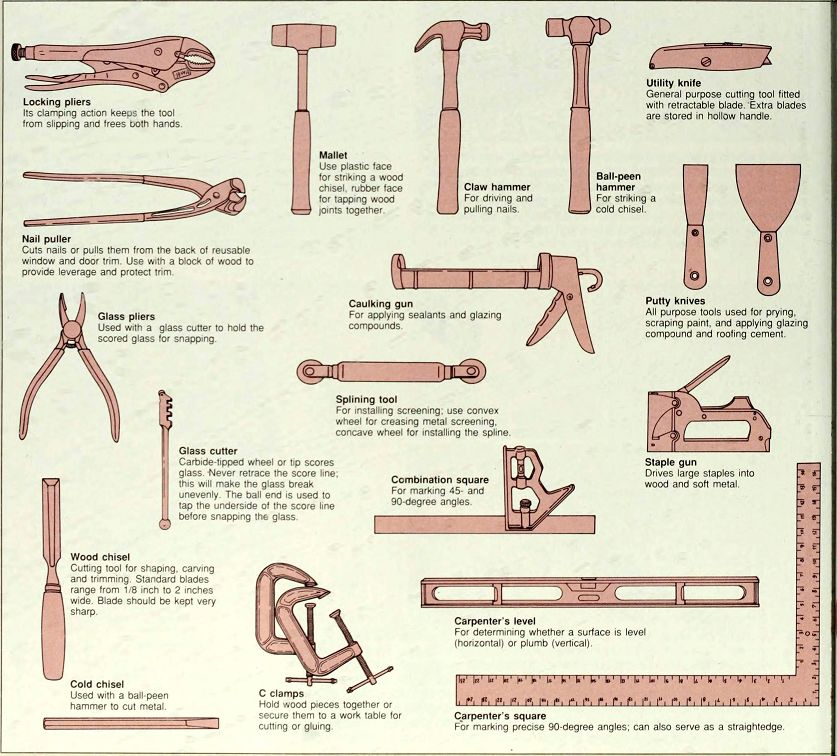
Locking pliers
Its clamping action keeps the tool from slipping and frees both hands.
Mallet Use plastic face for striking a wood chisel, rubber face for tapping wood joints together.
Utility knife General purpose cutting tool fitted with retractable blade. Extra blades are stored in hollow handle.
Claw hammer For driving and pulling nails.
Ball-peen hammer For striking a cold chisel.
Nail puller
Cuts nails or pulls them from the back of reusable window and door trim. Use with a block of wood to provide leverage and protect trim.
Glass pliers Used with a glass cutter to hold the scored glass for snapping.
Caulking gun--For applying sealants and glazing compounds Putty knives All purpose tools used for prying, scraping paint, and applying glazing compound and roofing cement.
Splining tool
For installing screening; use convex wheel for creasing metal screening, concave wheel for installing the spline.
Glass cutter--Carbide-tipped wheel or tip scores glass Never retrace the score line; this will make the glass break unevenly. The ball end is used to tap the underside of the score line before snapping the glass.
Combination square--For marking 45- and 90-degree angles.
Staple gun--Drives large staples into wood and soft metal.
Wood chisel--Cutting tool for shaping, carving and trimming. Standard blades range from 1/8 inch to 2 inches wide. Blade should be kept very sharp.
Cold chisel--Used with a ball-peen hammer to cut metal.
Carpenter s level--For determining whether a surface is level (horizontal) or plumb (vertical).
C-clamps--Hold wood pieces together or secure them to a work table for cutting or gluing.
Carpenter's square--For marking precise 90-degree angles; can also serve as a straightedge.
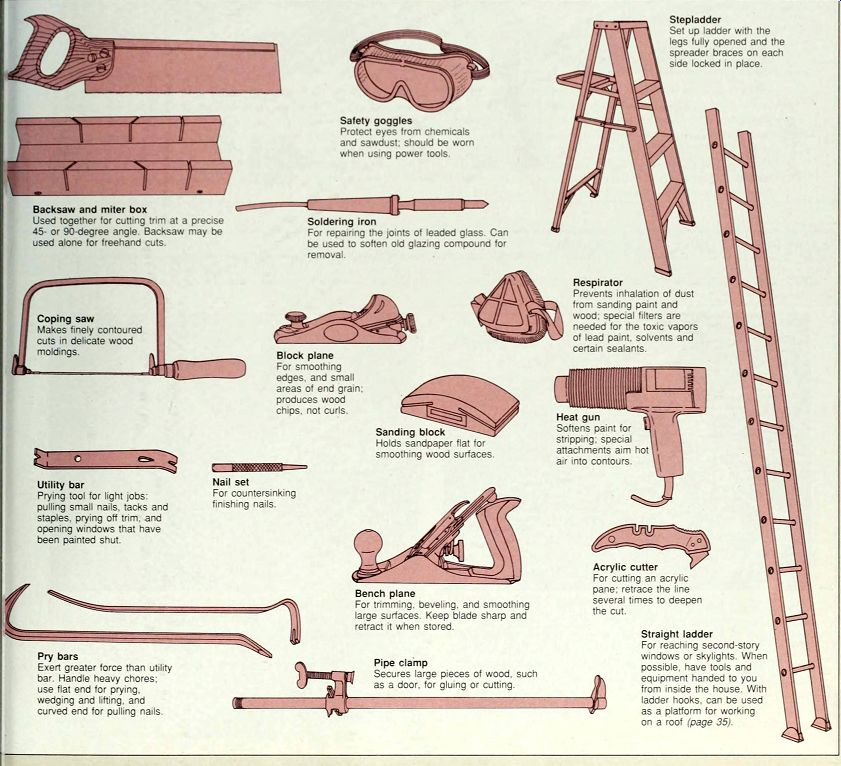
Safety goggles Protect eyes from chemicals and sawdust; should be worn when using power tools.
Backsaw and miter box Used together for cutting trim at a precise 45- or 90-degree angle.
Backsaw may be used alone for freehand cuts.
Soldering iron For repairing the joints of leaded glass. Can be used to soften old glazing compound for removal.
Coping saw--Makes finely contoured cuts m delicate wood moldings.
Stepladder--Set up ladder with the legs fully opened and the spreader braces on each side locked m place.
Block plane--For smoothing edges, and small areas of end gram; produces wood chips, not curls.
Respirator--Prevents inhalation of dust from sanding paint and wood; special filters are needed for the toxic vapors of lead paint, solvents and certain sealants.
Utility bar--Prying tool for light jobs; pulling small nails, tacks and staples, prying off trim, and opening windows that have been painted shut.
Sanding block--Holds sandpaper flat for smoothing wood surfaces.
Nail set--For countersinking finishing nails.
Heat gun Softens paint for stripping; special attachments aim hot air into contours.
Bench plane For trimming, beveling, and smoothing large surfaces. Keep blade sharp and retract it when stored.
Acrylic cutter--For cutting an acrylic pane; retrace the line several times to deepen the cut.
Pry bars Exert greater force than utility bar. Handle heavy chores; use flat end for prying, wedging and lifting, and curved end for pulling nails.
Pipe clamp--Secures large pieces of wood, such as a door, for gluing or cutting.
Straight ladder--For reaching second-story windows or skylights. When possible, have tools and equipment handed to you from inside the house. With ladder hooks, can be used as a platform for working on a roof.
---------------
---------------
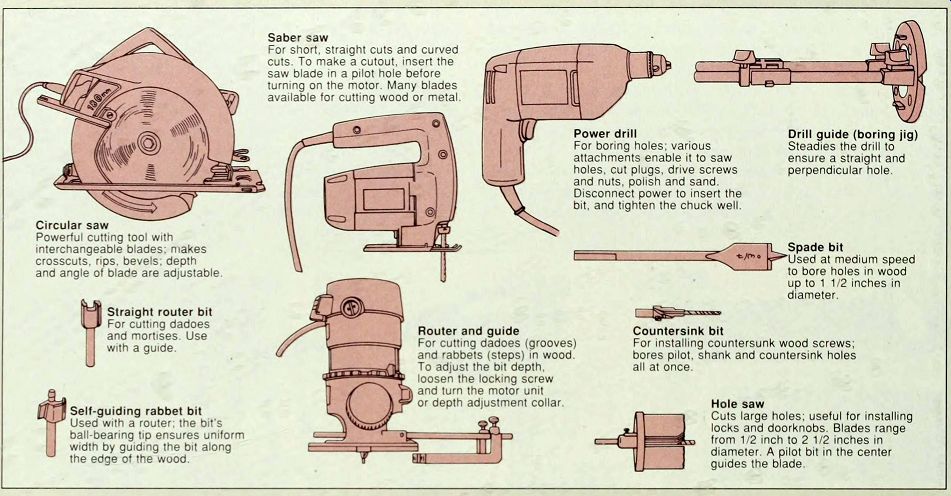
POWER TOOLS
Saber saw--For short, straight cuts and curved cuts. To make a cutout, insert the saw blade in a pilot hole before turning on the motor. Many blades available for cutting wood or metal.
Circular saw--Powerful cutting tool with interchangeable blades: makes crosscuts, rips, bevels, depth and angle of blade are adjustable.
Straight router bit--For cutting dadoes and mortises. Use with a guide.
Self-guiding rabbet bit Used with a router; the bit's ball-bearing tip ensures uniform width by guiding the bit along the edge of the wood.
Power drill--For boring holes: various attachments enable it to saw holes, cut plugs, drive screws and nuts, polish and sand.
Disconnect power to insert the bit, and tighten the chuck well.
Drill guide (boring jig)--Steadies the drill to ensure a straight and perpendicular hole.
Spade bit paused at medium speed to bore holes in wood up to 1 1/2 inches in diameter.
Router and guide--For cutting dadoes (grooves) and rabbets (steps) in wood.
To adjust the bit depth, loosen the locking screw and turn the motor unit or depth adjustment collar.
Countersink bit--For installing countersunk wood screws; bores pilot, shank and countersink holes all at once.
Hole saw--Cuts large holes; useful for installing locks and doorknobs. Blades range from 1/2 inch to 2 1/2 inches in diameter. A pilot bit in the center guides the blade.
--------------
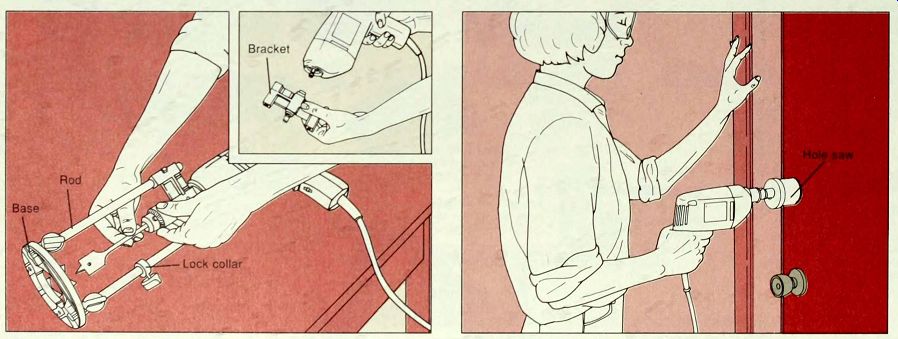
USING POWER DRILL ACCESSORIES
-----------
Assembling a power drill guide. Use a drill guide to bore a straight, perpendicular hole. To attach the guide, remove the chuck using its geared key. Screw the guide bracket on the end of the drill, then replace the chuck. Slide the rods, with the base attached, into the bracket and install the drill bit.
Position the base flat against the work surface, with the rods protruding if being used on a door edge. Adjust the drilling depth by sliding the base along the rods, and securing the lock collar at the desired stopping point.
----------- Using a hole saw. A hole saw can be used for installing a lock cylinder in a door, as shown here. Fit a power drill with a hole saw of the correct diameter, and wear safety goggles to protect your eyes from sawdust. Start the drill before applying it to the surface to be cut, and drill straight through the wood, keeping an even pressure on the drill. To avoid splintering, stop drilling as soon as you feel the pilot bit pierce the opposite side. Keep the blade spinning as you pull it out, then complete the hole from the other side.
MAKING STRAIGHT CUTS WITH A CIRCULAR SAW
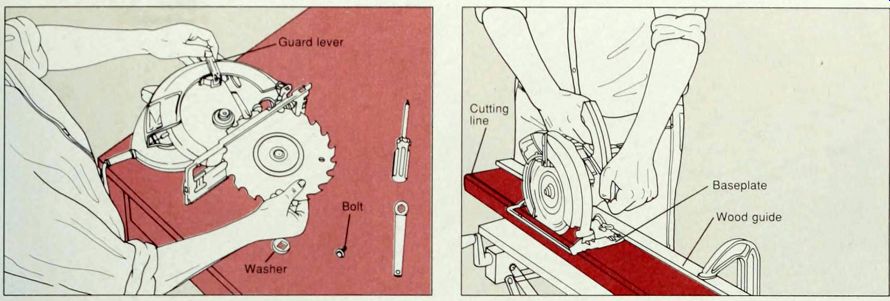
--------Changing a circular saw blade. Use a wrench to remove the bolt securing the blade to the saw shaft, or arbor: loosen it counterclockwise and pull the bolt and its washer free. Retract the blade guard by pulling its lever Lift the blade off the arbor and slide in the new blade (above). Resecure the washer and nut by hand. Then let the saw blade's teeth dig into a piece of scrap wood while you tighten the nut one eighth of a turn with the wrench. Do not overtighten.
--------- Using a circular saw. Measure from the edge of the saws baseplate to the blade, and clamp a straight piece of wood this distance from the cutting line as a guide. Remove any nails from the wood. Set the saw s cutting depth to the thickness of the wood.
Wearing safety goggles, start the motor; let it reach full speed be fore cutting. Feed the saw steadily into the wood from one end, running the edge of the baseplate along the guide (above). Wait until the blade stops revolving before putting the saw down.
ROUTING RABBETS AND DADOES

Cutting a rabbet. Clamp the wood firmly and remove any nails.
Fit the router with a rabbet bit of the correct width; choose a bit with a built-in guide, called a pilot, to help you keep the rabbet straight. Set the baseplate on the wood with the bit hanging over the edge and adjust the bit to the correct depth. Wearing safety goggles, turn on the router, set the bit 1 inch from the left end along the side to be cut and feed the bit into the wood until halted by the pilot. Then move the router steadily from left to right (above). Complete the rabbet by reversing the direction of the router to remove the uncut inch at the beginning.
Cutting a dado. Draw two lines indicating the width of the channel to be cut; fit the router with a dado bit of this width. Measure from the edge of the bit to the edge of the baseplate, and clamp a straight piece of wood this distance from one of the cutting lines as a guide. Adjust the bit to the correct depth. Wearing safety goggles, turn on the router and feed the bit into the wood at one end. Move the router from left to right, running the edge of the baseplate along the guide.
CHISELING A MORTISE
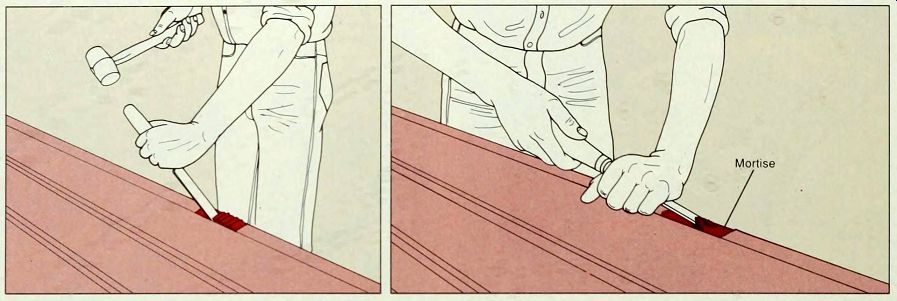
Chiseling a mortise. Trace the outline of the mortise, then score the outline with a utility knife or a sharp chisel. Holding the chisel at a 90-degree angle to the wood and using hand force only, make a series or shallow parallel cuts within the outlined area. Then, holding the chisel bevel side down, position its tip at a 30-degree angle in each of these cuts, and tap the end of the chisel handle with a mallet (above, left). Keeping the bevel side down to prevent the chisel from cutting too deeply, slice the wood away in thin layers. Repeat until you reach the desired depth, then turn the chisel bevel side up and carefully smooth out the recess (above, right).
SMOOTHING WOOD WITH A PLANE
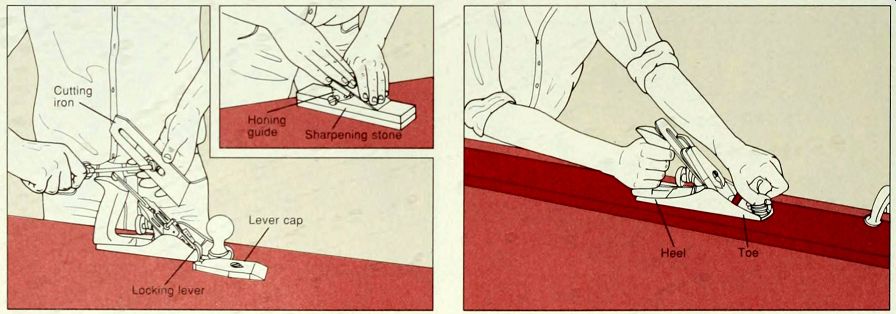
-----------Sharpening the blade. Lift the locking lever to free the lever cap, loosening the lever cap screw if necessary. Lift out the irons. Wipe dust off the irons and the plane body. Separate the irons (above) by unscrewing them. Place the cutting iron in a honing guide at a 25-degree angle to maintain the bevel and rub it gently back and forth against an oiled sharpening stone (inset). Turn the iron over and pull the blade flat against the sharpening stone to smooth the edge. Wipe the blade and reassemble the plane by reversing the steps you took to disassemble it.
---------Using a bench plane. Before cutting into a wood window or door, practice planing a scrap piece of wood. Check that the blade is sharp and not protruding more than 1/16 inch. Clamp the wood to a workbench. Always use a bench plane in the direction of the wood grain: use a block plane on end grain. Apply pressure to the toe of the plane at the beginning of each stroke, then gradually shift the pressure to the heel as you finish the cut. The wood should curl off in thin layers. If the plane jerks or cuts roughly, you are applying too much pressure or the blade is protruding too far.
PACKING A WORN SCREW HOLE
---------
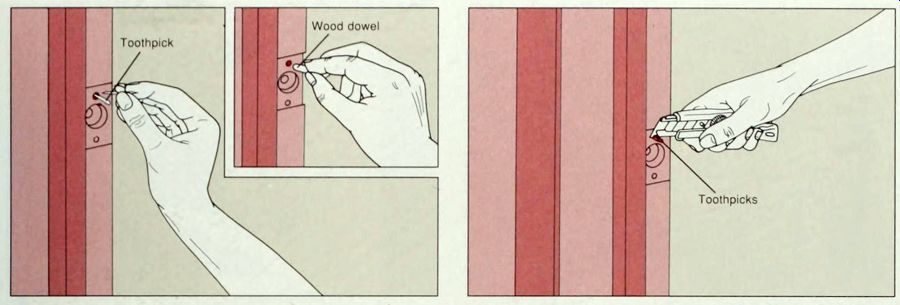
1. Plugging a screw hole with toothpicks. To refurbish a screw hole that is enlarged or stripped, pack it with wood. Remove the strike plate, hinge plate or other hardware.
Apply carpenter's glue liberally to several toothpicks, and pack them tightly into the screw hole (above). Alternatively, you can insert a wood dowel into the hole. Allow the glue to dry for at least 20 minutes.
2. Reinserting the screw. Use a utility knife to cut the tooth picks flush with the surface. If you used a wood dowel, trim it with a wood chisel, then drill a pilot hole into it for the screw.
Replace the strike plate or hinge plate and use longer screws for more stability.
PATCHING ROTTED WOOD
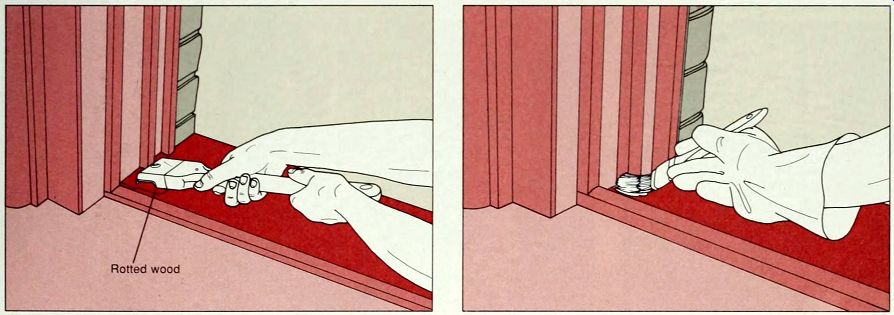
-----1. Scraping away the rot. Look for rotted wood on the top surface of a sill or threshold, at sash and frame joints and under areas of peeling or chipped paint. Scrape away paint flakes and check for loose, graying wood fibers. Push an awl into the wood to test the area for softness. Wood that crumbles instead of splintering is weakened by rot. Use a paint scraper (above, left) or a wire brush to scrape out the softened wood down to healthy wood.
--------2. Applying the epoxy compound. Mix epoxy resin and hardener according to the manufacturer's instructions. Wear safety goggles and heavy rubber gloves, and work in a well ventilated area: choose a warm, dry day for best results. Use an old paintbrush to apply the epoxy compound to the damaged area, filling all cracks and holes completely. Then cover the epoxy with a sheet of plastic and smooth it with a block of wood. Allow the epoxy to cure overnight and remove the plastic. Smooth the surface with sandpaper or a metal file.
CLEANING WINDOWS AND DOORS
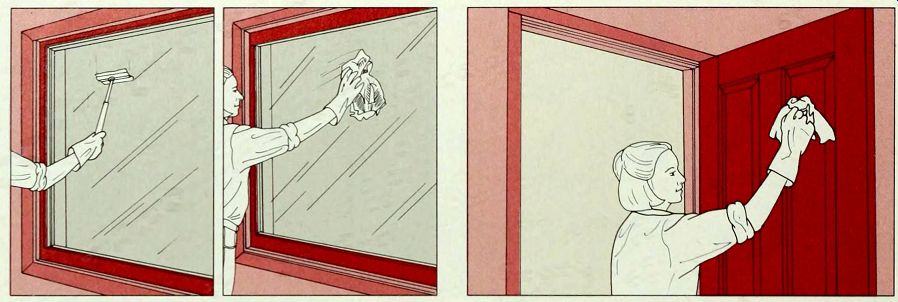
-----------Washing a window. Use a squeegee and a solution of 3/4 cup ammonia and 2 1/2 gallons water to wash window panes. Scrub the glass with the squeegee sponge, then use the rubber blade to wipe off the solution (above, left), angling the squeegee blade to force the liquid to drip into a lower corner. Dry the glass with crumpled newspaper, wiping in a circular motion (above, right). Use a cloth with the same solution to clean the frame and sill. If you notice mildew, rinse the surface well and wash it with bleach (next step). If there are signs of wood rot. treat it.
------------Washing a door. Wash the door with a soft cloth and a mild detergent-and-water solution. If there are signs of mildew (dark green to black discolorations) wash the area with a solution of 1 cup household bleach and 1/2 gallon water, then rinse thoroughly.
Examine the door carefully for cracking or peeling paint. If there is only slight damage to limited areas, sand them lightly and touch up with the same finish as the original, or repaint the door. If there are signs of wood rot. treat it.
PAINTING A WINDOW

----------Removing glazing compound. Before painting a window, remove all cracked glazing compound Heat a soldering iron and touch its tip to the glazing compound.
Push the iron along the compound, lifting it from the pane (above). Take care not to burn the wood. Scrape off the com pound with a narrow, stiff putty knife and replace it.
-----------Painting a window. Remove window hardware. Scrape away peeling paint with a paint scraper or wire brush and wash all wood surfaces. Place masking tape on the glass 1/16 inch from the frame (above, left), or from the glazing compound if you are painting the exterior side. Apply paint with a 1 1/2-inch sash brush. Pull down the upper sash and raise the lower one to paint the inside and top of the upper sash. The bottom edge of the upper sash rail should be painted with exterior paint. Then slide the sashes past one another, leaving them open a few inches at each end. Finish painting any previously inaccessible parts of the sashes, and the stool and the apron. Finally, paint the window jambs after all the other sections have dried.
PAINTING A DOOR
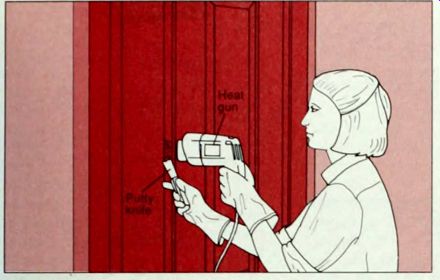
---1. Preparing the surface. Remove door hardware. Use a heat gun to remove heavy paint buildup. Wear gloves and if you suspect lead paint, a respirator. Working in a well ventilated area, aim the gun at the door from several inches away.
As the paint softens (a few seconds), move the gun ahead, scraping off the paint behind it with a stiff putty knife (above). Remove as much paint as possible, taking care not to burn the wood.
Clean off remaining paint with a chemical stripper and steel wool. Wipe the door with a cloth dampened in denatured alcohol and allow it to dry overnight.
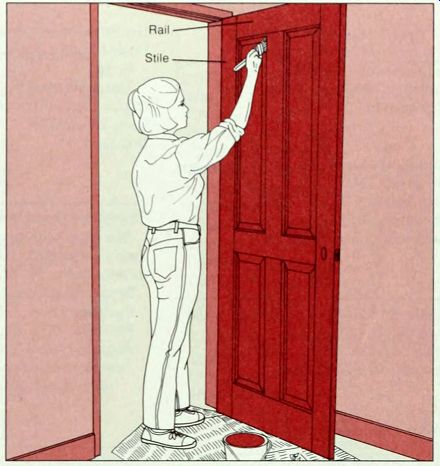
---2. Painting a panel door. Protect door hinges with masking F tape and lay newspaper on the floor. Sand the door lightly with medium-grit sandpaper on a sanding block. Load a 2 1 2-inch brush with paint to one half the bristle length and gently slap the bristles against the side of the can to knock off excess paint. Begin by painting the top edge of the door, then the panels (above). Working from top to bottom, with even strokes, paint the rails and. finally, the stiles. Remove the masking tape right away, but wait until the paint is dry to reinstall the hardware. Clean the paintbrushes thoroughly (step 4).
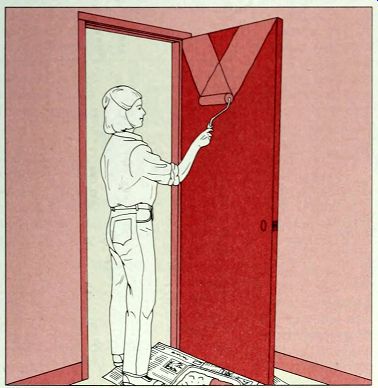
---------- 3. Painting a hollow door. Protect the door hinges with masking
tape and lay newspaper on the floor. First paint the edges of the door
with a brush. Then work paint into the nap of a paint roller until it is
heavily loaded but not dripping.
Starting at an upper corner, paint a rough pattern. Then fill in between the strokes, spreading the paint evenly. Remove the masking tape right away, but wait until the paint is dry to reinstall the hardware.
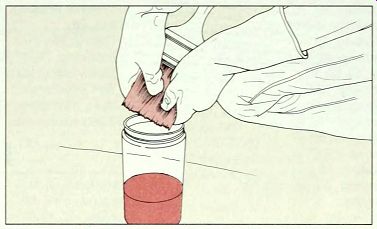
4. Cleaning paintbrushes. When cleaning alkyd paint, first squeeze out
as much paint as possible, wearing rubber gloves. Then fill a jar with
paint thinner or turpentine and agitate the brush in the solvent. When
the solvent becomes cloudy, use a fresh batch and work the solvent into
the bristles by hand (above). If necessary, leave the brush in the solvent
overnight. Remove latex paint by working warm water through the bristles.
Shake out excess water.