Repairing a broken door lock may seem a daunting prospect. After all, it is designed to keep even the most experienced intruder at bay. However, in most cases, the lock can be disassembled for cleaning and lubrication, and the cylinder and lock case removed by the homeowner for repair or replacement by a locksmith. When security of the existing lock is in question, consider installing a deadbolt as an auxiliary lock.
Most lock problems stem from either inadequate upkeep or abuse of the lock cylinder. If the lock doesn't work, first inspect your key; it may be burred, bent, or the wrong one entirely. Remove burrs with fine emery cloth and replace bent keys: have copies made by a reputable locksmith.
Diagnose your lock's problem with the help of the Trouble shooting Guide (below). It will lead you through the maze of possible solutions, which mostly involve the disassembly of a lock for cleaning or repair. Leave the servicing of lock cases to a professional. Although the covers of rim and mortise locks can be removed, they enclose an intricate assemblage of levers, slides and springs that are difficult to put back once they've fallen out.
To familiarize yourself with the type of lock securing your door, study the lock anatomies at right-chances are that your lock will resemble one of them. These models are single cylinder: opened by a key from the outside, and by hand from the inside. A double-cylinder lock needs a key both inside and out to open it. This design is intended to thwart access to the inside by someone breaking through a glass pane. However, it can also keep the household residents locked in. As a safe guard, keep the indoor key hanging near the door. Many double-cylinder locks cannot be removed by the do-it-yourselfer because their tamperproof screws require the special tools of a locksmith for disassembly.
--------------------------
TROUBLESHOOTING GUIDE
[[[DEGREE OF DIFFICULTY:
ESTIMATED TIME:
Easy H; Moderate Complex O; Less than 1 hour; 1 to 3 hours; Over 3 hours; Special tool required]]]
SYMPTOM
Key won't fit in keyhole
Key stuck in lock
Key turns in keyhole but doesn't lock
Key broken in lock
Key won't turn in keyhole or turns stiffly
Bolt won't enter bolt-hole
Doorknob loose
Doorknob of key-in-knob lock turns but bolt doesn't move
POSSIBLE CAUSE
Keyhole blocked by foreign material
Cylinder broken
Cylinder needs lubricating
Cylinder upside down
Retaining plate screws of deadbolt lock or rim lock loose
Cylinder broken
Key turned in lock when only partially inserted or when lock is jammed
Cylinder or bolt needs lubricating
Bolt binding on strike plate
Cylinder dirty or gummed up
Bolt assembly dirty
Lock case of rim or mortise lock dirty
Bolt assembly broken
Cylinder frozen
Strike plate misaligned
Knob retaining setscrew loose
Bolt assembly broken
Knob tailpiece broken
Lock is worn or of poor quality
PROCEDURE
Pick keyhole clear; if foreign material won't come out, remove cylinder for service (deadbolt lock: rim lock, ; mortise lock: for key-in-knob lock, call a locksmith)
Remove cylinder for service (deadbolt lock: rim lock: mortise lock: for key-in-knob lock, call a locksmith)
Pull key out slowly with pliers and lubricate keyhole
Turn key one-half turn and remove it
Disassemble lock and tighten cylinder retaining plate screws (deadbolt lock: rim lock
Remove cylinder for service (deadbolt lock; rim lock; key-in-knob lock: mortise lock) HO Pick broken piece from cylinder; if broken piece won't come out. remove cylinder for professional service (deadbolt lock: rim lock; mortise lock: for key-in-knob lock, call a locksmith)
Lubricate keyhole or bolt
Adjust strike plate
Remove cylinder (deadbolt lock: rim lock: key-in-knob lock: mortise lock); clean and lubricate
Remove assembly for cleaning and lubrication
Remove lock case of rim lock, or mortise lock , for cleaning and lubrication
Replace assembly
Thaw cylinder
Adjust strike plate
Tighten setscrew
Replace assembly
Replace key-in-knob lock with one of the same backset measurement, following manufacturer's instructions
Add an accessory deadbolt lock
--------------------
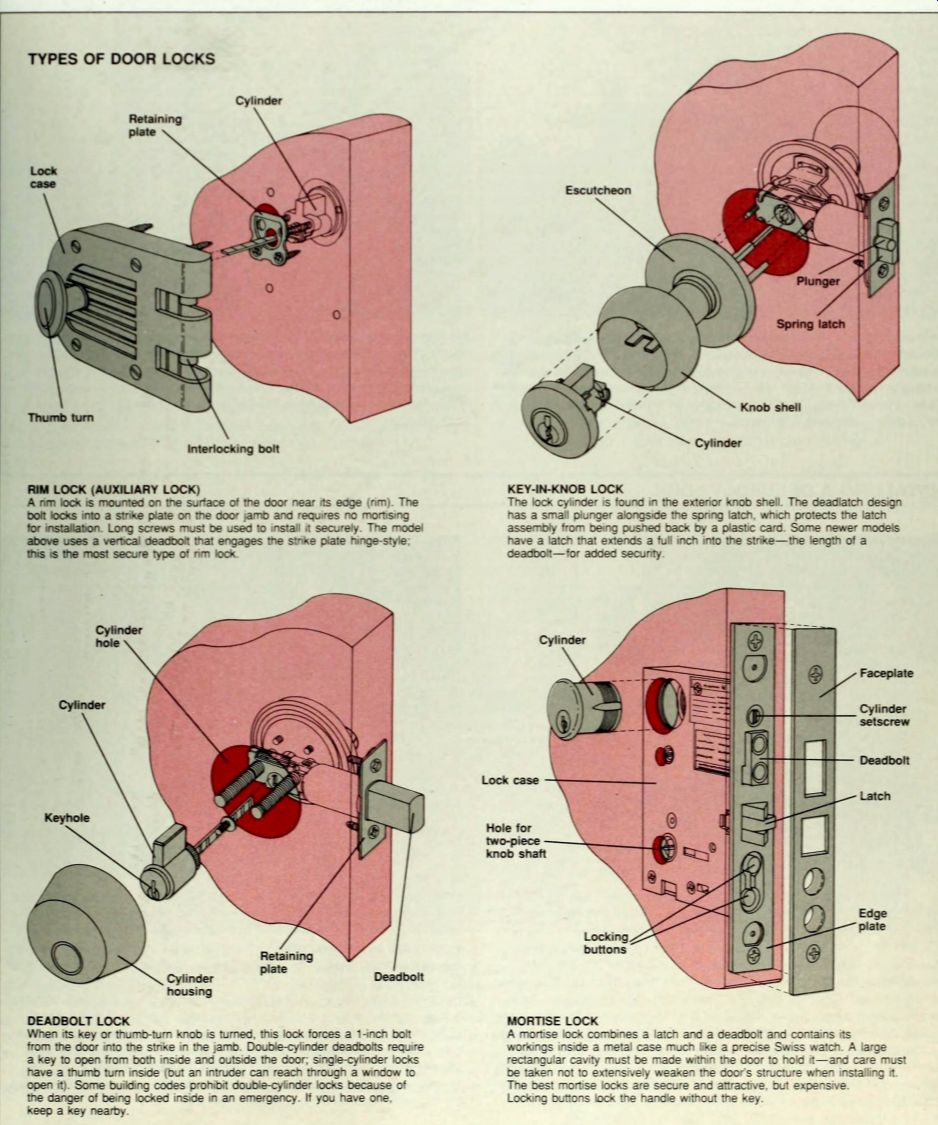
TYPES OF DOOR LOCKS
RIM LOCK (AUXILIARY LOCK)
A rim lock is mounted on the surface of the door near its edge (rim). The bolt locks into a strike plate on the door jamb and requires no mortising for installation. Long screws must be used to install it securely The model above uses a vertical deadbolt that engages the strike plate hinge-style; this is the most secure type of rim lock
KEY-IN-KNOB LOCK
The lock cylinder is found m the exterior knob shell. The deadlatch design has a small plunger alongside the spring latch, which protects the latch assembly from being pushed back by a plastic card. Some newer models have a latch that extends a full inch into the strike--the length of a deadbolt-for added security.
DEADBOLT LOCK
When its key or thumb-turn knob is tuned, this lock forces a 1-inch bolt from the door into the strike in the jamb. Double-cylinder deadbolts require a key to open from both inside and outside the door; single-cylinder locks have a thumb turn inside (but an intruder can reach through a window to open it). Some building codes prohibit double-cylinder locks because of the danger of being locked inside in an emergency. If you have one, keep a key nearby.
MORTISE LOCK
A mortise lock combines a latch and a deadbolt and contains its workings inside a metal case much like a precise Swiss watch. A large rectangular cavity must be made within the door to hold it-and care must be taken not to extensively weaken the door s structure when installing it.
The best mortise locks are secure and attractive, but expensive. Locking buttons lock the handle without the key.
----------------
EASING A STICKING LOCK
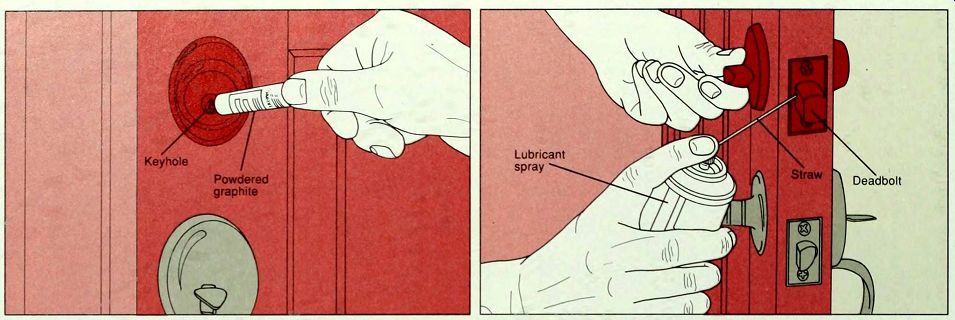
--------- Lubricating a lock. Lubricate your lock twice a year. Choose one lubricant and stick to it; mixing lubricants may gum the lock, requiring disassembly for a thorough cleaning (page 75). One of the best lubricants, particularly in dry, dusty climates, is graphite powder puffed from a tube. Press the nozzle of the container to the keyhole and into the cracks around the bolt and squeeze it once or twice (above, left).
Another effective lubricant is petroleum-based lubricant spray. Fix the plastic straw in the nozzle to focus the spray into the keyhole and around the bolt (above, right). Spray liberally to saturate the assembly, then use a rag to wipe away excess lubricant. After applying any lubricant, insert the key and work the bolt back and forth to help it penetrate the lock.
INSTALLING A DEADBOLT LOCK
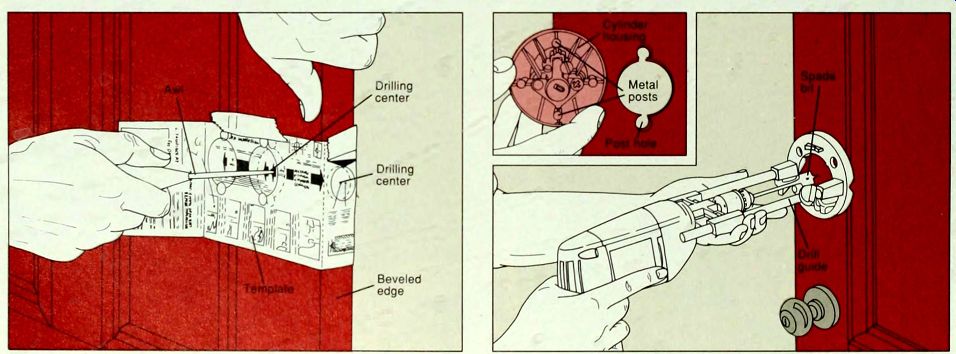
1. Using the template. If you are replacing your lock, be sure to I measure the distance between the door edge and keyhole-the JL lock s backset-and buy a lock with this measurement.
Use a lock with the backset of your choice if you are installing a deadbolt from scratch. Most backsets measure 2 3/8 inches or 2 3/4 inches.
Also measure the thickness of your door; the majority of locks fit either a 1 3/8-inch or 1 3/4-inch door. To ensure accurate installation, most manufacturers supply paper templates with their locks to indicate the position and size of holes you will need to drill in the door. Always read the manufacturer's instructions carefully before you start.
Fit the tem plate over the high side of the door, that is, its beveled edge (page 53) and tape it in place. Then use an awl or a finishing nail to make 1/16 inch starter holes in the required drilling centers (above), on the door face for the cylinder, and on the door edge for the bolt itself.
2. Drilling the hole for the cylinder. Remove the template and F wedge the door wide open with shims. Fit a spade bit and drill guide, shown above, or a hole saw (page 120) on a power drill.
Holding the bit perpendicular to the door, drill through the door face at the starter hole. Stop drilling just when the drill bit pierces through the door. Then go to the other side and finish drilling in the hole just made by the bit's tip (above); drilling from both sides of the door will prevent splintering of the door's surface. Some single-cylinder tubular dead bolts, such as the one being installed here, have two metal posts that protrude from the back of the cylinder housing to fit in the door and thus stop the cylinder from being twisted out with a wrench. Drill two smaller holes above and below the cylinder hole to the depth required by the manufacturer's instructions (inset).
73
INSTALLING A DEADBOLT LOCK (continued)

3. Boring the bolt-hole. Fit the drill with a spade bit and drill guide: the bit size will vary depending on manufacturer s instructions. In most cases it will be 1/8 inch larger than the diameter of the bolt.
Position the bit in the starter hole made in the edge of the door in step 1. and drill a straight hole perpendicular to the door edge. Accurate drilling is essential for the lock to function properly. Brush away saw dust and wood chips left by the drilling before you continue.
4. Inserting the bolt assembly. Insert the bolt assembly into its 1 hole. Hold the bolt edge plate against the door and etch its out line with a utility knife. Remove the assembly and. using a wood chisel and rubber mallet, chip a mortise deep enough for the edge plate to fit flush, usually 1/8 inch. Reinsert the bolt assembly right side up and extended, as shown above, or retracted, depending on the manufacturer's instructions. Screw the faceplate to the door.
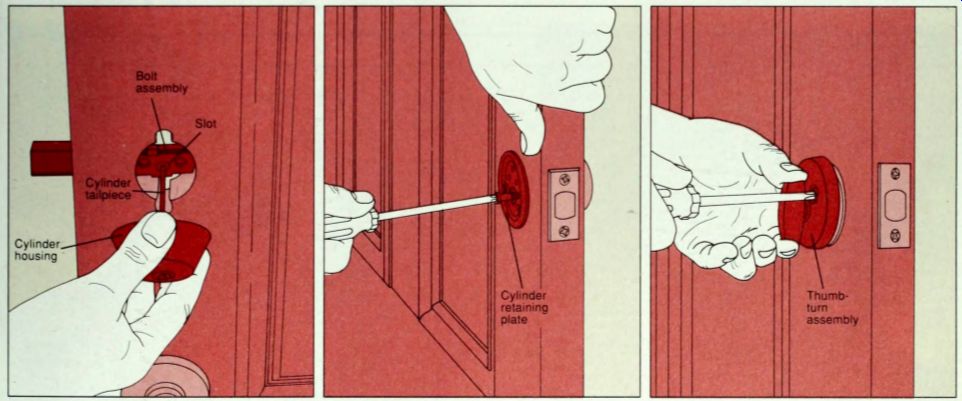
5. Installing the cylinder housing and thumb turn. Before completing the installation, check whether the deadbolt retracts and extends as it should by inserting the tip of a screwdriver through the slot in the bolt assembly and working it back and forth. If the deadbolt slides freely, install the cylinder housing on the outside of the door. Hold the housing so that the notched end of the keyhole points up. and push the tailpiece through the slot in the bolt assembly (above, left). Position the retaining plate against the cylinder hole on the inside of the door and screw it through the door into the back of the cylinder housing (above, center).
Finally, screw the thumb turn over the retaining plate (above, right). When you have finished, check that the lock works with the door open before installing the strike plate (page 70).
INSTALLING A STRIKE PLATE
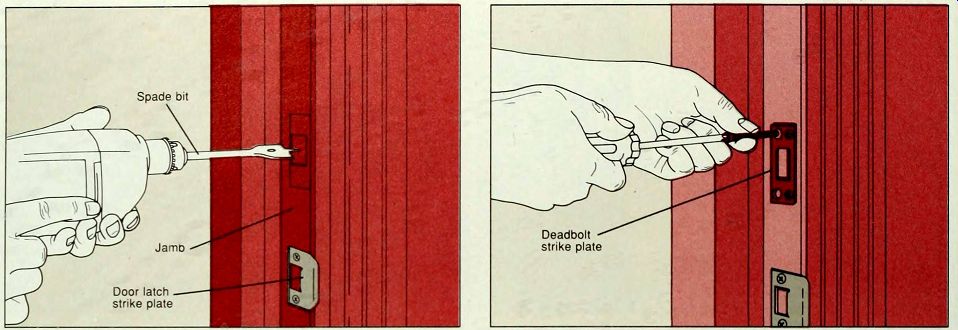
1. Boring the strike hole. First make a dot in the center of the I deadbolt with lipstick or crayon. Then retract the deadbolt. Close the door and turn the key or thumb turn to force the deadbolt against the door jamb. The smudge on the jamb indicates the center of the strike hole. Position the strike plate on the jamb with the-mark in the center of the opening and trace the plate and the plate opening.
Then, using a spade bit or auger bit, bore a hole slightly larger than the deadbolt at the mark on the jamb (above). A typical deadbolt is 7/8 inch in diameter and extends 1 inch beyond the edge plate. In this case, drill a hole 1 inch in diameter and 1 1/8 inches deep.
2. Securing the strike plate. Use a wood chisel and rubber mal F let to cut a mortise about 1/8 inch deep so that the plate will sit flush with the jamb. Pencil the screw positions in the mortise, drill pilot holes and screw the plate in place (above). Many manufacturers provide 3-inch screws which are long enough to reach the stud behind the jamb. If your strike plate's screws are short, replace them with longer ones for added security. If the mortise is too deep, shim the strike plate with thin metal washers: place washers under the strike plate, around each screw hole if possible, and drive the screws in securely.
SERVICING A DEADBOLT LOCK
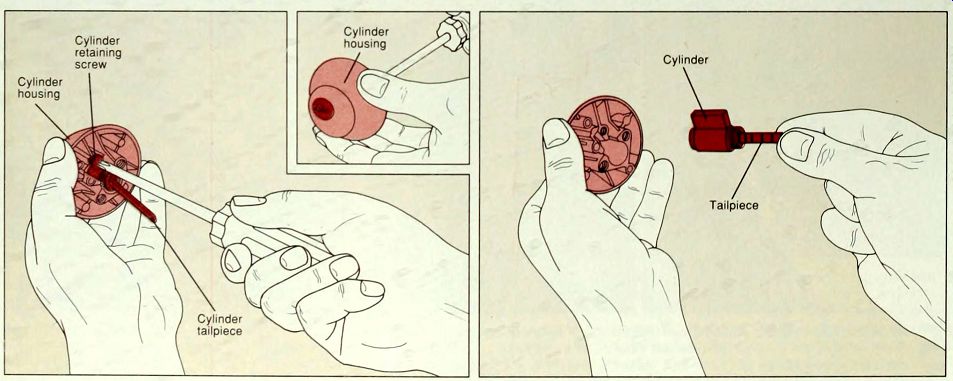
------- Removing the cylinder. To remove the cylinder housing from a deadbolt lock, unscrew the thumb turn and remove the two screws securing the cylinder retaining plate to the door. Some screws may have caps which must be drilled or chipped off to allow removal.
Lift off the retaining plate and the cylinder housing. In some models, like the one shown here, the cylinder can be taken out of its housing. Remove the cylinder retaining screw from the back of the housing (above, left) and pull out the cylinder by its tailpiece (above, right). Take it to a locksmith for service.
SERVICING A RIM LOCK
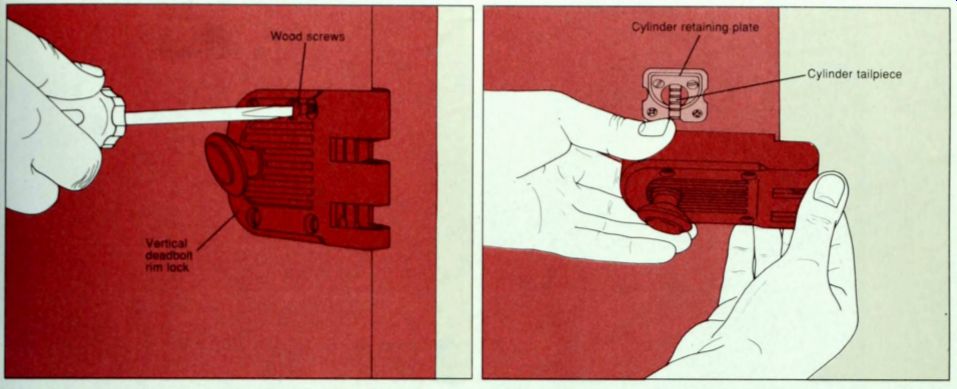
--- 1. Removing the lock case. Rim locks may have either horizontal or vertical deadbolts To give the lock case of either type a thorough cleaning or to remove the cylinder for servicing, you must first unscrew the lock from the door. If your rim lock was installed with carriage bolts for increased security, you may need a locksmith to remove the case from the door. Otherwise, remove the three, four or five screws that secure the lock case in position (above, left). Beneath it is the cylinder retaining plate with its tailpiece protruding through the center (above, right). Do not risk damaging the inner workings of the lock by opening the lock case.
2. Removing the cylinder. If your lock isn't responding to the turn of its key. try tightening F the cylinder retaining plate screws with a screwdriver. To free the cylinder, remove the two machine screws that pass through the retaining plate and door into the cylinder on the other side (above, left). As the last screw is taken out, support the cylinder with one hand to pre vent it from falling (above, right). In some locks, the retaining plate is fastened to the door with two wood screws. In this case, the plate will remain on the door when the machine screws are removed. Clean the cylinder, or take it to a locksmith for rekeying or replacement. To reinstall the lock reverse the steps you took to disassemble it.
SERVICING A KEY-IN-KNOB LOCK
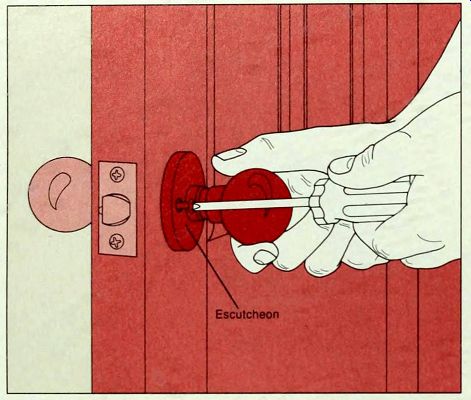
1. Removing the knobs. The cylinder housing of a key-m-knob I lock is the exterior knob itself. You must remove the doorknobs from the door before you can free the cylinder. On the popular model shown above, unfasten the screws on the inside escutcheon (above). With these screws removed, the inside and outside knob assembly can be pulled apart. Some key-in-knob locks require that you first remove the inside knob by depressing a release catch on the knob's neck and pulling the knob off its shaft (page 43) to reveal the screw.
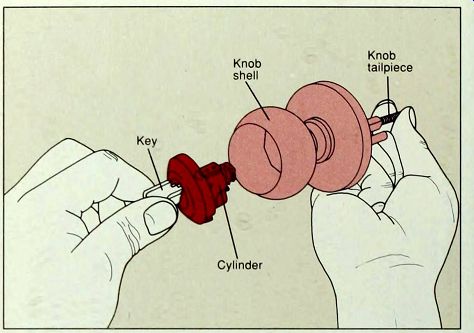
2. Removing the cylinder. With one hand, insert the key in the outside
knob and hold it with the notched edge up. With the other hand, hold
on to the tailpiece. Pull on the tailpiece while you turn the key about
45 degrees counterclockwise. Withdraw the key; the cylinder and knob face
will separate from the knob shell.
Take the cylinder to a locksmith for service.
To replace the cylinder in the knob, first insert the key in the keyhole with its notched edge pointing up. Turn the key counterclockwise as before. Fit the top of the cylinder between the prongs of the bracket inside the knob's shell and press it into place. Turn the key back to the upright position until you hear a snap. Remove the key. Now reassemble the lock, reversing the steps you took to disassemble it.
REPLACING A BOLT ASSEMBLY
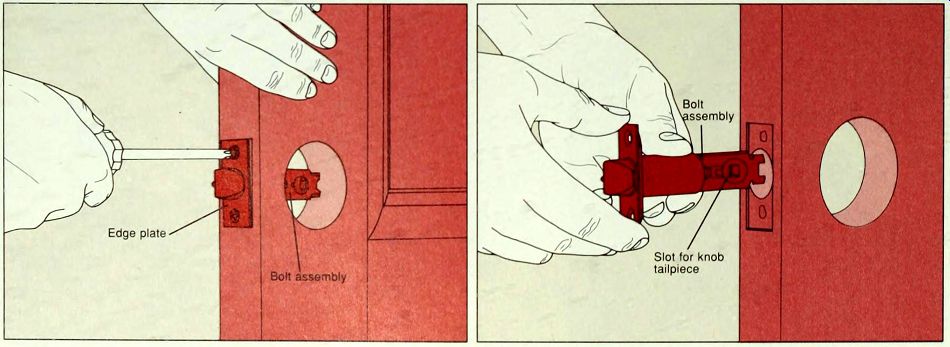
1. Removing a bolt assembly. To remove a key-in-knob dead latch, first remove the doorknobs (top, left). Then unscrew the edge plate from the door (above, left), and pull the deadlatch free. If you are removing the bolt assembly of a deadbolt lock, reverse the actions taken to install the cylinder housing (page 69, step 5) and then unscrew the edge plate. Contractors sometimes use bolt assemblies in metal doors which are of the "drive-in" type, with no retaining screws. This kind must be pushed out with a screwdriver blade inserted into the knob opening and forced behind the latch. Take a broken bolt assembly to a locksmith and buy an exact duplicate. Clean and lubricate it as you would a lock case. Use a cotton swab to wipe dirt from the assembly. When replacing it in the door, reverse the steps you took for removal. Make sure the assembly is right side up, or the door will not close.
------
REMOVING THE CYLINDER FROM A MORTISE LOCK
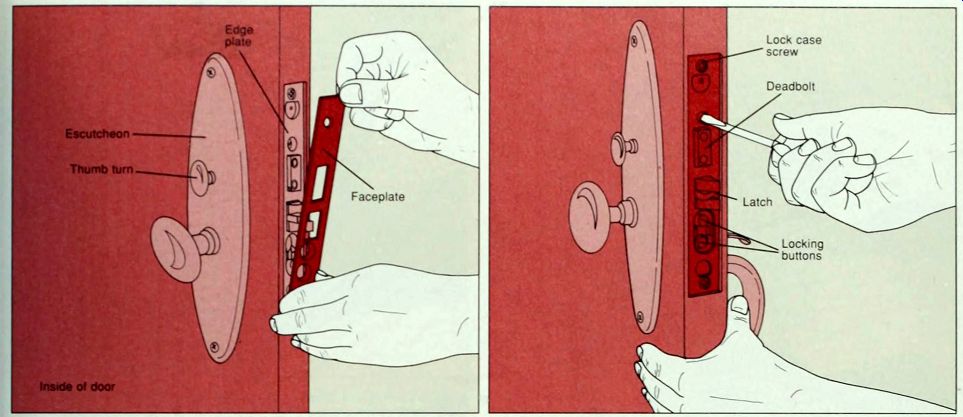
1. Freeing the cylinder. Before removing a cylinder for repair or replacement, check to see if the lock case edge plate is hidden by a decorative faceplate. If it is, remove its screws and lift it off. The cylinder is held in the door by a setscrew. Use a screw driver to free the cylinder by loosening the setscrew, usually three or four turns counterclockwise (above, right). Do not remove It Some models may have a second setscrew on the inside edge of the lock case that connects to the thumb turn; do not loosen this screw.
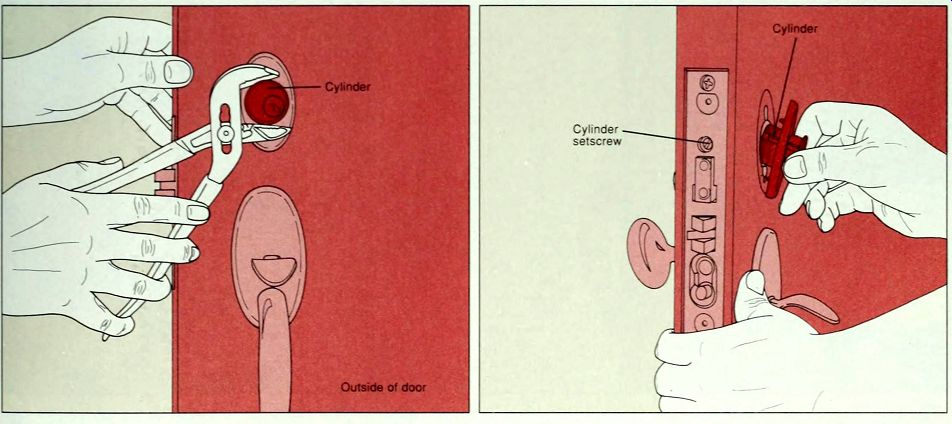
2. Removing in the cylinder. Loosen the top and bottom lock case F screws to give the cylinder some play. Then, using channel-joint pliers padded with masking tape to protect the cylinder's finish, gently grip the rim of the cylinder and turn it counterclockwise to loosen it (above, left). In some locks, the cylinder may have a rotating collar that prevents it from being loosened in this way: instead insert the key partway and turn the cylinder. Do not use excessive force, or the key may break off in the cylinder. Remove the cylinder by unscrewing it by hand (above, right). Count the number of rotations (usually five or six) for proper reassembly later.
To replace a cylinder after servicing, insert it in the door with the key hole s notched edges pointing up. Taking care to keep the threads of the cylinder in line with those in its lock case, screw the cylinder back into the door: rotate it by hand the same number of times required for removal earlier. Then retighten the setscrew and the top and bottom lock case screws. Reinstall the faceplate, if the lock has one.
REMOVING THE LOCK CASE FROM A MORTISE LOCK
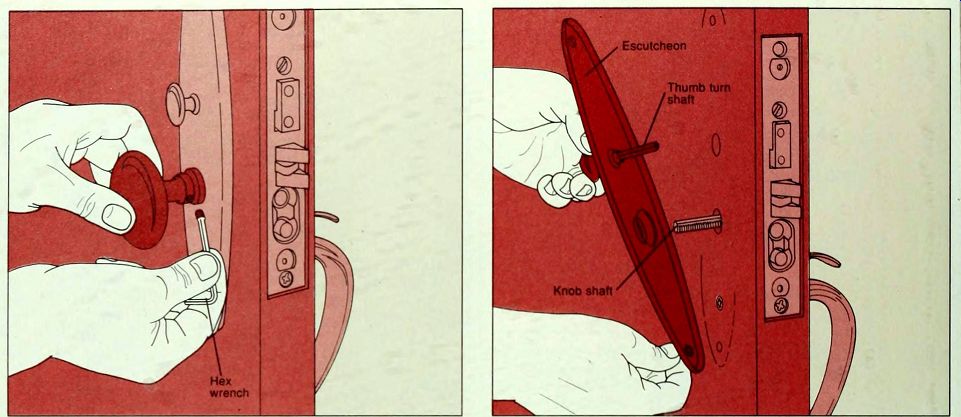
1. Removing the inside doorknob. To remove a lock for cleaning or repair, first remove its cylinder from the lock case. Then, using a screwdriver or hex wrench, loosen the two knob setscrews two or three turns or remove them (above). If the screws are exceptionally tight, insert the short end of the wrench into the screw head, using the long arm for greater leverage: you will need to remove and reinsert the wrench several times. Turn the knob counterclockwise to remove it from its threaded shaft.
2. Removing the escutcheon and thumb turn. Use a screwdriver to remove the screws at the top and bottom of the escutcheon on the inside of the door, and lift it off. The thumb turn and its shaft are attached to the escutcheon and come away with it.
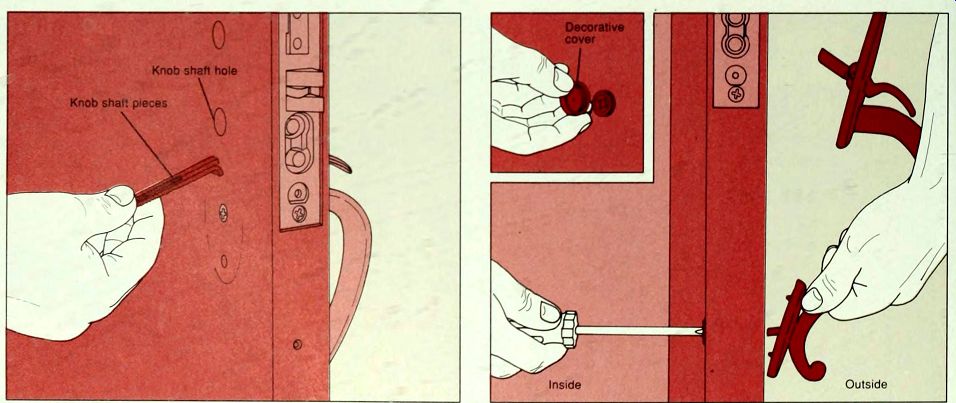
3. Removing the knob shaft. If your mortise lock has a knob on the inside and a handle on the outside, the knob shaft is likely to consist of a straight piece and a hooked piece; together they form a threaded square shaft. Pry the ends apart with the tip of a screwdriver and slide the straight piece out. Then unhook the bottom piece and pull it free. Place them together, with the threaded edges on the outside (above), to ensure proper reassembly later. If your lock has knobs on both the exterior and the interior, the shaft will be a simple square one. Pull it free from the door and go to step 5.
4. Removing the exterior door handle. The outside handle is held by two screws that pass through the door from the inside. With a screwdriver, remove the screw that secures the top of the handle. The head of the bottom screw is often hidden by a decorative cover. Using channel-joint pliers padded with masking tape, loosen the cover, then take it off by hand (inset). Finish by removing the bottom screw while you support the handle on the outside (above).
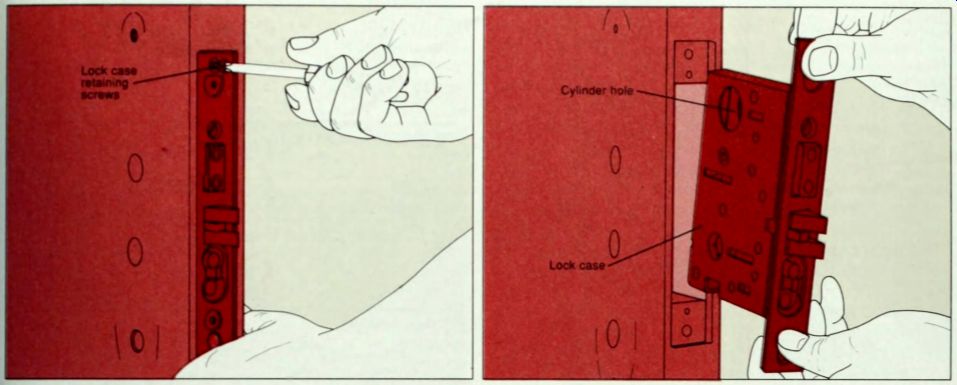
5. Freeing the lock case. If there is any paint buildup on the edge of the door around the lock case, use a utility knife to break the seal and scrape it oft. If necessary, first apply paint remover sparingly to soften the paint The lock case is retained in its mortise by two screws at the top and bottom of the lock edge plate. Use a screwdriver to remove first the bottom screw, then the top one (above, left), and lift out the entire lock case (above, right). Do not risk damaging the delicate mechanisms inside the lock case by trying to remove its cover. Clean the lock case thoroughly if necessary (below), or take it to a locksmith for service. To reassemble a mortise lock, reverse the steps taken for the removal of the lock case and finish by replacing the cylinder .
CLEANING AND LUBRICATING A LOCK CASE
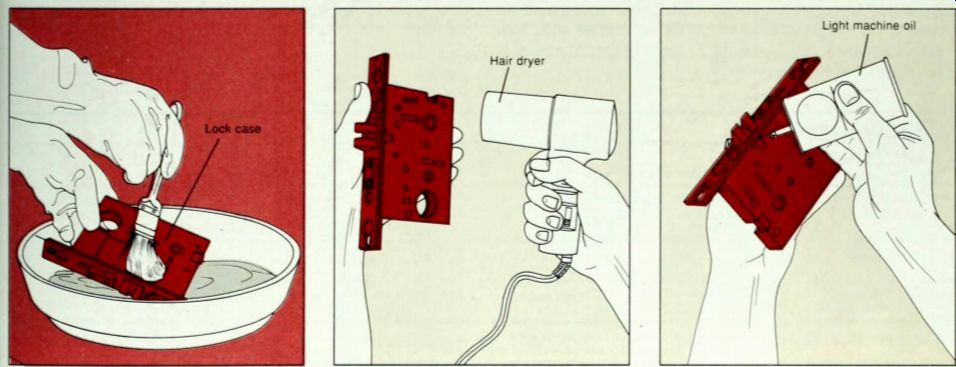
1. Washing the lock case. Working in a well-ventilated area and wearing rubber gloves, wash dirty lock parts such as bolt assemblies, cylinders and lock cases in a shallow basin filled with mineral spirits or turpentine. Do not open lock cases: instead, brush solvent into the openings (above). Clean the bolt assemblies of key-in-knob and deadbolt locks with a cotton swab.
2 . Drying the lock case. Set clean lock parts on a newspaper to drain for an hour or so. Dispose safely of all dirty solvents, cleaning rags and papers. Cap solvent containers and store them. To speed drying of the lock case, use a hair dryer set at low heat (above).
3. Lubricating the lock case. Generously apply light machine oil through the holes scattered over the surface of the case cover plates (above). Also oil the surface of a deadlatch or deadbolt assembly and lubricate the cylinder. In dry, dusty environments, use powdered graphite.