A door leading into the home welcomes visitors and discourages intruders, keeps storms outside and retains inside warmth. A high-quality exterior door that is properly installed and maintained should remain trouble-free for many years. However, virtually all exterior doors are sources of air infiltration and must be weather-stripped.
Several styles of exterior door are illustrated below. Solid wood doors are used in the majority of homes. Most wood doors have typical panel-door construction; some newer models have a solid wood core covered with a wood veneer.
Increasing in popularity are insulated steel doors; usually designed to look like wood panel doors, they cost less, insulate better and are often more secure and fire-resistant. Steel doors rarely need repair, but an old wood door can be replaced by a steel door. Hollow-core doors do not provide adequate security, and are made only for interior use.
Proper maintenance can extend a wood door's life. Once a year, clean the door and inspect the condition of the door and frame. Also check its paint or vanish finish. A door may need a fresh coal of varnish or paint annually. Use a high-quality exterior varnish containing an ultra-violet filter, or a high gloss alkyd exterior paint. If your climate is hoi and humid, choose a fungicide paint. Wash away surface mildew with a bleach-and-water solution. If mildew has spread beneath the finish, or the wood is cracked and graved, or a heavy paint buildup obscures its details, strip and refinish the door. Re-finishing is easier if you take the door off its hinges. It can be a weekend job; plan to remove and re hang the door several limes during that period, unless you can leave it oil tor one or two nights.
The Troubleshooting Guide below lists repairs to exterior doors. An exterior door is usually repaired the same way as an interior door. But unique to an exterior door is the damage caused by a break-in. In most cases, the door and Jamb can be saved; however, repair requires careful carpentry, When installing a new wood exterior door, paint it before hanging it to avoid exposing the wood to the elements.
Treat the end grain with a water-repellent preservative, then paint the edges. Adding a storm door can increase an exterior door's insulation value and protect its finish.
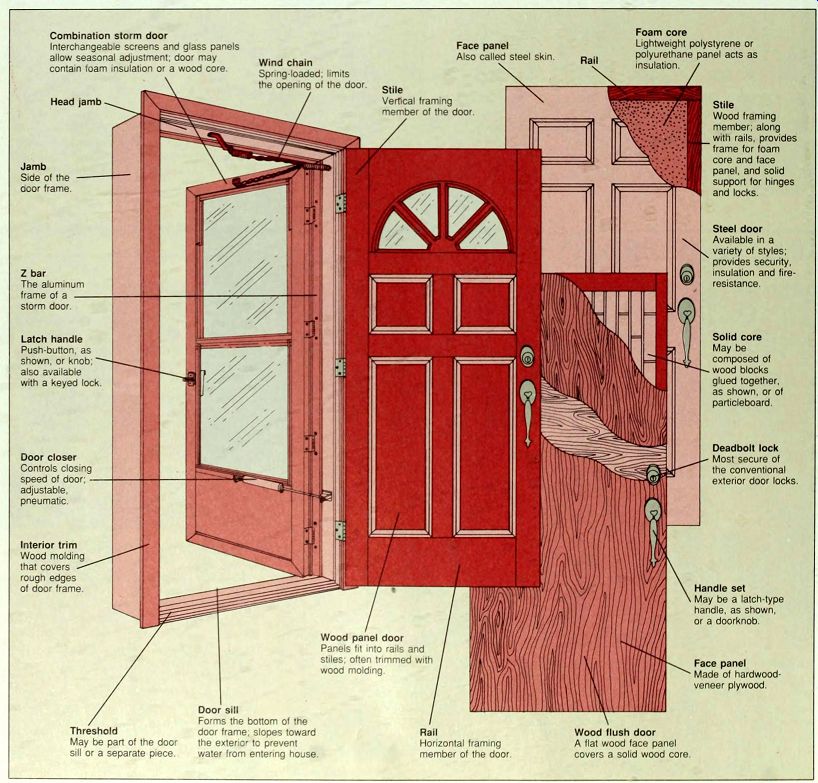
Combination storm door--Interchangeable screens and glass panels allow seasonal adjustment; door may contain foam insulation or a wood core
Head jamb
Jamb--Side of the door frame.
Z bar--The aluminum frame of a storm door.
Latch handle--Push-button, as shown, or knob: also available with a keyed lock
Door closer--Controls closing speed of door; adjustable, pneumatic.
Interior trim--Wood molding that covers rough edges of door frame.
Wind chain--Spring-loaded, limits the opening of the door.
Face panel--Also called steel skin.
Rail
Foam core--Lightweight polystyrene or polyurethane panel acts as insulation.
Stile--Vertical framing member of the door.
Wood panel door--Panels fit into rails and stiles, often trimmed with wood molding
Stile--Wood framing member; along with rails, provides frame for foam core and face panel, and solid support for hinges and locks.
Steel door--Available in a variety of styles; provides security, insulation and fire resistance.
Solid core--May be composed of wood blocks glued together as shown, or of particleboard.
Deadbolt lock--Most secure of the conventional exterior door locks.
Handle set--May be a latch-type handle, as shown, or a doorknob.
Face panel--Made of hardwood veneer plywood.
Threshold--May be pan of the door sill or a separate piece.
Door sill--Forms the bottom of the door frame, slopes toward the exterior to prevent water from entering house
Rail--Horizontal framing member of the door.
Wood flush door--A flat wood face panel covers a solid wood core.
------------
---------------
TROUBLESHOOTING GUIDE
SYMPTOM
Door hinges squeak
Doorknob or handle loose
Door doesn’t close or lock properly
Door rattles
Door sticks or binds
Leakage around door
Water leakage below door
Dark, spotty discolorations in door finish
Door finish flaking, peeling or discolored
Door cracked or splintered
Door jamb splintered
Deadbolt or surrounding area damaged
Storm door slams
Storm door binds
Storm door sags
POSSIBLE CAUSE
Rust or paint buildup around hinges
Retaining setscrew loose
Dirt or paint buildup around latch or lock
Latch or bolt assembly broken
Hinges set too deep
Strike plate misaligned Strike hole too shallow
Door has shrunk or house settled
Door has shrunk or house settled
Hinge screws loose
Excessive paint or varnish buildup
Door or frame warped
Weather stripping worn or absent
Door sill worn or rotted
Mildew on finish surface
Mildew below finish surface
Varnish or paint deteriorated
Break-in damage
Break-in damage
Break-in damage
Door closer faulty
Metal door frame twisted or misaligned
Hinge screws loose
Hinges damaged by wind
Metal door frame twisted or misaligned
PROCEDURE
Remove one hinge pin at a time: clean and oil the pin
Tighten setscrew
Clean and lubricate latch or lock
Replace latch or bolt assembly
Shim hinges
Adjust strike plate
Deepen strike hole
Weather-strip door; weather-strip threshold shim door hinges or strike plate shim door jamb
Weather-strip door or threshold ; shim hinges or strike plate shim jamb
Repair worn screw holes ; replace with longer screws
Strip and refinish door
Determine and correct binding area; replace door with prehung unit
Weather-strip door ; install storm door
Weather-strip threshold ; replace sill
Wash door with bleach-and-water solution
Strip and refinish door
Touch up finish: strip and refinish door
Glue and clamp cracks and splinters; install reinforcement plate
Replace damaged section; reinstall strike plate; install reinforcement plate
Glue and clamp splintered area; plug old hole ; install new deadbolt lock
Adjust or replace door closer: adjust or replace wind chain
Shim metal frame
Replace with larger screws
Replace hinge Z bar : adjust or replace wind chain: replace storm door
Shim frame; replace frame; replace door
REFINISHING AN EXTERIOR DOOR
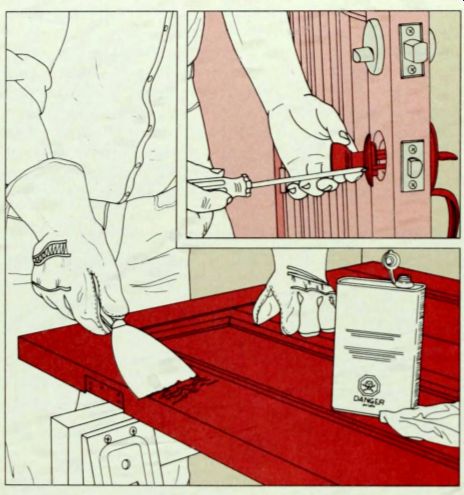
1. Preparing the door. For slight damage limited to small areas, sand lightly and touch up with the same finish as originally used. To remove the old finish, first take the door off its hinges and remove all door hardware (inset).
Place the door across two sawhorses or on a flat surface. Work in a well-ventilated area-outdoors if possible, avoiding direct sunlight. If you are working indoors, protect the floor with newspaper, open all windows and aim a fan out the window. Use a paint scraper to remove loose and peeling paint from the door. On surfaces with a heavy paint buildup, use a heat gun before applying the chemical strip per. Wear heavy gloves, safety goggles and a well-fitting respirator with an organic-vapor filter to apply a non-flammable stripper containing methylene chloride to the painted surface. Caution: children, pregnant women and people with heart or lung problems should not use a chemical stripper.
Using an old paintbrush, apply stripper generously in short strokes.
Work in one direction, covering one section of the door-rail, stile or panel-at a time. After the application stops bubbling-about 15 minutes-lift off the sludge in smooth strokes with a wide putty knife (left).
Place the sludge in a container that can be sealed for disposal.
Clean off any remaining finish with a light application of stripper, scrubbing gently with fine steel wool. Finally, wipe the entire surface with a clean rag soaked in denatured alcohol. Turn the door over and strip the other side if desired, then let the door dry overnight.
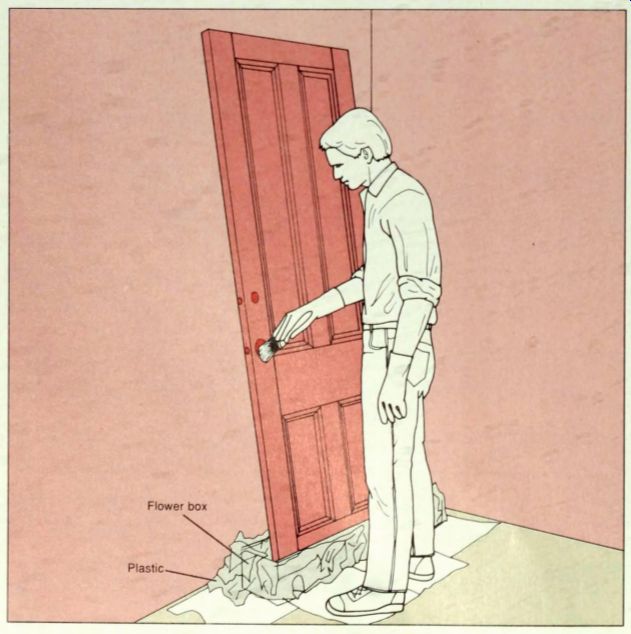
2. Applying water-repellent preservative. Protect your door from moisture and control fungus, mildew and rot by choosing a water-repellent preservative available at marine or construction supply dealers-that is compatible with the paint or varnish you will apply. If you prefer to use a water repellent without toxic preservative, make your own by mixing 1 cup exterior varnish, 1 ounce shaved paraffin wax and enough paint thinner or turpentine to make one gallon of solution.
Line a flower box with plastic and fill it half way with the water-repellent solution. Remove the door and stand its bottom edge in the trough for three minutes to treat the end grain of the door. While the door is absorbing the solution, use an old paintbrush to coat thoroughly all door surfaces, including the inside edges of lock and doorknob holes (left). Turn the door upside down to immerse its top edge, and brush all remaining surfaces. Allow the door to dry at least 24 hours (or follow the preservative manufacturer's instructions); re hang the door at the end of the day if necessary. When the wood is dry. paint or varnish the door.
REPLACING THE DOOR SILL
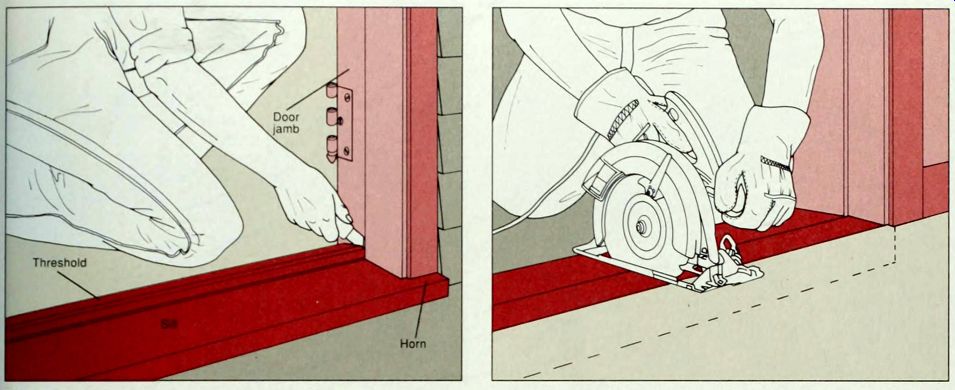
1. Getting at the sill. Use a utility knife to cut away any caulk around the door jamb and threshold or sill edges (above).
Remove a wood or metal threshold that has been added to the sill, and any weather stripping or other protective material attached to the sill. If the exterior edge of the sill is mortared into brick, chip away the mortar with a cold chisel and ball-peen hammer. If you can see where the sill ends, measure the width and thickness of the sill both inside and outside; the difference between these measurements is the combined length of the sill horns. Otherwise, measure the sill after it is removed (step 4).
2. Cutting the sill. If the sill is badly rotted, use a cold chisel and ball-peen hammer to break it away in small pieces. Otherwise, Mai use a double-insulated circular saw fitted with an old combination blade, set at a depth of 1 8 inch less than the thickness of the sill.
Wearing goggles, cut through the middle of the sill, perpendicular to the wood gram (above).
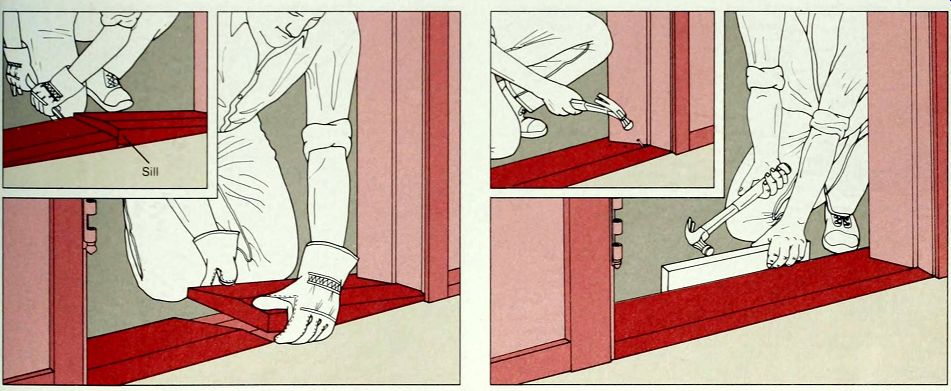 3. Removing the sill. Free the sill by forcing a pry bar under the cut
(inset). Pry up the sill just enough to loosen it from the nails fastening
it to the jamb: too much force could damage the jamb.
Lift each half of the cut sill at the middle and pull it out sideways from under the jamb (above). Cut off protruding nails in the jambs with a hacksaw. Close the door: if it does not close, the jambs have bowed and should be straightened.
4. Installing the new sill. Mark and cut a new hardwood door sill as for a window sill (page 17, step 3). Clean the sill opening and insert the ends of the new sill under the edges of the jambs.
Protecting the sill's finish with scrap wood, tap the sill into place with a hammer (above), working from the center of the sill out to the jambs. If the fit is too tight, take out the sill, cut 1/8 inch from its length, and rein stall it. Drill four pilot holes for nails at each end of the sill, angled into the jamb, and toenail the sill to the jamb with finishing nails (inset).
REPAIRING A CRACKED OR SPLINTERED DOOR
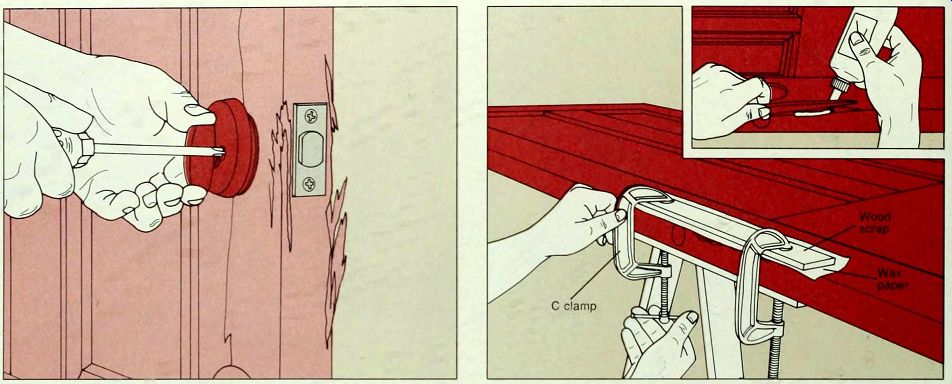
1. Assessing break-in damage. It the deadbolt or lockset is broken. repair it (page 66) or buy a new one. Remove the locks (above) and check the door for cracks and splinters. Examine the wood carefully for hidden cracks that can cause structural weakness. To replace a lock, plug its old hole (step 3) and install a new lock in a solid part of the door.
2. Repairing cracks and splintered edges. Squeeze a generous F amount of carpenter's glue around splinters and into cracks (inset); fit broken pieces back into place. Cover the glued area with wax paper and use C clamps and wood scraps to clamp the repair, as shown. Use masking tape to secure small splinters. To repair a deep vertical crack, insert a utility bar. spread the crack slightly and fill it with carpenter's glue. Wipe off excess glue with a moist cloth and use a pipe clamp to close the crack. Allow a clamped repair to set for 12 hours, then use a putty knife to lift off any beads of dried glue. Smooth the repair with fine sandpaper.
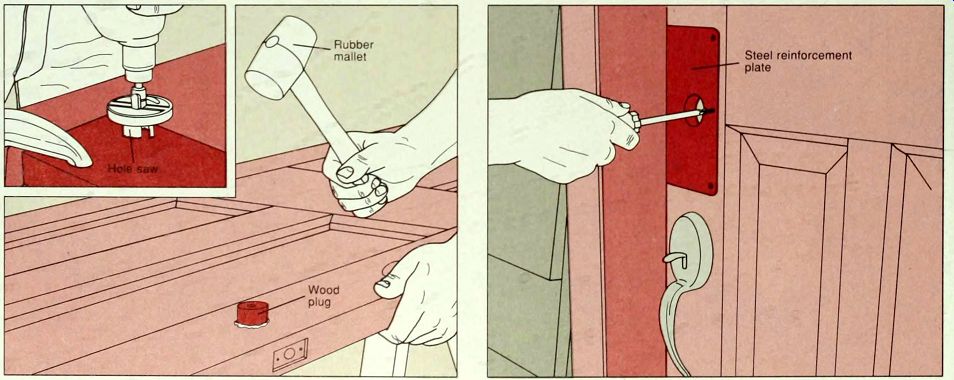 3. Plugging a hole. Choose a piece of wood about 1/8 inch thicker than
the door. If the door has a clear finish, use the same kind of wood the
door is made of. Clamp the piece to a workbench protected by scrap wood.
Using a hole saw, cut a plug the same diameter as the hole in the door
(inset).
Coat a 1/4-inch dowel with carpenter's glue and tap it into the plug's center hole using a rubber mallet. Then cover the plug's cut edge with carpenter's glue or epoxy glue and tap it firmly into the hole with a rubber mallet, as shown. Let the glue set for 12 hours Level the plug with a block plane and sand the surface with fine sandpaper.
4. Installing a reinforcement plate. Strengthen a door against break-ins by adding a steel reinforcement plate, precut to fit around the deadbolt and door edge, and available from a lock smith. With the door hardware removed, drill holes for the deadbolt cylinder and bolt, then trace the outline of the reinforcement plate in position on the door. Using a wood chisel, cut a mortise in the door edge to accommodate the thickness of the reinforcement plate. Within this mortise, cut the mortise for the deadbolt edge plate. Install the edge plate, then screw the reinforcement plate over it (above) and install the deadbolt.
REPAIRING A SPLINTERED JAMB
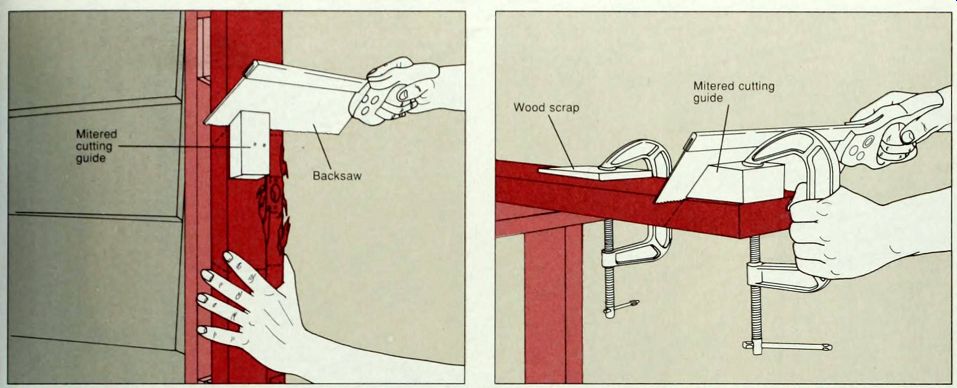
1. Removing the damaged section. After removing the interior I trim (page 49) and deadbolt strike plate, use a combination JL square to mark horizontal lines above and below the damaged section of the jamb. Using a miter box and backsaw. cut a block of wood at a 45-degree angle, and nail it to the jamb as a cutting guide.
Saw through the jamb at the top line (above), then move the cutting guide to saw at an opposite angle through the bottom line. Pull out the damaged section after removing any screws or nails.
2. Cutting a patch. Buy a piece of wood of the same type, width and thickness as the jamb, and longer than the section you removed. The shape of the built-in stop must be cut into the patch later. Using a combination square, mark guidelines for the length of the patch on the wood. Clamp the cutting guide (step 1) just outside each of the guidelines and cut them at opposite angles with a backsaw (above). Then use the backsaw to cut away excess wood to match the shape of the jamb stop-this requires careful measuring and some artistry. Test the fit of the patch and, if necessary, trim the ends until it sits flush with the jamb.
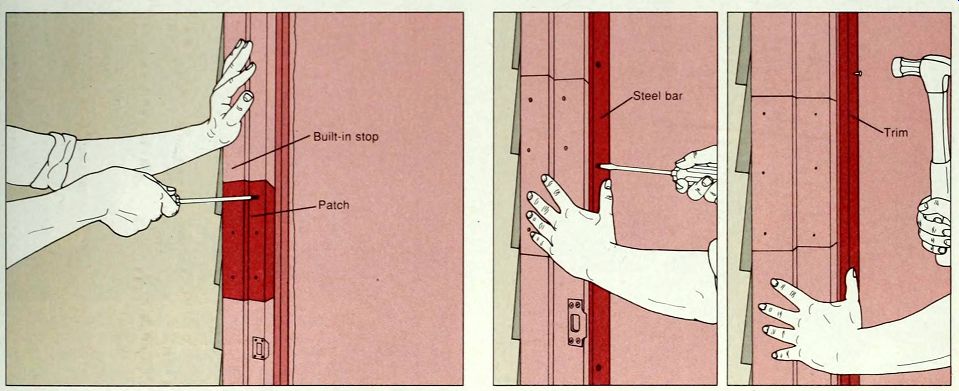
3. Splicing the patch. Holding the patch in place on the jamb, drill pairs of pilot holes through it for screws, using a counter bore bit. Space the holes at 4-inch intervals. 1 inch from the patch edges. Do not drill a hole where the deadbolt strike plate will be installed. Remove the patch and coat its back and ends with carpenter s glue. Reposition the patch and drive screws through the holes into the rough frame. Wipe away excess glue and let it dry for an hour. Use medium-grit sandpaper on a sanding block to refine the shape of the patch. Cover the screw heads with wood putty and rein stall the deadbolt strike plate.
4. Reinforcing the jamb. Installing a 1-by-1/8-inch steel bar to the indoor edge of the jamb will keep the deadbolt from breaking through the jamb if the door is forced. Buy a bar that extends at least 2 feet above and below the door locks. Mark screw-hole positions along the center of the bar at 6-inch intervals. Drill the holes through the bar, then hold the bar against the jamb. 1/8 inch from its edge, and mark the screw-hole positions on the jamb. Drill pilot holes at the marks and screw the bar to the jamb with 3-inch wood screws (above, left). Cover the bar with the original door trim (above, right); caulk the small gap behind the trim created by the bar.
INSTALLING A STORM DOOR
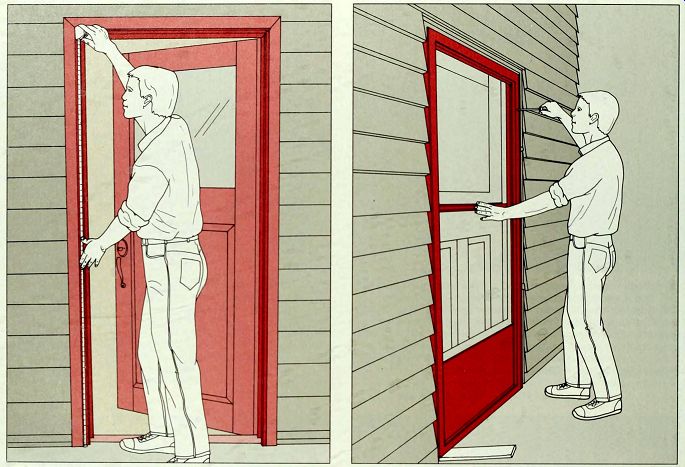

1. Measuring and cutting the frame. Measure the inside height of each door jamb (above, top), and the width between the jambs at top center and bottom. Record the smallest height and width-this is the opening size to order from the door dealer. (If ordering a storm door with hinges attached, order one that opens on the same side as your main door. Prehung storm doors-such as the one shown here-usually come with a three-sided frame made of aluminum strips called Z bars. The door will come with the side Z bars too long. Turn the door on its side and use a hacksaw to cut the hinge-side and latch-side Z bars 1/4 inch shorter than the opening's height measurement (above, bottom).
2. Installing the door. The Z bar frame must be installed perfectly plumb and square, even if the door jamb is crooked. The door itself must clear the frame by 1/8 inch at the latch side, top and ground to open and close properly. To install a typical storm door, unscrew the hinge-side Z bar from the door. Align the Z bar on the jamb with 1/4 inch of space at its top end for the header Z bar. Use a level to plumb the Z bar at both its side and its front, mark its screw hole positions on the jamb and drill pilot holes. Screw the Z bar back on the door and lift them both into the jambs. Supporting the door on a shim, screw the Z bar to the jamb (above, top); if the door does not hang straight, loosen the screws and shim the Z bar (above, bottom).
Install the latch-side Z bar on the other jamb the same way, its top end even with the top end of the hinge-side Z bar. Close the door to check its fit, and shim the Z bar if necessary. Finally, insert the header Z bar across the top of the door and screw it to the head jamb.
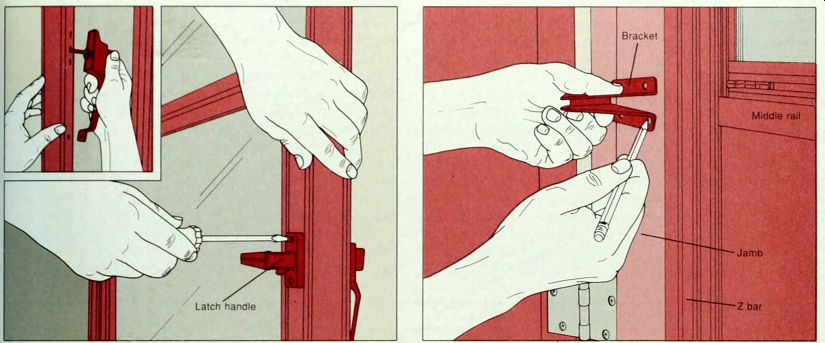
3. Installing the latch and handle. If screw holes are not pre-drilled in the door, position the latch, or template if provided, on the door where it will not hit the main door’s knob or lock. Mark the positions of the screw holes. Use a power drill to drill the holes straight through the door from the latch side. Fit the handle and latch through the door together (inset), and install them with the screws pro vided (above). Then close the door, and position the strike plate on the jamb where it can receive the latch. Drill pilot holes, and screw the strike plate to the jamb. Close the door to check the strike plate position: adjust or shim it if necessary.
4. Installing the door closer bracket. Close the storm door and work from inside the house. The door closer may be located on the door's top or middle rail. Position the door closer bracket on the hinge-side door jamb. 1/4 inch from the Z bar. and mark its screw positions with a pencil, as shown. Then drill pilot holes for the screws, and screw the bracket in place.
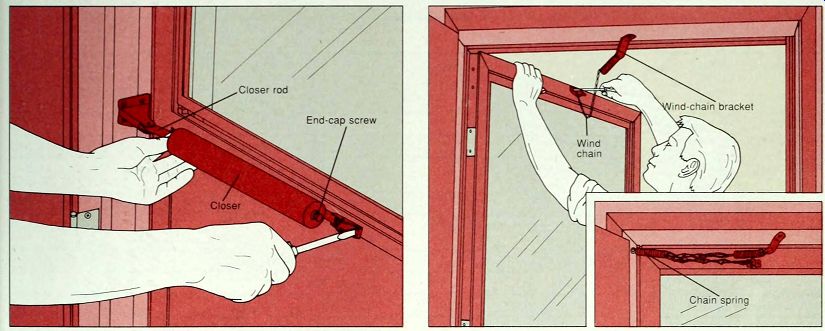
5. Installing the door closer. Slip the hold-open washer onto the door closer rod. then use the pin to attach the rod to the door closer bracket. Hold the free end of the closer against the closed storm door and mark the screw positions on the door. Then remove the closer and drill pilot holes in the door. 1/4 inch farther from the hinge side than you marked. Replace the closer and screw it to the door, as shown. Adjust the closer to the desired closing speed by turning the screw in the end cap. For more tension, remove the closer bracket, turn it and the rod 180 degrees and reinstall it.
6. Installing the wind chain. Screw one wind-chain bracket into the midpoint of the head jamb. Then, with the door closed, mark the screw positions for the other bracket, midpoint at the top of the door: be sure the two brackets will not touch when they are both installed. Screw on the second bracket, as shown. Adjust the length of the chain at this bracket so that the door opens no wider than allowed by the door closer. Then use the attachment provided-in this case, a nail-to attach the chain spring to the side jamb near the upper corner of the door (inset).