The simple opening and closing of an interior door can invite visitors into a room, declare privacy or hide a less-than orderly area of the house.
Doors may be solid or hollow. Solid panel doors commonly grace the interiors of older homes, while modem homes use hollow doors, often filled with corrugated cardboard. Other styles include top-hung sliding doors for closets and folding doors used for closets and pantries.
In principle, interior doors should remain trouble free for years. In practice, however, hinges sag, houses settle and solid doors warp and shrink due to temperature and humidity.
As a rule, when a hinged door refuses to open and close as it should, first work on the hinges, then the door and finally the door frame. Hinges and strike plates can be shimmed or their mortises deepened. Doors can be cut, or planed and jambs can be shifted in or out. Occasionally a bowed door will need to be straightened with weights or clamps or its joints will require gluing or bolting. However, wood has a long memory and straightening a warped door should be seen only as a temporary measure. Eventually the door must be replaced.
Match a new door to the other doors in your home. For older styles, cull through demolition yards and antique stores. If the door you choose doesn't fit, you may have to cut it to size. Measure the doorway between the side jambs and from head jamb to floor; subtract 1/2 inch for rug or threshold clearance. Don't cut more than an inch off the height of a panel or hollow door-although you can cut up to 2 inches from the width. Reuse old hinge and strike plate mortises, re-plugging worn screw holes if necessary. Chisel hinge mortises on the door in exact alignment with those on the jamb. Install new doorknobs according to manufacturer's instructions. New doors can also be bought as prehung units and installed yourself.
----------------
TROUBLESHOOTING GUIDE
SYMPTOM
Door hinges squeak
Doorknob or handle loose
Door won t close properly
Door rattles
Door sticks or binds
Door drags
Hole in hollow door
Top-hung sliding door drags
Top-hung sliding door jammed
Folding door drags
Folding door corner broken off
Fixed louver broken
POSSIBLE CAUSE
Rust or paint buildup around hinges
Retaining setscrew loose
Dirt or paint buildup around latch
Latch broken
Latch spring broken
Latch mechanism stuck
Hinges set too deep
Strike plate needs adjusting
Door warped Strike plate misaligned
Door shrunk or house settled
Door hinge screws loose
Door warped House settled
New door too large
New carpet too thick
Heavy blow against veneer surface
Roller wheel or bracket needs adjusting
Roller wheel jumped from track
Bottom guide askew
Slider screw or spring-pivot pin loose
Excessive force used to un-jam door
Heavy blow against louvered surface
PROCEDURE
Remove one hinge pin at a time clean and oil the pin
Tighten setscrew
Clean and lubricate latch
Replace latch
Replace latch spring
Lubricate interior of lock case
Shim hinges
Adjust strike plate by filing or repositioning
Shim strike plate reposition door stop straighten door
Adjust strike plate
Weather-strip door shim hinges or strike plate shim jamb reposition stop
Repair worn screw holes replace screws
Determine and correct binding area
Determine and correct binding area
Cut door or plane door
Cut door or plane door raise floor bracket (folding door, ; sliding door. ) Patch door (p. 55)
Adjust roller wheel or bracket
Remove and re-hang door
Adjust bottom guide
Tighten screw or replace pin in slider
Glue corner back and clamp
Replace louver
----------------
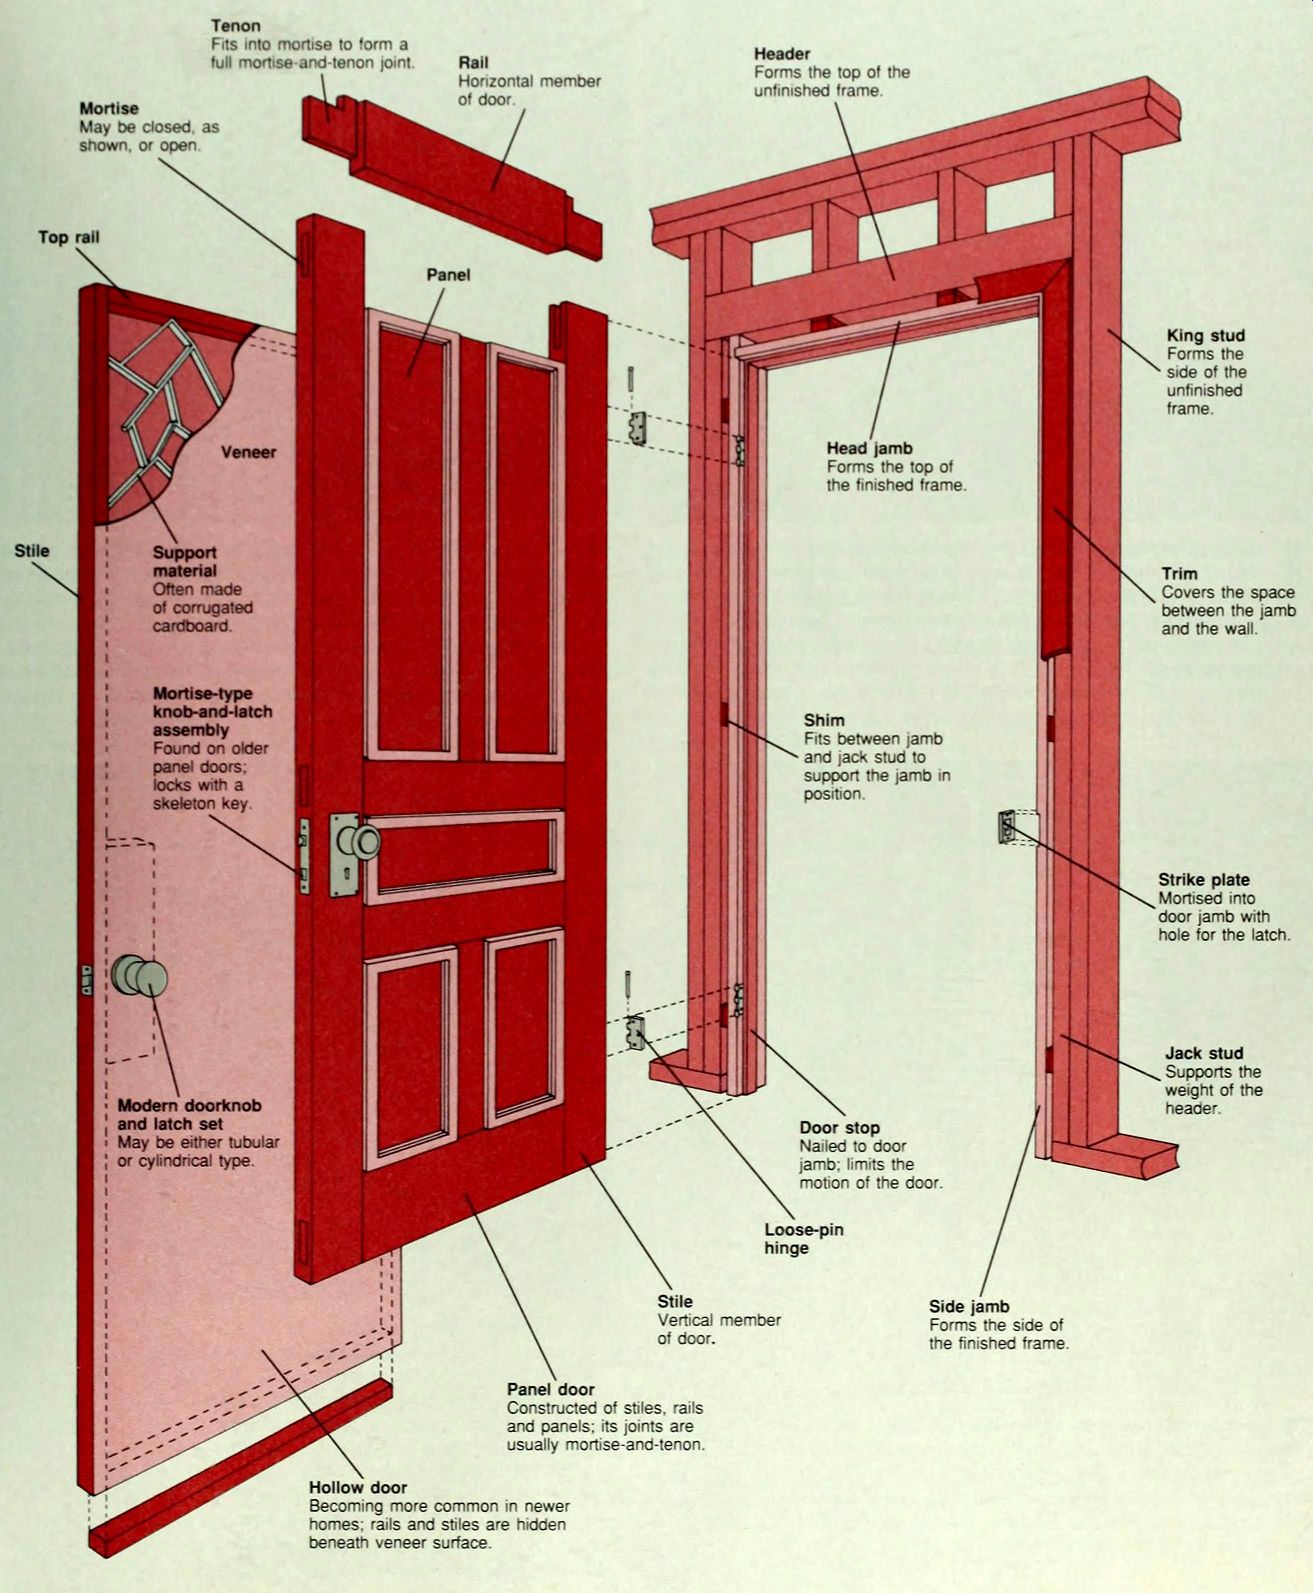
Tenon
Fits into mortise to form a full mortise and tenon joint
Mortise
May be dosed as shown, or open
Rail Horizontal member of door
Header Forms the top of the unfinished frame.
Top rail Stile Panel
Head jamb Forms the top of the finished frame.
Veneer
- A Support material Often made of corrugated cardboard.
Mortise-type knob-and-latch assembly Found on older panel doors; locks with a skeleton key.
Shim Fits between jamb and jack stud to support the jamb in position.
Modern doorknob and latch set May be either tubular or cylindrical type.
Door stop Nailed to door jamb: limits the motion of the door.
Loose-pm hinge
Stile Vertical member of door.
King stud Forms the side of the unfinished frame.
Trim Covers the space between the jamb and the wall.
Strike plate Mortised into door jamb with hole for the latch.
Jack stud--Supports the weight of the header.
Side jamb Forms the side of the finished frame.
Panel door Constructed of stiles, rails and panels; its joints are usually mortise-and-tenon.
Hollow door
Becoming more common in newer homes: rails and stiles are hidden beneath veneer surface.
--------
SERVICING A KNOB-AND-LATCH ASSEMBLY (Older models)
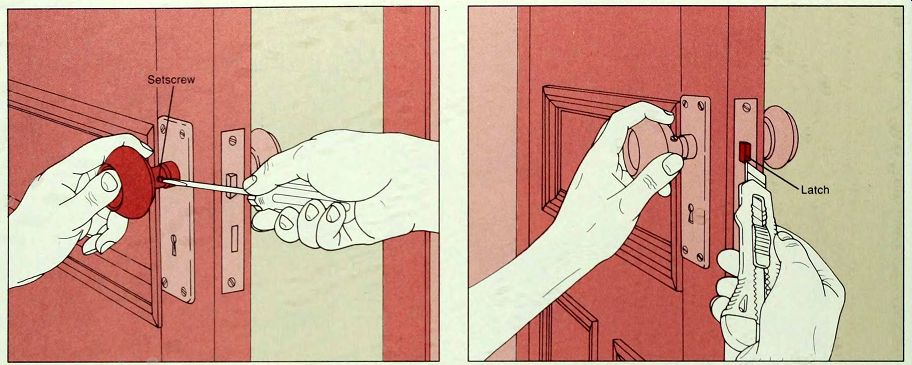
1. Tightening a loose doorknob. If its skeleton key has been lost, the mortise-type lock case of an older door may operate as a simple knob-and-latch assembly. To cure the rattling knob of a mortise-type assembly, first loosen the setscrew that secures it to the knob shaft, push the knob snug against its collar on the door, then retighten the screw (above).
2. Unsticking a latch. Lubricate sticky door latches periodically W with silicone spray. Turn the doorknob so that the latch is with drawn, and apply the lubricant to the latch opening. Turn the knob back and forth several times to work it in. Paint buildup is a common cause of a sticking latch. Use a utility knife to break the paint seal around the latch and to scrape paint off its surface (above). If the latch in an old mortise-type lock case continues to stick, remove the lock case for repair or replacement (step 3).
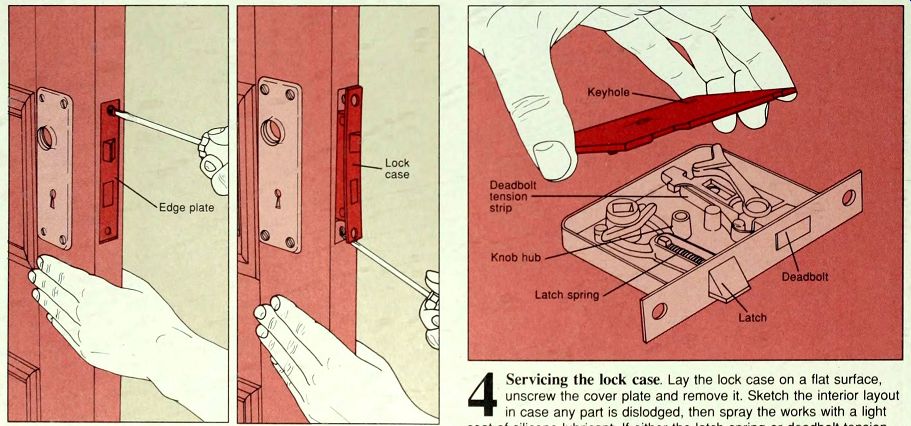
3. Removing the lock case. Unscrew one of the doorknobs and pull it off its shaft. Then withdraw the shaft from the door by pulling on the other knob. Using a utility knife or old screwdriver, scrape away any paint blocking the screw slots at the top and bottom of the lock case edge plate. Remove the screws (above, left) and carefully pry the lock case free from the door (above, right).
4. Servicing the lock case. Lay the lock case on a flat surface, unscrew the cover plate and remove it. Sketch the interior layout in case any part is dislodged, then spray the works with a light coat of silicone lubricant. If either the latch spring or deadbolt tension strip is damaged, replace it. To check the latch insert the knob shaft in the knob hub by hand and turn the shaft. To check the bolt, turn the skeleton key in the keyhole. If either the latch or bolt won't budge, file its openings in the lock case as you would a strike plate. If the latch or bolt is still stuck, take the lock case to a locksmith who will also be able to replace a lost skeleton key. Once the latch and bolt work smoothly, reassemble the lock case and reinstall it.
SERVICING A KNOB-AND-LATCH ASSEMBLY (Newer models)
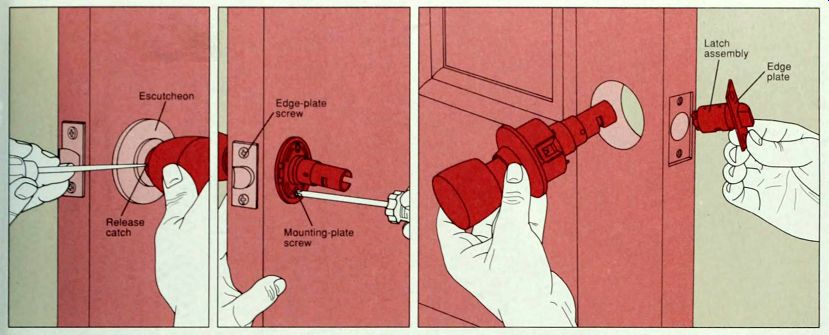
Repairing a loose knob or broken latch. Sometimes a loose knob can be secured simply by tightening two screws located on the escutcheon. Other types require you to remove the doorknob and escutcheon in order to tighten the mounting plate that connects the knob assembly to the door. For the popular model shown above, you must turn the knob until the slot on the knob shank is aligned with the release catch. Use an awl to depress the catch (above, left) and release the knob.
Then twist and pull the escutcheon off the shank. Tighten the mounting plate screws to stop the knob assembly from rattling (above, center). If the latch sticks, remove paint buildup. If this doesn't free it, the latch may be broken. To remove a broken latch assembly, unscrew the mounting plate screws and the screws securing the latch edge plate. Then pull gently on the remaining knob with one hand, while you wiggle the latch and edge plate free with the other (above, right).
Replace the broken latch with an exact duplicate. To reassemble the knob and latch, reverse the steps for disassembly. When reinstalling the escutcheon, make sure you turn it until it catches. Then position the doorknob on the shank, aligning the release catch with the slot, and slide it into place.
ADJUSTING THE STRIKE PLATE
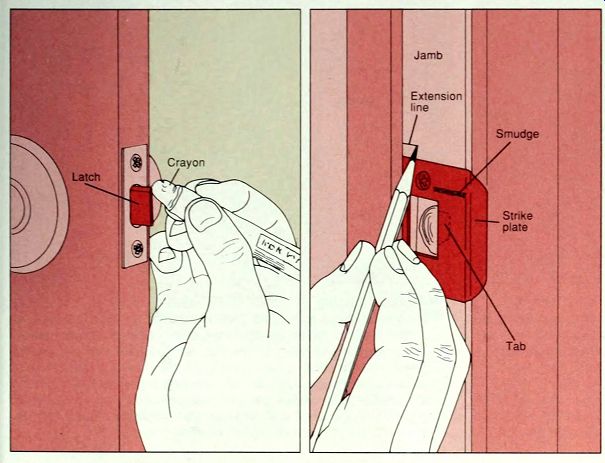
1. Determining strike plate problems. I Before adjusting the strike plate, check that the hinge screws are tight. To pinpoint problems with the strike plate, mortise or latch hole, rub crayon or lip stick on the edge of the latch (far left) and close the door. Open the door and examine the smudge on the strike plate. Measure between the smudge and the strike-plate opening to determine the distance the strike must be shifted to fully engage the latch. If that distance is less than 1/8 inch, file the strike plate (step 2). If it is more than that, mark the distance on the jamb (near left) and extend the mortise (step 3) to reposition the strike plate. To stop a rattling door if your strike plate has a metal tab as shown here, pry the tab outward with an old screwdriver.
Push it in slightly if the latch sticks. If only part of the latch reaches into the strike hole when the door is closed, shim the strike plate as you would a door hinge. Finally, if the latch can't extend its full length because the strike-plate hole is too shallow, deepen the hole (step 4).
ADJUSTING THE STRIKE PLATE (continued)
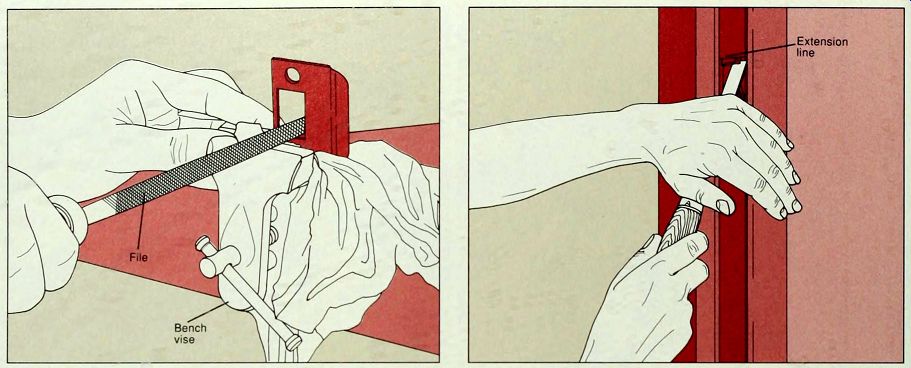
2. Filing the strike plate. Unscrew the strike plate and clamp it in J a bench vise, protecting the plate with cloth. Using a metal file, file the edge of the opening to the crayon mark (above). Then re-secure the strike plate with the top screw only. Close the door to see whether the latch catches correctly. If it does, replace the bottom screw. If the latch still doesn't catch properly you may have to reposition the strike plate by extending the mortise (step 3).
3. Extending the mortise. Remote the strike plate and pack the screw holes with toothpicks or wooden pegs. Using a rubber mallet and a wood chisel, cut straight into the extension line you marked on the jamb (step 1). Then with the chisel and hand force only (above), clean out the new mortise shape. Check that the plate sits evenly in its new mortise, then trace the outline of the new strike-hole position.
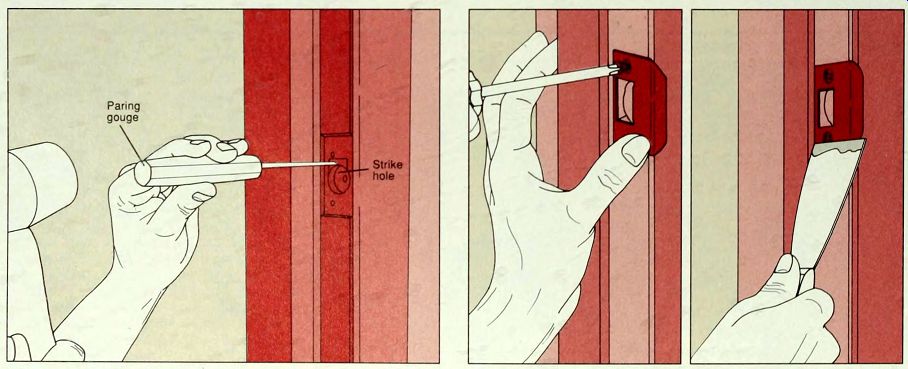
4. Enlarging the strike hole. To increase the diameter or the depth of
the strike hole, use a rubber mallet and a narrow wood chisel, or a paring
gouge if you have one, to chip away wood to the new strike hole outline
(above). Several smaller cuts will produce a cleaner strike hole than a
few big ones.
5. Repositioning the strike plate. Place the strike plate in its new location on the door jamb and mark the screw hole locations Drill a pilot hole for the top screw, then position the plate and drive the screw in (above, left). Then close the door to see whether the latch slides easily into the hole. If it does, add the bottom strike plate screw. If not. adjust the mortise and strike hole as necessary and test again. To fill the gap at the end of the strike plate (above, right), use a putty knife to apply wood putty or spackling compound, depending on whether you plan to stain or paint the wood.
REMOVING AND REHANGING A DOOR
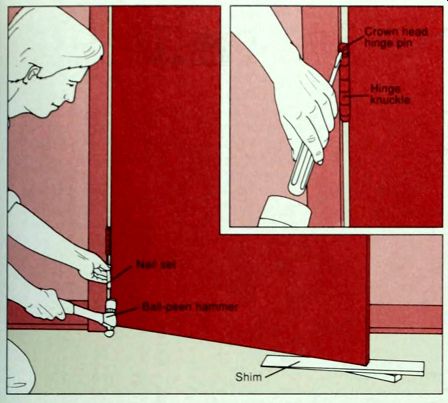
--Removing the door. Wedge the door open with shims (Do not force the door upward or it will be difficult to extract the hinge pins.) Most interior doors have loose-pin hinges. Scrape off any paint that may be restricting the pins. Beginning with the lowest hinge, position a nail set on the bottom of the hinge pin (sometimes the knuckle end is open, other styles have only an access hole), and tap it up with a hammer (above), until about 12 inch of the pin is exposed. Then pull the pin out by hand. If it won t budge, knock it free with an old screwdriver and a rubber mallet: use this same method to free older crown-head hinge pins whose knuckle bottom is fully sealed (inset). After freeing the bottom hinge pin, free the middle pin (if there is one) and finally the top pin. Then, with a helper if necessary, lift off the door.
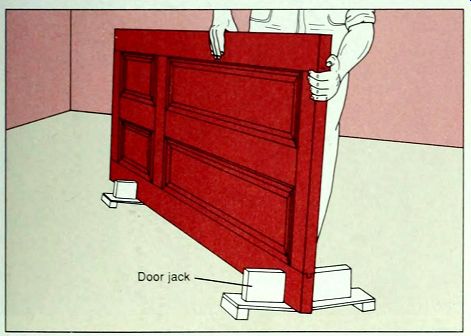
---Propping the door with door jacks. If you plan to turn the door on its side to work, build two door jacks to support the door securely at each end. For each jack, use an 18-inch strip of 1/4-inch plywood or flexible fiberboard with two wood scraps nailed to the bottom as legs. Then nail two scraps of 2-by-4 to the top surface. 2 inches apart. Remove the door (top) and position it in the jacks (above). With the door propped in this fashion, you will be able to work safely while protecting the finish of the door and floor.
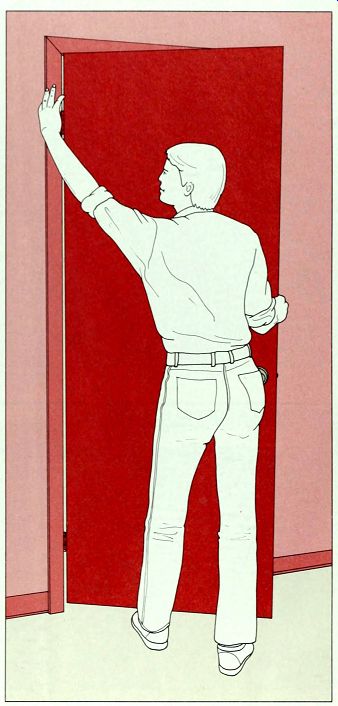
--Re-hanging the door. If you had difficulty freeing the hinge pins when
you removed the door, use a half-round file to make a notch at the top
of the hinge knuckle in order to make it easier the next time. Re-hang
the door: Rest the door on the end of your shoe or on a wedge. Lift the
door up so that the top door hinge slips into that on the jamb and drop
the hinge pin into the knuckle far enough to grip (above). Then do the
same for the bottom and middle hinge, if there is one. Tap the pins in,
using a hammer if they will not press in by hand.
DETERMINING THE CAUSE OF BINDING
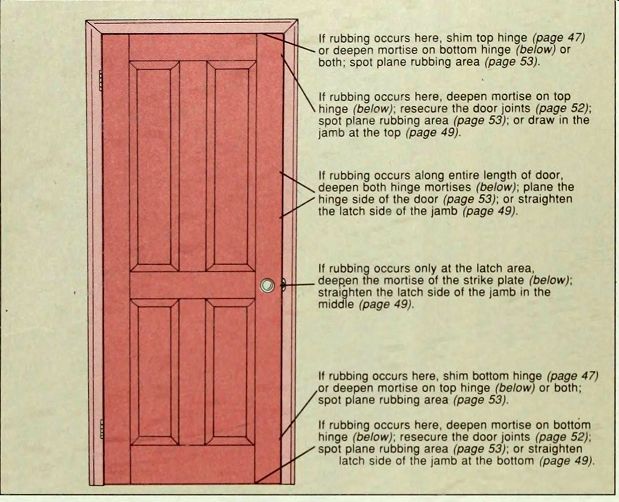
---If rubbing occurs here, shim top hinge or deepen mortise on bottom hinge (below) or both: spot plane rubbing area.
If rubbing occurs here, deepen mortise on top hinge (below): re-secure the door joints ; spot plane rubbing area (page 53): or draw in the jamb at the top.
If rubbing occurs along entire length of door, deepen both hinge mortises (below): plane the hinge side of the door: or straighten the latch side of the jamb.
If rubbing occurs only at the latch area, deepen the mortise of the strike plate (below): straighten the latch side of the jamb in the middle .
If rubbing occurs here, shim bottom hinge or deepen mortise on top hinge (below) or both; spot plane rubbing area.
If rubbing occurs here, deepen mortise on bottom hinge (below): re-secure the door joints spot plane rubbing area: or straighten latch side of the jamb at the bottom.
Correcting a binding door. Binding may sometimes be corrected by simply tightening the hinge screws on the door or jamb. If a screw hole is too large, remove the loose screw, pack the hole with toothpicks or a wooden peg, and replace worn screws with new, longer ones. If loose hinges aren't the problem, adjust the door, using the diagram at left as a guide. Work on the door before straightening the jamb. Use a long straightedge to check whether the door is warped. For a slight warp, reposition the door stop. If rub marks are not visible on the jamb, slip a nickel around the door between the door and jamb. A properly installed interior door will have a gap of at least 1/16 inch between it and the jamb; the coin will catch where the door is sticking.
DEEPENING A MORTISE FOR A HINGE
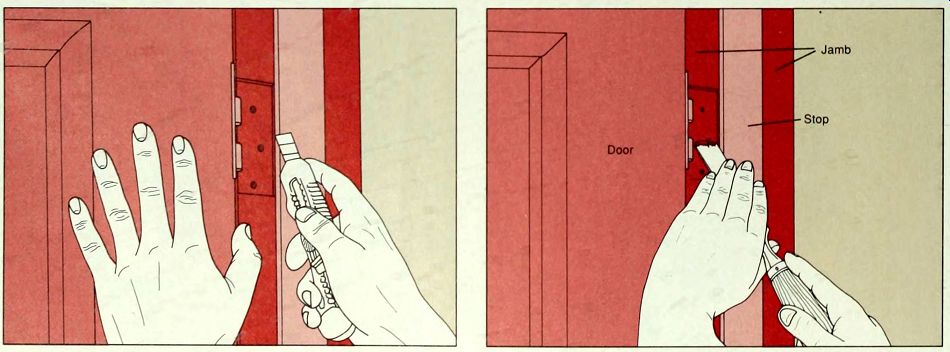
1. Etching the mortise depth. Only deepen a hinge mortise I when a hinge leaf protrudes slightly from the jamb or door edge; when reinstalled, the hinge must be flush with the surface of the wood. To deepen the mortise on the jamb only, simply wedge the door open. If deepening the mortise on the door, remove the door and prop it securely.
If you need 1/8 inch or more of extra depth, deepen the mortises on both the door and the jamb.
To deepen a mortise, first unscrew the hinge leaf and score the perimeter of the mortise with a utility knife (above).
2. Chiseling the mortise. Using a wood chisel with the beveled J edge facing in and working from the center of the mortise area outward toward the perimeter, clean out the mortise to the required depth. Use hand force only, and do not force the chisel too much.
Place the hinge leaf into the mortise, making sure that it sits firmly and evenly in position. If you have made the mortise too deep, shim the hinge flush with the surface of the wood. Secure the hinge leaf in place with screws; do not reuse screws with worn heads.
SHIMMING HINGES
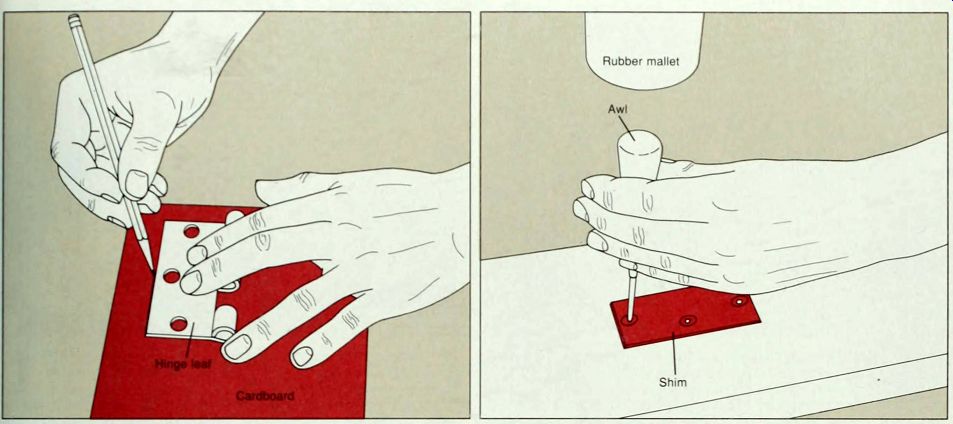
1. Making the shim. Wedge the door open and remove the pin of the hinge that requires shimming.
Then unscrew the jamb hinge leaf; you may have to scrape paint from the screw slots. If a screw turns in the hole without coming out, stick the tip of an old screwdriver either under the hinge leaf or under the screw head and pry it up. Use a pair of locking-grip pliers to turn the screw, pulling it out at the same time. If you are shimming the entire hinge leaf, trace the leaf and its screw holes on a piece of thin cardboard. Then cut out the shim; make two or three for extra thickness. Use an awl to puncture the cardboard at each screw hole position (above, right). If shimming only one edge of the hinge leaf (below), cut out about 1/3 of the traced pattern. To make a shim for a strike plate, unscrew the plate from the jamb and trace its outline as you would for a hinge shim.
2
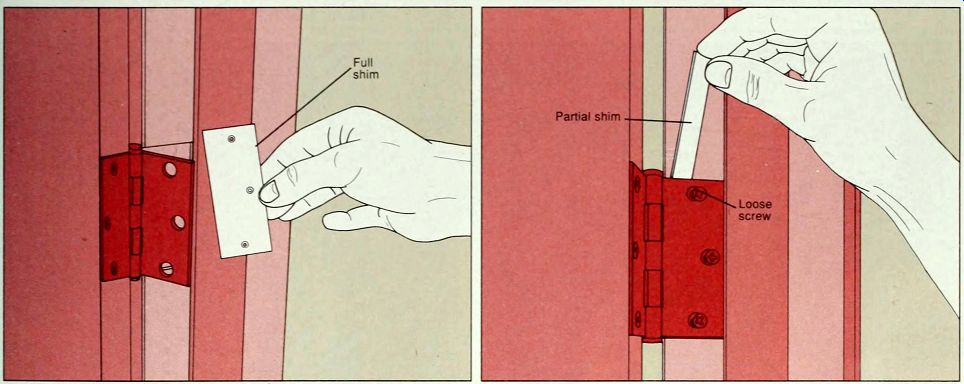
. Shimming a hinge. Re-pin the hinge leaf and place one or more shims in
the hinge mortise (above, left). Position the hinge leaf over the shims,
and secure it with the hinge screws. If the screw holes are too large,
pack them with toothpicks or wooden pegs, and replace worn screws with
new, longer ones. Remove the wedges from under the door, and test whether
the door closes smoothly. Repeat the shimming process until the door works
perfectly. To shim a strike plate, insert the cardboard shim under the
plate.
Resecure the plate to the jamb and test whether the latch catches properly. Add shims until it does, but do not shim out beyond the surface of the jamb. If using partial shims, use them on both the top and bottom hinges. Placed behind the pin edge of the hinge leaf (above, right), partial shims will make the door swing slightly farther into the jamb; placed behind the outer edge of the hinge leaf, they will pull the door slightly away from the door stop. To install a partial shim, loosen the hinge leaf screws and slide the shim behind the leaf.
REPOSITIONING THE DOOR STOP
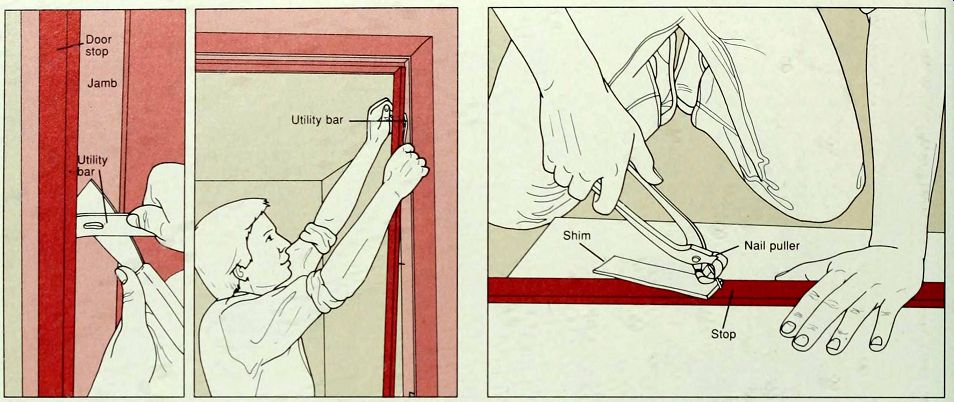
1. Removing the door stop. Score paint sealing the edges of the I door stop to the jamb with a utility knife. A stop that butts against another stop should be removed first. To pry a stop free, insert a flexible putty knife between it and the jamb, starting at one end. Tap the knife gently with a rubber mallet to open a crack between the stop and the jamb. Then slip a small utility bar into the crack, pivoting the bar on the putty knife blade to protect the wood surface (above, left).
Exert gentle pressure, lifting the stop out about 1/4 inch at each nail.
Then return to your starting point and pull the stop completely free of the jamb (above, right).
2. Removing nails from the stop and jamb. Pull old nails from a door stop that you plan to reuse. Use a nail puller to grip their shanks where they protrude from the back of the stop, rolling the puller s head against a shim to protect the surface of the wood (above).
Pull nails from the jamb the same way. If the door stop broke when you removed it, take the pieces to a lumberyard and get an exact replacement.
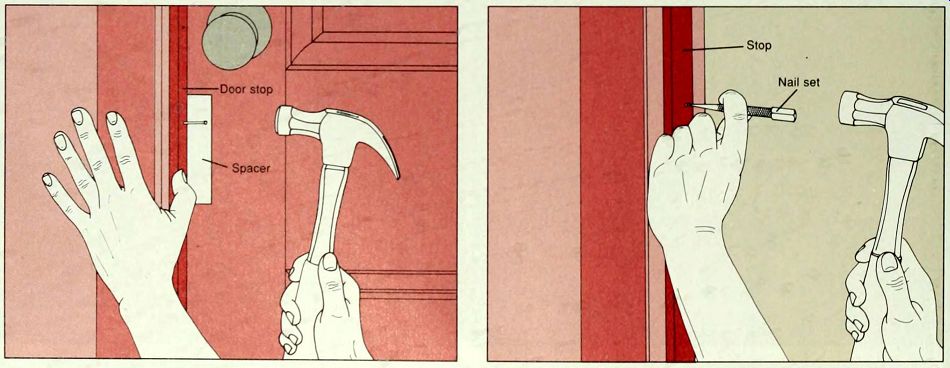
3. Repositioning and securing the door stop.
Close the door and position the stop against it, using a thin piece of cardboard as a spacer between door and stop. Starting at the middle, near the strike plate, lightly press the stop against the cardboard spacer and drive a slightly larger finishing nail than the ones you removed (step 2) into the closest old nail hole.
Nail at a slight angle, until only 1/8 inch of the nail protrudes. Continue driving nails through old holes where possible, positioning nails about 16 inches apart.
Alternate nailing up and down the stop, forcing it to conform to the shape of the door.
4. Countersinking and filling nail heads. When the stop is secured, check to see that the door rests evenly against it.
Then use a hammer and nail set to set the nail heads 1/16 inch beneath the surface of the wood. If the wood is to be painted, use a putty knife and spackling compound to fill the countersunk nail holes, as well as any holes left by the old nails. For wood that is to be stained, use wood putty.
SHIMMING A DOOR JAMB
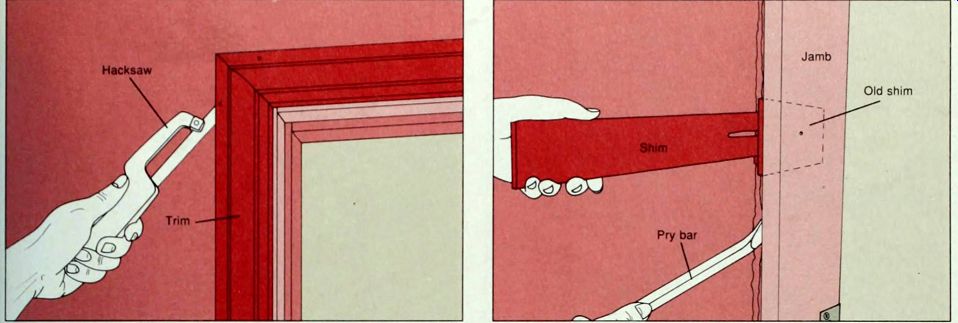
1. Removing the trim. If your door no longer makes contact with I the door stop, remove the stop (page 48) and trim on both sides of the door and shim out the jamb If the side trim is blind-nailed to the top trim at the corners, first cut through built-up paint with a utility knife, then slip a hacksaw behind each corner and cut the face nails as shown. Pry up the trim, using the same technique described for repositioning the stop. Use a nail puller to remove the finishing nails from the jamb and the trim.
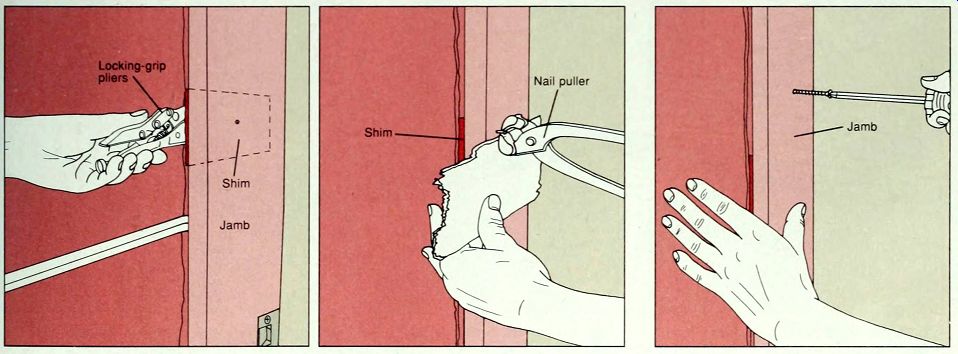
2. Shimming out the jamb and replacing the trim. Locate the shims between the jamb and the jack stud. With a utility knife, cut a 1/2-inch notch at the thin end of a cedar shim. Insert a pry bar between the jamb and the jack stud at a shim location and lift the jamb out far enough so you can see the shank of the shim nail. Fit the notched end of the shim around the nail (above) and test the door for fit. If necessary, add another shim. Drive a finishing nail through the jamb to secure the new shim. Break off the protruding end of the shim. Rein stall the trim, reversing the steps you followed to remove it.
STRAIGHTENING A BOWED DOOR JAMB
1. Removing the shims. Hold a long, straight 2-by-4 against the jamb and mark with a pencil the high point of the bow. If the jamb is only slightly bowed, try reseating it; hold the 2-by-4 against the high point of the bow and hit it once or twice with a rubber mallet.
If that doesn't work, you will have to remove some shims. Pry off the stop and trim (step 1, above). Use a pry bar to lift the jamb out enough to fix a pair of locking-grip pliers onto the shank of the nail securing the shims to the jack stud (above). Push against the jamb until the nail head protrudes. Using a nail puller padded with an old shim, pull the nail head out just enough so a shim falls loose (above, right), and check the straightness of the jamb. If too many shims drop, you may have to replace one (step 2. above).
2. Drawing in the jamb. Drill a pilot hole for a 3-inch screw through the high point of the bowed jamb. Drive in the screw until the jamb is pulled straight. Then cover the screw head ( step 4), and replace the trim (step 2, above) and the door stop.
CUTTING A DOOR
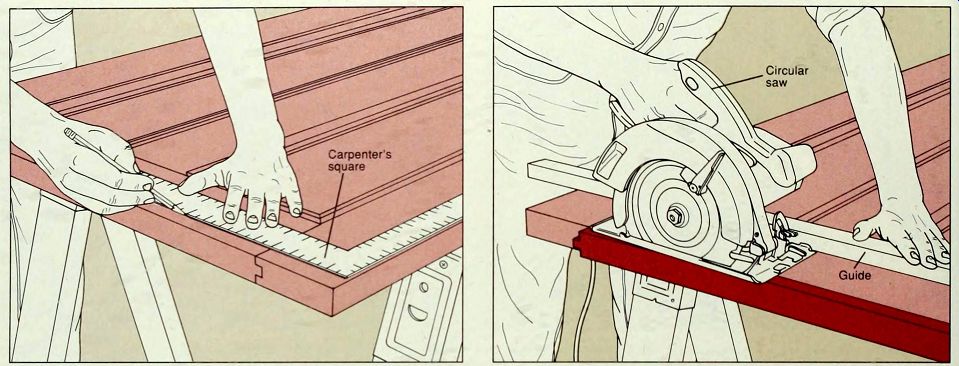
1. Measuring and marking. Tailoring a new door to fit an old I doorway, or to clear new carpeting, may involve cutting at least 1/2 inch from one or more edges of the door. Leave a minimum of 3 inches of rail or stile on a solid door to maintain its structural integrity. Remove the door from its hinges and lay it flat on saw horses. Then, using a carpenter's square, draw a line across the door at the required distance from each edge. If cutting a solid door, go to step 2. If cutting a hollow door, go to step 3.
Cutting a solid door. Cut a solid wood door with a circular saw. Wear safety goggles and check the edge of the door for nails before starting. Adjust the cutting depth of the saw blade 1/2 inch deeper than the thickness of the door. Clamp a piece of wood to the door as a guide for the base plate of the saw, to ensure that the cut is perfectly straight. After cutting, clean off any roughness or splinters with medium-grit sandpaper on a sanding block. Hang the door. To make minor adjustments, use a plane.
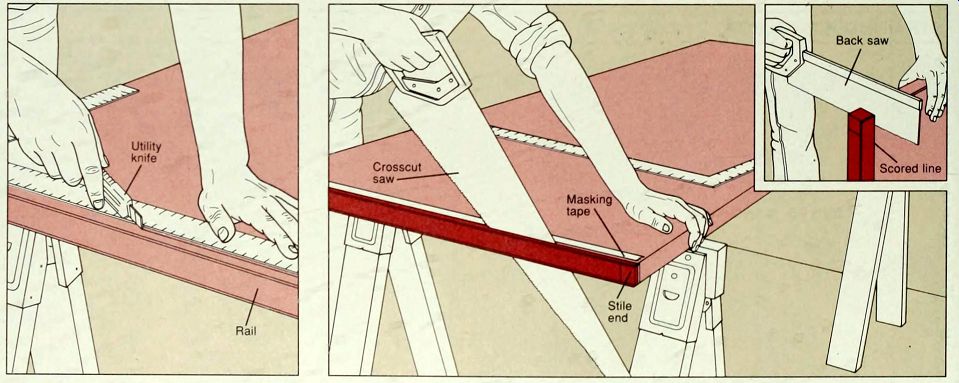
3. Cutting through the veneer. Score through the veneer of a hollow door
with a utility knife and run a strip of masking tape along the scored line
to prevent splintering. Then cut the door (step 4); if the knife did not
encounter the underlying rail, first score through the veneer on the other
side of the door as well, then saw through the stiles (step 4, inset).
Then clean the rail (step 5) and glue it in place (step 6).
4. Sawing through a hollow door. Use either a circular saw and guide (step 2) or a crosscut saw (above) to cut through a hollow door. Place the blade a bit outside of the line you scored in the veneer (step 3).
If you are using a handsaw, keep the strokes perpendicular to the door. After cutting the door, sand the edges smooth with medium-grit sand paper on a sanding block and re-hang it. If you only need to cut through the stiles, prop the door securely on its hinge side, and use a backsaw to saw through the stiles at the scored lines in the veneer (inset).
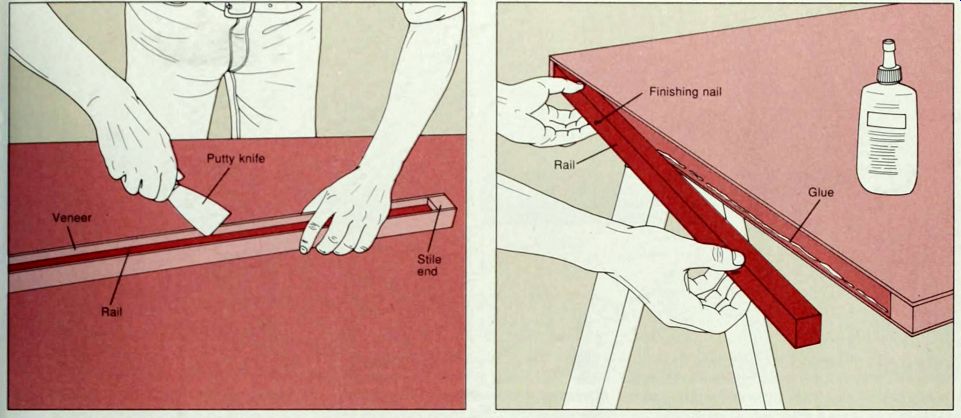
5. Freeing and cleaning the rail. Free the rail by running the blade of a putty knife between the rail and veneer. Break off the stile ends and scrape splintered veneer and dried adhesive off with a putty knife or paint scraper. Drive a short finishing nail partway into the rail near each end for help when repositioning the rail (step 7).
6. Gluing the rail. Push back any support material inside the door that might interfere with the insertion of the rail. Apply a thin bead of carpenter’s glue to the back of the door's veneer, and allow it to set for a few minutes until the glue is tacky. Then insert the rail in the door (above).
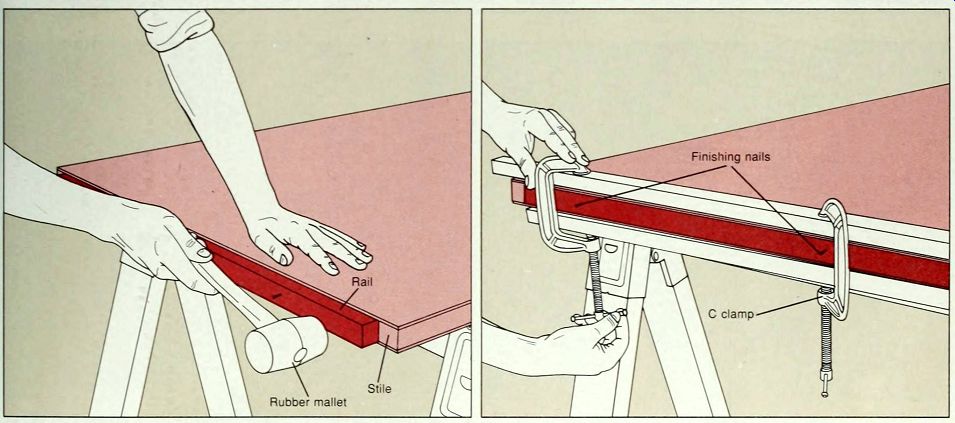
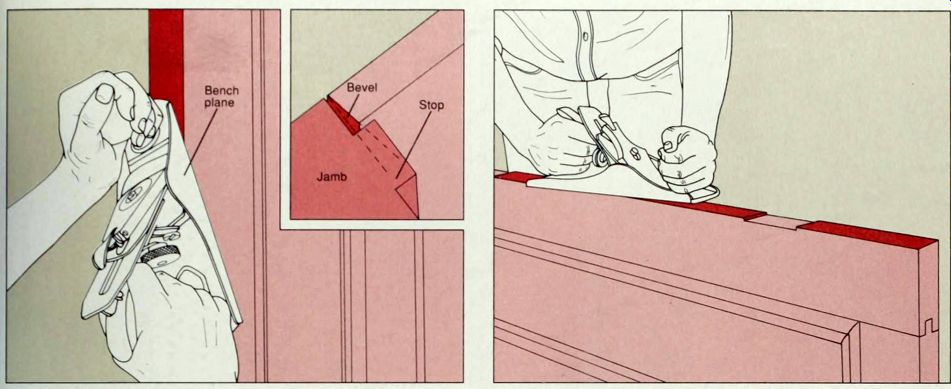
7. Securing and clamping the rail. Lightly tap the rail into position, using a rubber mallet m (above, left). If you accidentally tap either end of the rail too far, pull on the finishing nails to adjust the rail correctly. Then, using strips of wood to protect the veneer surface, clamp the veneer against the rail (above, right). When the glue has set, remove the clamps and pull out the nails with a nail puller. Hang the door.
REJOINING A DOOR JOINT USING A PIPE CLAMP
Gluing and clamping the door joint. Panel doors that are subject to excessive humidity or temperature variations can spring open at the joint between the rail and the stile, causing the door to bind on the door jamb. Remove the door and place it on sawhorses. Using a putty knife, scrape dirt and old glue out of the gap between the stile and rail and brush it out. Apply a thin bead of carpenter's glue in the gap on both sides of the door (above, left). Attach a pipe clamp, its ends padded with scrap wood, across the door from stile to stile (above, right). Tighten the pipe clamp as shown to draw the stile and rail together. Leave the clamp on overnight.
REJOINING A DOOR JOINT USING A RECESSED LAG BOLT
1. Drilling a hole for the lag bolt. Installing a recessed lag bolt is a severe measure not suitable for very old, dry doors, but it may be necessary if the stile has warped out badly. The bolt must be at least 1 inch longer than the width of the stile. If the tenon is visible in the edge of the stile do not use a lag bolt.
Remove the door and prop it securely. Using a power drill with a bit the size of the lag bolt shank, drill through the stile and into the rail. Then use a 1/2-inch bit to countersink for the lag bolt head (above), and to accommodate the socket wrench head used to tighten the lag bolt (step 2).
2. Installing the bolt. Clean the gap between rail and stile using a putty knife and brush it out. Use a socket wrench to drive the bolt, tightening it until the stile is drawn snug against the rail (above). It may be necessary to draw in the stile gradually by tightening the bolt several turns a day. Inject glue in the joint just before you draw it closed. When the stile is snug against the rail, and the lag bolt head is beneath the surface of the door, fill the hole with wood putty or spackling compound (step 4).
PLANING A DOOR TO SHAPE

Bevel; Bench plane; Stop Jamb
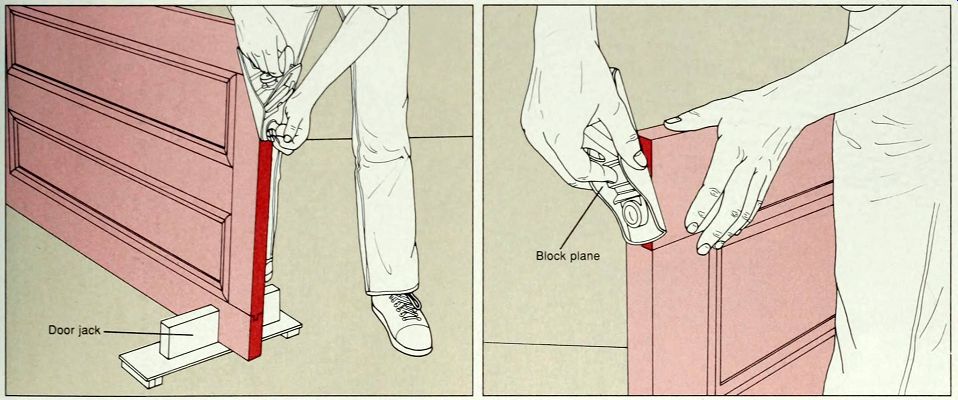
--- Spot planing a door. Try sanding the rubbing spots on the door with sandpaper on a sanding block. If there is too much to sand, use a bench plane to remove excess wood, but do not plane the latch area.
If the door rubs near the latch, remove the door and its hinges and plane along the hinge side (right). To spot plane, wedge the door open securely. Set the plane blade cutting depth for very fine planing, and test first on a scrap of wood. The latch edge of a door is beveled so it can swing closed (inset): if you smooth off the bevel, reshape it with coarse sandpaper on a sanding block. Take off just enough wood so that the edge will not catch on the jamb as the door is closed.
-- Planing the side of the door. Remove the door and its hinges and prop
it securely on its latch side. Set a bench plane blade to the
required depth, and always test its action on a scrap piece
of wood before working on the door itself. Plane the entire length of the
door, the plane's long base will help you to produce a straight, flat surface.
If you plane so much wood from the hinge side that the hinge mortises are
about to disappear, pause and deepen the mortises now (page 46) before
continuing.

-----Planing door ends. If more than 1/4 inch of the door must be removed,
cut it rather than planing it. Spot plane (top. left) the top
of the door with the door still hung; to plane the bottom of the door,
remove it and prop it securely with door jacks. Set the blade
of a bench plane to the required depth, and test its action
on a scrap piece of wood before working on the door itself. Plane in toward
the middle of the door (above, left). To plane the end grain of a stile,
use a block plane (above, right) with a freshly sharpened blade only slightly
extended. Shave in small shallow strokes, from the corner inward.
STRAIGHTENING A WARPED DOOR
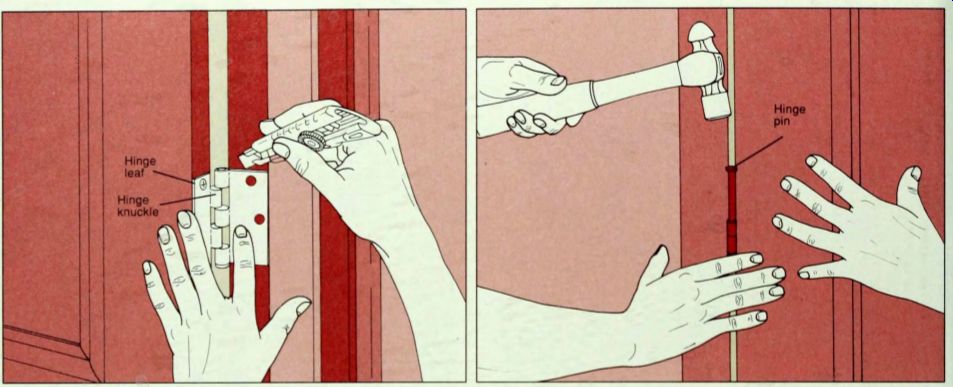
----Adding a third hinge. If the door is warped slightly near the middle, adding a middle hinge may solve the problem. Position a hinge leaf against the edge of the door and use a utility knife to score its outline. Chisel a mortise to the same depth as that of the top and bottom hinges. Screw the leaf to the door. Now press the other leaf against the jamb, engaging the hinge knuckles as shown. Score the leaf outline on the jamb (above, left). Chisel the mortise and screw in the hinge leaf. Have a helper push against the middle of the door, bringing the hinge knuckles in line, so that you can tap in the pin with a hammer (above, right).
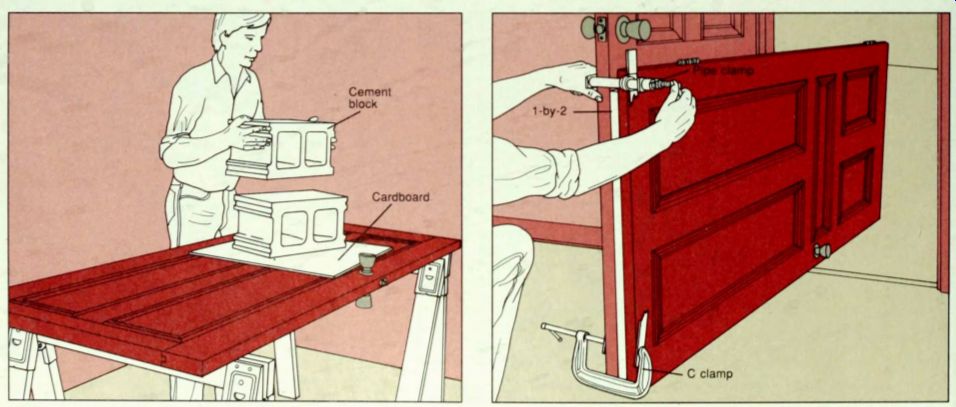
----Straightening a center warp with weights. Remove the door
and lay it flat on sawhorses.
Use a carpenter's level to locate the center of the warp. Protecting the door surface with cardboard, place heavy weights-such as concrete blocks, shown here-at the center point of the warp. Check the door every twelve hours, leaving the weights on until the door is slightly warped in the opposite direction.
Correcting a corner warp with clamps. Remove the door and find the center of the warp as described at left. Then bolster the warped door against a strong, straight door, with the warped corner at the top. warp facing out. Put a 1-by-2 between the doors. Attach a clamp, its jaws padded with scrap wood, to each corner of the door.
Tighten the top clamp until the corner is drawn in slightly (above). Over a period of several days, continue tightening the top clamp until the corner is straight.
PATCHING A HOLE IN A HOLLOW DOOR
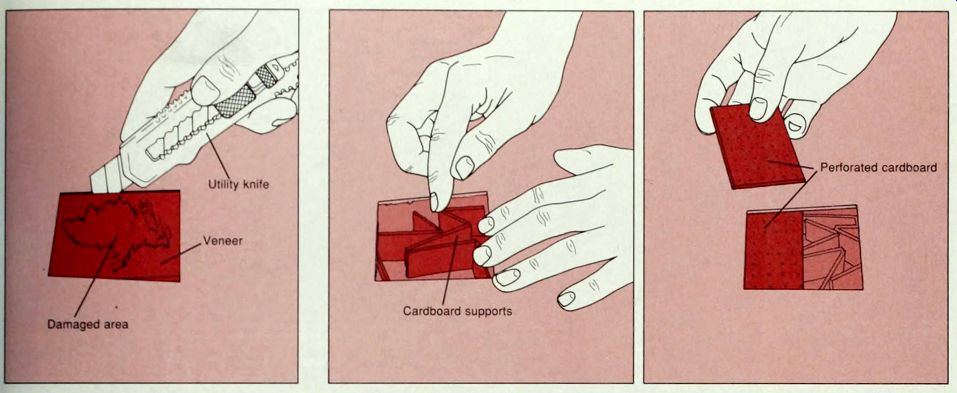
1. Cutting out the damaged area, Using a sharp utility knife, cut out a rectangle around the damaged area in the veneer. Trim away splinters and push the support material inside the door away from the hole.
2 .Making and inserting cardboard supports. Measure the depth of the hole and subtract 1/16 inch. Cut strips of 1/8-inch-thick cardboard to this exact width. Fold the strips loosely and insert them into the hole (above, left) to support a new surface. Cut a rectangle of the same cardboard a little larger than the hole. Use an awl to perforate this piece, and cut it in half. Insert one half into the hole on top of the bent cardboard strips; the fit should be very tight (above, right). Then slip the second half into place, butting it against the first. Push on the cardboard; it should resist downward pressure, and allow little sideways movement.
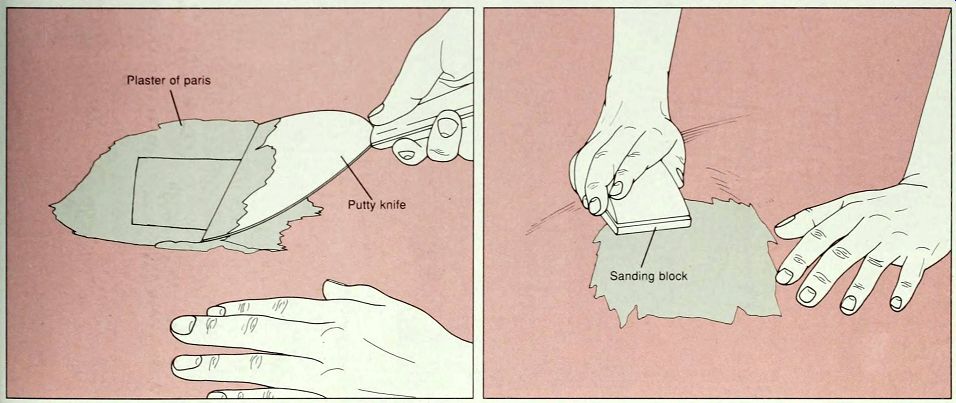
3. Filling and sanding. Mix enough plaster of Paris to cover the perforated
cardboard flush to the veneer surface. Apply plaster to the cardboard with
a flexible putty knife, squeezing it through the perforations (above,
left). Work fast; plaster of Paris sets quickly. When the plaster is
dry, sand it smooth, using fine sandpaper on a sanding block (above,
right). Apply a second coat of plaster if the surface is not perfectly
smooth, and sand again. Then paint the door.
SERVICING A FOLDING DOOR
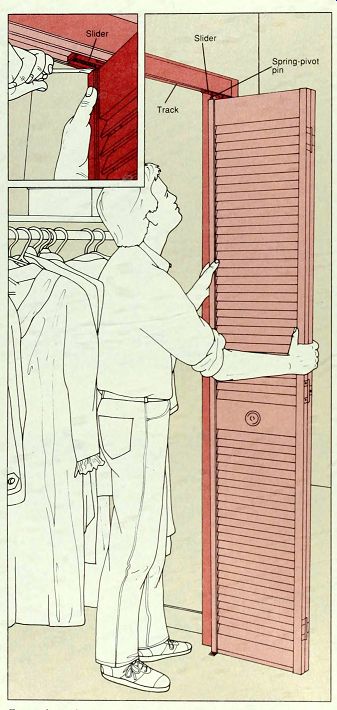
---Correcting a jammed or dragging door. A folding door that jams usually needs only to be removed and re-hung properly.
Fold the door open and lift it up out of the floor bracket, then pull it down out of the track (above). Tighten the screw on the top corner bracket if it is loose. To re-hang the door, fit the top corner pin back in its bracket on the track.
Then lift the door, and insert the pin at the bottom into its bracket on the floor. Finally, depress the spring-pivot pin at the top with a screw driver, and slip it back into its slider (inset).
If the folding door has more than two panels replace the other spring-pivot pins the same way.
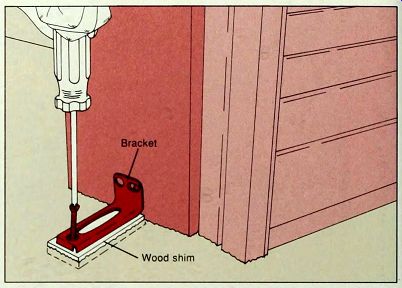
---Raising the floor bracket. To prevent the door from dragging or jamming
on newly-installed carpeting, remove the door (left) and cut
or plane its bottom edge. To raise the floor bracket, un screw
it and trace its outline on a scrap of wood the same thickness as the new
carpeting. Cut out the wood shim and insert it between the bracket and
the floor. Reinstall the bracket, using screws that are long enough to
pass through the shim into the floor (above). Replace the door (left).
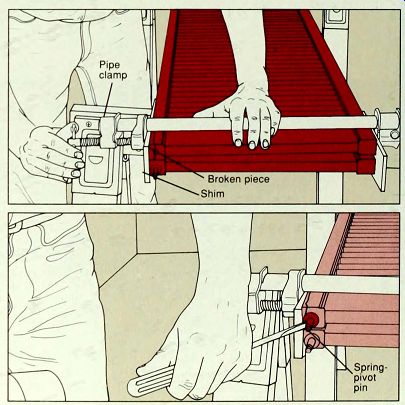
---Repairing a broken corner. The spring-pivot pin in a folding door weakens
the top corner. If the door is yanked or forced, the corner may break and
the pin fall free. Remove the door as described at left and place it on
sawhorses or a work bench. Apply a small amount of carpenter's glue to
the broken piece, fit it in place, and then pull it off.
When the glue is tacky, press the broken piece back into position, and secure the corner with a pipe clamp padded with wood shims (above, top). Before the glue sets, tap the pin in place with an old screwdriver and a mallet (above, bottom). Leave the clamp on until the glue is dry.
REPLACING A FIXED LOUVER
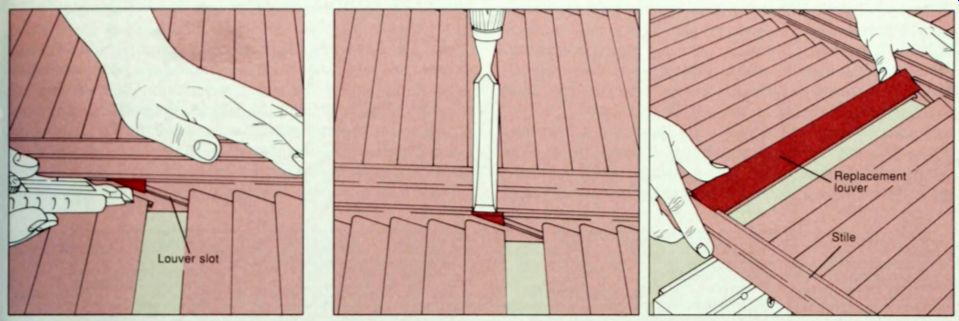
1. Extending the slot. Remove the door and place it on sawhorses. Pull out any pieces of broken louver that may still be attached. Working from the less visible side of the door, use a utility knife to score a notch at the louver slot on each side of the door (above).
2. Cutting and inserting a new louver. Using a wood chisel and rubber mallet, carefully M cut out each notch, extending the louver slot to the edge of the door stile (above, left). Keep the pieces for replacement later. Buy a new louver of the same width as the others. Measure the distance between the stiles of the door, and add 1/8 inch. Using a backsaw and miter box. cut the new louver to size. Stain or paint it to match the finish of the other louvers and push it into the slots (above, right). Glue the chiseled pieces in place and re-hang the door.
SERVICING A TOP-HUNG SLIDING DOOR
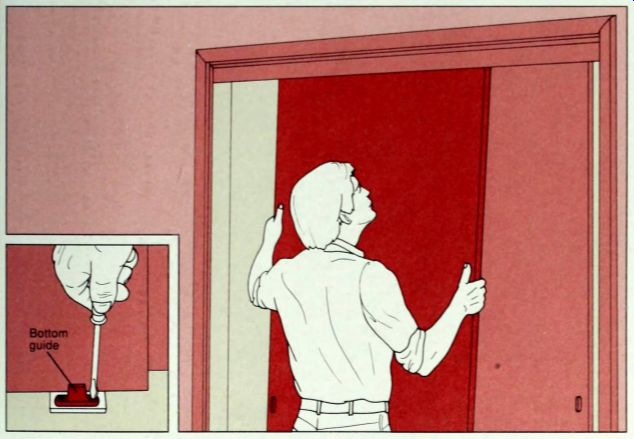
--- Un-jamming a top-hung sliding door. Sliding closet doors generally hang from the top, with a simple roller mechanism that moves in a track. Some models also have a bottom guide to maintain alignment. Sliding doors may jam either because one of the rollers jumps out of the track or because the bottom guide comes askew. To reengage the roller wheel, first use a screwdriver to remove the bottom guide (inset). Check from the inside of the closet whether the model you have has access slots in the back of the track to permit reinsertion of the roller wheels. Then swing the door out, lift it upward and fit the wheel through the access slot, before settling the roller back into the track. Then replace the bottom guide.
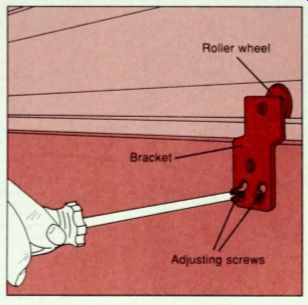
---Correcting a dragging top-hung sliding door. A sliding door may drag because the roller wheel or bracket on the top inside edge of the door requires adjustment to accommodate newly-installed carpeting. Loosening the bottom screws on the bracket (above) may allow you to raise (or lower) the door's roller. Check what type of hardware your door has to determine where the adjustment can be made. If the door bottom needs to be raised more than is allowed for by an adjustment to the roller assembly, remove the door (left) to cut or plane it. Then unscrew any bottom guide from the door (left, inset) and raise it with a wood shim the same thickness as the new carpeting. Replace the bottom guide and re-hang the door (left).