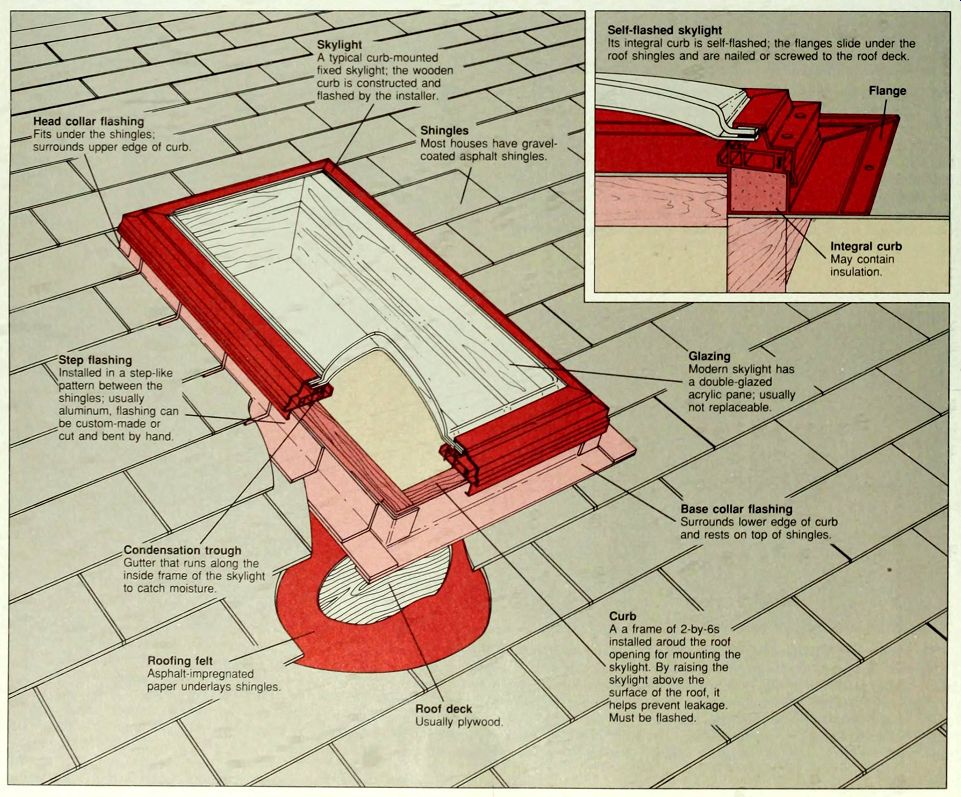
A skylight lends a sense of spaciousness to a room or hallway by breaking the confinement of a closed ceiling. The traditional multi-paned glass structure has been superseded by modem styles with a clear acrylic, double-glazed dome and a prefabricated aluminum frame. Two variations are shown below. One is mounted on a raised wood frame called a curb: the other has a built-in aluminum curb (inset). The curb helps divert water away from the skylight. To keep it watertight, the wood curb is flashed - wrapped with thin sheets of aluminum overlapped in such a way that they shed water down-roof. The aluminum curb has flanges that serve as built-in flashing.
Flashing joints are sealed with roofing cement.
Modem non-opening skylights rarely leak; if water gets into the house, fault usually lies with the lashing. Inspect the flashing periodically: if it is damaged, also inspect the wood curb beneath it for rot. Some skylights are installed without a curb. If this type of skylight leaks, it should be replaced with a model that requires a curb.
Most houses have asphalt shingles, secured with shingle nails (or staples) and roofing cement. The lashing strips are layered among the shingles or inserted beneath them. When inspecting or removing lashing, take care not to tear the shingles. Loosened shingles may be renailed and cemented, but damaged ones must be replaced. If your roof is cedar, slate or die, consult a roofing expert before servicing a skylight.
You can buy new aluminum lashing in rolls and cut and bend it to shape, or it can be custom-made at a metalwork shop. Wear work gloves when handling lashing.
Before working on the roof, read the precautions. When you are finished, clean any spilled roofing cement off an acrylic pane with kerosene. Wash the pane with a mild detergent-and-water solution and wipe it with a chamois.
---------
Self-flashed skylight
Its integral curb is self-flashed; the flanges slide under the roof shingles and are nailed or screwed to the roof deck.
Skylight -- A typical curb-mounted fixed skylight; the wooden curb is constructed and flashed by the installer.
Head collar flashing
Fits under the shingles; surrounds upper edge of curb
Shingles
Most houses have gravel coated asphalt shingles.
Integral curb
May contain insulation.
Glazing
Modern skylight has a double-glazed acrylic pane; usually not replaceable.
Step flashing Installed in a step-like pattern between the shingles: usually aluminum, flashing can be custom-made or cut and bent by hand.
Base collar flashing
Surrounds lower edge of curb and rests on top of shingles.
Condensation trough
Gutter that runs along the inside frame of the skylight to catch moisture
Curb
A a frame of 2-by-6s installed around the roof opening for mounting the skylight. By raising the skylight above the surface of the roof, it helps prevent leakage.
Must be flashed.
Roofing felt Asphalt-impregnated paper under lays shingles.
Roof deck Usually plywood
----------
39
TROUBLESHOOTING GUIDE
[[[DEGREE OF DIFFICULTY: Easy H Moderate Complex
ESTIMATED TIME: O Less than 1 hour 01 to 3 hours Over 3 hours]]]
SYMPTOM
Skylight on low-pitched roof leaks
Skylight on steeply pitched roof leaks
Condensation drips from skylight
Skylight admits too much heat
Glass or plastic skylight cracked, discolored, crazed, stained or scratched
POSSIBLE CAUSE
Self-flashed skylight without a curb
Wood curb rotted due to inadequate flashing Roofing cement dried out and cracked; flashing torn or corroded
Glazing compound around glass pane deteriorated Roofing cement dried out and cracked; flashing torn or corroded Self-flashed skylight without a curb Skylight installed in bathroom, kitchen, laundry room or other humid location
Skylight faces southwest and transparent glazing does not block sun s rays Wear and tear caused by ice. hail or fallen branches; mishandling during installation
PROCEDURE
Remove skylight and replace with self-flashed model with an integral curb or with one that uses a wood curb. Build wood curb and flash
Remove skylight and curb; build new curb and install new flashing
Seal flashing with roofing cement or patch; install new flashing
Remove glazing compound and re-caulk with silicone sealant
Call for service to replace flashing
Call for service to replace skylight with self-flashed model with integral curb or with one that uses a wood curb
Install a ventilating fan; or replace existing unit with ventilating sky light, or skylight with condensation trough
Install custom shade following manufacturer s instructions; replace existing unit with ventilating or tinted skylight
Replace skylight or re-glaze if possible, following manufacturers instructions
------------------
SECURITY ON THE ROOF
Ladder hooks; Skylight; Ladder ; Roof brackets
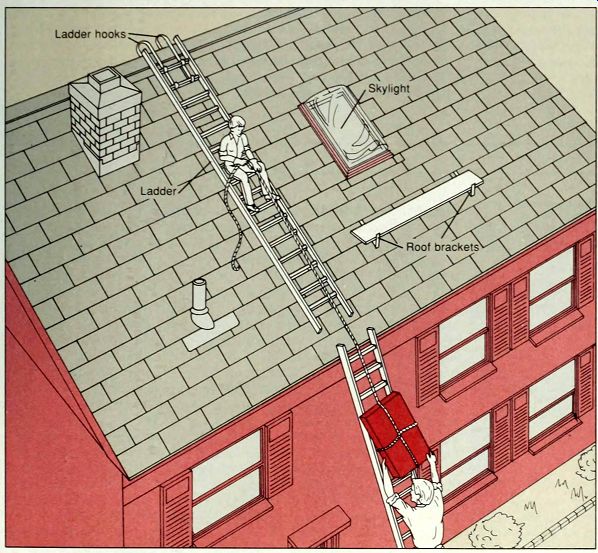
Working on the roof. Essential for reaching the roof is a heavy-duty extension
ladder. A second ladder, fitted with ladder hooks, can be hung from the
ridge of the roof for a secure toe hold. A 2-by-10 plank supported by a
pair of roof brackets provides extra comfort and a plat form for work materials.
All of these tools can be rented. On a steep roof where the pitch is more
than 4 in 12-that is, the roof rises 4 feet for every 12 horizontal feet-enlist
the services of a professional. To work on a roof with a lower pitch, take
the following precautions:
Plan repairs for when there is no forecast of rain, wind or extreme temperatures. Work with a helper when moving materials between the ground and roof. While on the roof, make sure someone is within earshot and can lend assistance if necessary. Wear soft-soled shoes, and heavy work gloves when handling flashing.
Assemble the tools and materials you need and hoist everything up at the same time. Make sure the ladder is firmly planted on level ground, with the distance from the foot of the ladder to the base of the wall one quarter the length of the ladder. Haul up the skylight and curb with ropes, using the sides of the ladder as guide tracks. Protect the skylight from scratches with blankets or its original container.
REMOVING AND REPLACING A SKYLIGHT
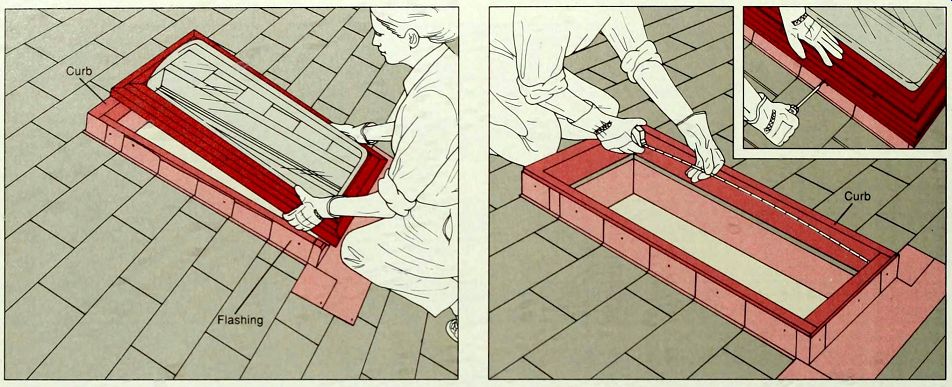
1. Removing the skylight. To service a skylight, prepare to work safely on the roof. A leak may be caused by failure of the skylight, the flashing or the curb. A skylight like the one shown here is most likely to leak because the flashing has deteriorated or was poorly installed. To remove this type of skylight for replacement or service, use a screwdriver to unscrew it from its curb. Lift the skylight off the curb and lay it carefully on the roof.
Some self-flashed skylights rest directly on the roof deck. If this type leaks, replace it with one that requires a curb and flashing.
To remove a self-flashed model , pull back the roofing shingles to ex pose the flanges. Work carefully, using a utility bar to pry up the shingle nails or staples. Do not tear or crease the shingles. Remove the screws securing the flanges to the roof deck and set the skylight aside.
To measure for a new curb or skylight, go to step 2.
2. Measuring for a new skylight or curl). Whether replacing a curb or installing a new skylight of the type shown above, measure the length and width of the curb from the inside edges (above). Then measure the thickness of the lumber used to build the curb. Before installing a skylight in the old curb, use a stiff putty knife to scrape old roofing cement from the curb, and add a fresh layer. Fasten the skylight to the curb with galvanized wood screws (inset). Build and install a new curb if necessary.
Install a new skylight as above.
To replace a self-flashed skylight, measure the length and width of the opening itself. To install it. slip the flanges beneath the shingles at the top and sides; you may need a helper to pull them back. Rest the lower flange on top of the shingles, leaving it exposed. Screw the flanges to the roof deck with galvanized screws. Nail the shingles in place with roofing nails, through new holes, and cover their heads and the old holes with roofing cement.
SERVICING CURB FLASHING
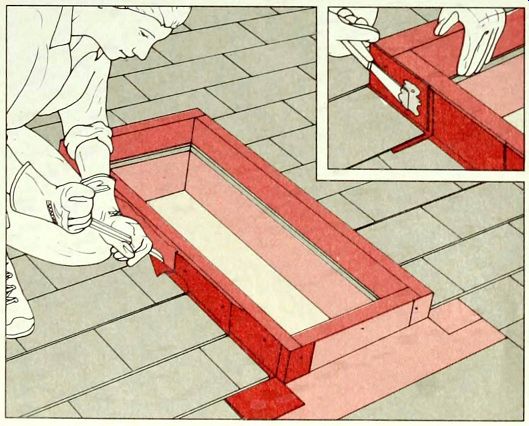
Repairing curb flashing. Remove the skylight (step 1, above). If you have a curbed skylight similar to the one shown, inspect the flashing for corrosion, cracks or missing sections. Use a putty knife to apply a generous amount of roofing cement to seal any small holes or tears where the flashing was nailed to the curb (inset). To repair a larger hole, use tin snips to cut a patch from a piece of flashing. Spread roofing cement around the perimeter of the hole and place the patch on top of the wet cement. Check whether the roofing cement along the curb has deteriorated or was inadequately applied when the skylight was installed. If so, use a pry bar to extract the nails securing the flashing to the curb. Gently bend back the flashing (left) and add a dollop of roofing cement to the curb. Then press the flashing back in place and re-nail it to the curb. Seal all seams between flashing and shingles, and flashing and curb, with roofing cement. If the side flashing is one continuous strip instead of overlapping steps, or if it is badly corroded, reflash around the skylight. Test the curb for signs of rot by sticking the point of a key or a tool into the wood; if the curb is soft and spongy, replace it.
REPLACING THE CURB
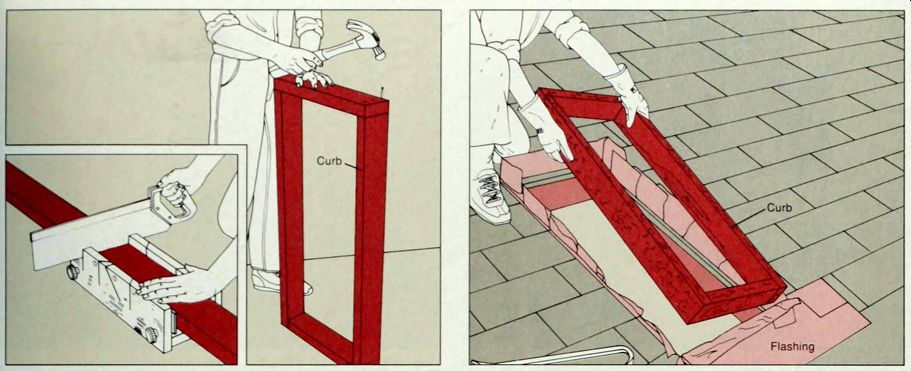
1. Making a curb. Remove the skylight and measure the old curb. Working on the ground, mark the measurements on pressure-treated lumber, usually 2-by-6s Use a backsaw and miter box to cut their ends at right angles at the marks (inset). Butt the ends together so that the inside dimensions of the curb match the sky light opening. Use galvanized nails to secure each butt joint (above). Check that the joints are square by using a carpenter's square, or extend a tape measure diagonally from corner to corner: the diagonal measurements should match. If not. shift the curb until they do. Then brace two opposite corners with wood strips temporarily nailed to the curb to keep the curb square until it is set in place.
2. Removing the old curb. Tie the new curb with rope and. work M mg with a helper, raise it up onto the roof. If installing a new sky light, hoist it. as well as any tools, flashing and roofing cement that you plan to use. at the same time Remove the skylight (page 36, step 1). Pry out the nails securing the flashing around the old curb and bend back the flashing (page 36). taking great care not to damage it. Then use a pry bar to extract nails holding the curb to the roof, or a screwdriver to unfasten any screws. Reach inside the opening and insert the pry bar between curb and roof, and lever the curb free of the roofing cement. Then take hold of the edges of the curb and pull it away from the roof deck (above). Use a stiff putty knife to scrape any remaining roofing cement off the deck where the curb was resting.
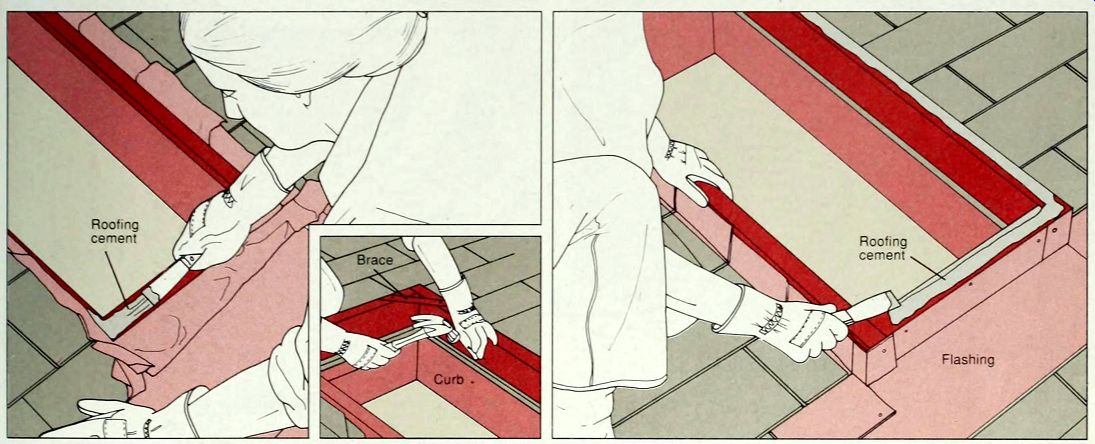
3. Installing the ne curb. Use a putty knife to apply a 2-inch-wide bed
of roofing cement around the skylight opening (above, left). Set the curb
in position, pressing it into the roofing cement.
Toenail the curb through the deck into the wood framing of the roof, driving 3-inch galvanized nails at 6-inch intervals (inset). Apply a liberal amount of roofing cement to the outer curb sides: bend the flashing back into place and use roofing nails to secure it to the curb. Cover the nail heads and all holes and joints with roofing cement.
If the flashing was damaged or inadequate when you removed the old curb, remove and replace it .
To prepare the curb for the skylight, pry off the corner braces and spread a 1-inch-wide layer of roofing cement (above, right) around the top edge of the curb, or apply a thick bead of silicone sealant with a caulking gun. Mount the skylight, with the aid of a helper if it is heavy, and press it onto the curb. Secure the frame of the skylight to the curb with galvanized screws.
INSTALLING FLASHING
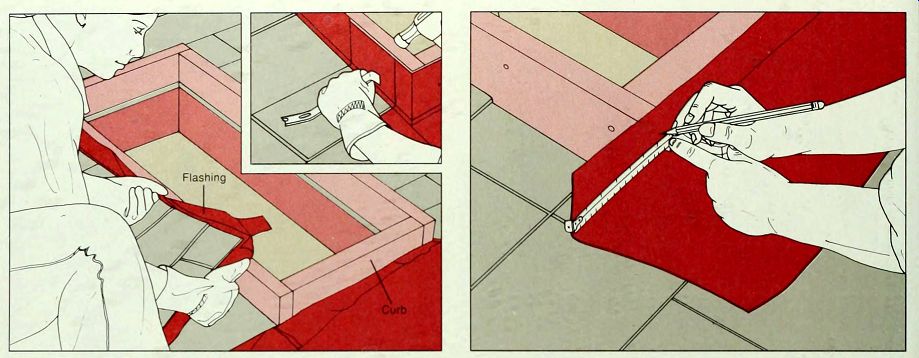
1. Removing old flashing. If the flashing has corroded, or if strip I flashing was used along the sides instead of step flashing, you will need to remove part or all of the old flashing. First, remove the skylight (page 36). Then loosen the shingles around the sides and top of the curb by prying up the nails with a utility bar (inset). Nail heads may be hidden beneath a quarter-sized dab of roofing cement; scrape away the cement with a stiff putty knife. Pry out the nails attaching the flashing to the curb and. wearing gloves, pull the old flashing free (above). Take care not to damage the shingles.
2. Measuring and cutting collar flashing. You will first install W base collar flashing across the bottom of the curb, then step flashing along the sides and, finally, head collar flashing across the top. Measure the outside length and width of the curb. Buy custom made collar flashing from a sheet metal shop, or buy flashing in a 12 inch-wide roll and make your own collar flashing: Use tin snips to cut a strip of flashing from the roll, at least 6 inches longer than the base of the curb. Bend the strip lengthwise over a side edge of the curb; one flap should be about 4 inches wide, and the other about 8 inches wide. Center the flashing along the base of the curb, narrow flap up, and mark the flap where it meets the curb corner at each side (above).
Cut along the fold to each mark, and wrap the flaps around the corners of the curb. Set this base collar flashing aside and form the head collar flashing the same way.
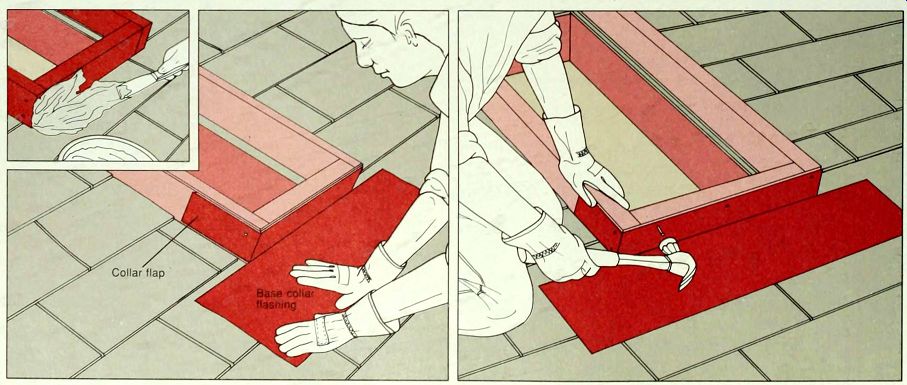
3. Installing the base collar flashing. Use a putty knife to apply a liberal
coat of roofing cement to the base of the curb and around its corners,
and to the shingles below the curb (inset). Reposition the base collar
flashing, pressing it into the roofing cement (above, left), and wrapping
the collar flaps around the curb edges.
Nail the flashing to the curb 1 inch below the top edge, driving galvanized roofing nails at 4-inch intervals (above, right). Cover the heads of all nails with a generous dab of roofing cement.
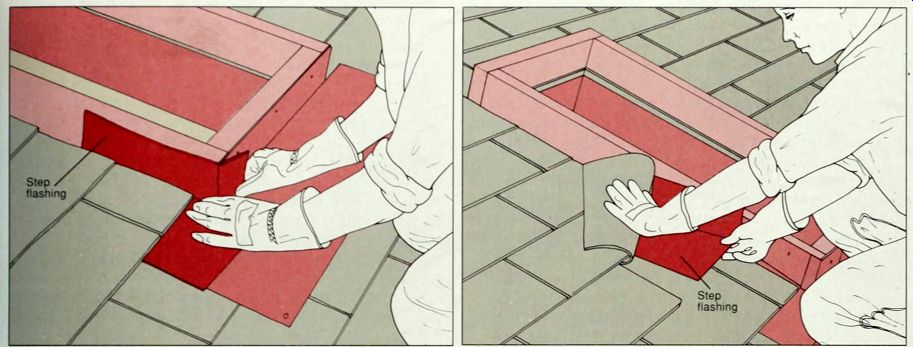
4. Installing step flashing. Count the number of courses of shingles along one side of the curb; you will need at least twice as many pieces of step flashing to seal both sides of the curb. Buy flashing in pre-bent. 10-inch-square pieces from a sheet metal shop. Using tin snips, make a 3-inch cut along the fold on one side of the step flashing. Slip the flashing under the shingles near the bottom of the curb and fold the cut edge around the corner to overlap the base collar flashing (above). Once folded, set the flashing aside and apply roofing cement to the roof deck under the shingles, and to the side of the curb. Slide in the flashing and nail it with galvanized nails at 4-inch intervals, an inch below its top edge. Then apply roofing cement between the next layer of shingles and the deck, and along the curb, and position the second piece of step flashing (above, right). Work your way up to the top of the curb, always applying the roofing cement before weaving the next piece of step flashing between the shingles. Nail each piece of flashing to the curb as you go. When you get to the top piece of step flashing, cut it as you did the first piece of step flashing, and fold the cut edge around the curb. The top collar flashing, when installed (step 5). will overlap it. Install step flashing on the other side of the curb the same way. When both sides are completed, re-nail the shingles with galvanized roofing nails: make new holes and cover old ones, and all nail heads, with roofing cement.
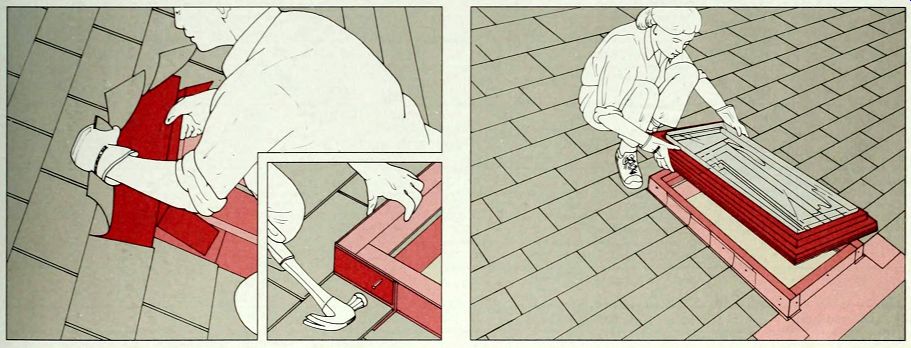
5. Installing head collar flashing. Apply a bed of roofing cement to the top edge of the curb and to the roof deck beneath the shingles. Add some to the surface of the upper pieces of step flashing. Using the head flashing you formed in step 2, slide the flap under the shingles (above), and press it into place so it fits snugly against the curb. Then fold the extension flaps around the corners of the curb, overlapping the upper pieces of step flashing. Nail the flashing in place with galvanized roofing nails. 1 inch below its top edge and at 4-inch intervals (inset).
6. Reinstalling the skylight. Resecure the shingles with galvanized roofing nails: make new holes and cover old holes and cover nail heads with roofing cement. Apply roofing cement or silicone sealant to the curb (step 3) and lower the skylight onto the curb (above). Screw the skylight to the curb with galvanized screws.