A double-hung window, with movable upper and lower ashes, opens at a touch with help from one of several balance systems, illustrated at right. Single-hung windows, on which only the lower sash is movable and has a balance system, work similarly and are maintained the same way. An old-style weight-and-pulley balance may be repaired, or it may be replaced by one of the more modem balance systems shown.
On a small, light window, replacement channels, which work by friction, can replace a balance system entirely.
A wood double-hung window suffers from the problems typical of any wood window: The wood shrinks, rots or warps, window joints loosen and paint buildup makes sashes slick hut. In addition, the balance system can wear out or break-a broken sash cord is very common. The Troubleshooting Guide below lists fixes in this chapter for these problems and more. Before performing any complicated procedures--for example, routing a rabbet in a sash -- make sure the window is sound enough to make repair worthwhile. Have a professional evaluate the window if necessary-some old windows are best replaced entirely. For problems with window panes, see Panes and Screens, Installed over a double-hung window, an aluminum storm window takes the brunt of moisture and temperature extremes.
Regular cleaning and lubrication of the sash channels will keep a storm window operating smoothly. Many storm sashes can be disassembled for repair or for replacement of panes or screens, and new storm windows are not difficult to install.
TROUBLESHOOTING GUIDE
[[[ DEGREE OF DIFFICULTY: Easy Moderate Complex
ESTIMATED TIME: 0 Less than 1 hour 0 1 to 3 hours Over 3 hours A Special tool required]]]
SYMPTOM
Window doesn't open or opens with difficulty
Lower sash doesn’t stay open, upper sash falls down
Wood sash rattles
Metal storm sash doesn't open or opens with difficulty
Metal storm sash rattles or sash rails loose
POSSIBLE CAUSE
Sash channels need lubricating
Wood window painted shut
Paint buildup in wood sash channels
Wood stop and/or sash warped
Wood sash separating at joint
Sash cord broken
Block-and-tackle balance faulty
Spiral balance faulty
Clockspring balance faulty
Weather stripping faulty
Sash cord broken
Clockspring balance faulty
Replacement channels faulty
Spiral balance faulty
Wood has shrunk
Wood sash rotted
Sash channels dirty or clogged
Slide tab broken
Metal frame out of square
Rubber gasket dried out
Corner key broken
PROCEDURE
Lubricate channels with paraffin wax or silicone spray
Break paint bond
Strip channels
Reposition interior stop plane sash
Glue and clamp joint reinforce joint
Replace sash cord or replace balance with clockspring balance replacement channels, or spiral balance
Replace balance
Lubricate balance with silicone spray; adjust or replace balance (older window; tilt-in window
Replace balance or replace with replacement channels or spiral balance
Replace weather stripping
Replace sash cord or replace balance with clockspring balance replacement channels or spiral balance
Replace balance or replace with replacement channels or spiral balance
Replace channels or replace with spiral balance
Adjust or replace balance (older window; tilt-in window)
Reposition interior stop or install weather stripping
Remove rotted wood and patch with epoxy replace sill
Clean channels and lubricate with silicone spray
Replace slide tab
Realign frame or replace window
Replace gasket
Replace corner key
---------------------------
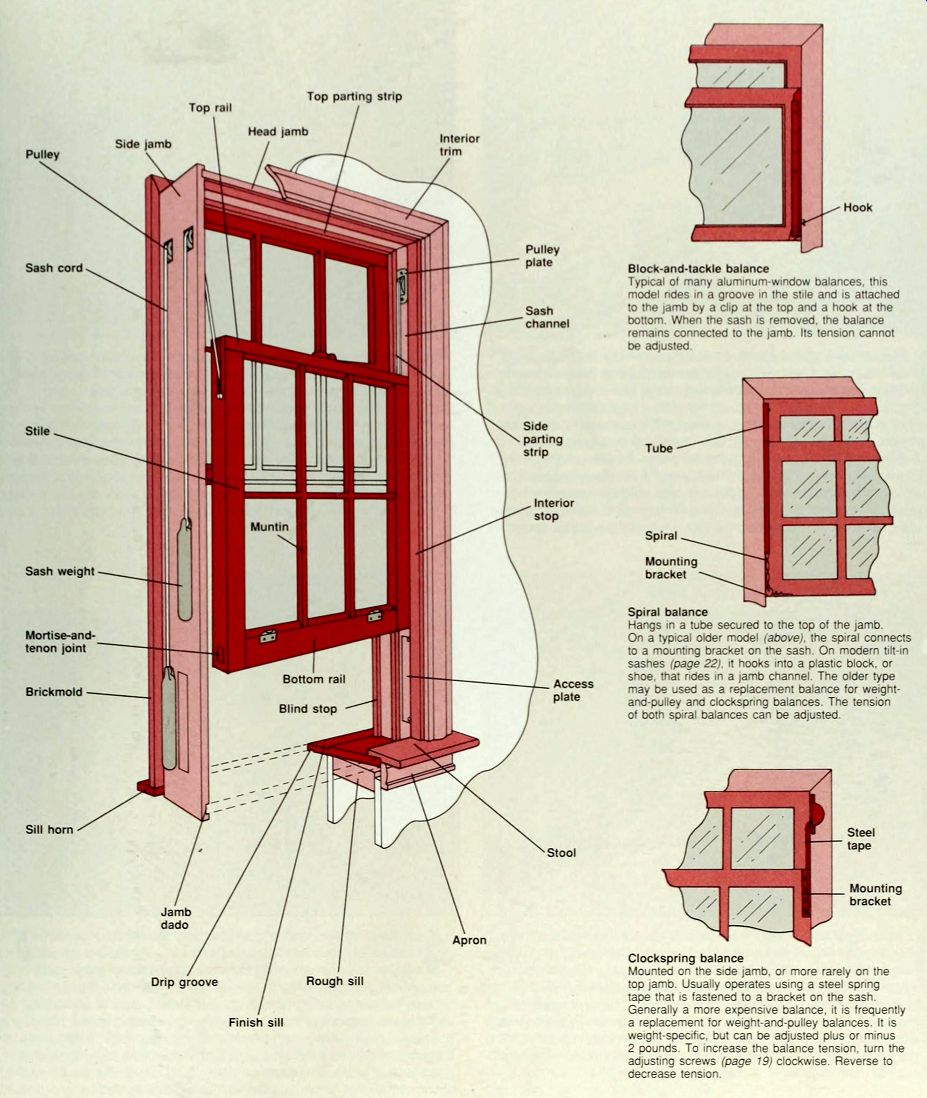
Block-and-tackle balance---Typical of many aluminum-window balances, this model rides m a groove in the stile and is attached to the jamb by a clip at the top and a hook at the bottom When the sash is removed, the balance remains connected to the jamb. Its tension cannot be adjusted.
Tube; Spiral; Mounting bracket
Spiral balance---Hangs in a tube secured to the top of the jamb. On a typical older model (above), the spiral connects to a mounting bracket on the sash. On modern tilt-in sashes, it hooks into a plastic block, or shoe, that rides in a jamb channel. The older type may be used as a replacement balance for weight and-pulley and clockspring balances. The tension of both spiral balances can be adjusted.
Steel tape, Mounting bracket, Clockspring balance
Mounted on the side jamb, or more rarely on the top jamb. Usually operates using a steel spring tape that is fastened to a bracket on the sash.
Generally a more expensive balance, it is frequently a replacement for weight-and-pulley balances. It is weight-specific, but can be adjusted plus or minus 2 pounds. To increase the balance tension, turn the adjusting screws clockwise. Reverse to decrease tension.
----------------
UNBINDING A WOOD SASH
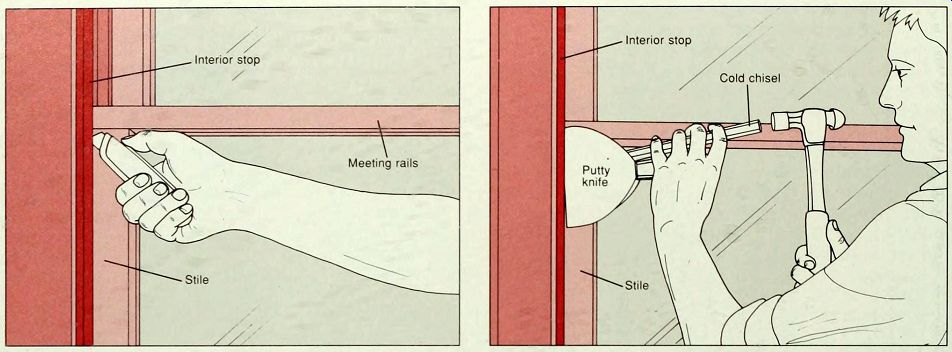
1. Breaking a paint bond. Carelessly applied paint will seal a window shut. Use a utility knife to slice through the paint bond M Place the blade ol the knife between the interior stop and the top of the lower sash (above). Draw the knife straight down, taking care not to gouge either the stop or the sash. Cut the paint between stop and sash all the way around both sashes, inside and outside.
If the meeting rails are stuck together by paint, use the utility knife to break the paint bond. Push up the window; if it still doesn't open, continue to step 2. If the window opens, but with difficulty, examine the channels. If old paint has built up there, go to step 4. If not, try lubricating the channels with household paraffin wax or with silicone spray.
2. Separating stop from sash. Wood sashes and stops swell with humidity, making a window difficult to open. Free a lower sash by separating the interior stops from the sash stiles. Remove any weather stripping that may be in the way. Wedge two wide putty knives together between the sash and the interior stop. Drive them apart with a cold chisel and ball-peen hammer, as shown, forcing the stop slightly away from the sash. Work up and down the length of the window and repeat at the other side. Repeat this technique on the exterior as well, between the upper sash and blind stop. Push up the window. If it still doesn't open, continue to step 3.
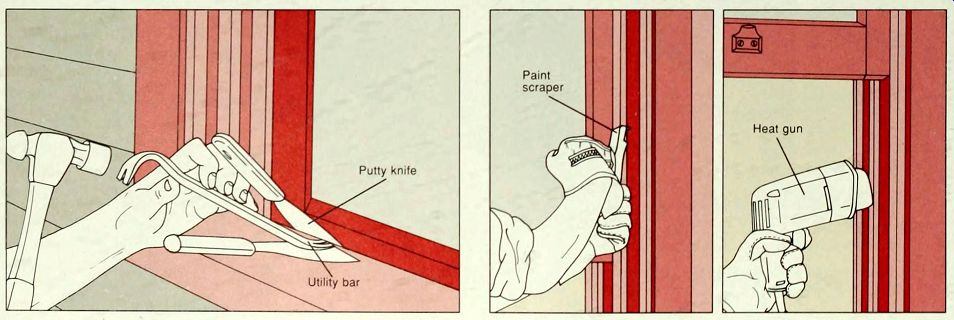
3. Forcing up the sash. From outside the house, wedge a pair of wide putty knives between the sill and the bottom rail of the sash near one corner. Drive the knives apart with a utility bar and ball peen hammer (above). The utility bar will force up the edge of the sash. Work gently; too much force may separate the window joints. Work on one corner at a time until the sash comes free. If the top sash is balky, use the same technique to separate the sash's top rail from the top jamb. If the sash remains frozen, strip the channels (step 4) or remove the sash to plane it.
4 . Stripping the sash channels. Work the sash up as far as it will go, only remove the sashes if the window won't budge. Use an old wood chisel to scrape away minor paint buildup and dirt obstructing the movement of the sash. If the paint is thick or bumpy, try using a paint scraper (above, left) to smooth it down. If the problem is more severe, use a heat gun to soften the paint (above, right) and a narrow putty knife to remove it.
If necessary, remove vestiges of paint with a chemical paint stripper (page 60), then sand and repaint. Finish the job by lubricating the channels with paraffin wax or silicone spray.
REMOVING UPPER AND LOWER SASHES
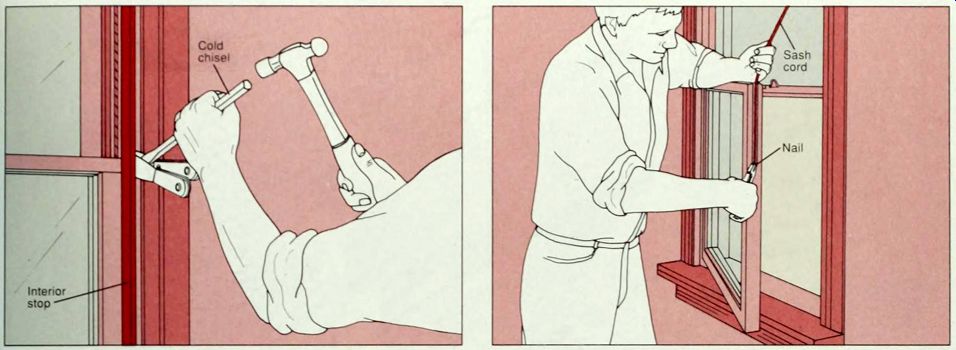
1. Prying off the interior stop. If the window has a spiral balance, go to step 2 To take out a lower sash, first remove one of the interior stops If you are servicing a balance, remove the stop on the side of the broken balance. Begin by breaking any paint sealing the interior stop to the jamb ( step 1). Remove any screws that secure the stop. Then push a pair of putty knives between stop and jamb and drive them apart with a cold chisel and ball-peen hammer (above). Start at the middle of the stop and work up and down. If the top of the stop has a mitered corner, carefully bow the stop to slip the tip out of the joint.
2. Removing the sash. Pull the sash out of the frame on the M side where the stop was removed. Remove any screws or nails securing the end of the sash cord or chain to the sash (above). Push a nail through the cord or chain and feed it slowly up to the pulley: the nail will prevent it from being pulled through. Lift out the other side of the window sash and remove the cord or chain the same way.
If the window operates with a clockspring balance, unhook the tape from the sash and feed it back into the drum. If the sash has a spiral balance, unscrew its tube from the top of the jamb and unscrew its mounting bracket from under the corner of the bottom rail. Then pry off the interior stop (step 1).
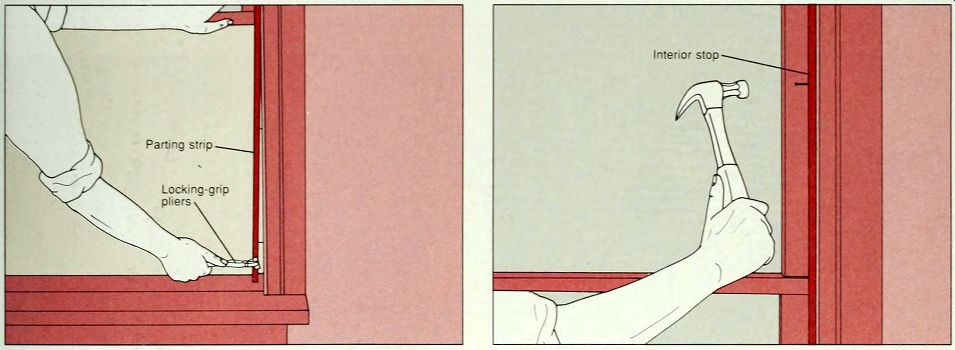
3. Pulling out the parting strip. If the upper sash uses a spiral balance, disengage the balance as in step 2 before removing the parting strip. To remove an upper sash that uses a weight-and pulley or clockspring balance, first pry the parting stop out of the jamb on the same side as the interior stop. Remove any screws from the strip and break the paint bond. Pressing against the lower rail of the upper sash, use a pair of locking-grip pliers padded with wood shims to pull the bottom of the strip out of its groove in the jamb (above). Lower the upper sash, angle it out and remove the balance attachments as described in step 2. Then lift it out of the window.
4. Replacing the sash and re-securing the interior stop. After completing repair, reassemble the sashes in their frame by reversing the steps you took to remove them. Take this opportunity to lubricate the sash channels with paraffin wax or silicone spray and to touch up paint or varnish. Use a nail puller to remove old nails from the interior stop (page 48. step 2). Be careful to replace the stop close enough to the sash to keep the sash from rattling, while leaving sufficient space for the sash to move freely. Secure the stop with finishing nails (above)or wood screws, opening and closing the sash after driving each nail or screw to test the fit.
PLANING A SASH TO SHAPE
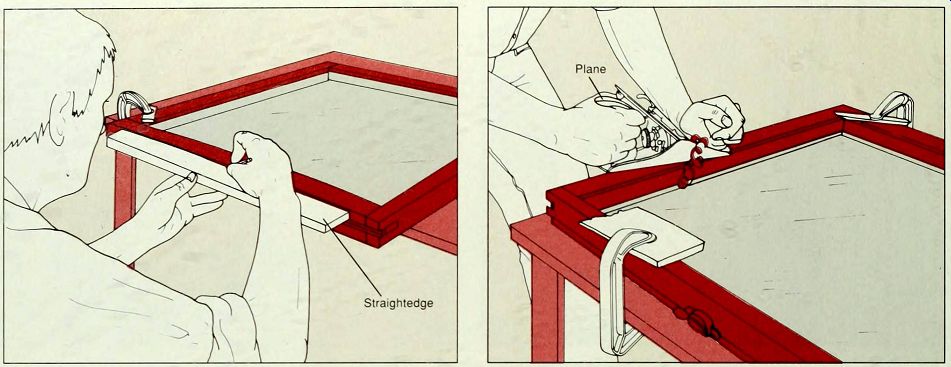
1. Marking the warp. Remove the binding sash from its frame and clamp it to a work table with C clamps padded with scrap wood. Align a straightedge along the side of the warped stile and draw a line indicating the warp (above). To preserve the finish on the front of the sash, you can plane the back: draw the line accordingly. Sometimes sanding the stile with medium-grit sand paper on a sanding block is all you need to do. If sanding isn’t enough, use a plane to shave away the binding area (step 2). If the warp is more than 1/4 inch high, consider replacing your window.
2. Planing the sash. Set the blade of a jack plane for fine planing F and practice on a scrap of wood. Holding the plane firmly in two hands, push it over the warped area in the direction of the grain (above). Lift the nose of the plane off the wood as you finish the stroke to avoid gouging. After each stroke, check the line that marks the warp. When the warp has been flattened, smooth the sash with fine sandpaper on a sanding block. Touch up the paint or varnish and reinstall the sash.
REINFORCING THE JOINTS OF A WOOD SASH
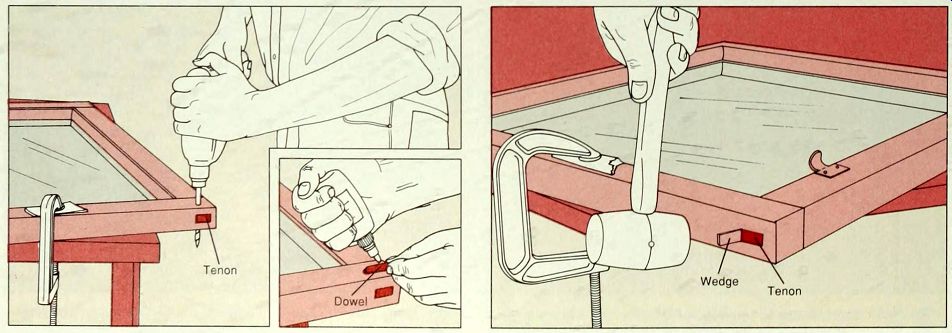
--Doweling a sash joint. Remove the sash from the window.
Clamp the sash to a work table with C clamps padded with scrap wood, the joint you are strengthening extending over the edge. Using a power drill fitted with a 1/4-inch bit, drill a hole for the dowel straight through the mortise-and-tenon joint (above). Use a backsaw to cut a piece of 1/4-inch dowel slightly longer than the thickness of the sash. Round one end slightly with sandpaper for easier insertion. Coat the dowel with carpenter s glue (inset) and tap it into the hole using a rubber mallet. Clean off excess glue with a damp rag. When the glue is dry, use fine sandpaper on a sanding block to trim it flush with the sash.
--- Adding a wedge to a sash Joint. Remove the sash from the window (page 15) and inspect the joints for looseness. Inserting a wedge between tenon and mortise will strengthen the joint. Use long-nose pliers to pull out any loose old wedges. With a utility knife, cut a 1-inch wedge from cedar shim or scrap wood, 1/8 inch thick at the thicker end. Coat both sides of the wedge with carpenter's glue and use a rubber mallet to hammer it into the joint next to the tenon (above). Hammer gently; too much force could crack the sash. When the glue has dried, use fine sandpaper on a sanding block to smooth the wedge flush with the sash.
REPLACING A WINDOW SILL
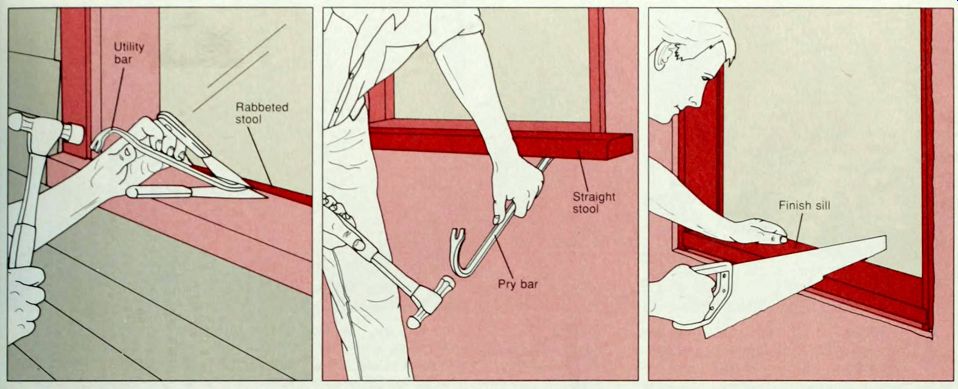
1. Removing the stool and sill. Inspect the finish sill closely; if it I has minor rot. cut it away to healthy wood and patch with epoxy. If the damage is severe, replace the sill to prevent rot from spreading to the house framing. The sill may fit into sloped dadoes in the jambs, may simply butt against the jambs or may be held by corner rabbets. To gain access to the sill, first remove the windows interior side trim and apron, the stops and the stool. To remove a rabbeted stool that overlaps the indoor edge of the sill, go outside and wedge a pair of wide putty knives between the sill and the stool. and drive them apart with a utility bar and ball-peen hammer (above, left). If the window is inaccessible from the ground, lean out the window from inside to dislodge the stool. Use a hammer and pry bar to free a straight stool that is nailed flush to the sill (above center). Measure the width and thickness of the sill and its length both inside and outside. The difference between these two measurements (if there is one) is the length of the sill horns. Using a crosscut saw, cut through the finish sill down to the rough sill (above, right) in two places.
2. Prying out the finish sill. With a pry bar, lever the middle portion of the sill up and out, and then lift up each of the two 4 remaining sections (above). Pull these end pieces free by hand to avoid damaging the jambs. Keep the pieces of the sill, if in good condition, to use as a template for the new sill. If the jambs shifted inward, tap them back out with a rubber mallet. After the finish sill is removed, use a hacksaw blade with a handle (inset) to cut off any nails sticking out of the jamb.
3. Cutting the horns for the new finish sill. Buy sill stock of the same dimensions as the original sill: the wood must be straight-grained and knot-free. Lay the pieces of old sill on the sill stock and trace its outline. If the sill horns have disintegrated too much to use as a template, draw a pattern on cardboard using the measurements you took in step 1. Use a fine-toothed crosscut saw to cut out the horns for the new sill (above). Sand rough edges smooth and apply two coats of a wood preservative compatible with the paint or varnish you will apply.
REPLACING A WINDOW SILL (continued)

4. Installing the sill. Vacuum the jamb dadoes, if any, and the rough sill. Hold the sill outside the window and slide it into the dadoes (above, left). If necessary, use a rubber mallet and a block of wood to tap it into place. If the ends of the sill are too thick to fit into the dadoes, trim their edges with medium-grit sandpaper on a sanding block. For extra support, insert wood shims snugly beneath the center of the sill (above, center). Take care not to force the sill out of alignment.
If the sill butts against the jamb or fits into rabbets rather than dadoes, shim the full length of the sill. Toenail each end of the sill to its jamb with three or four finishing nails (above, right). Caulk all exterior joints between the sill and the window frame and reinstall the stool, stops, interior trim and apron. If necessary, re-trim the window. Then paint the sill with exterior paint.
REPLACING A BROKEN SASH CORD ON A WEIGHT-AND-PULLEY BALANCE
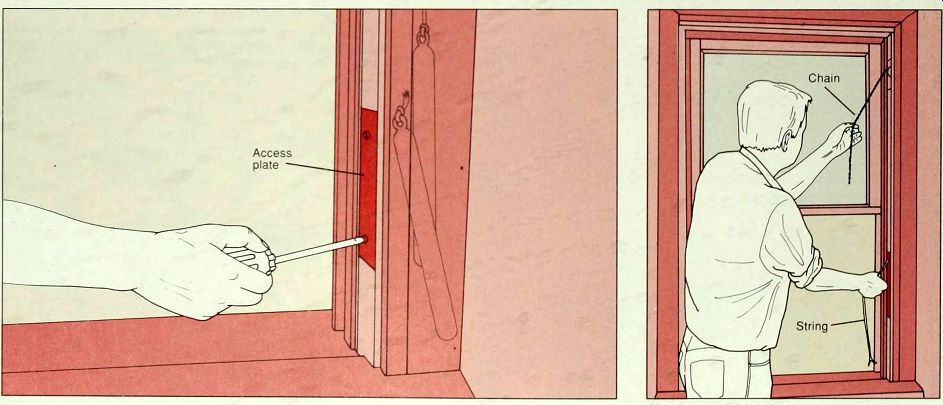
1. Removing the access plate. If one sash cord breaks, install all new cords to prevent I future problems. Sash cords may be replaced with more durable flat-link sash chain, or you may replace the entire system with clockspring balances, replacement channels (page 20) or spiral balances. To determine the length of a replacement cord, measure from the top of the pulley to the bottom of the sash channel and add 6 inches.
If one of the lower sash cords is broken, remove the lower sash; if an upper sash cord is bro ken, remove both sashes.
Unscrew the access plate in the sash channel on the side of the broken cord (above). If necessary, strip away old paint first. If no screws are visible, the plate may be nailed shut; use an old screwdriver to pry the plate out. If there is no access plate, remove the window trim to expose the pocket. Lift out the weight and untie the broken cord from its eye.
2. Feeding the sash chain or cord. Tie a nail or screw to the end of a long piece of string. Tie its other end to the end of the new sash chain or cord. Feed the weighted end of the string over the pulley and down into the pocket. Reach into the pocket and pull the string (above) until the sash chain or cord appears.
REPLACING A BROKEN SASH CORD ON A WEIGHT-AND-PULLEY BALANCE (continued)
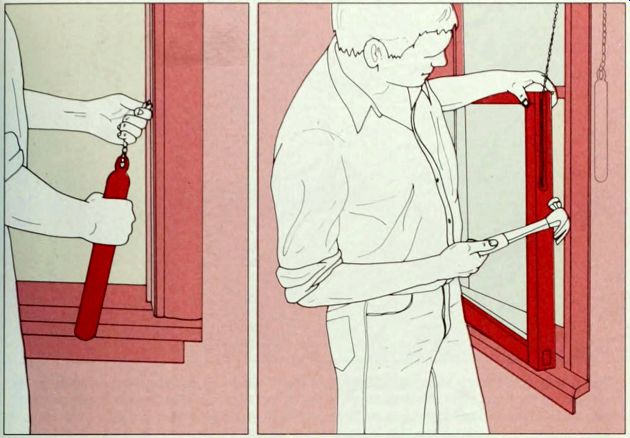
3. Connecting the chain or cord. Untie the sash chain or cord from the string and pass it through the eye of the weight. Wrap copper wire through the links of a chain to secure it to the weight (far left); if you are using a sash cord, knot it. Put the weight back into the pocket. To fasten the chain or cord to the sash, pull down its free end until the weight hits the pulley. Run a nail through a link in the chain, or through the cord, and rest it across the pulley hole to keep the weight from tugging the chain or cord. Place the sash on the sill and feed the free end of the chain into the sash groove, securing it with screws or short nails through two links (near left). For a cord, knot its end and hammer a finishing nail through the knot. Remove the nail at the pulley. Have a helper slowly raise the sash and hold it against the top of the window while you look into the pocket; the weight should hang 3 inches above the sill. If not. adjust the chain or cord at the weight end. Reinstall the access plate and the sashes.
INSTALLING A CLOCKSPRING BALANCE
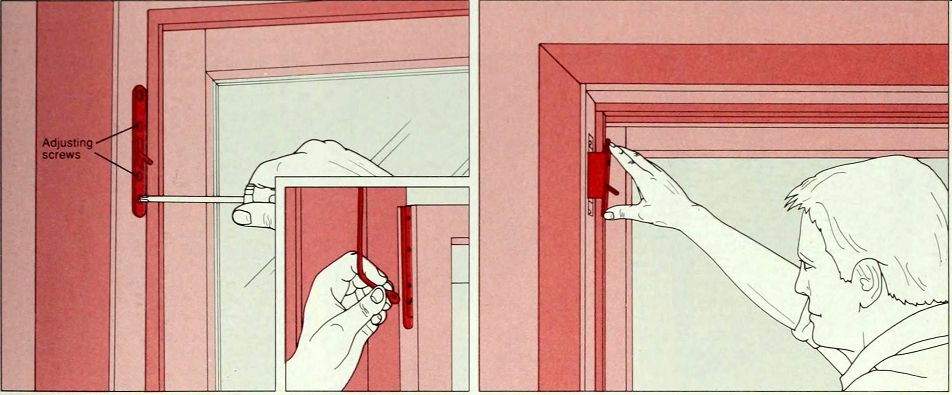
1. Removing and replacing a clockspring balance. Take out I the sash and unhook the balance tape from its bracket on the sash (inset). Remove the screws securing the clockspring plate to the jamb (above, left) and pull the clockspring drum free of its pocket. Take the drum to a window specialist and buy an exact replacement. Position the new drum in its pocket (above, right) and screw the plate to the jamb. Place the sash on the sill, angled out slightly on the side of the new balance. With one hand holding the sash, use the other to pull down the balance tape clip and attach it to the bracket on the side of the sash. If the sash is heavy you may have to use considerable force to pull down the tape. Reinstall the sash. To replace worn-out weight-and-pulley balances with clockspring balances, weigh the sash and buy a pair of clockspring balances and mounting brackets made to support that weight. Unscrew the pulley plate from the jamb and let the sash cord drop into the pocket. Screw the clockspring plate to the jamb. If it doesn't fit into the pulley-plate mortise, enlarge the mortise as you would for a strike plate (page 44). Screw the bracket into the sash groove for the tape clip. Then complete the installation as described above. If you are installing clockspring balances on both sashes, work on the upper sash first.
INSTALLING REPLACEMENT CHANNELS
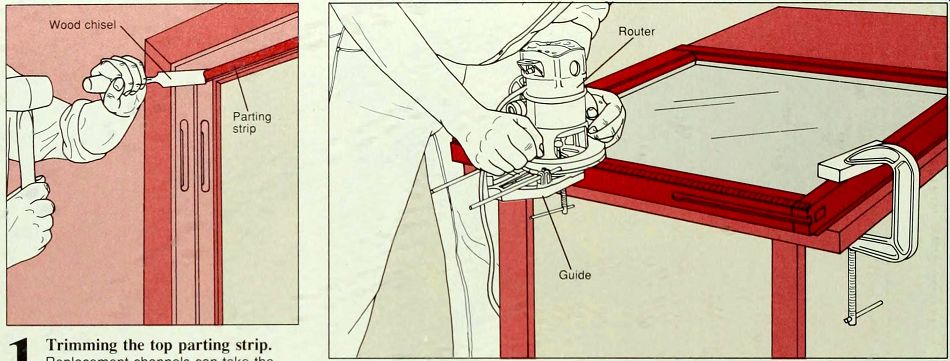
1. Trimming the parting strip. Replacement channels can take the place of worn-out balances. Measure between top jamb and sill to determine what height replacement channel you need. Remove the sashes and the old balance system. Using a sharp wood chisel and rubber mallet, cut 1/2 inch off each end of the top parting strip (above). To install the channels on a typical 1 3/8-inch-thick sash, go to step 3. If your sash is thicker than this, use a router to cut rabbets in the sash stiles to fit the replacement channels (step 2).
2. Routing the sash. To cut a rabbet, use a router fitted with a guide or a self-guiding J rabbet bit. When positioning the sash, remember that the rabbets must be cut in the interior side of the lower sash, and in the exterior side of the upper sash. Clamp the lower sash to a work table, using C clamps padded with blocks of wood. Pull out any nails in the stile: hitting metal will throw the router off course. Measure the thickness of the sash stiles and subtract 1 3/8 inches to determine the depth to cut each rabbet. Since the inner and outer flanges (or stops) of the replacement channels protrude 1/4 inch, use a 1/4-inch rabbet bit. Move the router slowly and evenly along the sash stile (above), deepening the rabbet in 3/8-inch increments. Cut rabbets in both stiles of both sashes.
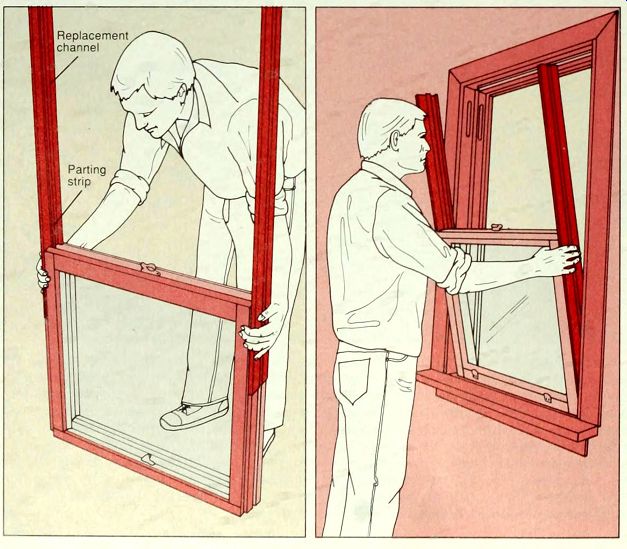
3. Installing replacement channels. Hold the upper and lower sashes 7
together, the exterior side of the lower sash against the interior side
of the upper sash. Fit the replacement channels along the sash stiles (far
left). The replacement channels are angled at the bottom to fit the slope
of the sill; position the channels correctly in relationship to the sashes.
The parting strip spring-loaded in the model shown here-fits between the
sashes, and the channels' flanges act as stops. Lift the sashes and replacement
channels onto the window sill, tilting them into the window frame (near
left) until they come to rest against the blind stop.
Secure the channels to the jamb using the nails or screws supplied with the replacement channel kit. If you routed the sash stiles to fit the replacement channels, reinstall the interior stops to hide the grooves.
To replace damaged replacement channels, remove the nails or screws securing the channels to the jamb. Take off any interior stops, slide both sashes to the middle of the window and, with a helper, tilt the sashes and channels out of the window as a unit. Then slide the channels up off the sashes. Install new replacement channels as described above.
INSTALLING A SPIRAL BALANCE
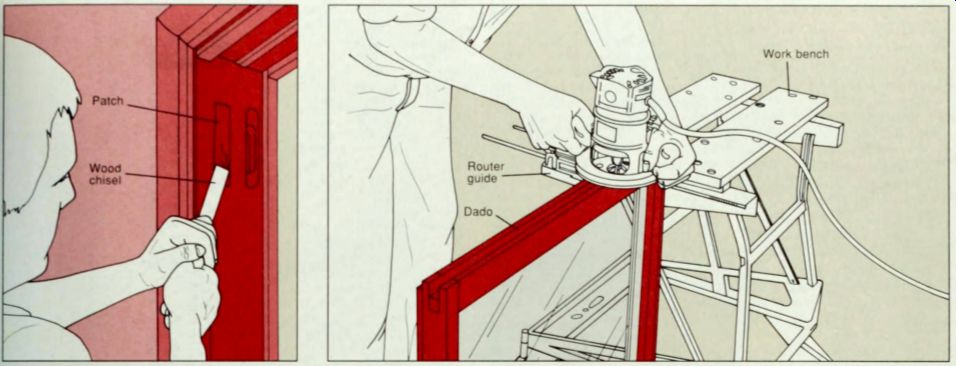
1. Patching the jamb. Measure the height of the sash stiles and subtract 2 inches Buy four spiral balances of this size, with mounting brackets. Take out the sashes and the old balance system. To patch a mortise left by an old pulley plate or clockspring plate, measure the mortise and draw its outline on a 1/4-inch piece of wood. Cut out the patch with a back saw. Glue it in the mortise with carpenter's glue. When the glue is dry. use a sharp wood chisel to level the patch flush with the jamb (above). Sand the area smooth and touch up the paint.
2. Routing a dado for a spiral balance. To adapt a wood sash for spiral balances, cut a F channel, or dado, in each stile. Clamp the sash with the stile you are working on facing up. Pull out any nails in the stile: hitting metal will throw the router off course.
Measure the thickness of the stile and draw a line down its center. Position the balance exactly on the center line and draw two lines outlining it along the stile. These lines mark the width of the channel to be routed. Choose a dado bit of the right size to cut this width. Then measure the thickness of the balance. This will be the depth of the channel; cut to this depth in 3/8-inch increments. Turn on the router and align the bit with the lines. Rout along the stile from left to right, repeating to the channel s final depth (above). Check that the balance fits into the channel: when installed it must be flush with the stile. If necessary, use a wood chisel to square off the corners of the channel. Cut dadoes in the other stile and both stiles of the upper sash the same way.
3. Installing spiral balance. Reinstall the upper sash and the parting strip. Insert the bottom end of the spiral balance into the stile channel (far left): the spiral will drop down. Center the balance in the sash channel and nail or screw it in place (near left. top). Repeat for the other side of the sash. Raise the sash about a foot and rest it on a block of wood. Rotate the mounting bracket near each corner of the sash's bottom rail clockwise until it rises to the rail (near left. bottom). Secure each bracket to the bottom of the sash with one screw. Remove the block of wood and move the sash down and up. If the sash does not open or close easily, the balance is too tight. Remove the bracket screw, being careful not to let the balance unwind.
Rotate the bracket counterclockwise one or two turns and reattach it. Adjust the other balance and try the window again. If the window will not stay open, increase the tension by rotating the brackets clockwise. Repeat until the window opens and closes smoothly, then install the other screws. After the upper sash is adjusted, replace the lower sash and interior stop. and install and adjust the lower sash balances the same way.
SERVICING A SPIRAL BALANCE ON A TILT-IN WINDOW
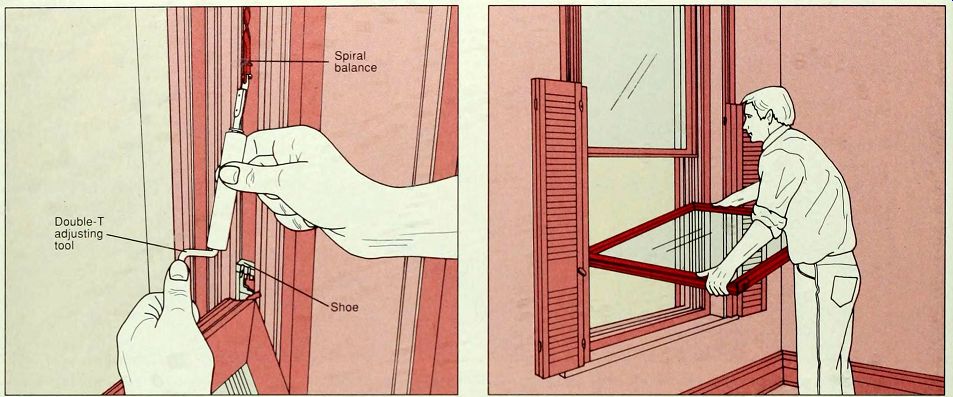
1. Adjusting the spiral balance. The sashes of some modern I double-hung windows can be tilted indoors for cleaning or for servicing of their spiral balances. To adjust a balance, release the slide catches on the top rail of the lower sash and carefully lower the window. To tilt in an upper sash, slide it halfway down and tilt it in as well. If the sash does not open or close easily, loosen the tension on the balance by using a double-T adjusting tool. Unhook the balance from the shoe on the jamb and rotate it counterclockwise two turns (above). If the window does not stay open, tighten the tension by rotating the balance clockwise two turns. Do the same on both sides. Resecure the sash to the jambs and test its operation. Repeat the adjustment until the window opens and closes smoothly.
2. Removing the lower sash. If the spiral balance breaks, replace J it with an exact duplicate. To remove the broken balance on the type of lower sash shown here, tilt down the sash until it is parallel to the ground, then lift up one side of the sash until the corner pivot that connects it to the shoe is freed. Lift out the other side and store the sash in a safe place. Lower the top sash and remove it the same way. Use the double-T adjusting tool to unhook the broken balance from the shoe on the jamb (step 1).
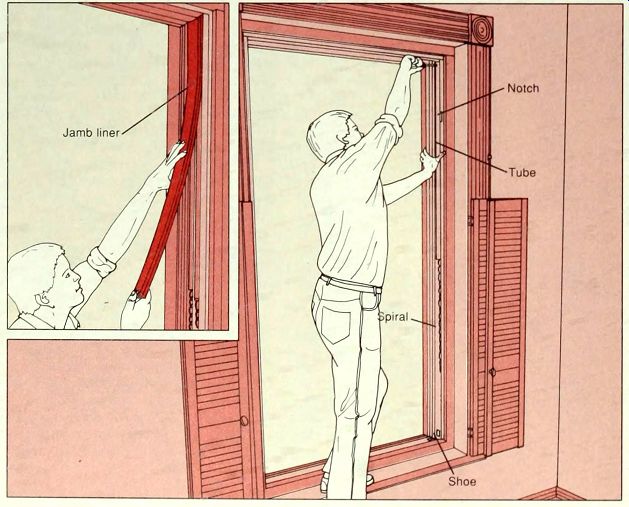
3. Replacing the spiral balance. To remove a broken spiral balance on a tilt-in sash, remove the jamb liner, if it has one, by slipping a screwdriver under the edge of the liner and prying up one end. Lift the liner free as shown (inset). If it is screwed to the jamb, unscrew it. Remove the screw at the top of the spiral balance that holds the tube end of the balance to the jamb (left), and lift out the balance. To install a new balance, reverse the steps you took to remove the broken one. Use the double-T adjusting tool to rotate the spiral five or six turns before hooking it to the shoe.
If the shoe fell to the bottom of the jamb when the balance was removed, slide it up to the same level as the shoe in the other jamb. To lock it in place, fit a screwdriver into its hole and rotate it clockwise. If a shoe breaks, slide it to the open notch two thirds of the way up the jamb, and pull it free. Install an exact re placement by reversing the steps you took to remove it. Lock it in place, then use the double-T adjusting tool to re-hook the spiral end of the balance into the slot in the shoe. Adjust the balance tension as described in step 1.
SERVICING A BLOCK-AND-TACKLE BALANCE
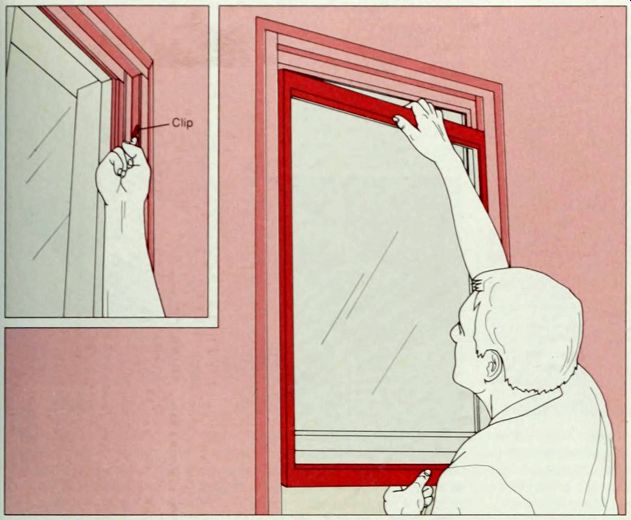
1. Removing the lower sash. A block and-tackle balance (page 13) cannot be adjusted: if the window does not open and close properly or does not stay open, one or more of the balances is probably broken and must be replaced. To remove the lower sash, first flip up the clip at the top of each sash channel (inset). If the clip is hidden by a sash stop, remove its screws and lift it off. then pull up the clip. Flip up the second clip the same way. Raise the sash high; the clips will catch the tops of the balances and disengage them from the sash. Push one side of the sash against the jamb and pull the other side out of the frame (left). If the upper sash doesn’t work properly, lower the sash to flip up the clips, then take out the sash as described above.
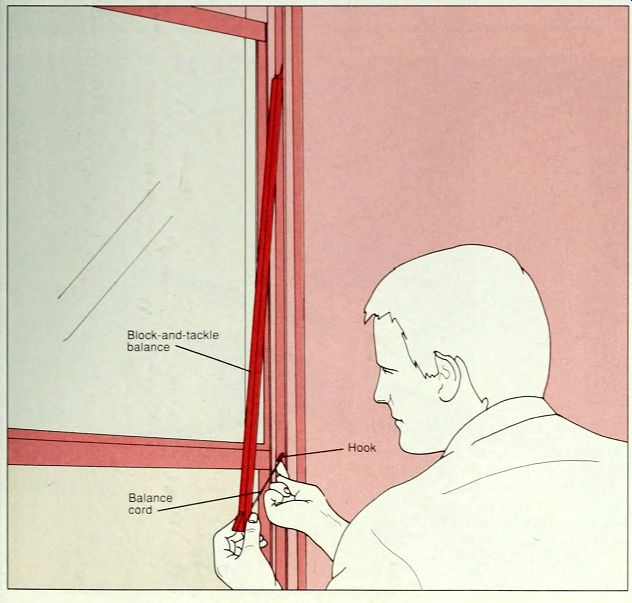
2 . Removing the balance. Pull the bottom of the balance away from the jamb to expose the balance cord, which is hooked into a notch in the jamb (left). Push the hook up and out of the notch and lift the balance free. Disengage the second balance the same way. Inspect the balances for dam age: take a broken balance to a window specialist and buy an exact replacement, or buy just the broken part, if possible. To reinstall a balance, push the top of the balance under the clip. Hold the balance with one hand while you pull the balance cord hook and engage it in the notch in the jamb. Install the second balance the same way. Reinstall the sash by pushing one side of it into the jamb channel above the balance and swinging the other side of the sash into the frame. Then lower the sash and reinstall the sash stops, if any. Replace the upper sash the same way.
SERVICING A METAL STORM WINDOW
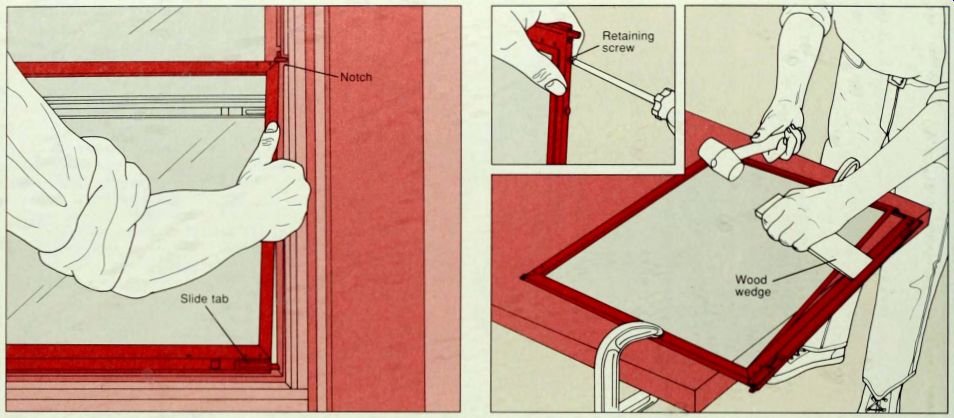
1. Removing the sash. To remove an upper or lower sash from a double-track window, shown above, release the slide tabs and slide the sash up or down to align the swivel keys with the notches in the frame. Then pull out the bottom of the sash and tilt it to pull the swivel keys out through the notches (above). Many triple-track windows have an opening along one side of the frame for each track; slide the sash up or down to the opening and lift it out.
2. Disassembling the sash. Unscrew any retaining screws at the top and bottom of the stile edges (inset) and gently pull the top and bottom sash rails off the pane of glass. If a screw is stuck, apply penetrating oil and wait 15 minutes before unscrewing it. To remove a stubborn bottom rail, clamp the sash to a work bench or table. Place a wedge of wood against the lip of the bottom rail (above) or in the slide tab channel, and tap it gently to free the rail. If the corner keys are crimped to the rails, follow step 3 to replace the corner keys and slide tabs. To replace the pane and rubber gasket...
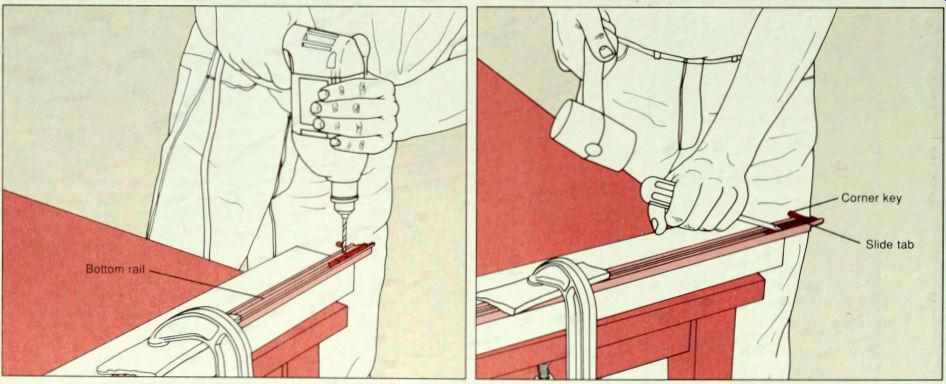
3. Removing corner keys and slide tabs. In most cases, the L-shaped corner keys inside the sash corners are crimped to the rails and-unless there are retaining screws (step 2)--to the stiles. You will see two small indentations at each end of the rail. To remove the corner keys and slide tabs, fasten the rail securely to a block of wood with a C clamp. Wearing safety goggles, drill through each indentation (above, left), using a power drill at slow speed, with a bit exactly the same diameter as the indentations. Then place an old screwdriver against the slide tab (above, right) and. using a mallet, knock out the slide tab and corner key. The spring may fall out-if so, replace it as well. Repeat at the other end. If necessary, remove the top rail's T-shaped swivel keys the same way.
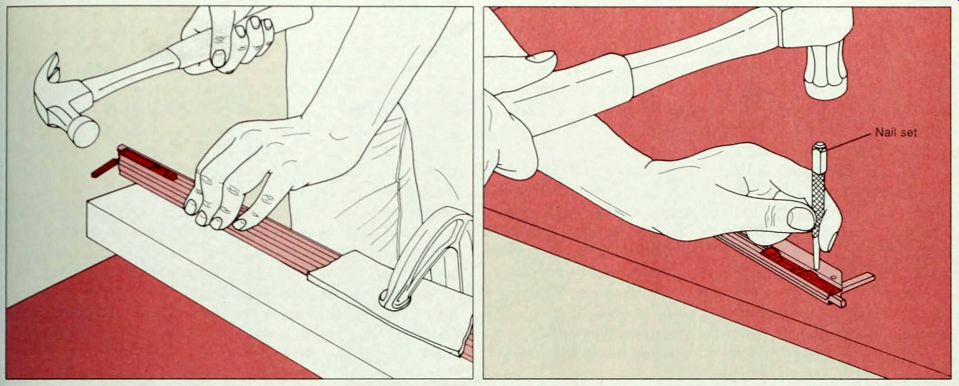
4. Reassembling the sash. Take the old slide tabs and corner keys to a window specialist for exact replacements. Slide in the new corner key and slide tab. tapping them into place with a hammer (above, left). To re-crimp the corner key. lay the rail on a flat surface and secure it with a C clamp. Place a nail set over each hole left by the drill, and tap it firmly with a hammer (above, right), crimping the rail against the corner key. Place the rails and stiles back on the pane, tucking the rubber gasket into place, and replace the stile screws or crimp the stiles against the corner keys.
INSTALLING A METAL STORM WINDOW
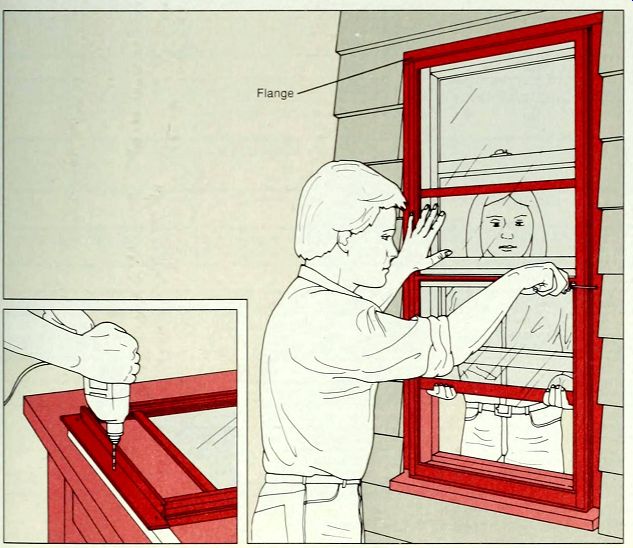
Installing a storm window. If you are replacing an old storm window, measure its height and width from the outside edges of the flanges and replace it with a window of the same model and size. Otherwise, go out side and measure the window opening height at both jambs, and the opening width across top and bottom, recording the smallest measurement from each. Buy a storm window to fit this opening size.
Drill 3/16-inch screw holes at the corners and midpoint of each flange and midway between these holes. 3 4 inch from the outside edge of the flange (inset). Apply a 3 8-inch bead of caulk along the inside flange edge. With a helper inside to hold the storm window, place it against the window frame. Fasten the storm window with a screw in the middle hole of one side (left), then align the storm window evenly against the window frame and install the middle screw on the other side. Be careful not to push the sides of the window toward each other as you drive the second screw; this will cause the sashes to bind in their channels. Have your helper test all sashes to ensure that they slide smoothly. Then secure the window through the remaining screw holes and caulk around the outside flange edges.