Preventing window and door problems. When a window or door needs fixing, it rarely creates a serious problem. It may not work smoothly or look elegant, but usually the repair can be put off until tomorrow. Occasionally, however, a real emergency will arise. A window pane may break during a heavy rainstorm, demanding immediate action to protect the inside of the home against water damage. Or burglars may splinter a front door, leaving the home and its residents temporarily without protection. More commonly, the planned removal of a door or a window for repair or replacement requires the ser vices of a plywood panel nailed over the opening.
Door locks, or their failure, are more likely to cause head aches than doors themselves. Most people have experienced the frustration of being locked out of their own home, or the fright of finding that a stranger has broken in. A broken lock can rarely be fixed, but installing a padlock hasp until you can replace the old lock can be done in a matter of an hour or so.
Simply removing a broken key or other foreign material from a keyhole, or thawing a frozen lock, are easy fixes that take more patience than skill. These emergency lock repairs arc detailed.
Read the safely tips at right for suggestions on how to pre vent problems that might arise when fixing a window or door, as well as how to make them safer. Simple, easily installed accessories that increase the security of a window or door are shown in the inventory on page 9. For advice on how to deal with an emergency when it does arise, review the Troubleshooting Guide.
It lists quick-action steps to take, and directs you to procedures described in this chapter and elsewhere in the guide. Study the Tools & Techniques chapter for the right choice and proper use of the tools needed to fix a window or door.
When in doubt about your ability to handle an emergency, don't hesitate to call for help. Post numbers for the police and fire departments, a 24-hour locksmith and the poison control center near the telephone. Even in non-emergency situations, these professionals can answer questions concerning the sale use of tools and repair materials and the security ol your doors and windows.
-----------
SAFETY TIPS
1. Before attempting any repair in this guide, read the entire repair procedure. Familiarize yourself with the specific safety information presented in each chapter.
2. Carefully read the label on any paint, solvent, patching compound, adhesive or other material used to make a repair.
Follow manufacturer's instructions to the letter, and pay special attention to hazard warnings and storage instructions.
3. Before cutting into a wall, switch off power at the main service panel. Leave a note on the panel so that no one turns on the power while you are working.
4. Guard against electrical shock when using power tools. Plug power tools into grounded outlets only, and never cut off or bypass the third, or grounding, prong on a power tool's plug.
A tool with a two-prong plug must be labeled "double insulated". Do not use any power tool in a damp area.
5. Wear the proper protective gear for the job: safety goggles when operating power tools such as a router or a circular saw; heavy work gloves to handle broken glass, fiberglass or metal flashing; heavy rubber gloves when applying chemical strippers, solvents, and cleaning solutions.
6. Wear a respirator when working with fiberglass insulation or doing jobs that generate dust or toxic fumes. Select a respirator filter specially made to block the particles or vapors being produced. Replace filters according to the manufacturer’s instructions.
7. Do not drink alcoholic beverages while using paints, solvents, strippers or adhesives that produce fumes-the combination can cause illness If you feel faint or sick, leave the room and get fresh air, then improve ventilation before continuing work.
8. When working with flammable chemicals or with power tools, have on hand a fire extinguisher rated ABC, and know how to use it before you begin work.
9. Keep garage door opener transmitters away from children.
10. Stick tape or colorful decals on clear glass doors and windows that may appear transparent to a running child
11. Prune branches away from windows to prevent obstruction and glass breakage.
12. Don t rely on weak, easily picked locks, such as spring-latch locks, to secure exterior doors. Choose deadbolt locks and install strike plates with 3-inch screws.
13. Don't leave valuables near windows where they can be seen.
14. Keep a roll of 4- to 6-mil plastic sheeting on hand as a temporary cover for blown-in windows.
15. If a lock requires a key to open it from the inside, keep the key nearby for emergency escape.
16. Install locking interior doors with loose-pin hinges that can be removed from outside the room if someone gets locked inside.
17. Post emergency, utility company and repair service numbers near the telephone.
--------------------
TROUBLESHOOTING GUIDE
SYMPTOM:
Person locked in a room
Person cut by glass
Person fallen from window or roof
Person locked out of the house
Lock frozen
Key broken in lock
Exterior door lock broken
Sliding window or door lock inadequate
Window pane broken
Exterior door or window severely damaged, or removed for repair or replacement
PROCEDURE:
Insert nail or hairpin into slot m center of doorknob to open door; or slip a credit card between latch and strike plate and pull door open
Remove door from hinges.
Call locksmith or fire department to unlock door
Apply pressure with clean cloth and elevate limb until bleeding stops; clean injury with soap and water if minor, if cut is serious or contains glass fragments, go to hospital emergency room
Do not move victim; call for emergency medical service
Call locksmith to unlock door
Chip away any ice from face of lockset. dip key In alcohol and insert into keyhole Heat key with lighter and insert into keyhole.
Use a hooked darning needle to lift cylinder pins and extract key fragment.
Install temporary hasp and lock.
Secure window or door with a broomstick or other piece of wood until new lock can be installed
Remove broken glass; cover opening with plastic sheeting or plywood until you replace pane.
Cover opening with plastic sheeting or plywood panel until you repair or replace the door or window
--------
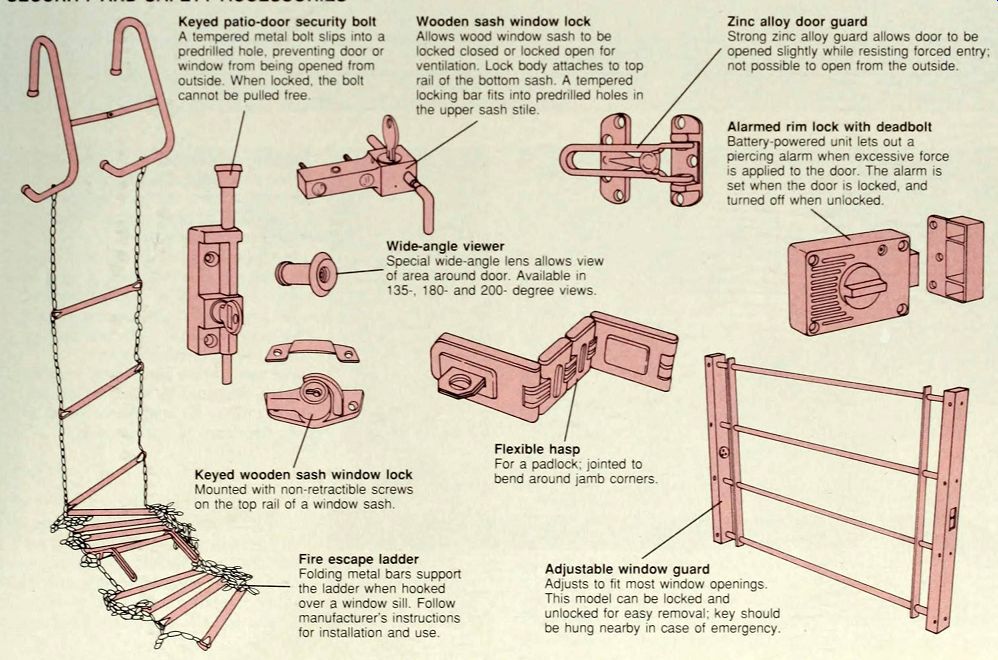
SECURITY AND SAFETY ACCESSORIES
Keyed patio-door security bolt--A tempered metal bolt slips into a predrilled hole, preventing door or window from being opened from outside
When locked, the bolt cannot be pulled free
Wooden sash window lock--Allows wood window sash to be locked closed or locked open for ventilation. Lock body attaches to top rail of the bottom sash. A tempered locking bar fits into predrilled holes in the upper sash stile.
Wide-angle viewer
Special wide-angle lens allows view of area around door. Available in 135-, 180- and 200-degree views.
Keyed wooden sash window lock Mounted with non-retractable screws on the top rail of a window sash.
Flexible hasp--For a padlock: jointed to bend around jamb corners.
Zinc alloy door guard--Strong zinc alloy guard allows door to be opened slightly while resisting forced entry: not possible to open from the outside.
Alarmed rim lock with deadbolt
Battery-powered unit lets out a piercing alarm when excessive force is applied to the door. The alarm is set when the door is locked, and turned off when unlocked.
Fire escape ladder---Folding metal bars support the ladder when hooked over a window sill. Follow manufacturers instructions for installation and use.
Adjustable window guard---Adjusts to fit most window openings.
This model can be locked and unlocked for easy removal: key should be hung nearby in case of emergency.
-----------------
PROTECTING WINDOWS AND DOORS AGAINST STORMY WEATHER
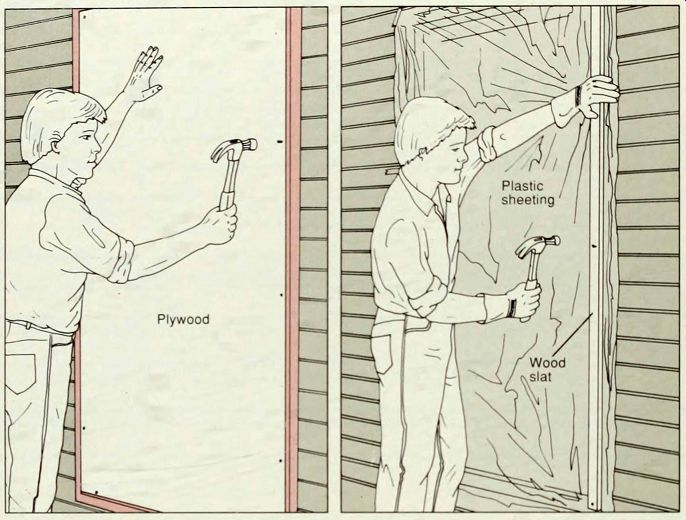
--- Shielding unprotected openings. To prevent storm damage, cover windows
and doors with 1/2-inch plywood sheets cut to fit. Nail the plywood to
the exterior wood frame (far left), using 2-inch common nails spaced about
12 inches apart.
Remove nails and plywood with a pry bar or claw hammer after the storm has sub sided. and fill nail holes with wood filler. To attach plywood sheets to metal frames, drill pilot holes and use screws: caulk the holes when the plywood is removed. In hurricane regions, install shutters or window shields that can be closed in the event of a storm.
Use 4- to 6-mil plastic sheeting to seal a broken window. Staple the plastic around the window frame, or tuck the plastic under 1-by-2 wood slats, nailing 1 1/2-inch common nails through the slats and plastic into the window frame (near left). Cover the floor and sill under the window with rags or towels if it rains. Remove the slats with a pry bar or claw hammer to re-glaze.
SECURING A SLIDING WINDOW OR PATIO DOOR
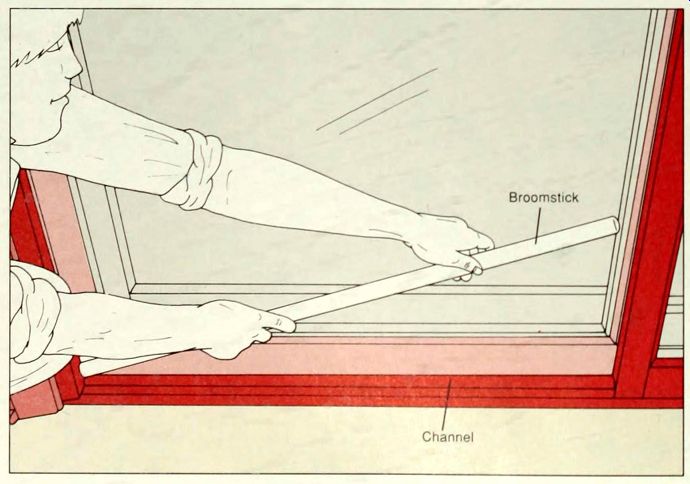
------- Burglar-proofing a patio door. If a sliding patio door or sliding
window can be jimmied open, secure it temporarily with a broomstick or
other piece of wood cut to fit the interior floor channel.
Measure the length of the channel with the door closed and locked. Using a hand saw. cut a broomstick or other piece of wood to fit snugly in this space. Wedge the wood into place, as shown, making sure it lies flat in the channel.
For better, more permanent protection, install a commercially available locking security bar in the channel, or install a patio door security bolt.
--
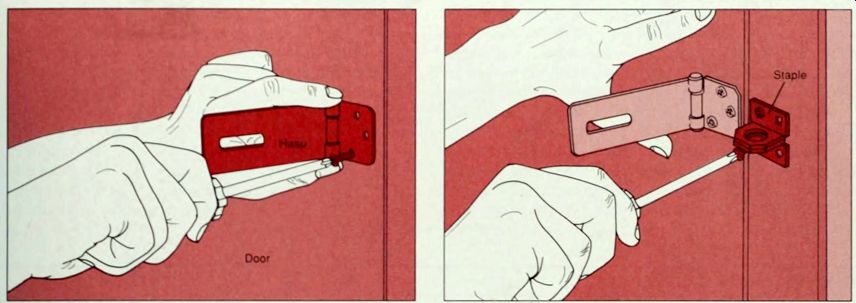
INSTALLING A TEMPORARY DOOR LOCK
1. Installing a hasp. Position the screw-hole leaf of the hasp closest to the door edge Drill pilot holes, then drive 1-inch screws through the holes into the door check that the screws are covered when the hasp is closed If the surfaces of the door and the jamb are not flush when the door is closed, install a flexible hasp on the jamb.
2. Installing the staple. Close the hasp and mark where the staple should be screwed into the door frame. Attach the staple to the door frame with 1-inch screws. Close the hasp over the staple and secure the door with a padlock.
FREEING A LOCK
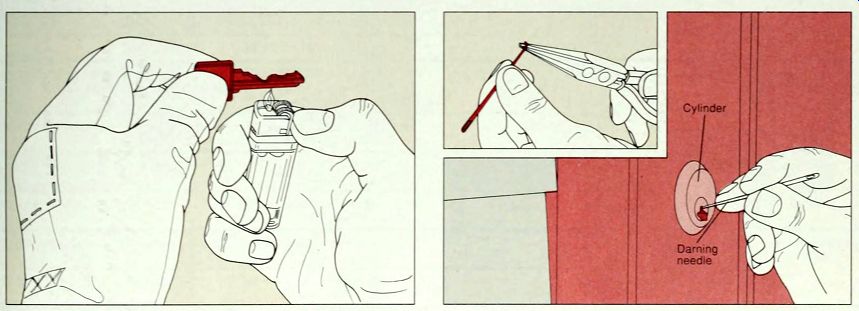
Unfreezing a lock. To unfreeze an exterior door lock, first chip any ice off the lockset. Using a pocket lighter, heat the door key, wearing a glove to protect your hand (above). Slowly work the heated key into the cylinder.
Repeat several times, if necessary, until the key turns in the cylinder. Lock de-icer, available in tubes, or denatured alcohol, can also be used to unfreeze locks.
Removing a broken key from a lock. Bend a metal darning needle point by heating it with a lighter and twisting the point into a hook with needle-nose pliers (inset). Lubricate the keyhole with a lubricant spray. Insert the needle in the top of the cylinder hole, the hook pointing down. Push up the cylinder pins and pull out the key fragment with the hook. Alternatively, dismantle the lock and push the key through from the back of the cylinder or replace the cylinder.