Properly planned and completed in stages, even a major renovation can be minimally disruptive, so that you will still have a place to store dishes, to cook, and to serve meals. Large upgrades cost more than $7,000, although many can be completed in a day or two.
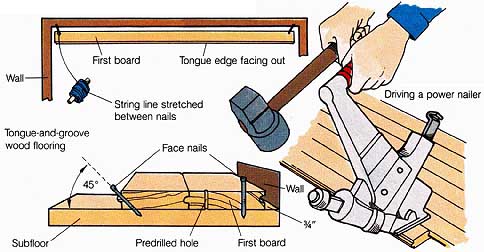
Installing Hardwood Flooring
The first question a prospective client asks about a hardwood floor is, “Is it hard to clean?”
Bumpy, grooved, plugged, and notched hardwood flooring not practical for the kitchen. Although it may look good in the showroom, it doesn’t hold up well to moisture and food spills. Use a square-edged, flush-jointed style in the kitchen, and take special care to ensure tight joints between planks on all four sides.
There are two types of pre-finished hardwood flooring—solid planks and veneered plywood planks. The latter are highly susceptible to damage from falling objects and once damaged are nearly impossible to repair. Solid planks resist most kinds of abuse and can be refinished again and again. Solid-plank hardwood costs 30 to 50 percent more than veneered plywood planks but will last 10 times longer.
For lasting quality, take two precautions when installing hardwood. First, always use a vapor barrier between the subfloor and the hardwood flooring boards. Second, never glue the hardwood directly to the subfloor. The correct way to attach prefinished hardwood floors is to nail a layer of underlayment to the subfloor and then glue the hardwood to the underlayment.
The finest hardwood floor is the custom floor. It is nailed directly to the subfloor over a moisture barrier, then it's put tied, sanded, stained, and varnished in place. This type of hardwood floor is the most water-resistant and easiest to clean. Even though it's the most expensive, it's also the longest lasting, which makes it the most cost-effective type of flooring.
Installing Expensive Countertops
Expensive countertop materials, such as Corian and slab marble and granite, can be stunning additions to a kitchen. Their durability and ease of maintenance complement their exceptional beauty.
Corian is a popular synthetic countertop material that's durable and stain resistant; in addition, accidental cuts can be repaired by sanding. Corian and similar synthetic products are popular in finer homes; they cost approximately 35 percent more than ceramic tile and about five times as much as plastic laminate. For an interesting look, trim synthetic countertops with a ceramic tile back splash, and use wood or metal trim for an unusual edge detail.
Synthetic slab countertops made of cultured marble, cultured onyx, and cultured granite are better used in bathrooms than in the kitchen, since they are easily stained by food and beverages and are less durable than Corian and similar synthetics.
Natural slab granite is durable, beautiful, unique, and expensive. A granite countertop will not provide much of a return in a first-time-buyer’s neighborhood, but it can be considered a sensible investment in move-up homes.
Granite is available in a wide range of prices, depending upon the type used and how it will be edged. Some types are more widely avail able than others, making them less expensive. The slabs are usually ¾ inch thick but are made to look thicker by having a second piece glued onto the underside of the front edge. Polishing can make the seam almost invisible to the naked eye.
Installing a Bow Window
Adding a bow window at the kitchen sink can turn a small, plain kitchen into a light, airy, spacious-looking one. The project is relatively expensive, but if a room addition is out of the question and the kitchen is cramped, a bow window could be the most cost-effective alternative.
Bow windows differ from bay windows in that they have four or more panels. Bay windows have three. Bow windows are available in aluminum, vinyl, wood, and clad wood frames. Cladding is available in aluminum or vinyl. It is important to use a frame material that matches that of the rest of the windows in the house. A wood-framed window installed in a house with aluminum frames might look out of place and could actually diminish the value of the home.
Installation cost is the main reason that a bow window is more expensive than other types of specialty windows. Structural alterations are usually necessary. This project should be planned with the help of an architect or a designer and a contractor or an engineer.
Loss of usable wall space is a drawback to a bow window. If the bow window is wider than the window being re placed, the opening in the wall will have to be enlarged. Reduced wall space also might result in the loss of wall cabinets. Consider these trade-offs carefully. You might decide to install a skylight instead.
Installing a Skylight
A skylight can add natural light and , with some models, ventilation to an otherwise dark and dreary work place without diminishing wall space.
A skylight itself is relatively inexpensive, but installation can involve costly structural alterations. Plan the installation with the assistance of a professional. This is important be cause proper installation is necessary to reduce the chance of leaks. Skylights themselves don’t usually leak. Most often, leaks occur at a faulty joint between the skylight and the roof.
The installer should use connection details provided by the National Roofing Contractors Association in its Roofing and Waterproofing Manual. The installation information provided with the skylight may not be sufficient to ensure a watertight configuration with every type of roofing material.
Metal flashings are usually required for the installation. Some skylight companies offer the flashing at extra charge; if they don’t, a heating and sheet- metal contractor can make them. Some tile roofs require lead flashing for a proper seal, which can be expensive. Roofing contractors are expert in this area.
Do not use canned roof patching compound (a cold patch) to install a skylight in a hot-asphalt type of roof. The connection will not last and eventually a leak will occur. Use hot asphalt for a more permanent seal, even though it's more expensive initially.
Installing a skylight in the kitchen is somewhat different from installing one in most other rooms, mainly because the kitchen requires more artificial lighting in the ceiling, which leaves less space available for a skylight. During the planning phase it's important to consider rearranging rather than eliminating any artificial lighting.
There are two basic types of skylights—fixed and operable. A fixed skylight (one that doesn’t open) is the least ex pensive of the two. It is avail able with either a domed plastic lens or a flat glass lens. Of these two, the domed plastic lens is the least expensive and most commonly used.
Operable skylights, some times called sky-windows, can be opened and come in a wide variety of styles. Some open only on the side to improve ventilation; others lift open. Some can be opened and closed manually; others have electrical controls. Some electrically operated models have moisture sensors that will close the sky light automatically in the event of wet weather. Louvered blinds to reduce heat and light on hot days are another option; the blinds in some models open and close electrically.
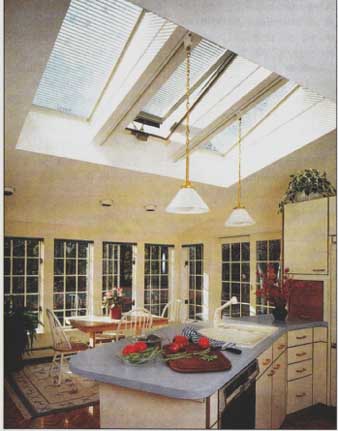
Skylights and casement windows brighten this remodeled eat-in kitchen.
Other new touches include recessed lights in the eating area, hardwood
floors, and an appliance garage.
Re-facing Cabinets
Advertisements claim that cabinet re-facing can be done for 5 percent of the cost of replacement, and it’s true. It’s also true that a refaced surface, done properly, will last a long time and be worth the price. How ever, replacement, not re-facing is best if you are planning to remodel your kitchen completely and if the existing cabinet space is arranged inefficiently.
All appliances must be re moved before re-facing can begin. Then remove moldings, drawers, blank drawer fronts, and doors and hinges. Rough the remaining surfaces with sandpaper (50 to 80 grit), and ply a layer of contact cement. Also coat the back of the veneer to be used for re-facing with contact cement. Allow the cement to dry, and then press the veneer onto the cabinet surfaces and trim the edges with a router, razor knife, file, and sandpaper. If plastic laminate is the veneer of choice, paint the cabinet interiors before beginning the re-facing process. Next, install new moldings, doors, and drawer fronts. Finally, if the veneer is wood, you can either apply stain and varnish, or paint.
A good re-facing job requires lump-free adhesive application and careful trimming of the newly applied veneer. Grained veneers should be applied so that the grain runs in the same direction, usually vertically, except on horizontal rails.
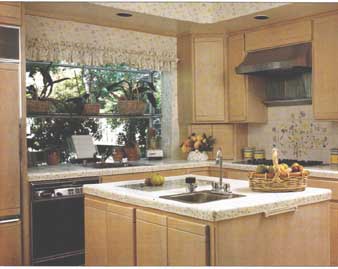
The delicate floral trim in this kitchen is repeated in the wallcovering and matching fabric, the tile back splash, and the island countertop
trim. Note the electric power strip on the island and the refrigerator
faced to match the cabinetry.
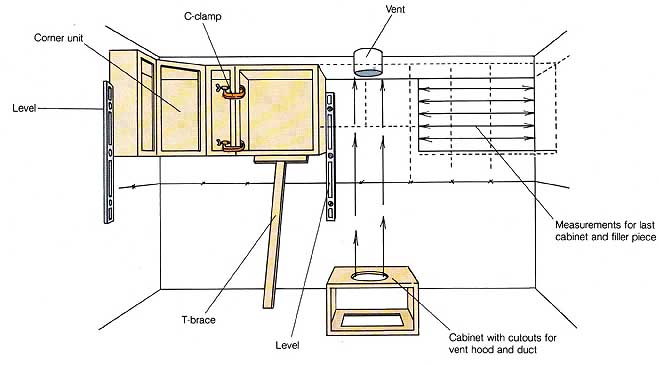
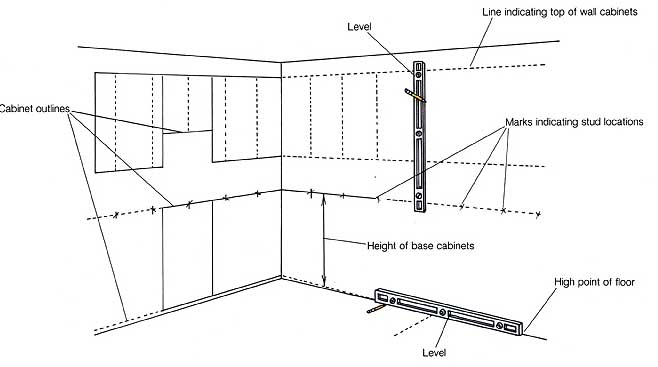
Wall Cabinet Installation: Cabinet with cutouts for vent hood and duct;
Replacing Cabinets
Cabinet replacement is most cost-effective when you are completely remodeling the kitchen. Damage to cabinets and countertops is most likely during the removal required for most major kitchen remodeling.
As has been noted previously, the markup on prefabricated (modular) cabinets is high, so when shopping for modular units, expect 50 to 70 percent discounts. This is not true for custom cabinets, al though prices will vary greatly from cabinetmaker to cabinet maker, depending on quality of construction, accessories, door style, and finish. Not every cabinetmaker is a good de signer. Professional design assistance is most important to achieve a high-quality finished product.
Dovetailed drawer construction is the finest, but its absence should not preclude the importance of strong hard ware (drawer glides and hinges), thick cabinet walls, finished interiors, good-quality wood products and accessories, and a fine finish.
Factory-applied varnishes ire usually superior to those on locally made cabinets. However, cabinets with “photo-finished” surfaces, such as contact paper, are not a good investment.
Adding Island Cabinets
Island cabinets can make a kitchen more versatile and in nesting. It is important when installing them to avoid creating tight passageways. To find out how well an island cabinet would work in an existing kitchen, try the following. Measure a point 3 feet in front of the dishwasher and place a kitchen chair on the mark. Open the dishwasher, bend over, and pull out the bottom tray. If your body doesn’t bump the chair, you have enough space to install an island. Perform this experiment with any appliances that will open into a walkway created by the installation of an island cabinet.
Remodeling or Expanding a Kitchen
Statistics show that you can expect a 75 to 110 percent return on your investment from a kitchen remodeling project, with expansions returning slightly less. This excellent re turn compounds the pleasure of having a safe, luxurious, modern work center.
No home improvement is more satisfying than a complete renovation. But the process can be stressful. You can minimize the stress by making as many decisions as possible before the project begins, pre paring a separate cooking and sink area to be used during construction, and accepting that your life will be in disarray for many weeks.
The success of a kitchen remodeling project or expansion depends on planning. Every detail must be thoroughly studied. Making a wants and needs checklist of every feature in the new kitchen can make planning easier. Architects, de signers, and contractors can get a better idea about your dream kitchen by knowing your preferences.
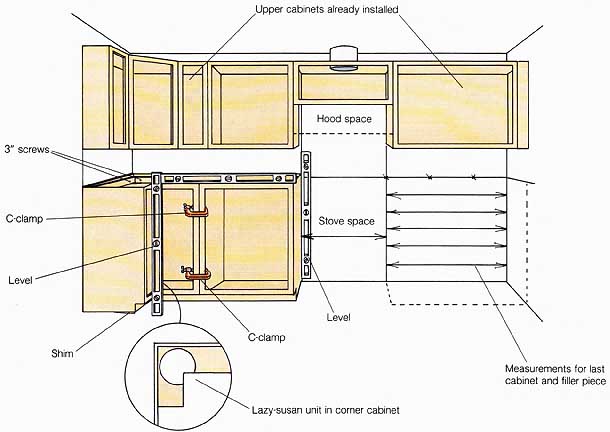
Base Cabinet Installation: Measurements for last cabinet and filler
piece; Lazy-susan unit in corner cabinet; Upper cabinets already installed.
