No other room in the house is subject to more use by everyone in the family than the bathroom. Whereas most other rooms are improved for comfort and convenience, many bathroom improvements have become necessities due to changes in life style. One bathroom is rarely sufficient for an entire family, especially when it must accommodate two income earners in the morning, not to mention children getting ready for school.
The addition of a second bathroom to a one-bath home is the most cost-effective bathroom upgrade. Yet it may not be affordable or high enough on the list of priorities to justify doing at first. In that case, the second most cost-effective improvement is remodeling a bathroom to make it more convenient for two people to use at one time. Remodeling can mean anything from installing a new light fixture to replacing a toilet to adding a second sink. The latter can greatly alleviate the rush to get ready for work in the morning.
A rimless shower door louvered shutters, brass and ceramic fixtures, and skylights with sensors that close automatically in the rain add distinction, function, and style to this remodeled bathroom.
Small Bathroom Upgrades
For a homeowner who is handy, the cost of some small bathroom upgrades can be less than a night out at the movies for the family. Like all the small upgrades in this guide, small bathroom projects cost up to $900 and can be completed in a day or two.
Installing a Mirror
A mirror can create the illusion of space in a small bathroom. Large mirrors enhance the light in the room and reflect its various finishes, creating beauty and interest. Polished or beveled edges, etched borders, curves, and layered glass make mirrors a dramatic and elegant accessory.
A mirror need not be limited to the space over the sink or vanity. It can wrap a vanity on all sides. It can run from the top of the counter or counter back splash to the ceiling. It can be framed in decorative metal trim to match other finishes in the bathroom.
Caution: Avoid installing a mirror directly on a surface where there may be standing water. The silver coating on the back of the mirror will be dam aged by continued contact with dampness or moisture. This is especially true when decorative J-molding is used at the bottom of the mirror to hold it in place. Water can become trapped in this channel, permanently damaging the mirror. Instead, install the mirror in a bed of panel adhesive or with conventional mirror clips.
You can purchase precut mirrors at most hardware stores and home-improvement centers. If the design you desire varies from the norm even a bit, however, a custom mirror will be required. Custom mirrors are available from companies specializing in mirror fabrication or glass replacement. Rounded edges, bevels, and other special cuts will add significantly to the purchase price.

Bathroom Upgrades: For an overview of the bathroom, before and after remodeling, see earlier section.
Installing a Medicine Cabinet
Medicine cabinets are as attractive as they are useful and are sold in an almost limitless number of shapes and sizes. Many are much larger than old-fashioned cabinets, and some of the more expensive models have interiors as fancy as their exteriors. Options include mirrors inside and out, integral lighting and electrical outlets, swing-out magnifying mirrors, and even a mirror de fogger. You can choose swinging or sliding doors, recessed o surface-mounted models, and interchangeable configurations
If you choose a recessed model that's larger than your current medicine cabinet, you can alter the existing opening, provided that there is no plumbing, electrical, or mechanical equipment inside the wall. If there is, it may be preferable both in terms of cost and disruption to install a surface- mounted cabinet.
Medicine cabinets range widely in price, depending upon the size and the number of features. Elaborate models fall outside the range of a small upgrade, but even the most difficult configurations can usually be installed in less than a day.
Replacing a Toilet or Seat
Apart from aesthetic considerations, one of the primary reasons for replacing a toilet is to save water. Replacing a toilet is a lot like trading in a car for a new one. The old car may run satisfactorily, but a new model s certainly more stylish and generally more efficient.
Toilets are sold in an enormous number of brands, styles, and colors. The least costly and most common are two-piece, or close-coupled, toilets. The most stylish and most expensive are one-piece, or low-profile, toilets, some of which may be beyond the range of a small upgrade. Two-piece toilets depend a great deal on gravity; one-piece models contain sophisticated entrails that facilitate a full yet quiet flush with a minimal amount of water.
Water conservation is an excellent reason to replace an old toilet with a modern, more efficient model. Many older toilets use between 5 and 7 gallons of water per flush; modem, water- saving models use about 3.5 gallons per flush. New legislation in many states requires the manufacture and installation of ultra-low-flow (ULF) toilets that use 1.5 gallons per flush. Many ULF toilets contain devices that assist the flush with air.
Replacing an old, worn toilet seat will improve the appearance of any bathroom. A screw driver, a pair of pliers, and about 20 minutes are all that you need to perform this task.
Most toilet seats are manufactured from wood, wood by products, or plastics. Those made from plastic are more ex pensive, offer excellent lasting quality, and come in a wide range of colors and styles. Those made from wood, such as natural oak, are most appropriate with traditional or colonial decor.
Replacing a Tub Enclosure
A tub enclosure that's leaking and does not contain safety glass is a candidate for replacement. One major reason that many people do not have a tub enclosure is their fear of being severely cut in a fall. This is no longer a problem with modern tub enclosures, which are constructed with safety glass— essentially the same type of glass used in automobiles. It is designed to fracture into small, non-jagged pieces that will remain connected and not cause injury.
Many frame styles and finishes are available for tub enclosures. Frameless tub enclosures with clear glass are especially effective if the goal is to minimize visual distractions or to make a smaller bathroom seem bigger. If privacy is a concern, many opaque or translucent glass patterns are available, or you may choose to have custom etched glass panels fabricated.
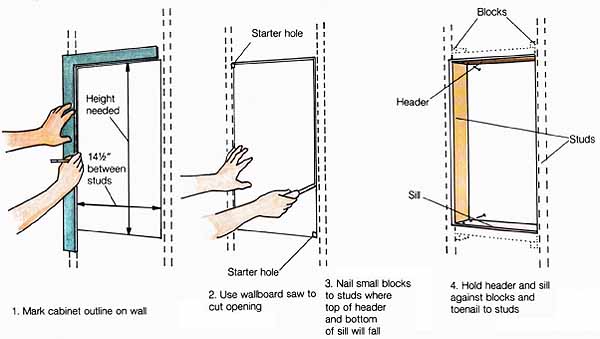
Cutting a Wall Recess: 1. Mark cabinet outline on wall; 2.
Use wallboard saw to cut opening; 3. Nail small blocks to studs where top
of header and bottom of sill will fall; 4. Hold header and sill against
blocks and toenail to studs.

Replacing a Faucet
Replacing a Faucet
Now more then ever, a bath room faucet must not only be functional but must look good too. There is an enormous variety of faucet styles and finishes, ranging widely in quality and price. Replacing a faucet is a medium upgrade that should take a couple of hours.
Look for a faucet whose body and working parts are constructed of solid brass. Al though you will find many in expensive faucets constructed of plastic or other synthetic materials, the finish will last significantly longer on more expensive brass faucets. All of the major American plumbing companies offer a wide selection of superior faucets and valves that not only provide longevity, but will maintain their attractive appearance for years.
When replacing a faucet, you may want to consider in stalling a hair-washing sprayer. This device is available as an optional accessory with many of the leading lavatory faucets and can be a real bonus. Hair- washing sprayers come with installation accessories and can be installed in about an hour.
Replacing a Sink
If the new faucet you just bought makes your old sink look even worse, you might want to replace the sink. Among the other reasons you might find for justifying this upgrade is that after countless hours of searching for just the right faucet, it’s fairly common to find that the one selected has an 8-inch centerset (the distance from the center of the hot-water faucet to the center of the cold-water faucet), and the existing sink will accept only a 4-inch centerset. Also, a hair-washing attachment needs an additional hole drilled, and a bigger sink makes hair washing easier.
Material and style are two considerations when shopping for a new sink. The options for the material include enameled steel, enameled cast iron, vitreous china, acrylic, teak, pottery, and even hammered brass. The style options include round, oval, square, hexagonal, shell shaped, and even a specially designed hair-washing sink.
Enameled cast iron or vitreous china are probably the most cost-effective options. They are not the most competitively priced but will wear significantly better than any of the other choices.
Since finding a replacement sink to match a countertop exactly is difficult (almost impossible if the sink or countertop is more than 10 years old), consider using a complementary color. If you have selected a self-rimming sink, see earlier discussion for a few tips on installing it.
Refinishing Fixtures
One cost-effective way to give a bathroom a fresh, new look is to refinish the bathtub, sink, and toilet. It’s a simple process:
The fixture is chemically cleaned and etched, and then a porcelain-like finish is applied. The new finish is cured with heat or chemicals and then thoroughly polished.
The finish is either a polyurethane enamel or an epoxy; the former lasts about five years, the latter can discolor in about six months, so be sure to ask about a warranty. Also, do not consider refinishing if the structure surrounding the fixture is damaged. In such cases, it's necessary to remove the fixture to make a more complete investigation of what exists and what proper repairs mould be made.
Refinishing is a smart alter native to replacement if the fixture enamel or fiberglass is worn off, stained, or moderately chipped. Refinishing does not require the removal of the surrounding wallcoverings, such as tile and wallpaper, whereas fixture replacement Joes. For example, refinishing in existing tub would cost about one tenth of the price of replacing a tub that's surrounded by ceramic tile, including the tile work, plumbing labor, and the cost of the new tub itself.
Another advantage of refinishing is the minimal level of disruption. Refinishing usually takes only a day or two, whereas replacement, including plumbing, wallboard, tile, and so forth, could easily take a couple of weeks.
Refinishing is not limited to fixtures. Many firms will apply the same finish to ceramic tile. However, refinishing damaged tile can mask other more serious problems in the substrate, which could result in heftier costs down the road. If the color of the tile is the problem, you will be dollars ahead by simply removing it and replacing it with some thing new, since unlike fixture refinishing, tile refinishing tends to diminish the cosmetic value of the tile.
If you do decide to refinish the tile, clean it meticulously with a bathtub cleaning prod ct and a dish-scrubbing pad. You may even find it necessary to re-grout the tile, which in itself will greatly enhance both its appearance and integrity.
Few projects offer more return on an investment than new wallcoverings or a fresh coat of paint. By the same token, if not done properly, there are few things that can do more to spoil the look of the space. Both of these projects can be done without the help of a professional. Plan on spending a weekend’s worth of your time, most of which will involve wall preparation.
Applying Wallcoverings
The wallcovering you select for a bathroom should with stand considerable moisture. Although you can use foil and plain-paper wallcoverings, the best bet for long-term adhesion and easy cleanup is a vinyl wallcovering.
Before installing the wall-covering, make sure that the walls are smooth and free of imperfections, since these blemishes will be more apparent after the wallpaper is hung. Smooth walls that are textured with 80-grit sandpaper and a sanding block. Fill low spots with joint compound or vinyl patching compound. For a smoother finish, coat the entire wall from floor to ceiling with joint compound applied with an 8- to 12-inch putty knife. Once dry, sand the compound to ensure a uniform finish.
Seal the walls designated for covering with at least one coat of an oil-based primer. This will minimize the amount of moisture that the wallboard absorbs, making the wallcovering easier to manage during installation and significantly easier to remove in the future.
Because of the amount of heat and moisture generated in a bathroom, it's especially important to ensure adequate adhesion by applying paste to the wallcovering, even if it's prepasted. To protect against the growth of mildew and other fungi, use a mildew- resistant paste.
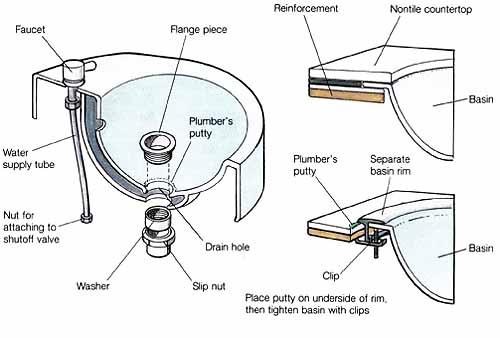
Installing a Washbasin: Place putty on underside of rim, then
tighten basin with clips
Adding a Light Fixture
Lighting contributes to both the comfort and safety of a bathroom. It is designed to emphasize the myriad colors and textures in a modern bathroom.
Start this improvement by assessing where additional lighting may be needed: over a tub or shower, over a vanity or dressing table, or just to enhance the space as a whole. Call an electrician if you are not handy or you don’t feel confident enough about this project.
Recessed lights offer a clean, unobtrusive look that will highlight a specific area, adding interest and excellent illumination. Those used in certain parts of the bathroom must be approved for use around dampness and moisture and are fit ted with a special waterproof trim for added protection. Most manufacturers of recessed lights offer a retrofit model, which can be installed in an existing ceiling if there is attic space above to allow for the installation of wires running from the new light location to a switch in the wall. If the room is located between floors, you will need to remove at least part of the ceiling to install the wires. In this case, retrofit housings will not be required.
Surface-mounted ceiling lighting is not as popular as it once was, but it's still an alternative. Here, the simpler the style the better. Surface- mounted ceiling lighting offers good general lighting but is not as effective as recessed lights for specific tasks, such as bathing, shaving, or applying cosmetics.
The basic wiring for surface- mounted ceiling lighting is the same as that for recessed lighting except that you will need to install a light rough-in box in stead of the recessed light housing. Some additional blocking between the joists may also be required to support the fixture adequately.
One w to improve the general lighting in the bath room is with a combination exhaust fan and light. These are generally more expensive to in stall than a plain light fixture because, in addition to the added electrical work, the fan housing must be vented to the exterior. These units also frequently require more than one switch, which also adds to the cost.
The cost of an above-average exhaust fan and light combination depends on the amount of air it will move and the level of noise it emits. The larger, quieter units are the most expensive but are well worth the added cost in comfort and convenience. With professional installation, this project could qualify as a medium upgrade.
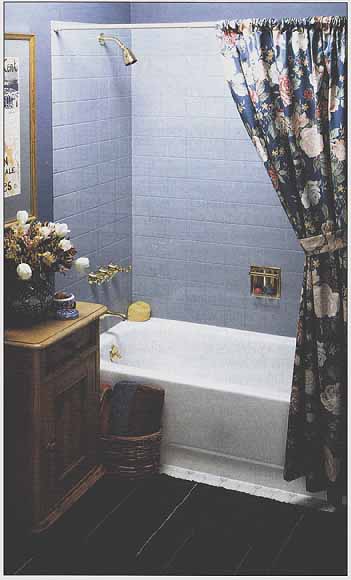
A polyurethane enamel refinishing adds at least five years of life
to this bathtub.
Replacing a Light Fixture
Many bathrooms have a small light fixture mounted on the wall directly above the mirrored medicine cabinet. The light casts shadows on the face, which makes it difficult to shave or apply makeup. A better solution is lights mounted on either side of the mirror.
Although replacing a light fixture doesn’t require the skills of a licensed electrician, you should use extreme caution when performing this task. The best place to begin this project is at a hardware store, home- improvement center, or lighting specialty store. Do this before removing the existing fixture. Most of these stores have qualified lighting consultants on their staff. It is helpful to supply them with a photo graph or simple sketch of your bathroom that clearly reflects what exists. This will enable the consultant to make specific suggestions regarding the size, style, and finish of the replacement fixture.
Maintaining an Exhaust Fan
Many people who already have an exhaust fan don’t use it be cause it either is too noisy or isn’t in good working order. The former is usually a result of the latter.
The first step in fan maintenance is to turn off the circuit breaker that supplies power to the fan. Then, and only then, remove the protective grille that conceals the fan and housing. Thoroughly vacuum all the parts to remove any dust, dirt, and dead insects. These not only make the fan less efficient, they contribute to its early demise. Apply a couple of drops of fine machine oil to the shaft to ensure that it will operate smoothly. Then clean the grille with a solution of ammonia and warm water. Replace the grille before turning the circuit breaker back on.
Installing Safety Devices
A ground fault circuit interrupter (GFCI) will prevent serious shock. This is especially important in the bathroom, where electrical appliances are used in close proximity to water. See earlier discussion for more information on this safety upgrade.
One of the most dangerous laces in the home is a bathtub with a slippery surface. The rest way to prevent bathtub falls is to install nonskid rubber decals. They will not only improve the safety of the tub but, when placed over chips or other minor imperfections, will enhance its appearance as well. A clear nonskid material, which is virtually unnoticeable other than its texture, is good flews for people who don’t like floral or other patterns in the bottom of the tub. For the decals to adhere, the surface of the tub must be clean and dry. Use a household cleaner designed to remove oil and soap scum and a nylon brush or dish-scrubbing pad.
A simple grab bar can make retting into and out of the tub less of a chore, particularly for the old and very young. Made of chrome, plated brass, brass, or brushed nickel, grab bars are mounted directly onto the wall surface. It is important that these fixtures be anchored into he wall studs and not just at ached to the wallboard or tile. For example, if the bathroom wall is tile, use a masonry bit to rill through the tile, and screw e grab bar to the wall stud behind it.
A sudden rush of hot water while you are showering can be merely annoying, or it can be dangerous. This commonly occurs with non-mixing, two- handled faucets when a nearby toilet is flushed or a sink is used, because these other fixtures reduce the amount of cold water flowing to the shower.
Anti-scald or pressure- balanced shower valves are designed to deliver a steady stream of temperature- controlled water that's virtually unaffected by demands placed on the water in other areas of the house. These de vices are not as easy to install as a lavatory faucet, but safety concerns make this upgrade well worth the effort.
Re-grouting and Re-caulking
Both re-grouting and re-caulking are ongoing preventive maintenance projects that can help you avoid larger, more costly projects in the future. Grout and caulk that are kept in good condition prevent water from seeping into cabinets, wall board, wall framing, and sub-flooring. By the time damage of this sort is discovered, costly replacement of the affected areas is often the only solution.
Because ceramic tile has many joints, it requires more ongoing maintenance than other products manufactured as solid sheets. Most homeowners balk at the chore, but ceramic tile will look better and last longer if it's cleaned and re-grouted at least annually. This is especially important if the tile is installed directly over wallboard without the benefit of a mortar bed.
Grout is sold packaged as a dry powder in a variety of colors; it's available at most hardware stores and home- improvement centers. The first step in installing new grout is to remove about 1/8 inch of the existing grout with a hammer and chisel or the sharp-pointed end of an old-fashioned bottle opener. This will provide a depression for the new grout to occupy.
Next, mix the grout with water to form a paste, following the instructions on the package. Apply the grout with a rubber float or a sponge, forcing the grout into the joints in a diagonal direction. Wipe off excess grout immediately with a damp sponge. Any grout residue that remains on the tile will form a haze and can be polished off with a dry piece of cheesecloth. Wait a few days for the grout to dry completely, and then apply a coat of acrylic sealer to both the tile and the grout.
Important: Fill the joint between the tile and the bathtub or shower pan halfway with grout and then top it with a bead of clear silicone caulk. The caulk will provide flexibility at a joint where there is typically a considerable amount of movement.
Apply clear silicone caulk at all locations where cultured products or other solid-surface materials are joined or where they meet fixtures or other finishes. It is imperative that the surface be clean and completely dry before you install new caulk, to minimize the possibility of future mildew growth behind it.
Caulk the joint between any vinyl floor covering and the tub or shower pan. Use a latex caulk with silicone, which is simple to install and will re main flexible. All the vulnerable locations in a bathroom can be re-caulked in less than an hour at very little expense.
Eradicating Mildew
Mildew is a fungal growth that thrives in warm, dark, damp areas. It looks unappealing and has a strong odor. The key to long-term mildew control is to rid the area completely of dormant mildew spores and then to maintain proper ventilation and sufficient natural lighting to help avoid future growth of mildew.
One of the most effective deterrents to mildew is a solution of 1/3 cup laundry deter gent, 1 quart laundry bleach, and 3 quarts warm water. Add the bleach to the water first, and then add the detergent. Even though the solution is mild, be sure to wear rubber gloves, eye protection, and old clothes. Also be sure that there is plenty of ventilation.
Apply the solution to affected areas with a sponge or nylon brush. Let the solution sit until all the dark stains have disappeared (about 15 minutes), but don’t allow the solution to dry. Repeat the process a second time if needed.