New countertops and flooring are medium upgrades with a large impact—on comfort, convenience, and looks. Medium kitchen upgrades cost between $900 and $5,000 and may be completed in two to six days.
Installing Medium Priced Countertops
Kitchen countertops are commonly constructed from ceramic, marble, or porcelain tile r from plastic laminated onto particleboard or plywood. Countertops can also be made of solid sheeting created from resins (such as Corian), solid wood (such as maple butcher block), or slab granite or other stone (such as slate). Because a stainless-steel work surface is most often used in commercial installations, it will not be discussed in this guide.
The two most widely used medium-priced countertop finishes are plastic laminate and ceramic tile. Tile is more resistant to heat, and so it generally lasts longer than laminate. However, tile grout is far more difficult to clean and maintain. Tile is also more expensive to purchase and install.
As is true with all aspects of home improvement, it's wise not to overbuild when it comes to countertops. In a neighborhood where the countertops are predominantly laminate or installing one of the more expensive surface materials, such as Corian or slab granite, would not be a cost-effective grade. However, a small, isolated section of counter or an island cabinet topped with granite or butcher block could lend elegance to a kitchen and would be far more reasonable in cost than a full installation.
Plastic Laminate
Laminate is reasonably resistant to damage, easy to clean and maintain, and relatively in expensive. Although it can be damaged by hot pots and sharp knives, it's a fine surface for the money.
Many home-improvement centers stock ready-made laminate countertops, and you can save as much as 75 percent of the cost of the overall job by installing the countertop yourself. Usually, ready-made countertops are available in only two or three patterns, and the tops are square-cut on the ends. It takes some skill to make the angle cuts (miters) required to turn corners.
As for custom-cut laminate tops, many small companies specialize in their manufacture, and they will either supply or both supply and install them. When purchasing a custom countertop, it's wise to let the supplier install it, since the price of the counter material is approximately four times the cost of installation, and because the risk of damaging the top during installation is quite high—one slip of a saw could mean damage to the entire top.
The plastic surface of a ready-made top is usually laminated to particleboard, but the most lasting quality is achieved when the plastic is laminated to plywood, since it's more water-resistant than particle- board. The laminate materials themselves also vary in quality. Some laminate has color only on the surface over a black base, whereas solid-color laminate has color that extends all the way through the material, so it isn’t as prone to show seams and chips. The selection of solid-color laminates is not as wide as that of surface-color laminates.
Resurfacing a Laminate Countertop With Tile
You can resurface a plastic laminate countertop with tile with out removing the countertop. The job is slightly more difficult, but not impossible, if the countertop has rolled edges in stead of the square-cut type.
To ensure that the counter- top will be waterproof, use epoxy adhesive and epoxy grout. They are more expensive than regular adhesives but are well worth the extra cost.
The tile you select should be made for use on counters. Floor tile is more porous than counter tile and therefore is not as water-resistant; it's also not as resistant to damage by impact as counter tile.
The installation is easy. First, use a saber saw or chisel to cut the connection between the countertop and the back splash. Some damage may occur to adjacent walls and cabinets, so it's wise to plan to retile these areas. Next, use a jigsaw to cut the front edge away from the top. Remove the back splash and front edge, leaving only the horizontal surface. Use a rasp or plane at the front edge to ensure flush alignment with the cabinet below. Next, fill all damaged surfaces in the area to be tiled with a suitable filler. This should include the empty space at the back where the countertop meets the wall.
Getting the sink out of the way is easy. Although you should remove the sink-mount brackets, you need only loosen the plumbing, rather than completely disconnecting it. Use four wood blocks, cut about ½ inch thicker than the tile, to hold the sink in place while you install the tile. You can use the same type of bracing to support other built-in appliances, such as a cooktop.
Use a chalk box to mark the tile layout lines. Then spread the adhesive and lay the tile. Do not apply more adhesive than you can cover with tile in a half hour. Also, do not apply the adhesive too thickly, or it won’t dry properly. You are using too much adhesive if excess bulges from the joints when you place the tiles. Set the tiles firmly into the adhesive, maintaining an even surface at all times. If a wide joint is desired, use plastic tile spacers to ensure an even installation. Use a straightedge to improve alignment after the tiles are in place.
Ceramic and Porcelain Tile
Both ceramic and porcelain tile are sold in a wide range of colors, sizes, patterns, trim, and surface finishes. Even though some kinds of grout can be a nuisance to maintain, the sleek, sophisticated look of a properly installed tile countertop pro vides a high return on investment dollars.
By spending about 20 percent or more, you can make inexpensive tile look more appealing by in- stalling it in an interesting way to achieve the best return on a tile installation, use subtle colors and interesting patterns. You don’t have to lay tile in straight horizontal and vertical lines. Installing tile diagonally, staggered in a basket-weave pattern, or in a combination of diagonal and square rows will add value. The use of well-coordinated patterned decorator tiles or a feature strip are other inexpensive additions that can add 30 percent or more to the value of a tile installation.
Porcelain tile lasts longer than ceramic tile because it's far more dense, which makes it more waterproof and resistant to cracking and chipping. Al though it's available in a matte finish, porcelain tile is usually known for its super-smooth, extremely high gloss surface. However, it costs 30 to 40 per cent more than ceramic tile. Because of cost and lasting quality, porcelain tile is best installed by those planning to stay in their home rather than sell it.

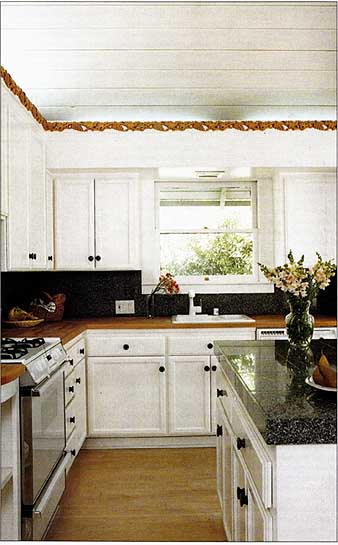
The homeowners kept costs to a minimum in this remodeled kitchen
by re-facing the original cabinets and using new handles and drawer pulls,
removing the old linoleum and sanding and finishing the old sub-floor
using granite squares rather than slabs on the island countertop and the back splash, and using mixed wood for the wood countertops. New hardware
dresses up the original window.
Marble Tile
Countertops made of marble tile are becoming increasingly popular in sub-division as well custom homes. However, marble is a porous stone that's very easily stained by food and common household chemicals and is nearly impossible to clean. It is wiser to use this luxury material on a bathroom vanity rather than in the kitchen.
Butcher Block
A butcher-block countertop is the most professional cutting and food-preparation surface. However, it should be used sparingly, because wood surfaces require substantial maintenance and discolor easily, and because food is easily trapped in the joints, especially where horizontal surfaces meet vertical ones. An island cabinet countertop, which has no horizontal-to-vertical connection, is an ideal place to use butcher block.
Butcher block is somewhat more expensive than tile and plastic laminate. Maintenance involves sanding every two to three years, combined with regular cleaning and oiling with mineral or vegetable oil.
You can make a butcher- block countertop look far more interesting by using a router to shape the top edge. Avoid a sculptured edge with a pat tern, such as an ogee shape (sort of an S), since sanding the top surface might ruin the ogee and require rerouting of the edge.
Adding Major Appliances
Adding or replacing a major appliance is a quick way to modernize a kitchen. Although some replacements might involve a special expense for electrical or gas-line work, to day’s new appliances are more energy efficient and safer to use than ever before.
The markup on appliances isn’t as high as that on light fixtures and furniture. How ever, purchasing an appliance at a rock-bottom price could prove to be a mistake if the store doesn’t have its own de livery, installation, and repair service. In such cases the store usually advises the customer to bring the item back for a re placement or to contact the manufacturer for a warranty repair. In either case, extra costs are involved.
The least expensive appliance replacement is one that fits exactly into the space in the existing cabinets. Modifying a cabinet can sometimes cost more than twice as much as the appliance itself, as can modifying the electrical or gas service. All appliances have installation instructions and specification sheets. It is wise to review these documents carefully before making a purchase.
Many types of appliances are available with key locks that can prevent use by small children. In addition, electrical cooktops are available that generate heat only when special cookware is placed on the surface.

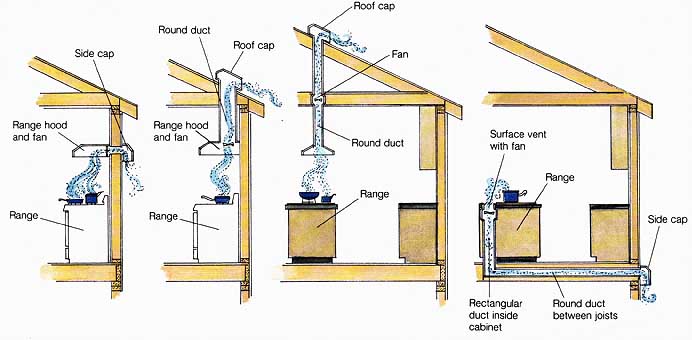
Range Venting Options: Surface vent with fan, Rectangular
duct inside cabinet, Round duct between joists, Side cap
Converting to a GasRange or Gas Cooktop
Gas appliances provide instant heat, and modern ones are more energy efficient and burn cleaner than outdated ones. However, converting from an electric cooktop or range to a gas one can be expensive even if the new appliance will fit perfectly into the old space. Three important costs to consider are that of extending the gas line, upgrading the exhaust hood, and providing 110-volt power. (Modern gas ranges use a small amount of electricity for panel lights and automatic ignition and shutdown systems.)
Gas appliances are rated by volume of gas, expressed in British thermal units (BTUs). When a house is first built, gas lines are sized according to the number of BTUs each appliance will use. Although the main gas line from the street may be sufficient to supply fuel to more appliances, the feeder pipes that travel to the individual appliances may not be large enough to supply gas to a second appliance.
Tapping into a gas line that isn’t large enough to fuel both the existing appliance and a new one could mean flame-out and a possible fire or explosion. (In many older appliances, gas will continue to flow when the flame has been extinguished.) Most licensed plumbing con tractors are capable of properly sizing a gas line. Do-it yourselfers who are not familiar with gas lines should hire a professional for this portion of the project.
Gas ranges generate more exhaust than electrical appliances do. In addition to the steam produced from the food being cooked, the flame also generates unwanted and potentially dangerous fumes. For this reason the Uniform Building Code requires that range hoods for gas appliances exhaust more cubic feet of air per minute (cfm) than those for the same size electrical cooking appliances. With gas appliances it's not wise to use re-circulating range hoods, because they filter the gases but do not exhaust them to the outside.
Caution: Newly installed gas lines should be pressure-tested for leaks. Using soapy water at each joint as the only test is not an acceptable method. To test the line properly, cap the pipe at the appliance location, install a pressure test gauge at the point where the new pipe will be connected to the existing pipe, and then fill the new pipe with compressed air. If the pressurized pipe leaks, a drop in pressure will show on the gauge. Then, use soapy water to find the leaks. Once these are corrected, retest the line. Finally, after connecting the appliance and the new pipe, use soapy water again to test for leaks. If new gas valves will be used in the configuration, they should be connected during the pressure test. (Even new gas valves frequently leak.)
Installing Floor Coverings
Properly preparing an old floor for a new covering is an important factor in achieving the most cost-effective result, regardless of the type of replacement covering.
Covering old kitchen flooring with another layer is not recommended; the most important reason being the possibility of not discovering hidden water damage to the subfloor. There are only a few instances in the life of a home when the subfloor can be inspected, and there isn’t a more cost-effective time than during replacement of the floor covering.
The only case in which glued-on finish flooring is attached directly to a structural floor is when the floor is made of concrete. On wood floors, the new finish flooring is glued to an intermediate layer of ply wood or particleboard, called underlayment. First, staple the underlayment to the wood subfloor. Then putty the joints and staple holes with a smoothing compound. Finally, glue the flooring to the underlayment. You can then remove the flooring later by prying up the underlayment without damaging the subfloor, which is expensive to replace.
Always replace the underlayment when installing vinyl floors, whether tile or sheet; adding a half-inch layer of vinyl and underlayment over an existing layer will thicken the flooring layer and can cause problems later if you need to remove a built-in appliance. Omitting the underlayment can cause another complication: When a new layer of vinyl is installed over an existing layer without underlayment, the surface texture of the old flooring can transfer through to the new layer, in many cases distorting the new surface in less than a month. If the old floor is perfectly smooth, no texture will pass through to a new layer. But if the old floor is not securely attached to its substrate, the new floor will also be loose, no matter how well it's glued to the old layer.
When re-flooring, first re move all appliances, the existing floor covering, and the underlayment. Check for dam age to the subfloor, make all necessary repairs, and then in stall the new underlayment and floor covering. Replacing the flooring from the underlayment up (excluding repairs du to water damage) will cost an extra 15 to 20 percent, but you peace of mind and the finished appearance will make the additional cost worthwhile.

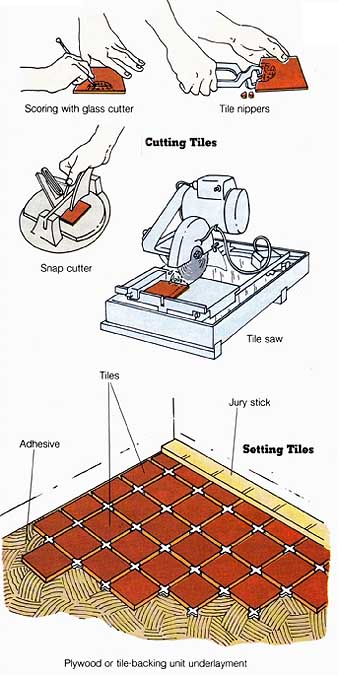
Installing Floor Tile Cutting Tiles: Cutting Tiles, Scoring
with glass cutter, Snap cutter, Tile, Plywood or tile-backing unit underlayment,
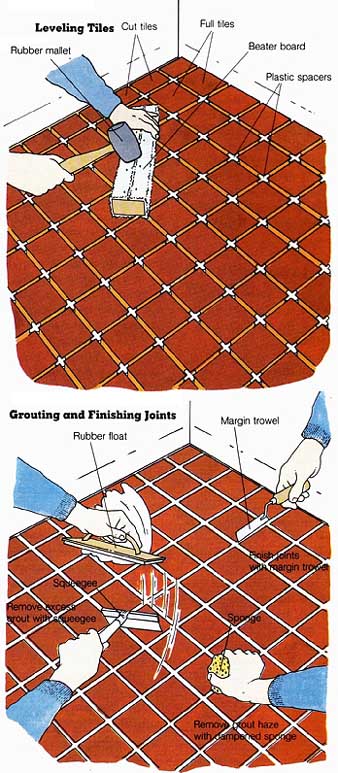
 Leveling Tiles
Ceramic Tile
Covering a wood subfloor with tile is not a simple task, but it can greatly improve the value of a home. With tile, the most cost-effective installation is the one that will last the longest. Improperly installed tile will not last.
Laying tile on a concrete floor that’s in good condition poses no special problems, but houses with wood subfloors are another story. Wood floors flex and ceramic tile is brittle, so you must stiffen the wood floor before applying the tile to keep the tile from cracking. The strengthening process should be performed from above and below the floor. Below the floor, add additional supports to completely eliminate movement of the floor frame. This is hard work, and it's expensive.
Once you have braced the horizontal floor-framing members, you must then prevent the subfloor from flexing. You can accomplish this by applying a ¾-inch-thick to 1-inch- thick layer of mortar onto the surface of the subfloor. The mortar adds the strength required to keep the subfloor from flexing and at the same time smooths irregularities common in wood subfloors. It is very important to install tile over a smooth substrate. It is also important to make sure that the finished thickness of the new floor—mortar and tile combined—is as close as possible in height to any adjacent floor coverings.
Vinyl Tile
One-foot-square vinyl tile is the floor covering of choice for most do-it-yourselfers. There are two basic types of vinyl tile—glue-on and self-sticking. The self-sticking type is easier to install but doesn’t last as long as tile installed with a proper adhesive. Part of good adhesion is derived from moist glue penetrating the surface of the substrate. This process can not occur properly with self- sticking products. In addition, there is no adhesive below the joints of self-sticking tiles, making the substrate more susceptible to water damage.
Using too much glue when installing glue-on vinyl tiles can be as unsightly as not using enough. Excessive amounts of glue can take months to dry and will cause the tiles to bulge and buckle; the excess glue will ooze out through the joints for months after the floor is completed.
The trick to a good installation is a thin layer of adhesive. Allow it to cure for about 30 minutes before applying the tiles. Completing small areas at a time will make the job easier to manage.
Sheet Vinyl
The most popular vinyl surface is sheet vinyl, or linoleum. It has fewer seams than individual tile installations, it's more resistant to water dam age, and it can be coved up the wall for greater protection against water damage. In addition, the almost jointless installation is easier to clean and maintain. The one drawback is that a proper installation re quires specialized talent.
When replacing a floor with sheet vinyl, it's important to consider how many seams will be required and where the seams will be located. Regardless of the number of seams, they should be as far away from heavily trafficked areas as possible. If you select a 6-foot-wide material to cover a floor that's 9 feet wide, expect to have a seam. Although 12-foot- wide material can be a solution to the problem, it may not be available in the desired pattern.
In many instances good planning can reduce the number of seams required without increasing cost, but in most cases fewer seams mean higher cost. However, the floor will last longer, which makes it the most cost-effective installation in the long run.
Caution: Inexpensive cushioned-back vinyls are best used in bathrooms, laundry rooms, and closets. Since they are highly susceptible to damage, they are not recommended for use in kitchens or other heavily trafficked areas.
Adding a Garden Window
You can enhance and brighten your kitchen by replacing a standard window with a specialty unit, such as a garden window. At the same time, you can improve energy efficiency by using double- or triple-pane glass. Multiple layers of glass filled with argon gas are even more efficient. In a high-glare situation, reflective glass can be useful.
More light enters a room through a garden window than a standard window of the same size because the side and top panes of a garden window protrude beyond the exterior wall of the home, allowing light to enter the room from more than one direction.
A garden window is especially cost-efficient to install if an available stock size fits into the existing opening, so that no special wall reconstruction is required. Many stock sizes are available. In this situation, in stalling a garden window, especially a small one, may qualify as a small upgrade. When an existing opening is nonstandard and a custom size must be ordered, or when you need a large standard-sized window, this project is a medium up grade. Many manufacturers will make custom sizes for about 15 percent more than the cost of similar stock sizes.
It is important to retrofit a window properly; the manufacturer’s installation guide provides a number of good tips. Proper flashing and caulking are imperative, since leaks are a common problem with incorrect installations.
The following are a few important considerations for deciding which brand of window to purchase. First, for maximum cost efficiency, it's important to ensure that the window fits exactly into the existing opening. Next, consider how the window opens. Some have operable sections on the sides, and others open on the top. In either case ease of operation should be the major concern.
Although one or two brands have aluminum bottom panels the bottom panel of most garden windows is made from some type of wood (regular plywood, particleboard, or marine plywood). If you will be placing houseplants in the window, a bottom panel constructed from marine plywood will best with stand water damage.
If a brand has all the features you desire, but the bottom panel is not waterproof, you can paint the wood with a coat of fiberglass resin. Although it will add slightly to the initial cost, the resin will reduce the possibility of moisture deterioration, and the window will last much longer.