A cost-effective kitchen improvement can be as simple as adding a soap dispenser or as dramatic as installing new cabinets and countertops. The kitchen offers more possibilities for alteration than any other room in the house. In fact, nearly every interior improvement suggested in this guide can be implemented in the kitchen—even some improvements you might not think of specifically for this room. For example, a garden window is a good place to display decorative cooking utensils. A skylight can create a sunny breakfast nook and brighten a dark work space. And a fireplace provides a place for indoor barbecuing as well as adding warmth and charm.
Because the kitchen is the primary work center of most homes, when a renovation is being planned, all the features of the room should be carefully considered—lighting, traffic plow, distance between work stations (sink, refrigerator and range), counter space, storage, ventilation, and safety. Care fully balancing these features is what makes the kitchen functional.
Skylights, a sloped roof hardwood floors, and white cabinets have made a small galley kitchen into a delightful work space. The cabinet doors beside the sink countertop conceal appliances, the refrigerator is faced with white painted doors, and a small laundry area is borrowed from the end of a long hallway.
Small Kitchen Upgrades
Without spending a lot of money, a do-it-yourselfer can complete any of several small upgrades that will make the kitchen better looking, more convenient, and safer These small projects cost less than $900 and can be completed in one to two days.
Repairing a Faucet
To enhance the value of an otherwise good-looking sink area, it's important to have a properly maintained faucet. If there is residue where the shine used to be, a faulty gasket or washer is probably to blame. It has let water leak onto polished metal parts, where the water has evaporated and left mineral salt residue.
A faulty gasket or washer is best repaired immediately, since a proper fix becomes more complicated when the condition is allowed to continue for an extended period of time. Mineral deposits build up, making disassembly more difficult.
Use a 10 percent solution of sodium carbonate to dissolve the alkaline buildup before at tempting a repair. You can purchase this raw chemical in small quantities from a photography shop, pharmacy, or lab oratory supply company.
Almost everyone is familiar with the gaskets in the faucet valve, but another gasket that's likely to cause problems is the o-ring located at the swivel point of the spout. If the faucet is leaking at this junction, re move the spout; the o-ring is at its base. To fix the leak, clean off the corrosion and alkaline buildup, and then replace the ring with a new one.
Replacing a Faucet
The faucet is the most-used device in the kitchen, so when choosing a replacement, the prime considerations should be personal preference and convenience, ease of repair, quality of the mechanism, and the exterior finish.
Faucets that are made of solid brass (not brass-plated metal) and that have been machined to close tolerances operate more smoothly and are less likely to leak than lesser- quality faucets. Smooth operation means better control of water flow.
Well-made faucets (those that will last 10 years or more) will most likely come from the best-known manufacturers of plumbing fixtures. Inexpensive faucets may look good, but the low-end models are usually constructed at least in part of plastic. Although certain plastic parts are acceptable, plastic housings coated with silver paint simply don’t hold up for very long.
The single-lever faucet has replaced the two-handle type in popularity for two reasons: It provides for quick, easy, one- handed control of both water flow and temperature, and fewer moving parts make even the most expensive faucet easy and inexpensive to repair. Modern single-lever faucets use modular valve and gasket kits that are almost as easy to re place as a battery in a flashlight.
Adding a Vegetable Spray or Soap Dispenser
Although a prospective buyer may not notice a fancy faucet, accessories always get a second glance. An extra 10 percent added to the price of a kitchen faucet will cover the cost of a vegetable spray attachment.
Another inexpensive feature that can improve convenience is an in-sink soap dispenser. They are easy to install, easy to refill (the pump lifts out, exposing the fill hole), and require no maintenance. Repairing one is as simple as lifting out the pump and replacing it with a new one.
You can purchase and install a soap dispenser separately from a faucet. If the sink doesn’t have a spare hole, you can drill one with a 3/4" carbide-tipped bit. Even a porcelain-coated cast-iron sink can be drilled, although care should be taken not to damage the porcelain finish. When drilling porcelain, you must cool the area with water. To do this, create a water reservoir by damming the surrounding area with modeling clay.
Upgrading a Sink
Before replacing a sink, try cleaning it. For a porcelain sink, make a paste of pumice powder mixed with turpentine. Wipe it onto the surface of the sink with a rag, and then polish it with a buffing pad on an electric drill. This simple procedure will remove rust and other stains and bring a new shine to even the most heavily pitted surface. Use a clean buffing pad and car wax to add a final glow. Car wax also works wonders on chrome accessories.
Caution: Pumice will dam age stainless steel and other nonporcelain finishes.
It’s time to refinish a kitchen sink when a replacement is too costly, when cleaning isn’t effective, or when the color needs to be changed. But refinishing is not always the best alternative. If the cost of purchasing and installing a new sink is the same as or even slightly more than the cost of refinishing, it's more cost-effective to replace the sink rather than refinish it.
You can add five years or more to the life of practically any sink by refinishing it. In this process a special paint is applied and then, in most in stances, heat-cured. Since the paint comes in a variety of colors, you can change an out dated color during this process. Refinishing is not permanent, but it can defer the cost of replacement for many years. Look online or in the yellow pages under Plumbing Fixtures—Refinishing to find someone to do this for you. It is wise to hire a company that offers at least a five-year guarantee.
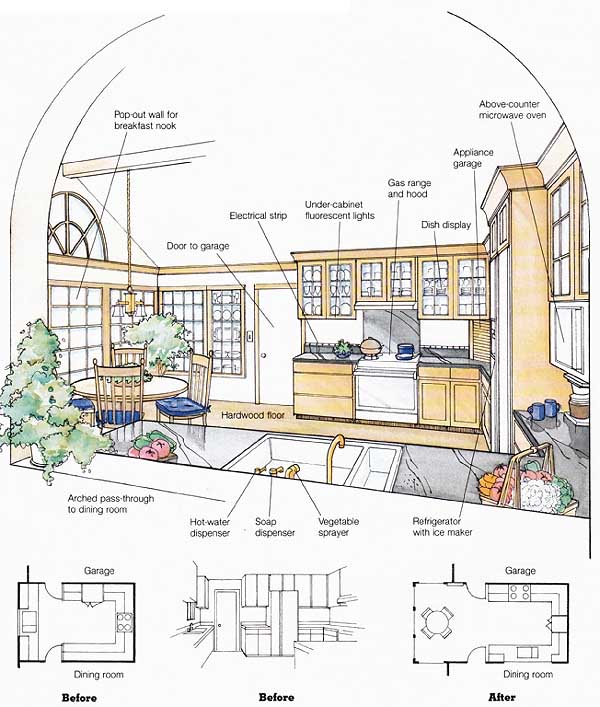
Kitchen Upgrades: For an overview of the kitchen, before and after remodeling, see prev. section. Before; After; Arched pass-through
to dining room;
Replacing a Sink
There are no special rules for choosing between sinks having one or two compartments. It depends solely on space limitations and personal taste. Sinks with one compartment are available in the smallest sizes; hence they are more practical for small, compact kitchens. Choose a sink appropriate to the size of the kitchen; a sink that's too large can overwhelm a small space and make it look even smaller and less efficient.
Sink replacement is affected by the existing countertop. The sink rim (outermost edge) must be compatible with the countertop into which it will be installed. There are two different basic rim styles—tile recessed and self-rimming.
Tile-Recessed Rim Style
A tile-recessed rim is designed to be placed into countertops made of ceramic, porcelain, marble, or granite tile. The key is not the surface material itself but the position of the installed sink—the sink is recessed be low the finished surface of the tile, its edge is encased in mortar, and then it's trimmed from above. With this type of rim, the top edge of the sink is almost an inch below the surface of the surrounding counter, making counter cleaning easy compared to other types of installations.
A high-quality recessed sink installation includes a tiled surface that slopes gently (with a slope not readily visible) to ward the sink, so that water will not stand on the countertop.
The hidden rim of the tile-recessed sink incorporates an upturned lip that sheds water toward the sink compartment, helping to prevent water from traveling beyond the tile-sink connection into the cabinetry. Laying a sink that does not have a proper rim into tile can be costly, since this would in crease the chance of damage to the undercounter support surface and other adjacent wood parts. Because most of these surfaces are hidden from view, damage usually becomes a serious problem long before it's discovered.
A new type of recessed sink suitable for tile countertops is the surface-mounted style. With this style, the top surface of the rim of the sink is placed flush with the top surface of the countertop tiles. This type of sink, like its recessed- mounted counterpart, is not recommended for use with plastic laminate countertops, because it's difficult to create an adequate water seal.
A drawback to the surface- mounted rim is that it derives most of its ability to shed water from the grout connection between the tile and the sink. Even the slightest house movement will cause grout to crack. Take the cost of special maintenance (regular re-grouting) into consideration before selecting this model in areas where ground movement or house shifting are commonplace.
Self-Rimming Style
The self-rimming cast-iron type of sink, in which the sink rises into a rim that rests above the level of the countertop, is by far the most popular, even though mopping up a flooded counter- top can be slightly more difficult with this style, and the cost of tile-recessed and self-rimming sinks are within pennies of each other. Self-rimming sinks are easier to install (resulting in less overall cost) and can be used in conjunction with any type of countertop.
The installation process is easy. Cut an opening into the countertop (a template for this purpose is provided with the sink). Caulk the underside of the rim and drop the sink into place. Then touch up by adding another bead of silicone caulk between the sink rim and the countertop. No tile contractor is needed, and the only chance for a leak is if the visible bead of caulk is not maintained. Re-caulk a self-rimming sink at least once a year. That may seem excessive, but it will prevent one of the leading causes of moisture damage in the house.
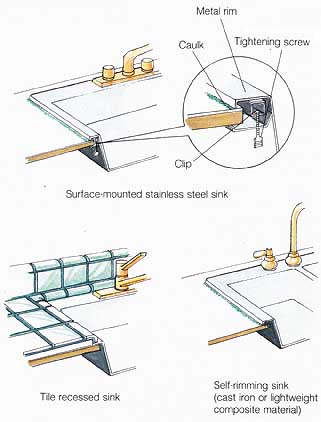
Sink Rim Details: Tile recessed sink; Self-rimming sink (cast
iron or lightweight composite material); Metal rim; Surface-mounted stainless
steel sink
Finishes and Compartment Configurations
The sink should fit comfortably into the counter configuration. Given ample counter space, a multi-compartment sink is convenient and is impressive to prospective home buyers. Sink depth is another consideration. The deeper the sink the more versatile—and expensive—it is.
Stainless steel sinks are attractive when new but scratch easily and require special cleaning compounds to maintain the original shine. If you are considering stainless steel, it's wise to remember that the gauge (thickness) of the metal bas a great deal to do with its lasting quality. Most stainless steel sinks are available in three thicknesses: 20, 18, and 16 gauge. Although the latter is the thickest and the most resistant to dents and bending, it's designed primarily for commercial use and isn’t available in a wide range of styles, so 18 gauge is the next best choice.
Porcelain is an extremely popular sink finish; it has a high gloss and comes in myriad colors. Porcelain is generally applied to either a pressed steel or molded cast-iron shell, with pressed steel being less expensive and more prone to chipping. Cast iron is the better base. It is quieter when the disposer is running, it keeps water warmer longer, and it's stronger and longer lasting than pressed steel.
Chips can be repaired in any porcelain sink regardless of the base materials. Avoid the do-it-yourself, paint-on type of patch kit; the repairs seldom look professional and can detract from the value of the sink almost as much as the chip. Professional sink-repair companies can make an almost invisible patch in a porcelain sink for about a third of the cost to replace the sink.
Lightweight composite materials are a recent development in sink finishes. They are almost as thin as stainless steel and come in a variety of designer colors. Sinks made of acrylic and fiberglass are also available but are not in wide use. Some homeowners may be willing to test the lasting quality of these products, but it's safer to stay with time-proven materials, such as stainless steel and cast iron.
How to Replace a Tile-Recessed Sink
Several methods are available for replacing an old-fashioned sink surrounded by tile. Although you can use another tile-recessed sink, the least expensive alternative is to use a self-rimming sink for the replacement. Interestingly, many self-rimming sinks have the same inside dimensions as their tile-recessed counterparts, but the rim portion is wider. This makes covering the hole created by the removal of a tile-recessed sink easy to hide. In addition, you can install a larger self-rimming sink by carefully cutting back the existing tile counter with a masonry blade mounted in a small circular power saw.
Replacing a tile-recessed sink with another of the same style, especially when the surrounding existing tile is irreplaceable, can be very expensive. Some companies hand-paint tile to any specification. A local ceramic tile distributor can usually help you find such a craftsperson.
It is less expensive to purchase new ceramic tile sink trim in a contrasting or complementary color. Make your se lection carefully. A bad color match can detract from the overall appearance.
Regardless of the type of sink you use for the replacement, success will depend on the painstakingly slow and careful removal of the existing sink trim tiles. Expect to dam age the trim tile during removal. It is more important to prevent damage to the adjacent field tiles. Most tile-recessed sinks can be removed easily once the sink trim tiles are out of the way.
Cleaning Grout and Tile
The white powder that builds up on grout is mineral salt efflorescence. Most apparent on medium- and dark-colored grout, it's best removed with white vinegar. Remove stains from light-colored grout with a strong solution of liquid house hold bleach applied vigorously with a stiff nylon brush.
Caution: Never mix bleach with ammonia or cleansers containing ammonia. The combination is lethal and can create a poisonous vapor similar to mustard gas.
Ceramic tile can be cleaned with any one of several non- abrasive, off-the-shelf cleaning products. For more information on these products, consult the Ceramic Tile Institute and the Tile Council of America.
Cleaning Plastic Laminate Surfaces and Linoleum
Laminates are not affected by most petrochemical agents. An old carpenter’s trick is to use lacquer thinner to remove especially tough scuff marks on plastic laminate countertops and linoleum. Use lacquer thinner sparingly on linoleum. Test a hidden area first to ensure that the chemical will not dam age the surface. Good ventilation is an absolute must when you are using lacquer thinner indoors. The vapors are toxic and highly flammable. Anyone with respiratory problems should not be present during the cleaning process. Wear gloves and eye protection.
Cleaning Porcelain and Fiberglass
Turpentine is effective for cleaning porcelain and fiber glass surfaces, but adding salt to create a paste is even better. Not many stains get by this combination. Turpentine is a petrochemical by-product and should be used with gloves and eye protection in a well- ventilated area.
Cleaning Wood Butcher-Block Countertops
Clean butcher block with a mild solution of liquid dish soap and water scrubbed in with a nylon brush or scrubbing pad. After the surface has dried thoroughly, apply a coat of mineral oil or vegetable oil. If the wood grain raises during the washing process, use sand paper to smooth the surface before applying the oil. Do not use steel wool or wet-and-dry sandpaper on butcher block. These materials release fibers and grains that might become embedded in the wood.
Cleaning Fine Wood Cabinets (and Furniture)
A mixture of linseed oil, turpentine, and water is an effective cleaner for fine wood furniture and cabinetry. Mix 3 tablespoons of turpentine together with 3 tablespoons of linseed oil, and then blend this into 1 quart of boiling water. Wearing rubber gloves, dip a rag into the cleaner and wring it out until barely damp. Wash small areas at a time (2 to 3 square feet), and then dry immediately with a clean, soft cloth. When the mixture cools it will separate. Don’t reuse the solution; discard it and make another batch.
Cleaning Glass, Appliances, and Porcelain
One quarter cup of rubbing alcohol mixed with a quart of water cleans appliances, glass, and highly polished porcelain tile. The alcohol leaves no streaks, and it disinfects as well.
Eradicating Mildew
Use the following mixture to eradicate mildew: 1/3 cup of powdered laundry detergent and 1 quart of liquid laundry bleach mixed with 3 quarts of warm water. Add the bleach to the water and then mix in the laundry detergent. Even though the solution is fairly mild, wear rubber gloves and eye protection. Keep the surface wet until the bleach turns the gray-black mildew white. Rinse thoroughly with water. This solution is safe for most surfaces, including painted walls, and can be used indoors or outdoors.
Caution: Never mix bleach with ammonia or cleansers containing ammonia; the combination produces a lethal gas.
Adding a Dimmer Switch
Easy and inexpensive to install, the dimmer switch (rheostat) seems to have more impact on the average consumer than projects costing hundreds of dollars.
Dimmer switches are avail able in a wide range of styles and prices; the lower-priced models work just as well as the expensive ones. They all do the same thing: control the intensity of illumination at the light fixture. For example, the over-the-sink fixture is often a single-bulb incandescent light operated by an independent switch. Leaving that light on during the meal at 25 percent of normal intensity wouldn’t be too bright to distract from the meal and would provide sufficient lighting to make trips to the kitchen safe.
Dimmer switches are avail able in three types: the rotating control (like the volume knob on a radio), the toggle (like a regular light switch), and the slide switch (with a separate on-off button). The cost is about the same, but the toggle and slide switches have a cleaner look and operate more quietly than some of the rotating controls, which have a tendency to hum.
Even the most expensive dimmer switches can be noisy. Make sure that the switch being purchased has a money-back guarantee in case it hums when in operation. Asking after the fact may not guarantee a refund.
A more significant difference among dimmer switches is whether they are two-way (single-pole) or three-way. Use a two-way dimmer where only one switch controls the light(s). A three-way dimmer must be used to replace a switch when two switches control the light(s).
Dimmers can't be used with conventional fluorescent lights. You can, however, in stall special ballasts that allow you to use a fluorescent light with a dimmer.
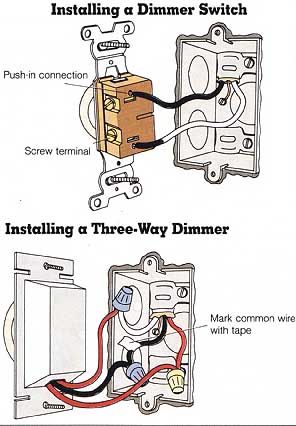
Installing a Dimmer Switch: Push-in connection; Installing
a Three-Way Dimmer: Mark common wire with tape
Caution: Before attempting an electrical project, it's important to be absolutely sure that the power is turned off—preferably at the breaker panel.
Upgrading a Light Fixture
A tarnished or worn light fixture can detract from the over all appearance of a room. Refinishing a light fixture rather than replacing it's one of the most cost-effective home improvements, especially if the fixture is 50 or more years old.
The older the fixture the better the chance that it's made of solid brass or pewter (or a combination of the two). Whereas most of today’s manufacturers would never consider painting solid brass or pewter, in bygone days the practice was commonplace. To find out whether a fixture is solid brass instead of brass plate, scratch a hidden surface with a nail or a screwdriver. Solid brass will yield a brass-colored scratch. If the fixture is brass plate, the best bet is to consider painting it. Re-plating is not cost-effective.
Fixtures made of cast iron or steel are almost impossible to damage during the paint stripping and cleaning process and are the easiest to paint.
Most brass or pewter light fixtures can be brought to like-new condition in an afternoon with paint remover, very fine steel wool, and brass polish. In cases where pitting has occurred, you can bring both brass and pewter back to life by sanding before polishing.
For best results, dismantle elaborate fixtures before refinishing, and then rewire them during reassembly. For hidden wiring, use 16-gauge stranded copper wire in a THHN casing. If decorative wiring is required, be sure to use a UL-approved material in a gauge that will support the total wattage of the bulbs.
Polish refinished brass, and then apply a corrosion inhibitor. Several spray-on products are available for this purpose. A coat of clear lacquer is one possibility, but it's difficult to remove when the fixture begins to tarnish. Unprotected brass will begin to tarnish immediately.
Although replacing a light fixture is easier than refinishing it, replacement is more costly. The price of light fixtures includes a high markup, so that lights are expensive even with the 20 to 30 percent discount that you can expect in a lighting store. (It is not uncommon for contractors to purchase light fixtures at a discount of “50 and 10,” that's , 50 percent off retail and 10 percent at off the remaining 50 percent, or 55 percent off retail.)
When replacing a light fixture, it's important to keep quality as well as appearance in mind. Good-quality fixtures are made of solid metal (brass is best) and have glass instead of plastic shades. Crystal is an alternative to glass because of the interesting way that it refracts light. Avoid using an intricate light fixture in the kitchen. Cleaning and maintenance can be a real chore in a room that generates so much greasy steam. Clean lines make for easy-to-clean surfaces.
Replacing Incandescent With Fluorescent Lighting
The least expensive of all lighting improvements consists of replacing a regular incandescent bulb with a fluorescent tube. The room will brighten and the electric bill will de crease. In addition, fluorescent lighting will reduce the load on old wiring, making the house safer.
Many building agencies actually require that fluorescent lighting be at least 50 percent of the lighting used in the kitchen and bath in both new and remodeled homes. The reason: maximum light and energy efficiency.
Adding Task Lighting
Task lighting is the term given to light fixtures installed in specific locations where activities can be accomplished more comfortably with the aid of an additional source of illumination. Although task lighting in the kitchen isn’t a new concept, it's more affordable than ever before.
The most common type is the under-cabinet fixture (mounted on the bottom of the upper cabinets). Other task lighting includes recessed or surface-mounted ceiling fixtures, hanging fixtures, or a combination of these.
Be careful when adding new lights to an existing electrical line, especially in homes with older electrical circuits already taxed by numerous appliances. It is a common misconception that adding a 75-watt light bulb will have less effect on an existing electrical circuit than a small appliance of greater watt age. In fact, small appliances are generally used for short periods of time, whereas lights often remain on for several hours at a time.
The most cost-efficient way to add any type of task lighting to the kitchen is to install all the lights at one time. This is because when you add a new light fixture you should also add a new circuit at the electric panel. This can double the cost of adding just one light with a switch. The good news is that one electrical circuit for lighting will handle several light fixtures.
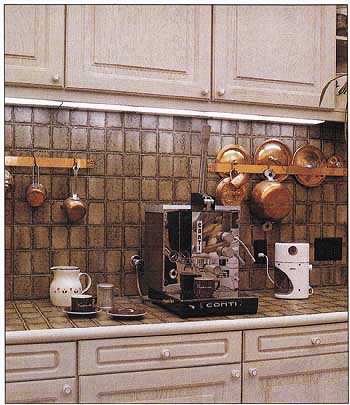
Fluorescent fixtures were installed under the upper cabinets to
illuminate the countertop and highlight the handsome tile-work in this
remodeled kitchen.
Adding Low-Voltage Lighting
Low-voltage light fixtures have an advantage over the conventional type in that they place less stress on existing electrical circuits; however, they are usually more expensive. In addition, high-intensity, low- voltage light bulbs are among the most expensive bulbs, they burn out faster than other bulbs, and they may fluctuate in intensity during operation (a condition called strobing).
When considering low- voltage interior lighting, it's important to see a live demonstration in a room with all the other lights turned off. Shine the low-voltage light onto a wall that you can view from several angles. Give the eye time to adjust to the brightness before moving from position to position. Some angles will not reveal the effect as readily as others. Dimming the lights usually increases the strobing effect.
Installing a GFCI Device
The National Electrical Code now requires ground fault circuit interrupters (GFCI) at some electrical outlets located in the kitchen. Most building agencies enforce this rule on electrical outlets that are located within 6 feet of a sink. GFCI circuit breakers are safer than normal circuits because they break much faster and because they detect overload on both positive and neutral lines. Regular fusing detects overload only on the positive line. This improvement probably will not bring any return on investment, but it will certainly make the kitchen safer. You can in stall a GFCI receptacle into an existing plug outlet box in about 20 minutes.
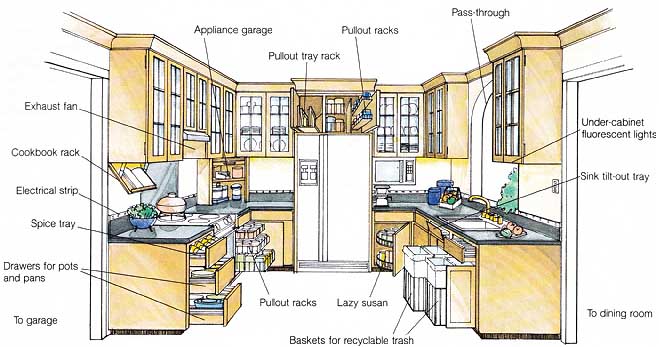
Adding Kitchen Accessories: Under-cabinet fluorescent lights,
Sink tilt-out tray, To dining room
Adding Cabinet Accessories
Installing ready-made plastic or wire pullouts solves the problem of how to reach the back of the shelf in lower cabinets. Each of these lightweight sliding trays is capable of holding a half-dozen or more heavy frying pans. It is wise to select pullouts in a width narrower than the door behind which they will be installed, so that you won’t have to open two doors to get to one pullout. If you aren’t handy with tools or you want the choice of a full line of these options, contact a local cabinetmaker. They have access to hundreds of cabinet accessories that can’t be found in home-improvement centers.
Cabinets with false drawer fronts below the cooktop or sink can be fitted with a tilt-out that can add storage space and versatility. Tilt-outs can be used to store spices, scouring pads, and other small items in the otherwise unused space between the front of the cabinet and the sink or cooktop. Al though tilt-outs are not as easy to install as pullouts, the project can be completed in an after noon. For each tilt-out you will need two hinges, which should match those on the existing cabinets. You will also need a tilt-out tray, which you can purchase or make from a scrap of wood.
Kits for appliance garages are available through all major cabinet-supply distributors. You can assemble, stain and varnish (or paint), and install in appliance garage in a weekend. Appliance garages are most versatile when a plug is available within, but even without one they are worth the investment for the tidy look and clean lines they lend to the countertop.
For a home with toddlers, it wise to consider child-proofing doors and drawers with safety latches. Hidden itches are the most convenient use and easiest to install, but the best protection is the more expensive key lock. It can be installed in a wood cabinet door in less than an hour. A double door configuration takes a little longer and requires the addition of a latch mounted on the inside of the second door.
Adding a Small Cabinet
You can use empty wall space in a kitchen for extra storage. A 2- or 3-foot-long cabinet costs less than a good cast-iron sink. Like furniture and light fixtures, modular cabinets usually have a considerable markup. A wise shopper can save 30 to 70 percent off the retail price of most brands.
When shopping for a ready-made base cabinet, try to find one in a size, color, and style to match the existing cabinets. When the new cabinet is not immediately adjacent to existing ties, casework detail and color can vary slightly without detracting from appearance. In such an installation the countertop can be made of a different material and actually add interest to the room.
First, find a cabinet of the right length. Most kitchen base cabinets are 24 inches deep; you can shorten this dimension if necessary with a handsaw, nails, and glue. Keep in mind that if the cabinet has drawers, you must also shorten the drawers and the tracks on which they slide—a more difficult alteration.
After finding the right size cabinet, consider doors and drawer fronts. You can purchase these individually from a local cabinetmaker. Buying all new doors and then staining or painting them can be far less expensive than having the en tire cabinet custom-made.
Adding a base cabinet to an existing run, rather than as a separate installation, can be ex pensive—old and new must match precisely, and lengthening a countertop can, in some cases, require a full replacement. Remember, the kitchen is an important room in calculating resale value and will not be enhanced by mis matched styles.
Because a wall cabinet does not require a countertop or drawers, the job of adding one is less complicated than that of adding a base cabinet. How ever, not every manufacturer makes wall cabinets. That will align with the bottoms of existing cabinets and be tall enough to reach an 8-foot ceiling. Be careful not to vary in style here. If you can’t find a good match, consider a custom-made cabinet.
The trick to installing a wall cabinet is to make sure that there is a positive connection with existing wall studs. Do not use expansion screws or toggle bolts. Instead, hold the new cabinet in place with temporary supports, then pre-drill the wall studs and the mounting strip at the top and /or bottom ends of the cabinet. Use 3- or 3½-inch-long wallboard screws for the connection. Two screws per linear foot of cabinet width (one at the top and one at the bottom) will be sufficient.
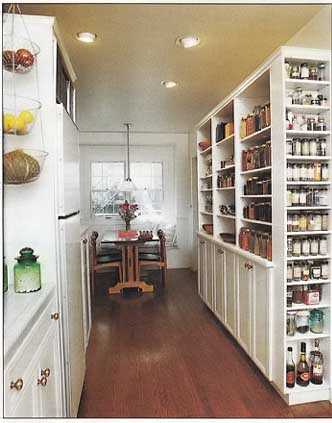
The need for plentiful storage led to a handsome addition to this
galley kitchen, with an inviting window seat in the eating area.
Painting Cabinets
Painting your kitchen cabinets can give your kitchen a fresh, new look unmatched by any other project in the same cost range.
As is the case with any painting project, the best results are achieved by careful preparation. Do not remove old paint completely. If several coats exist, remove only the top three or four. Attempting to remove all the paint down to the wood will cause unnecessary work and expense, and you could damage the cabinets themselves in the process.
Fill all voids, dents, scratches, and nicks before sanding the cabinets. It is wise to begin with a medium sand paper (80 grit), and then proceed to fine (150 grit) and finally extra-fine (400 grit). If the wood feels like glass after it has been sanded, it will look like glass when painted.
The prime coat creates a bond between the existing finish and the new layer of paint, lightens a dark surface, and seals and fills the sanded surface. Do not apply the primer so thickly that it covers the old finish completely unless you are lightening dark cabinets. The primer should be similar in color but not identical to the finish coat, so that you can see any spots you’ve missed when painting. Sand the primed surface with 400- to 600-grit sandpaper. Be careful not to sand through to the wood. If this happens, re-prime and touch-sand the area.
A careful painter can easily avoid the three most common mistakes when applying the finish coat: working in a dusty area, failing to use clean paint and painting equipment, and trying to do the job in one coat.
First, make sure that the work area is well ventilated, and then completely clean and vacuum the room and area adjacent to where the cabinets will be painted. Next, wipe the cabinets with a dust-free cloth dipped in the proper solvent (use a sparing amount). Then, use cheesecloth or a store- bought paint strainer to filter the paint. Unfiltered paint and dusty surroundings will result in a rough finished surface no matter how well the cabinets were stripped and sanded.
If the paint is too thick or is applied too heavily, it will run before it flows to a smooth finish. Thin oil-based paint to a watery consistency for the first of two finish coats. (Use 20 percent solvent and 80 per cent paint.) Filter the paint after thinning it. Once applied, the wet coat should be trans parent; you should be able to see the primer. Let the first coat dry, then sand lightly and apply a second finish coat.
Varnishing Cabinets
Bringing new life to stained and varnished cabinets is much easier than repainting painted cabinets. Again, success lies in professional preparation and in knowing what to expect during the process.
First, wash the cabinets with TSP. This removes grease and other residue from the surface and slightly etches the existing finish. Next, lightly sand all surfaces with 400- to 600-grit wet- and -dry sandpaper. Keep the sandpaper wet with water at all times. The sanding process will turn the varnished surface a milky white, and as it dries it will have a matte and lightly scratched appearance. This is normal. Sanding too much could damage the stained surface beneath the varnish. Finally, vacuum the work area thoroughly, wipe all surfaces with paint thinner or lacquer thinner on a soft, lint-free cloth, and then apply the first coat of finish. It is important to have good ventilation when working with chemicals that generate flammable and toxic vapors.
To make the cabinets look new again, apply two to four coats of clear varnish or a similar product. Lightly sand between coats with water and 600-grit wet-and-dry sandpaper. Make sure that the coat to be sanded is completely dry. It is wise to wait twice as long as the instructions on the can recommend. Varnish takes longer to dry in cool temperatures or high humidity.

This kitchen upgrade features the original cabinets with new chrome
drawer pulls to match the chrome faucet and light fixture over the sink.
Applying Wallcoverings
When selecting a wallcovering for the kitchen, keep in mind the same considerations concerning color and pattern that apply to the selection of paint—essentially, low-key pat terns are more appealing to a wider range of tastes.
Wall preparation is as important when you are putting up a wallcovering as when you are painting. Wall surfaces should be thoroughly cleaned, smoothed with a filler (such as joint compound) if necessary, and then primed with oil-based paint. Although you can apply a plain white base layer of wallpaper to rough wall surfaces to smooth them, smoothing the wall itself is the way professional paperhangers do it. Priming with oil-based paint will prevent the adhesive from penetrating too deeply into the surface of the plaster or wallboard, which will allow for easy removal later. Ease of removal can be a big selling feature to a prospective buyer who prefers paint or another wallcovering pattern.
It is especially important in the kitchen to use a wallcovering that will resist damage from grease and harsh cleaning products. Although some heavier papers hold up well, vinyl-coated ones are best. Note that special adhesives are required when you are applying vinyl-coated wallcoverings. Using the wrong adhesive could allow mildew to grow between the wall surface and the wall paper. It will show up as black splotches a few days after the paper has been installed.
A tip from the pros: Whether or not the wallcovering is prepasted, apply a coat of paste by hand. Over-wetting a prepasted wallcovering can completely remove all the adhesive that was applied at the factory. Thoroughly smoothing the covering to the wall to re move air pockets is also very important. The other secret to a good job is to have plenty of sharp razor blades on hand (30 or more for the average room). A new razor blade will be good for two or three cuts and should then be saved for a later use that doesn’t require extreme sharpness.
To remove old wallcovering, you must bring the adhesive that bonds it to the wall to a semi-liquid state. Two processes are currently available to accomplish this—steaming and enzyme chemical reduction. Regardless of the process you select, you must perforate the surface of the wallcovering so that the steam or enzymes can reach the old adhesive.
A tool specifically made for this purpose, when rolled over the surface of the wallcovering, creates thousands of holes through which steam or enzymes can pass and begin to dissolve the paste. Rubbing the teeth of a handsaw across the surface of the wallcovering will produce a similar result; how ever, a zealous hand can damage the surface of the underlying wall, which can be costly to repair. Working from the top down when removing wallcovering allows gravity to help the process along.
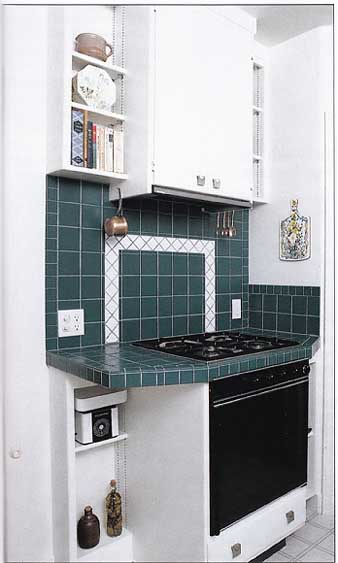
Thoughtful touches in this remodeled kitchen include a tiled cooking
area that's echoed in the tiled back splash in the photo at left.
Re-grouting Ceramic Tile
Usually the first part of a ceramic tile installation to show wear is the grout. Natural settlement of a newly installed counter surface and general house movement are the culprits. Because tile grout is a cement-based material, it's brittle. When the house moves, grout cracks, and the resulting valleys trap food and allow water to pass to the wood below.
When re-grouting it's important to match the existing grout color. Tile stores have samples of grout on hand for making a comparison.
First, clean the cracks with bleach and a nylon scrub brush. You can use a hair dryer to remove excess moisture. Next, widen existing cracks. Grout is made of sand and cement, and the cracks must be wide enough for the granules of sand in the new grout to fit. Use an awl, a screwdriver, a chisel, or a sharpened piece of hardwood—1/8- to ¼-inch in depth is plenty. Remove all the loose grout. The more you re move, the better the chance that the new grout will adhere.
Once you have prepared the surface, mix the grout. An old trick is to omit about 20 percent of the water recommended by the grout manufacturer and re place it with clear-drying white glue. The mucilage helps to bond the new grout to the old and is an excellent sealant as well.
You can use a grout trowel or a flat piece of hard rubber to force the grout mixture into the cracks. Remove excess grout with a slightly dampened pa per towel. It is important to clean as much of the grout from the tile surfaces as possible while the grout is still wet. It becomes almost impossible to remove once it dries. To easily remove the light film that will be left on the tile when the job is completed and everything is dry, use a solution of 10 percent vinegar and 90 percent water.
After about a week (assuming that no white, powdery mineral salts have surfaced), you can apply a silicone sealer to further protect the grout. Making the grout more water-resistant will help keep it clean and reduce water infiltration.
In a home with a tendency to shift, the best permanent re pair to the grout joint between the countertop and the back splash is done with a colored silicone caulk. Caulk is far more flexible than grout and will expand and contract under conditions where grout will crack.
Re-caulking the Sink
Since water can pass through almost invisible separations, it's important to maintain the connection between the sink and countertop, whether the sink is a tile-recessed or self- rimming type. Water damage can occur to hidden cabinet parts if there is a break in this connection. Caulking this seam is inexpensive and takes less than 30 minutes once a year.
First, remove as much of the old silicone caulk as possible by scraping it off with a putty knife (being careful not to scratch the porcelain or tile) or a sharp wood stick. Next, clean the area with a strong solution of bleach and water. Then use a hair dryer to dry the area thoroughly. Finally, brush away the last pieces of loose debris, and apply the new layer of caulk.
Repairing a Plastic Laminate Surface
To repair a delaminated plastic laminate surface, you apply heat. First, lay a towel on the damaged area to act as a buffer between the plastic laminate and the heat source. Then use a clothes iron, set on high, to bring the surface up to temperature. The heat of the iron will soften the laminate and the adhesive that binds the surface to the substrate. Once the laminate is hot to the touch, remove the iron and rub the towel with a hard downward pressure over the heated surface until it cools. The new bond will be stronger than the original connection. This process can be used on most plastic laminate surfaces, including cabinets.
Another way to repair a damaged laminate countertop is to cut out and replace the damaged portion. You can in stall a wood cutting board into a plastic laminate countertop in place of a badly damaged section of the surface. First, purchase a sink rim in a size that's slightly larger than the dam aged area (many sizes are avail able). Next, cut a 3 cutting board to fit the sink rim. Then cut the counter to accept the sink rim, and finally mount the cutting board and the sink rim into the counter- top with silicone and the retainer clips that come with the sink rim. The inlaid cutting board makes food preparation easier and solves the damage problem. This is a project to consider even if the countertop isn’t damaged.
Adding a Pass through Screen
If a sliding window is located between your kitchen and backyard, you can make the two areas more accessible to each other by adding a pass- through screen assembly. This project can improve logistics during garden parties and other backyard activities and will keep out flying pests while letting in fresh air. This little- known option is available from many window companies. It is nothing more than an aluminum track, made to match the frame of an existing window, that holds a sliding screen (similar to a sliding patio door). Installation takes less than 15 minutes.
Refinishing Appliances
When done in conjunction with appliance replacement, appliance refinishing is cost- effective. Repainting all the appliances in a kitchen could be costly, especially if some of them are coming to an end of their useful life. For example, if you are going to replace two or three major appliances you can refinish the remaining few to match. This can help to maintain a good-looking kitchen while stretching the lives of the remaining appliances until you are ready to upgrade them.
Like plumbing-fixture re finishing, appliance painting is not for everyone. In some cases, the painting process can be al most as expensive as the appliance itself; for example, a range hood can usually be replaced for less than the cost of re finishing. This is not true for a late-model refrigerator or oven, however.
You can repaint appliances yourself at home, but for lasting quality the proper paint materials and application process must be used. Appliance paints are made for use on metal, and the paint should be heat-cured (dried).
Adding, Moving, or Replacing Appliances
The biggest consideration when adding or replacing any electrical appliance is its power source. Taxing old electrical circuits with modern appliances, which may use more power, is dangerous. Even if a new appliance is more energy efficient than the one it replaces, it may I require an upgraded electrical circuit. When considering an appliance upgrade, it's important to contact an electrical con tractor for advice on circuit upgrades and costs. Do this be fore purchasing or installing any new electrical appliance anywhere in the home, especially the kitchen.
Electrical outlet receptacles for large appliances incorporate a plug face that's designed for a specific combination of voltage and amperage. When replacing the old receptacle with a new one designed to fit the plug on a new appliance, keep in mind that the receptacle must match the size of the wire in the circuit as well as the size of the fuse. Hence, changing the receptacle may also re quire new wiring and fuses.
It is not uncommon to see built-in dishwashers plugged into the circuit originally dedicated to another appliance, as the garbage disposer, or vice versa. Either practice increases the danger of fire. The following electrical appliances require their own separate circuits: single ovens, double ovens, cooktops, built-in micro wave ovens, built-in dishwashers, built-in trash compactors, instant hot-water dispensers, garbage disposers, some range roods, built-in food warmers, built-in food processors, and some ice-making machines.
Moving the Microwave Oven Off the Counter
Even in the largest kitchens, counter space is a precious commodity, and countertop microwave ovens take up a great deal of space. Although you can install a microwave oven hood in place of an existing range hood to free up counter space, this is wasteful if an existing countertop micro wave oven will be discarded in the process. There is another alternative—a microwave shelf, which is designed to place a countertop microwave oven in the range hood cavity, thereby storing the oven in a more convenient and space-efficient way. The shelf also includes the features of a standard range hood—ventilation and lighting.
The main prerequisite for this project is two studs in the wall where the shelf is to be installed. Countertop micro wave ovens are heavy, and the accessory shelf must have a sturdy attachment. Minor costs to re-fabricate the sheet-metal exhaust duct should also be considered when pricing this project. Consult an electrical contractor concerning electrical connections.

Bull-nosed edges, used instead of more costly trim, soften the
lines of the arched pass-through, window, and French doors. Similar light
fixtures are used in the kitchen and dining room. Because the custom
cabinets were made of inexpensive wood and then painted, they cost no
more than stock stained wood cabinets.
Adding a Trash Compactor
To accomplish a cost-effective installation of a trash compactor, the cabinet where it's to be installed must be approximately 24 inches deep. If it's an island or a peninsula cabinet, make sure that the entire back of the cabinet is perpendicular to the floor, without the interruption of a toe-kick recess. (This recess will prevent proper installation.) In addition, review the information about electrical considerations noted above. Having to add a new electrical circuit could cost more than the compactor itself.
Compactors are available in three widths: 12, 15, and 18 inches. An opening that matches one of these widths probably already exists in most cabinets. A slightly larger opening can be used but will require trim strips at the sides.
Once you have selected a location, remove the cabinet door, cut out the base of the cabinet with a saw, and remove any drawer hardware and framing. Then slip the compactor into the hole and adjust the legs so that the unit aligns with the face and top of the opening in the cabinet.
Quieting the Dishwasher or the Garbage Disposer
The problem of a noisy dish washer is easy and inexpensive to solve for a do-it-yourselfer capable of removing and re placing a built-in dishwasher.
First, disconnect the dish washer and remove it from the cabinets. Next, lightly cover the housing of the dishwasher and the interior walls of the cabinet with spray adhesive (similar to contact cement). Apply a layer of 1-inch-thick duct insulation (also sprayed with adhesive) to the dishwasher housing and the cavity in the cabinets. Then reinstall and re connect the appliance. It is important not to place the insulation over the ventilation holes that serve to dissipate heat from the appliance.
Making the garbage disposer operate more quietly is just as simple. First, lightly coat the underside of the sink and one side of 1-inch-thick duct insulation with spray adhesive. Next, apply to the underside of the sink, covering it completely. Finally, wrap an old piece of carpet around the sides of the disposer housing (back side out), leaving the bottom of the disposer exposed to dissipate heat. Duct tape will hold the carpet in place.
Adding or Replacing a Garbage Disposer
Replacing a garbage disposer is an easy and inexpensive project (not counting the cost of the disposer) that can reduce drain clogging and the noise generated by a worn-out model. Keep in mind, however, that if you are planning to sell your home, purchasing an expensive disposer may not be cost-effective. Most home buyers are more concerned that a disposer exists, not that it has lasting quality and quiet operation.
If you want a disposer that will last, select one with a grinding chamber made of stainless steel. (Most disposers have stainless steel cutting blades but are not all-stainless construction.) Horsepower should be another consideration. The greater the horse power, the more efficient the disposer. Many disposers are sold without a power cord (“pigtail”). Keep this in mind when you’re making price comparisons.
During installation, it's important to knock out the plug at the dishwasher inlet if a dishwasher will be attached. This requirement is true for all disposers. Once you have re moved the metal plug, extract it insulation to from the inside of the disposer before running the disposer for the first time.
When installing a new dish washer or disposer, consider replacing the air gap—the dish washer air vent device that's usually mounted to one side of the kitchen faucet. The dish washer drains through the air gap, leaving soap scum and food buildup inside. As a result, old air gaps are usually partially clogged. Because air gaps are inexpensive, it's wise to replace them when you re place the appliance. Air gaps are available in plastic or cop per. The latter is more expensive but a far better value.
Adding a Water Purifier
In many areas of the country, a water-purification device is a necessity rather than a luxury. Regardless of the area, how ever, such a device can make the water safer and more pleas ant to drink.
Plumbing-supply stores have a variety of alternatives to under-the-sink and whole-house water purification systems. This do-it-yourself project can be performed for less than one third of the cost of the major water purifiers sold by door-to-door salespeople.
Most small filter systems are used at the cold-water supply only, since hot water is generally used for washing and cooking. Filtering only the cold water is the least expensive option, but filters are available that will treat both hot and cold water.
The larger the filter (size is in gallons per minute), the faster the water will flow. A filter that produces a flow of 3½-gallons of water per minute is sufficient for most plumbing fixtures. A smaller and possibly less expensive filter may generate a reduced flow that's annoying to wait for.
Cartridge filters require periodic replacement. Spending 5 to 10 percent more on a unit that has easy-to-replace cartridges can prove to be far more cost-efficient in the long run. Some in-line filters can be a nightmare to replace. To calculate the usable life of the filter, divide the number of gallons used per day into the total number of gallons the filter is rated to clean.
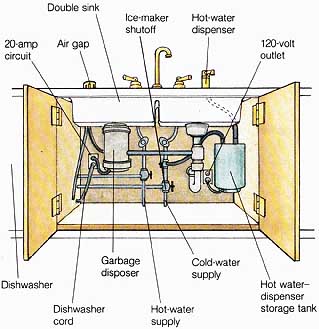
Instant Hot-Water Dispenser
Adding an Instant Hot-Water Dispenser
Tea, instant coffee, instant soup, or any other beverage requiring almost boiling water (180° F) can be as close as the kitchen sink. For a busy family this accessory could prove to be a real time saver.
A hot-water dispenser can be installed into any sink (drilling may be required). Installation is simple: Mount the hot-water tank to the cabinet beneath the sink, connect it to the cold-water supply line, plug it into a 110-volt electrical circuit, and connect it to its own spout mounted alongside the existing kitchen faucet.