When your plans call for either an open passageway or a door between rooms, a supporting structure called a rough doorframe replaces one or more studs in the partition wall. Ideally, one of the regular wall studs can serve as a king stud for the doorframe. The location of cripple studs should maintain standard stud spacing along the wall.
A Place for a Pre-hung Door: If you buy a complete prehung unit, you can make precise framing calculations in advance, as explained below, even though the door will not be installed until wallboard is in place. At each step of construction, check the frame with a square to make sure the finished opening will be level and plumb.
An Open Passageway: If you plan a passageway finished with wallboard, a simple formula applies: The distance between the king studs should be 4” wider than the intended width of the opening; this allows room for the jack studs and a 0.5” layer of wallboard on each side.
TOOLS:
- Circular saw
- Framing hammer
- Carpenter’s square
- Handsaw
MATERIALS:
- Common nails (2.5 – 3.5”)
- 2 x 4s
BE SAFE! When sawing lumber and hammering nails, wear goggles to protect your eyes.
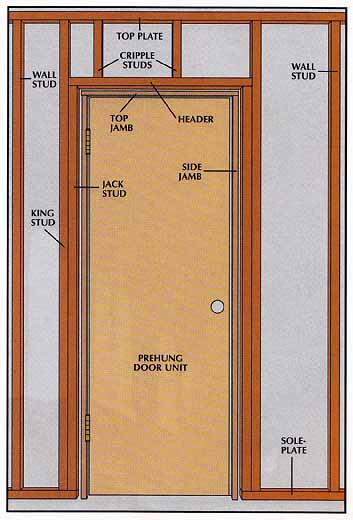
A rough frame. In a new partition wall, a doorway is framed between king studs and adjoining jack studs, both resting on the soleplate. The jack studs support a crosspiece called a header, which forms the top of the frame. Short studs called cripples brace the header against the top plate and provide nailing surfaces for wall board above the door.
If a pre-hung door will be in stalled, the distance between the king studs should be 3.5” wider than the unit (shown, with the casing removed for clarity). The jack studs are cut 1.25” shorter than the height of the top jamb, allowing 1.25” for the thickness of the soleplate, less 0.25” for clearance above the jamb. When completed, the rough frame is 0.25” higher and 0.5” wider than the door unit, allowing for shimming.
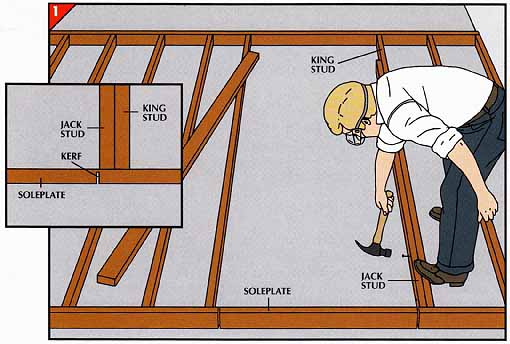
During construction of the frame, the continuous soleplate of the partition wall is partially cut: At the in side edge of each side of the planned frame opening, a kerf is sawed from the bottom surface of the soleplate to within 0.25” of its upper surface (Step 1). After the partition wall is raised, these cuts are completed to free the waste section.
1. Installing the jack studs.

• Against a king stud in the partially built partition wall, lay a jack stud on the soleplate, with its bottom end aligned with the sawn kerf. Drive two 3.5” nails through the soleplate into the jack stud.
• Brace the king stud with your foot and nail the jack stud to the king stud with six 2.5” nails at 1’ intervals.
• Attach the other jack stud in the same way.
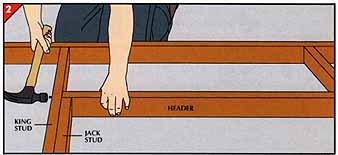
2. Installing the header.

• Cut a 2-by-4 to fit snugly between the two king studs.
• Lay the header across the tops of the jack studs and nail it in place with two 3.5” nails driven through each king stud.
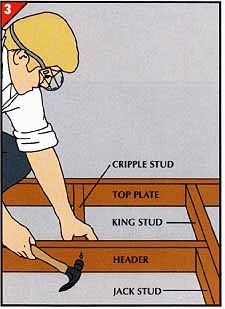
3. Installing the cripple studs.

• Cut cripple studs to fit between the header and the top plate.
• Position these studs at the 16- or 24” intervals of regular wall studs and secure them with 3.5” nails driven through the top plate and the header.
• After raising the wall into position, use a handsaw to complete the kerf cuts and free the unwanted section of the soleplate at the base of the opening.
