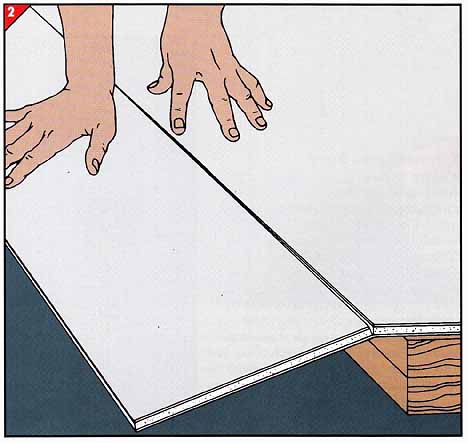
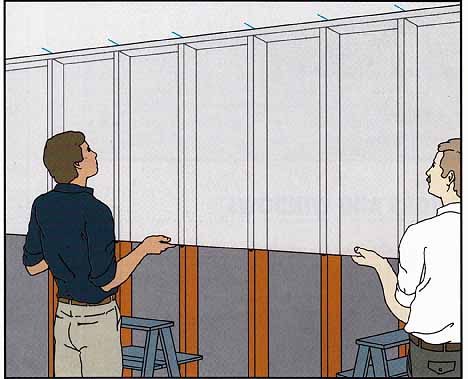
Wallboard—also called dry wall—is the common-sense solution for sheathing interior walls. Consisting of a core of gypsum sandwiched between layers of heavy paper, a standard sheet of wallboard is 4’ wide, 8’ long, and inch thick It is also available in larger sheets—10 and 12’ long and 4’ wide—and in varying thicknesses. For most walls, 0.25” thick wallboard is suitable.
Preparing: Estimate your needs by calculating the square footage of each wall, ignoring all openings except the largest, such as picture windows. Convert this figure into sheets by dividing it by the square footage of a panel.
Before covering exterior walls, check to make sure that the wall is insulated.
Vertical versus Horizontal: In any dry-wall installation, vertical seams must align with the centers of studs. In most cases, this is easier to accomplish when the boards are laid horizontally; however, for a narrow wall you can avoid creating a seam if you lay the sheet vertically.
Concealing Fasteners and Joints: Nailheads or screwheads are hidden with a filler called joint com pound, whereas seams between sheets are covered with paper or fiberglass joint tape before the com pound is applied. Outside corners must be strengthened with angled metal strips called corner bead.
TOOLS:
- Tape measure
- Framing square
- Utility knife
- Pocket plane
- Caulking gun
- Hammer or dry-wall hammer
- Chalk line
- Dry-wall saw
- Wallboard saw
- Taping knives (6”, 10”)
- Joint compound pan
- Wallboard sponge
MATERIALS:
- Wallboard
- Scrap 2 x 4s
- Wallboard adhesive
- Scrap shingle
- Ring-shank wallboard nails or wallboard screws (1.5”)
- Common nails (2.5”)
- Electrical outlet box
- Joint tape (fiberglass and pre-creased paper)
- Joint compound
- Corner bead
BE SAFE! Goggles are necessary when nailing and when working above eye level.
- - -
Some Handy Tips for a Smooth Job
- Buy wallboard with the long edges tapered for ease in finishing the joints.
- Use self-adhesive joint tape on flat seams—it is easier to apply than plain tape; pre-creased paper tape works better for inside corners.
- Choose premixed joint compound rather than the dry form—it will retain its consistency and moisture if you re-seal the container carefully.
- Stack and store wallboard flat on the floor indoors to prevent it from getting wet and from bowing or breaking.
- Cut wallboard short instead of long to fit into a given area, and leave a 1/16” gap around sheets. Trying to force wallboard into too small a space crumbles the edges.
- Don’t rush the job. Taking nailing shortcuts or ignoring wrinkled joint tape or uneven joint compound might save installation time but can result in split joints and popping nails.
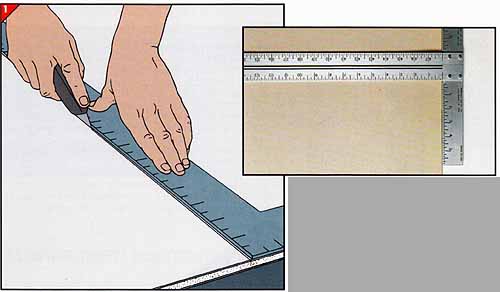
CUTTING THE SHEETS
1. Scoring wallboard.
• Mark a sheet of wallboard for cutting.
• Position a framing square at the mark at one edge of the sheet and draw a line. Then move the square to the opposite edge and complete the line. A wallboard T square allows you to draw this line in a single stroke.
• Place a square along the line and score the surface of the wallboard with a utility knife.
• Stack two 2-by-4 scraps under the wallboard just behind the scored line.
• With the palm of your hand, hit the short end of the sheet, snapping the core.
• Finish by slicing through the backing with a utility knife, then trim any ragged paper from the cut edge.
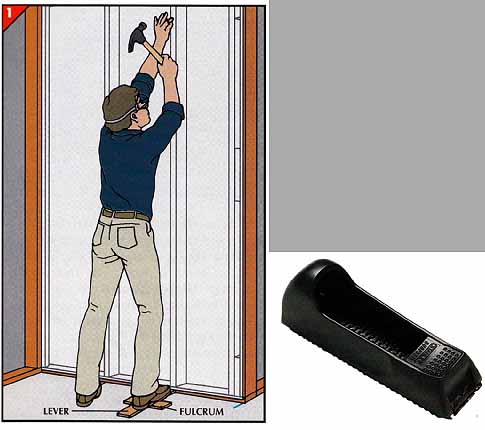
A VERTICAL INSTALLATION
1. Positioning the first sheet.
• Mark the ceiling and floor to indicate the centers of the studs and prepare any electrical outlet boxes for marking.
• To test-fit the sheet, lean it into position at an inside corner. Raise the sheet to the ceiling with a foot lever made from a piece of wood shingle that pivots on a scrap-wood fulcrum.
• Trim the sheet as needed with a pocket plane to ensure a 0.5” gap between the floor and the bottom of the sheet.
• Apply a 3/8” thick zigzag bead of wallboard adhesive to each stud behind the sheet with a caulking gun. Start and stop the bead 6” short of the stud ends so the adhesive will not ooze out at the joints.
• Lift the panel to the ceiling, aligning the outer edge with the centerline of the stud as you do so. Press the sheet against the studs.
• Using the stud marks on the ceiling as a guide, nail or screw the wallboard to each stud about 1 foot below the ceiling.
2. Fastening the board
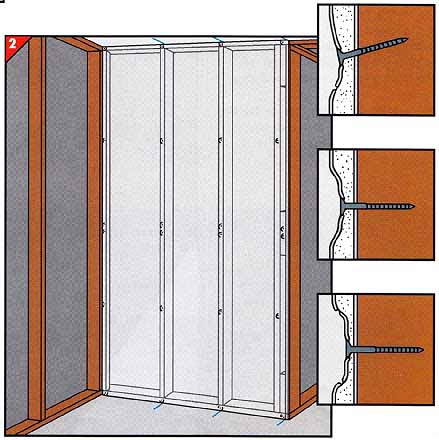
• Secure the panel to each stud with ring- shank nails or wallboard screws spaced about 2’ apart, starting 1 inch from the top and ending 1 inch from the bottom, and double the fasteners at the midsection of the sheet. Drive nails and screws straight; angled fasteners can break the paper covering. If a nail or screw misses a stud, remove the fastener and try again; you can fill the hole later with joint compound.
• Drive nails flush, then dimple them—hammer the heads a fraction of an inch below the surface. Do not strike so hard that you break the paper covering (bottom in set). Tighten screws to countersink the heads just below the wallboard surface, without damaging the paper cover.
= = =
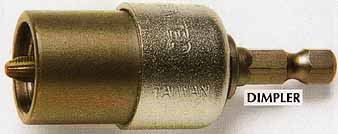
Dimpler: A Quick Way to Drive Screws
Dry-wail screws can be driven into wallboard speedily with an electric screw gun designed for this purpose. However, if you have a variable- speed drill, you can adapt it for wallboard screws with an attachment called a dimpler. Like a screw gun, the dimpler has a depth stop and a clutch that disengages when a screw is driven to just below the wall surface.
= = =
HANGING SHEETS HORIZONTALLY
• Mark the stud positions on the ceiling and floor.
• Drive 2.5” common nails part into the studs—4’ below the ceiling for 4’ wide sheets (4.5’ for the wider panels).
• Unless you are positioning the board to mark an electrical outlet, apply adhesive to the studs (Step 1).
• With a helper, lift the wallboard to the ceiling, and rest it on the nails. Align the vertical edge with the center of a stud.
• Nail or screw the panel to each stud about a foot from the ceiling. After driving the rest of the fasteners (Step 2) remove the support nails.
• Because ceilings and floors are rarely parallel, measure from the bottom of the sheet to the floor in at least four places and mark these distances on the second sheet.
• If the distances are fairly uniform, snap a chalk line between the marks, then score and break the second sheet at the chalk line. Otherwise, connect the marks with separate straight lines and cut the sheet with a dry-wall saw.
• If you will be putting up adjacent horizontal sheets, trim the second sheet to a length one stud shorter than the sheet above to stagger upper and lower joints. Also shave the panel lengthwise as needed to create a 0.5” gap between the wallboard and the floor.
• With a helper, raise the sheet with a couple of foot levers (Step 1) and fasten it to the studs.
ELECTRICAL OUTLETS
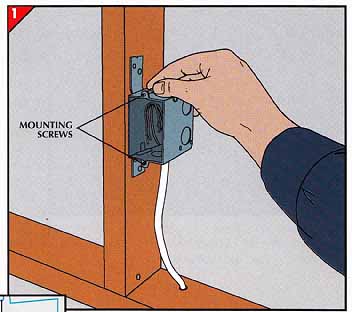
1. Marking the position.
• Fold the wires into the outlet box.
• Remove the mounting screws from the outlet-box ears and insert them from back to front through their holes so that they protrude about 0.5”.
• Place the wallboard sheet in its proper position against the wall and press it against the screw tips.
2. Cutting the hole.
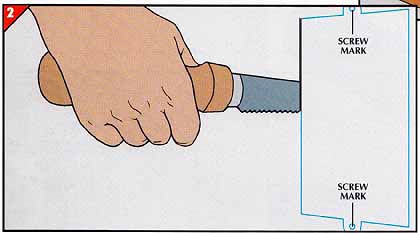
• Remove the sheet and place a spare outlet box on the wallboard, aligning the mounting holes with the marks made by the screws, then trace around the box.
• Force a wallboard saw through the board and cut just outside the lines, angling the saw so that the hole is slightly wider at the back of the sheet.
• Trim off any ragged paper around the cut and install the sheet.
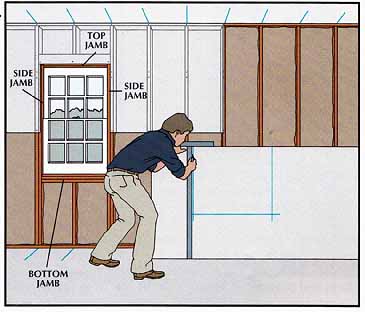
DOORS AND WINDOWS
Marking and cutting the opening.
For a window, measure from the ceiling to the top of the jamb at both corners. Next, measure from the last installed sheet to the nearest side-jamb edge. If the sheet will surround the window, also measure to the farthest side-jamb edge. For a door, measure the distances from the ceiling to the top jamb and from the last installed sheet to the side jamb edge or edges.
• Mark these distances on the face of the sheet and connect the marks.
• If the sheet will enclose three sides of the window or door, cut along the two parallel lines with a dry-wall saw.
• Score the remaining line and snap the core (Steps 1 and 2). If the sheet will surround a window, cut around all the lines with the saw.
• Similarly, mark and cut the lower sheet.
CONCEALING JOINTS AND FASTENERS
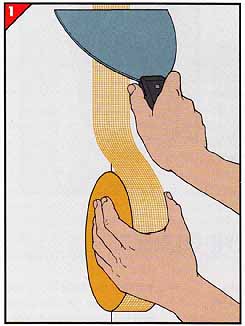
1. Taping the joint.
• Press the end of a roll of self-adhesive fiberglass-mesh joint tape against the top of the joint.
• Unwind the tape with one hand and use a taping knife to press the tape to the joint. Watch for wrinkles; if they appear, lift the tape, pull it tight, and press it again.
• Cut the tape off the roll when you reach the end of the joint.
2. Applying joint compound.
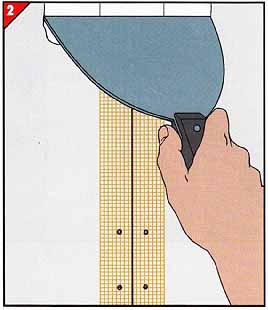
• Use the same knife to spread compound over the joint tape and the adjacent wallboard in a layer approximately inch thick. On joints where non-tapered ends of dry wall abut, apply compound slightly thicker. While working, wipe the knife frequently against the lip of the pan; otherwise the compound will harden on the knife and score grooves in the wet compound.
• When the tape is covered, run the knife down the joint in one motion to smooth out the surface.
3. Feathering the joint.
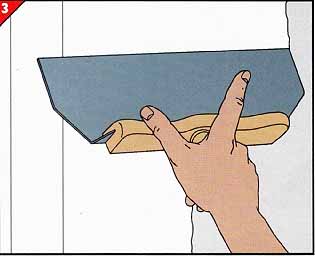
Run a clean 10” knife down each side of the joint, spreading the compound outward. Press hardest on the outer side of the knife so the mixture gradually spreads to a feathered edge. Let the compound dry for a day.
Meanwhile, hide fastener heads elsewhere by drawing joint compound across each one with a 6” knife held nearly parallel to the wallboard. Then raise the knife blade to a steeper angle and scrape off excess com pound with a stroke at right angles to the first.
Apply a second coat of joint compound thinned with about a pint of water per 5 gallons. Using a 10” taping knife, feather the compound to a distance of about 10” on either side of the joint. Where nontapered ends of dry wall abut, apply more compound and feather it to about 20” on each side of the joint.
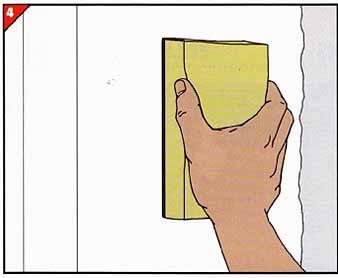
4. Smoothing the surface.
• When the last coat of joint compound is completely dry, rub it gently with a damp wallboard sponge. Be careful not to get the wallboard paper wet enough to tear, and rinse the sponge frequently.
• Repeat the procedure on the compound you applied to fastener heads.
DEALING WITH CORNERS
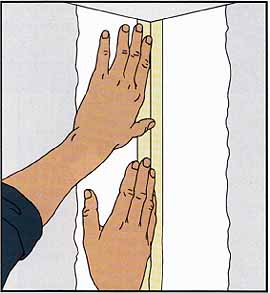
Taping inside corners.
• With a 6” taping knife, slather joint compound crosswise into the crack at an inside corner between two walls or a wall and the ceiling.
• After applying the compound, run the knife along each side of the joint to smooth the surface.
• Bend a length of paper tape in half down its crease line, and press the fold lightly into the corner by running your fingers along the joint.
• Draw the knife along each side of the corner, simultaneously em bedding the tape and coating it lightly with compound.
• When applying the second and third coats use thinned com pound (Step 3). Do one side of the corner, allow the com pound to dry 1 day, then do the other side.
• Smooth the compound with a wallboard sponge after it has dried (Step 4).
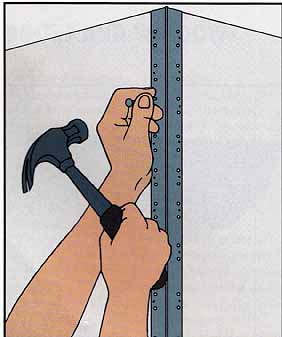
Strengthening outside corners.
• Nail a strip of metal corner bead so it fits flat on both sides of the corner.
• Load the left two-thirds of a 6” taping knife with joint compound.
• With the right half of the blade overhanging the corner, run the knife from ceiling to floor down the left side of the bead, smoothing the compound over the perforations.
• Cover the right side of the bead similarly.
• Clean the blade, then smooth and feather the joint by running the knife down each side of the bead.
• Let the compound dry for 1 day, then apply a second coat of thinned compound (Step 3), feathering the edge about 1.5” beyond the dry compound.
• Wait 1 day, then apply a third coat using a 10” knife to feather the compound 2” farther on each side.
• Smooth the compound after it has dried (Step 4, above). If the rounded tip of the metal bead still shows, it can be painted later with the rest of the wall.
