The sloping roof of an attic poses problems in framing a new room, but they are easily solved by adapting the framing techniques shown. At ceiling height, collar beams convert sloping surfaces to a horizontal one, with single- board beams functioning as joists for the ceiling and a doubled beam providing a surface wide enough for attachment of the top plate of a center wall. At the room’s sides, knee walls convert sloping surfaces to vertical ones.
Planning Considerations: A good ceiling height is 74 feet, but lower ceilings can work if the room has enough headroom, light, and ventilation. A knee wall 5 feet high is ad equate for general use; low furniture such as a bunk bed or .a storage chest may fit comfortably against even a 4-foot-high wall.
Working with Thick Rafters: In a home built before 1970, rafters may be thicker than present-day lumber. Thicken the blocking pieces between the boards of the doubled collar beam with scrap lumber. At the knee walls, center the studs when you toe nail them into the rafters.
MATERIALS:
- Cardboard
- Scrap lumber
- Framing lumber (2 x 2, 2 x 4, 2 x 6)
- Nails (2.5”, 3”, 3.5”)
CAUTION! Protect your eyes with goggles as you hammer, and put on a hard hat when you work with un secured lumber overhead. A dust mask can make you more comfortable in an old attic.
TOOLS:
- Tape measure
- Carpenter’s level
- Chalk
- Circular saw
- Hammer
- Plumb line
PUTTING UP COLLAR BEAMS
1. Measuring and marking.
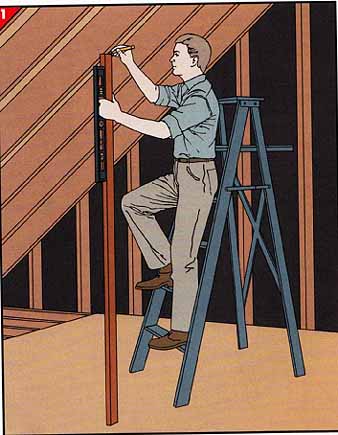
• Add the thickness of the planned ceiling material to the proposed ceiling height and cut a length of scrap lumber to that length.
• Stand the board upright against each rafter located in the planned area for the room. Use a level to make sure the board is vertical, and mark the rafter where it and the top of the board intersect.
Using another piece of scrap lumber in the same way, mark the rafters for the tops of the knee walls.
2. Making a pattern for the beam ends.
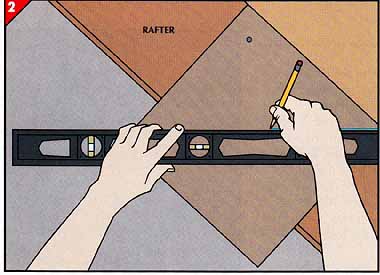
The collar beams must be beveled to provide the maximum nailing surface and to avoid splitting the beam ends. Create a pattern for the bevel as follows:
• Tack a square of cardboard to a rafter, placing one edge flush with the outside edge of the rafter.
• Hold a level against the square, with one corner of the level at the outermost corner of the square. From this corner draw a horizontal line.
• Detach the square, cut along the line, and discard the lower portion.
• On both sides of the remaining piece, mark with chalk along the newly cut edge and the edge that was tacked flush with the rafter edge.
If the pitch of the opposite roof is at a different angle, make an additional pattern.
3. Cutting the beam.
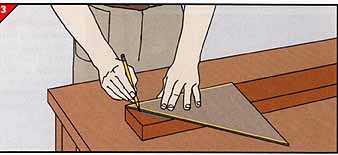
• At the pair of rafters above the planned center wall, locate the ceiling- height marks made in Step 1. Measure from the outside edge of one rafter to the outside edge of the opposite rafter at that height. Then subtract 0.25".
• Cut two 2-by-6 boards to that length.
• Place the apex of the angle formed by the two chalked edges of the pattern at one end of one of the boards.
• Hold either of the two chalked edges of the pattern flush with the bottom edge of the board.
• Draw a pencil line along the other chalked edge of the pattern.
• Mark the other end of the board in a similar fashion.
• Cut the board at the diagonal lines.
• Cut the second board the same way.
4. Installing the beam.
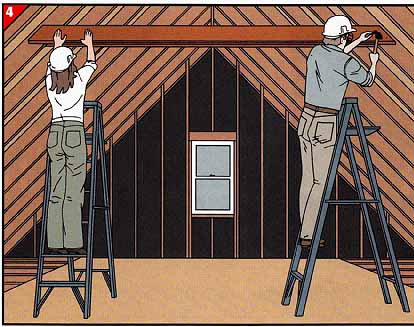
• Fasten the cut boards to either side of the selected rafters with three 3” nails at the boards’ ends; place each board so the bottom is at the ceiling-height marks and there is a space of inch between the beam ends and the roof.
• If the collar-beam span is 8 feet or more, nail short blocks of 2-by-4 between the boards at 3- to 4-foot intervals to keep them from bowing.
CONSTRUCTING THE WALLS
1. Building knee walls.
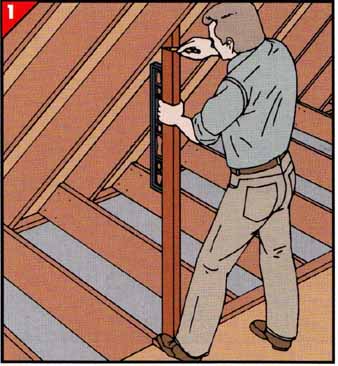
• On one of the center-wail rafters, locate the mark made for a knee wall. Drop a plumb line to the joist below; mark the joist.
• Measure in from the outside end of that joist to the mark. To position the other end of the knee wall, measure in from the end of that joist by the same amount.
• From the outside face of the collar- beam rafter, measure off the length of the knee wall. Cut a 2-by-4 to that length for the soleplate.
• Fasten the plate to the floor with 3” nails at 1-foot intervals; add 3 nails over each joist.
• At each rafter, rest a vertical length of 2-by-4 on the soleplate, plumb it with a level, and trace the angle of the rafter on the 2-by-4.
• Cut the 2-by-4 on the diagonal line.
• Set the stud in place. Attach the top to the rafter with two 3” nails, then toenail the base to the soleplate.
• Build the other knee wall the same way.
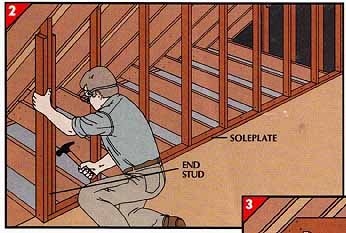
2. Completing the wall.
Make nailing surfaces for wallboard at the end of each knee wall as follows:
• At the back of the end stud, measure the distances from the rafter to the floor on one side, and from the rafter to the soleplate on the other.
• Cut a 2-by-4 to each length.
• Nail them to the sides of the end stud with 2.5” nails.
3. Assembling the center wall.
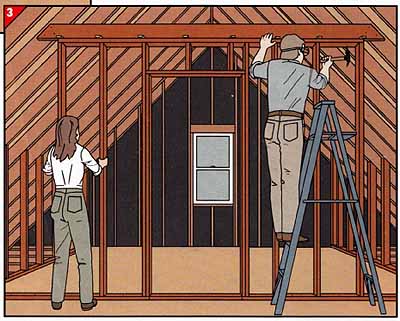
• Measure the distance from the outside edge of one knee wall to the outside edge of the other; cut a 2-by-4 to this length to serve as the soleplate for the center wall. For a door, cut kerfs in the plate as shown.
• Measure the bottom of the doubled collar beam from rafter to rafter and cut a 2-by-4 to this length as a top plate.
• Measure from the bottom of the beam to the floor at several points. Take the shortest distance and subtract 3”. Then cut studs to that length.
• Build this part of the wall on the attic floor as you would a conventional partition. Frame for a door opening as shown.
• Raise the wall and position it so that the soleplate meets the outside end of the thickened knee-wall stud.
• Shim the top plate as needed and then nail it in place.
• Nail the soleplate to the floor with 3” nails at 1' intervals.
4. Thickening the rafter.
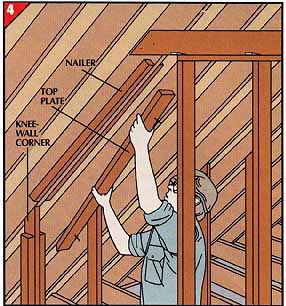
• Measure along the rafter from the end of the doubled collar beam to the end stud of the knee wall; cut two 2-by-2s or 2-by-4s to that length to serve as nailers.
• Attach the nailers to opposite sides of the rafter with 2.5” nails, positioning the bottoms flush with the bottom of the rafter.
• Cut a 2-by-4 to run from the center wall to the knee wall as a top plate, angling one end to fit tightly against the knee-wall stud.
• Nail the top plate against the rafter and nailers.
• Thicken the rafter in the other part of the wall in the same way.
5. Completing the center wall.
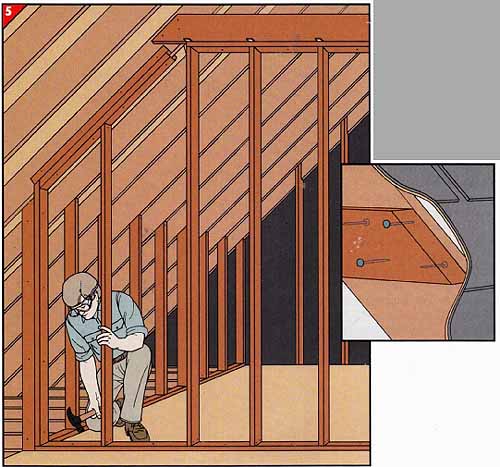
• At each side of the center wall, mark the sole-plate for a stud next to the knee-wall corner and for any additional studs between that point and the existing full-length studs.
• Set lengths of 2-by-4 vertically on 2-by-4 scraps next to the marks, trace the height and angle of the rafter at the upper ends, and cut the 2-by-4s at the trace marks for studs.
• Toenail the studs into place between the top plate and soleplate with 3” nails; for a tight joint, fasten the first stud to the knee-wall corner with four 2.5” nails.
After the walls are complete, frame for the ceiling by installing a single collar beam at each rafter pair, following the nailing pattern shown in the inset.