Introduction
Nothing transforms the interior of a house more dramatically than adding new walls or taking out old ones, the two tasks explained in this section. As you decide which walls to add or subtract, consider the family’s traffic patterns, as well as issues such as natural lighting and cross ventilation. Scale drawings can help you picture the planned alterations; for greater realism, try hanging sheets where you intend to build walls.
Building Partition Walls
The goal in dividing a room with a wall is to erect a sound structure that betrays nothing of its recent origins. In the construction methods shown, a wood frame is assembled flat on the floor from boards called studs fastened at the ends to boards known as the soleplate and the top plate. To install a doorway, follow the procedures provided in this guide. When finished, the unit is tilted upright and attached to walls, ceiling, and floor.
Construction Variations: You can build a partition wall with metal studs and plates instead of wood. With metal construction, you first attach the plates to the floor and ceiling and then you install the studs. This construction sequence is also useful when you are building with wood in a space that's too small for assembling the partition on the floor.
Adding Utilities: Metal studs are made with passages for wiring and plumbing, but you’ll have to make openings in wood studs to accept utilities. It’s best to consult a plumber if you plan to install pipes, but you can provide electricity to the new wall. Usually, power can come from an existing outlet box in a nearby circuit. Run the cable through holes drilled through the new wall studs to new outlet boxes installed on the studs of the open frame. Postpone connecting the new circuit to the house supply until after you have covered the partition frame with wall board and installed receptacles and switches.
TOOLS:
- Framing hammer
- Combination square
- Plumb bob
- Circular saw
- Pry bar
- Utility knife
- Electric drill with 0.75” bit
MATERIALS:
- 2 x 4s
- Cedar shims
- Common nails (3.5”)
- Cut nails (2.5”)
- Outlet boxes
- Cable
- Wire caps
BE SAFE! Protect your eyes with goggles and ears with earplugs when hammering and operating a circular saw. When using the saw add a dust mask to keep sawdust from your lungs.
Precautions for Lead and Asbestos
Lead and asbestos, known health hazards, pervade houses constructed or remodeled before 1978. Test all painted surfaces for lead with a test kit, available at hardware stores, or call your local health department or environmental protection office for other options. Potential asbestos locations include joint compound, ceiling and wall materials, insulation, and flooring and related adhesives. Mist such materials with a solution of 1 teaspoon low-sudsing detergent per quart of water to suppress dust, then remove small samples for testing by a National Institute of Standards and Technology-certified lab.
Hire a professional licensed in hazardous-substance removal for large jobs indoors, or if you suffer from cardiac, respiratory, or heat- tolerance problems that may be triggered by the protective clothing and respirator you must wear to do the work yourself. If you remove lead or asbestos yourself, follow these procedures:
Keep children, pregnant women, and pets out of the work area.
Indoors, seal off openings to the work area from the rest of the house with 6-mi! polyethylene sheeting and cut tape. Cover rugs and furniture that can’t be removed with more sheeting and tape. Turn off air conditioning and forced-air heating systems.
When you finish indoor work, mop the area twice, then run a vacuum cleaner equipped with a high efficiency particulate air (HEPA) filter.
Outdoors, cover the ground in the work area with 6-mil polyethylene sheeting. Never work in windy conditions.
If you must use a power sander on lead paint, get one equipped with a HEPA filter. Never sand asbestos- laden materials or cut them with power machinery. Mist them with water and detergent, and remove with a hand too!
Always wear protective clothing (available from a safety-equipment supply house or paint stores) and a dual-cartridge respirator. Remove the clothing—including shoes—before leaving the work area. Wash the clothing separately, and shower and wash your hair immediately.
Dispose of the materials as recommended by your local health department or environmental protection office.
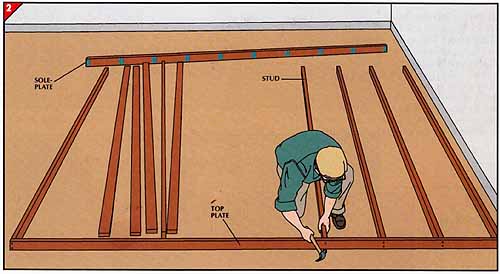
1. Marking the top plate and the sole plate.
• Measure the ceiling across which the new wail will run and cut two 2-by-4s to this length to serve as top plate and soleplate.
• Starting at one end of the top plate, mark stud locations 1.5” wide. Except at a doorway, space stud centers 16” apart, finishing with a stud location marked at the other end of the plate.
• With a combination square, transfer the markings from the top plate to the soleplate.
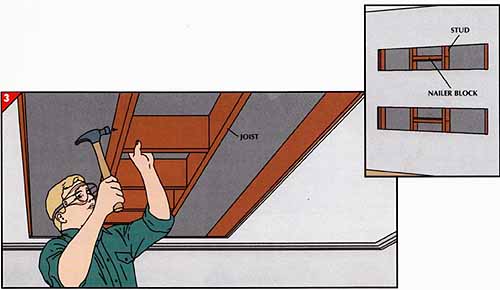
• To determine the length of studs, measure along a plumb bob dropped from the ceiling to the floor at each end of the new wall and in the center.
• With a circular saw, cut 2-by-4 studs 3” shorter than the smallest of these measurements to allow for the combined thicknesses of the top plate and soleplate and for ceiling clearance when raising the wall.
• Turn any bowed studs so that they all curve in the same direction.
• Set the top plate on edge and fasten it to each stud with two 3.5” nails driven through the plate. A framing hammer speeds the work.
• Nail the soleplate to the other ends of the studs in the same way.
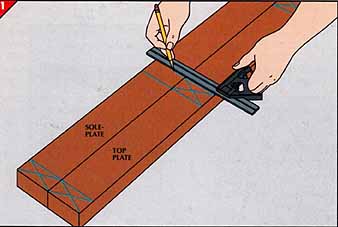
For a wall that will stand perpendicular to joists, mark the center of each joist on the ceiling. Try to position a wall that parallels joists directly under one joist. If the wall runs between joists, install nailer blocks no more than 24” apart to support the frame. Prepare truss or I-beam joists as shown in this guide.
• Cut the blocks from lumber the same size as the joists.
• If the space above the new wall is an unfloored attic, plan to install the blocks from above; if not, cut out a strip of ceiling 3 joist spaces wide as shown here.
• Set the bottoms of the blocks flush to the bottoms of the joists and fasten the blocks with two 3.5” nails in each end.
• After installing the blocks, patch the ceiling with wall board, marking the patch with block locations before fastening it to the ceiling.
If the new wall meets an existing one between studs, cut slots in the wall for nailer blocks installed about one-third and two-thirds of the distance from floor to ceiling. Patch the slots with wallboard.
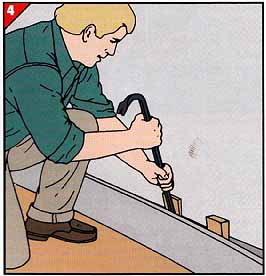
4. Removing baseboard.
For a tight fit between a new wall and an old one, remove the baseboard and shoe molding, a narrow strip often fastened at the bottom of the baseboard.
• Beginning at a corner or at a baseboard joint, gently loosen the baseboard and shoe molding where the new and old walls will intersect. Use a prybar backed with a thin scrap of wood to avoid damaging the wall, and insert a wood wedge be hind the baseboard to hold it away from the wall after you loosen it.
• Repeat the process, inserting wedges as you go, until the strip is completely detached.
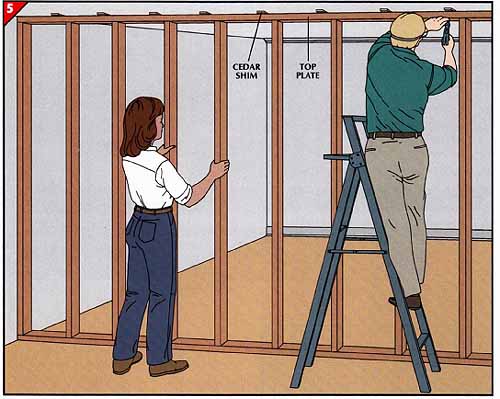
5. Securing the frame.
• With a helper, tilt the wall upright.
• While your helper holds the frame in place, push pairs of tapered cedar shims into each side of the gap between top plate and ceiling. Place shims where you will nail the plate to joists or nailer blocks.
• Drive 3.5” nails through the top plate and shims, and into the joists or blocking overhead; then score protruding shims with a utility knife and snap them off.
• Secure the soleplate to floor joists where possible; otherwise, nail it to the flooring, in either case, use 3.5” nails spaced 16” apart. For concrete floors, substitute 2 1/2” cut nails or use a powder-actuated hammer.
• Fasten the end studs of the new wall to studs or nailer blocks in the existing one.
Explosive Power for Nailing Concrete:
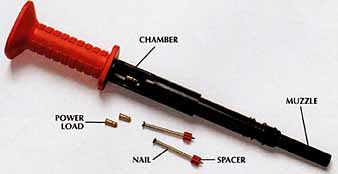
A powder-actuated hammer lets you drive a fastener through a soleplate and into a concrete floor with a single blow Fit a special nail into the
muzzle; a plastic spacer centers the nail in place. Then insert a power
load—an explosive in a brass case—into the tool’s chamber. To fasten a
2-by-4 soleplate to concrete, use 2 1/2” nails and No. 4 power loads. After
closing the chamber, press the muzzle against the soleplate to release
the took safety mechanism, and , strike a sharp blow with a 1-lb. hammer.
Doing so sets off the power load, which drives a piston that in turn drives
the nail flush with the soleplate.
CAUTION -- Always wear ear protection and goggles when you use this tool.
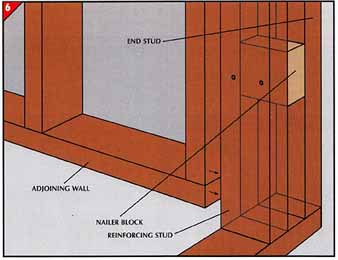
6. Turning a corner.
Add a stud and blocking to a corner to reinforce the joint and pro vide nailing surfaces for wallboard.
• Cut two 2-by-4 nailer blocks about 3.5” long.
• Fasten the blocks to the end stud, one-third and two-thirds of the distance between floor and ceiling. Use 3.5” nails.
• Cut a stud and nail it to the nailer blocks. Then toenail it to the top plate and soleplate.
• Nail the end stud of the adjoining wall to the edges of nailing blocks and end stud at the reinforced corner.
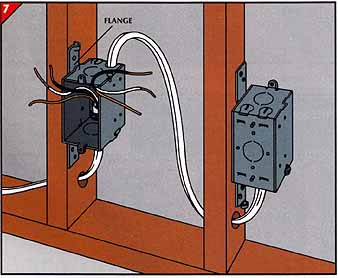
7. Roughing in wiring.
• Before covering the frame with wallboard, decide where you want switches and outlets in the new wall. Mark locations for them on the nearest studs.
• Determine where the new cable will tap into the house wiring, then drill i” holes through the studs of the new wall, near the soleplate, to accommodate the cable.
• Nail outlet boxes to the studs. Use boxes having flanges that position the front of the box flush with the wall surface after the wall board is hung. Avoid placing outlet boxes that serve adjacent rooms within the same stud space; they will conduct sound from one room to the next.
• Run the cable, clamping it securely to each box. Before hanging wallboard, tuck the wires out of the way inside the box.
After you install wallboard, switches, and receptacles, turn off the power to the circuit you intend to tap and use wire caps to connect the new cable—black wire to black, white to white, and ground to ground.
Framing with Metal
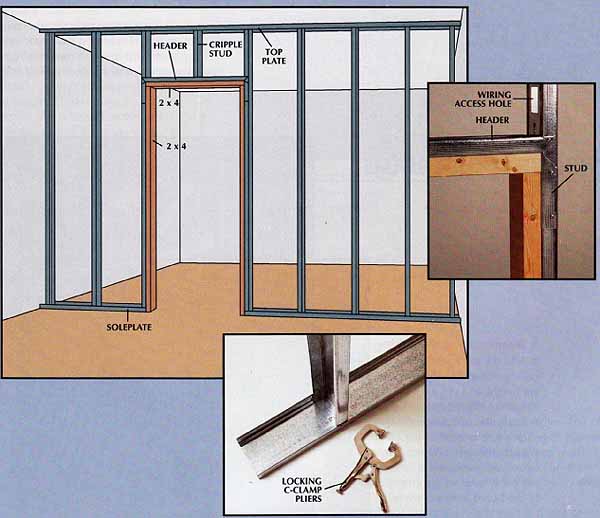
Light-gauge metal studs and plates, which are avail able from home centers, offer an attractive alternative to wood as a framing material for partition walls. Although unsuitable for supporting heavy bookshelves and cabinets, metal framing is less costly than wood and lighter in weight.
Like a partition framed in wood, a metal wall has a top plate at the ceiling and a soleplate fastened to the floor. Studs are attached to both plates at 24” intervals. All the pieces are cut to size with tin snips. Studs are tilted into position, then rotated perpendicular to the plates. End studs stand 2” from the wall; each end stud is put in place before the stud next to it, to make sure there is adequate working room.
All the studs are secured top and bottom with a 4” No. 8 self-drilling pan-head sheet-metal screw in each side. Locking C-clamp pliers facilitate holding the stud in place while the screw is driven.
A doorway is framed by two metal studs and a metal header cut from the same stock as the plates, with a cripple stud between the header and the top plate; 2-by-4s screwed to the metal studs and header facilitate door installation.
