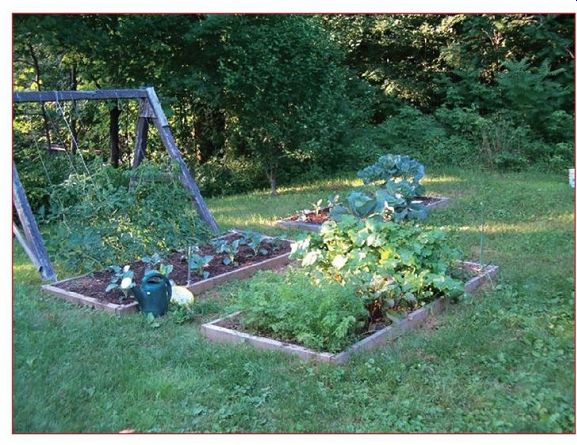
Raised beds and properly constituted soil make mini-farming practical. Modern people in the industrialized world have a lot less spare time and a lot less available land than their ancestors.
Raised beds offer so many advantages over row gardening that it is hard to imagine why everyone except big agribusiness cartels isn't using them. Especially in northern climates, raised beds can help gardeners lengthen their growing season because they can raise soil temperature by 8 to 13 degrees compared to ground soil temperatures.
By raising the level of the soil, farmers and gardeners can start their crops earlier because excess moisture drains easily so the cold spring rains won't overwhelm new crops. Raised beds are also easily fitted with attachments, such as cold frames.
A raised bed is essentially a bottomless and topless box laid on the ground and filled with soil. The boxes can be built from wood, plastic boards, cement, and other materials. Raised beds can be made from mounded earth, but surrounding them with a box structure limits erosion of the carefully prepared soil of the bed.
---- Raised beds extend the season and reduce problems related to excess
water.
Material Choices
The frames of raised beds are in constant contact with damp earth and can be subject to rotting. Ordinary lumber will last two or three years before replacement is needed. This can be delayed by carefully painting all exposed surfaces of the frames with a water based exterior latex paint and allowing them to dry thoroughly before putting them to use. Do not use oil-based paints or paints containing anti-mildew ingredients or else you'll poison the soil in your beds. Because of the weight of the soil, boards used should be at least 1.5 inches thick to avoid bowing, and opposite sides of long runs should be tied together every eight feet or so. The biggest benefits of lumber lie in its easy availability and easy workability.
Ordinary concrete blocks are inexpensive and easy to use. They are readily available, durable, and heavy enough to hold the soil in a raised bed without need for mortar . They can be picked up and moved around to relocate or expand beds, and they can be reused almost indefinitely. The only downside is their weight-45 pounds for each. That means that in spite of their compact size, only 22 at a time can be hauled in a pickup truck rated to haul a half ton. Since each block is eighteen inches long, a pickup-sized load gives only 33 linear feet.
Boards made from recycled plastic used for decks and other outdoor structures have become more available in recent years and combine the assets of the easy handling of traditional lumber with the durability of concrete block. Several raised-bed kits are on the market that use plastic boards, and these may be a good idea if you plan on doing a small amount of gardening, but because of the expense of the kits, they don't make sense on the scale needed to feed a family. For a mini-farm, save expense by buying the plastic boards at the lumber store and cutting them to the right size yourself.
It is true that more modern pressure-treated lumber uses less toxic components than it used to, but the components are still toxic, and they can leach into the soil of the growing bed, so they are best avoided.
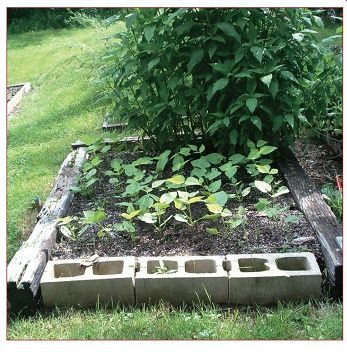
------ Raised beds can be made from a variety of materials. This one is
made with cinder blocks and landscape timbers.
Many other materials can be used, ranging from landscaping timbers to poured concrete forms. Just let imagination, cost, durability, and the potential toxicity of anything you might use guide the decision. Keep in mind that using materials that leach poisons into the growing beds completely defeats the purpose of the home garden or mini-farm because consuming the products grown in those beds can be extremely hazardous. (The arsenic in pressure treated wood, for example, is both directly toxic and highly carcinogenic.)
Shape and Orientation of Raised Beds
The most common and useful shape for raised beds is rectangular . Certain planters for flowers are circular , and this works fine as long as the diameter is not so great that the gardener has to step into the bed. Another common shape is a 4-foot square. This works well for casual vegetable-only gardening on a small scale, but at the scale of providing all the needs of a family, it becomes wasteful of space and material.
I recommend a rectangular shape because it makes maximum use of space and minimal material while making it easy to add standardized structures like hoop houses.
Any rectangular bed is going to be longer than it is wide. To give maximum sun to crops and avoid shading, ensure that the long sides face north and south. Any trellising for vining crops should be established along the north edge to get the advantage of sunshine without shading other crops.
Size of Raised Beds: Width
Everyone has an opinion on the proper size of raised beds. The Grow Biointensive method favors a width of 5 feet and a length of 20 feet to establish a "microclimate" for intensive agriculture. Square Foot enthusiasts advocate a maximum width of 4 feet, because it is easy to reach into a bed that is 4 feet wide from either side and get to whatever is in the middle. Many experienced organic farmers use even narrower raised beds.
The five-foot width advocated by Ecology Action requires, for many people, stepping into the bed onto a board intended to more widely distribute the weight and minimize damage to the soil structure. But stepping into the garden bed at all, even using a board, defeats the purpose of careful management of the soil structure by compacting the soil. The board would need to be set up so it can be laid across the sides of the bed structure and be rigid enough that it won't bend when someone is standing on it. (This would be impossible using the complete Grow Biointensive method since, in that method, the raised beds are only mounded soil without structural sides. My method uses structural sides instead.) The 4-foot width is narrow enough that most people can reach into the garden from both sides since only a 2-foot reach is needed.
This will not work, however , when trellised crops that grow food on both sides of the trellis are grown against one of the long sides of the bed. In that case, picking pole beans, for example, requires a 4 foot reach, which most people don't have. My wife and I did this with a 4-foot-wide bed one year , and watching my wife balance on one of the frame boards while reaching for the beans with one hand and holding on to me with the other was a sure sign that I would need to make some changes the following year! For reasons of experience and convenience, then, I recommend that beds should be four feet wide if they aren't going to be used for tall vines like pole beans. They should be three to three and a half feet wide otherwise.
Size of Raised Beds: Length
We already know that beds need to be rectangular for economic reasons and three to four feet wide for convenience-but how long can they be? Technically, they can be as long as the farmer wants, but there are some aspects of length worth considering.
One of the biggest causes of insect and disease problems is growing the same plants in the same space year after year .
Bacterial, fungal, and viral diseases often have preferred host plants--and sometimes won't even grow in plants of an unrelated genus.
Since these pathogens are competing against more beneficial microbes in compost-enriched soil, they can survive for only a limited period of time-usually three years or less-in soil that doesn't provide a suitable host.
Insect pests (some of which spread diseases) are quite similar.
They have a particular appetite-a particular niche-such as cabbage. Such pests not only eat cabbage and infect it with diseases but also lay their eggs in the soil around the cabbage so that their offspring will emerge right next to their favorite food. One important way of foiling such pests is to make sure that when their offspring awaken in spring, they find plants that aren't appetizing.
Limiting the length of raised beds so that you have more room to create several of them makes it easy to practice crop rotation because the soil in one bed is isolated from the soil in the others.
Making sure the same crop isn't grown in the same bed for three years solves a lot of problems in advance. In my own mini-farm, beds range in length from 8 to 24 feet.
Start at the Right Time and Grow Slowly
The time between when the soil can first be worked in the spring and when the early spring crops need to be planted is about three weeks. This is simply not enough time to create enough raised beds.
Ultimately, for total food self-sufficiency, you will need about 700 square feet per person. If you plan to raise market crops, you'll need even more. That will require a lot of beds. The number will depend on the length you choose.
Assuming the creation of beds that are 4-feet × 25-feet, that means you'll need at least seven beds per person or 21 beds for a family of three. Using 4-feet × 8-feet beds, that would be 22 beds per person or 66 for a family of three. In practice, depending on dietary preferences, chosen crop varieties, climate, and other factors, a larger or smaller number of beds could actually be used.
Initial creation of raised beds takes a considerable amount of time and is very labor intensive, but once they've been created, they require very little work to maintain. Raised beds can be created in a number of ways, but even the most time-efficient methods will take a few hours per bed. If you have limited time, getting all the beds made in spring will be physically impossible.
Therefore the best time to embark upon mini-farming is the summer or fall before the first growing season. This way the beds can be prepared in a more leisurely fashion and then sowed with cover crops for overwintering. In the spring, you only have to cut the cover crops and put them into the compost pile, cultivate existing beds, and start planting. (Cover crops are explained in the next section.) It may be best to start mini-farming slowly-say, by initially creating enough beds for just a single individual's food-and then keep adding beds as time and materials allow until the required number has been established. This is because of the trade-off between time and money. If the prospective farmer has the time to establish all of the required beds initially, that's great. But if time is lacking, the only way to shortcut the system is to pay for heavy equipment and truckloads of compost.
I don't want the fact that fall is the best time to get started to discourage you from starting in either the spring or summer if that is when you want to start. It is always better to start than to delay because even just a couple of raised beds can produce a lot of food.
If you get started in the spring or summer , just keep in mind that you'll want to add new beds in the fall as well.
Creating the Beds
For reasons of economy and productivity, I recommend creating the beds initially by double-digging. Lay out the area to be dug using stakes and string, then once it is dug, surround that area with the material you have chosen to create the box for the bed. Because the process of double-digging will loosen the soil, the level of the dug area will be between four and six inches higher than the surrounding soil.
Double-digging has been a standard agricultural practice for soil improvement in various places around the world for untold generations, and it is what I recommend because it is the most effective for the money required. The idea behind double-digging is that plants send their roots deeply into the soil, and making sure there are nutrients and aerated soil two feet deep provides ideal growing conditions. Up where I live in New Hampshire, any attempt at digging, no matter how modest, can be difficult because of the large number of rocks encountered. Did you ever wonder where all those picturesque rock walls in New England came from? Yep-they came from farmers getting rocks out of their fields.
My grandfather never double-dug anything but his asparagus beds. But, then again, he had 96 acres of land, horse teams, plows, tractors, four sons, and three daughters, so he wasn't trying to squeeze every ounce of productivity out of every square foot like a modern mini-farmer either . Nevertheless, the asparagus grown in a double-dug bed was far superior to any other.
Although many plants, especially grasses, can send roots several feet deep, the majority of a plant's root system exists in the top six inches of the soil. That's why Mel Bartholomew's Square Foot gardening system, which uses only six inches of soil, works. But in spite of the fact that six inches of perfectly prepared soil can be adequate, there can be no doubt that two feet of soil will necessarily hold a greater reservoir of nutrients and water.
As my father would say, with my apologies to our beloved cat, Patrick, in advance, "there's more than one way to skin a cat. "
Meaning, of course, that double-digging is not the only suitable way to prepare soil for mini-farming. There are actually three ways of digging the beds.
Digging Methods
The old-timers where I grew up never used the term double digging. In the United States and Great Britain, that practice has been historically known as "bastard trenching" to differentiate it from full or "true" trenching. Most modern texts don't mention it, but there are actually three sorts of trenching that are useful under different circumstances. All three types of trenching are brutally hard work, particularly in areas with a lot of large rocks or with soils composed mainly of clay, but they offer benefits worth the effort.
These three types of trenching are plain digging, bastard trenching, and trenching.
Plain digging relies on using a garden spade to dig into and turn over the soil to the depth of a single spade. The area to be dug is laid out using string or other marking, and a garden spade is used to remove the soil one-spade wide and a single-spade deep across the width of the bed, and that soil is placed into a wheelbarrow.
Then a couple of inches of compost is added to the bottom of the first trench, and the soil from the next parallel trench is added on top of the compost in the first trench. This process continues until the last trench is dug and compost added to the bottom, and then the soil saved from the first trench is added to the hole left by the last trench.
The only difference between plain digging and double-digging (a.k.a. bastard trenching) is that in the latter , after a trench is dug a single-spade deep and before the compost is added, a digging fork is worked into the soil at the bottom of the trench to lift and break up the soil. Finally, more compost is added on top and mixed with the top six inches of soil. I perform this last step after I've built the form around the dug area.
Both plain digging and double-digging can be useful for newly created beds and can be especially useful for an area that is covered with grass as the spits of dirt (the dirt that makes up a spade-full is known as a "spit") can be turned grass-side down in the adjacent trench as they are dug. It is extremely useful in either case, where the land to be used for farming was previously weeds or lawn, to sift through the soil to remove wireworms and grubs as you go along. When I use either of these trenching methods, I not only put compost in the bottom of the trenches but add some across the top of the finished bed and mix it in as well.
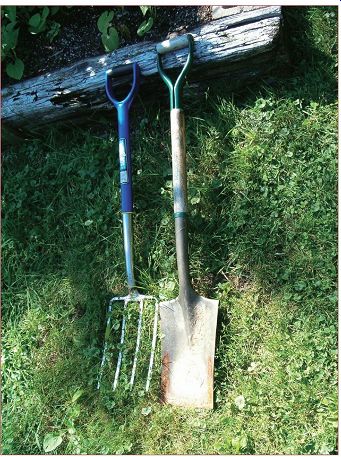
----- The garden fork and digging spade are indispensable tools for double-digging.
True or full trenching is serious work, but it is appropriate for regenerating soil in beds that have been previously double-dug or where the soil can be worked deeply without using a backhoe. A properly maintained bed should never need regeneration, but true trenching can be useful when dealing with land that was previously over-farmed using conventional methods since it exchanges the subsoil with the top soil. In true trenching, the first trench is dug a single-spade deep and the soil from that set aside, and then the same trench is dug another spade deep and that soil is set aside as well, separately from the soil from the top of the trench. Then a digging fork is used to break up the soil in the bottom as deep as the tines will go, and compost is added.
When the second adjacent trench is dug, the spits from the top are added to the bottom of the first trench, then the spits from the bottom are added to the top of that. In this way, the topsoil is buried, and the subsoil is brought to the top. Continue in this way until the last trench is dug, at which time the top spits from the first trench are put into the bottom of the last trench, and then those spits are topped with those that remain.
Because true trenching exchanges the topsoil with the subsoil, and subsoil tends to have far less organic matter , generous amounts of aged compost should be added to the top layer , worked in thoroughly, and allowed to sit for a couple of weeks before putting the new bed to use.
In any of the three trenching methods, you will be using hand tools to move, literally, thousands of pounds of soil for each bed.
This can be grueling work, and you should always use spades and digging forks that have been either bought or modified to accommodate your height. The correct height of a spade or fork (plus handle) can be judged by standing the tool vertically next to you, then seeing how high it reaches on your body. The top of the handle should fall somewhere between your elbow and the middle of your breastbone.
Digging forks and spades can be purchased with either straight or "D" handles. You should get the "D"-handled versions, as they will lessen the amount of required back twisting. When using the tools, keep your back straight, and avoid both twisting and jerky movements. Work at a comfortable pace, and take breaks when needed. This way you get an excellent and safe aerobic workout that improves your strength and flexibility while improving the soil.
What about "No-Dig" Beds?
In my experience, I have found nothing that competes, in terms of sheer productivity, with properly double-dug raised beds.
However , this can be a lot of work, and folks without a lot of time or with physical disabilities might not want to undertake the effort.
You can still get very good results, though, using a no-dig method that I've tested.
Illustrated Double-Dig
Every year we expand my mini-farm a little by adding a few raised beds. The beds in my farm vary in size depending on the materials we had available at the time of construction, but most of them are 3-1/2 feet wide and 8 feet long. In the spring of 2006, we added a few beds and had my wife take pictures of the process so we could include them for your reference.
1. Mark off the area to be dug. In our case, we just laid out the boards where I would be digging. Notice a completed bed in the foreground and boards marking where the new bed will be in the background.
2. Dig the first row across the width of the bed one spade deep, and put the dirt from that row in a wheelbarrow.
3. Loosen the soil in the bottom of the trench with a digging fork.
4. Add compost to the bottom of the trench.
5. Dig the second trench parallel and adjacent to the first one.
6. Because, in this instance, I am digging an area that was covered with grass, I turn the spits from the second trench upside down in the first trench.
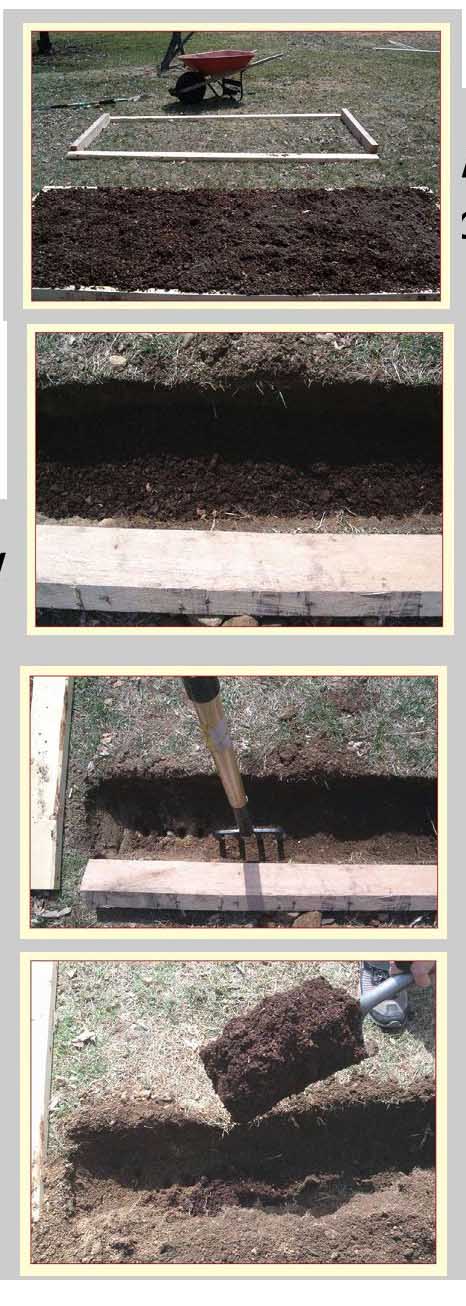
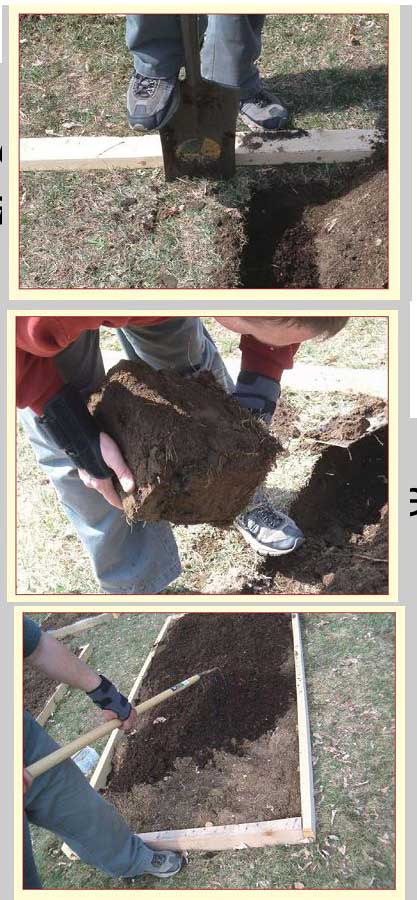
Boards are used to mark off the new bed. You could just as easily use string or chalk.
First row dug.
Loosening the soil.
Adding compost.
Digging the second trench. Beware the author's stylish footwear!
Putting spits in the trench upside down.
Working compost into the top few inches of the new bed.
7. Work some additional compost into the top few inches of the finished bed.
As you can see from the photo tutorial, preparing raised beds by double-digging is a pretty straightforward and very physical process. It is great exercise and loosens the soil to a depth of two feet, placing organic material throughout the entire depth. The yields from beds that I work like this are phenomenal!
Save up old newspapers-just the black-and-white portions, not the glossy parts. In the fall, build your frame out of 2 × 4 lumber right on the ground. Lay down the newspaper several layers thick, and then fill the bed completely with finished compost. Don't skip the newspapers because their purpose is to smother the grass underneath. If the grass isn't smothered, and if you are using only 2 × 4 lumber, you'll end up with a lot of grass growing in the bed.
When spring rolls around and the ground thaws, just use the digging fork to fluff it up a little; then plant, and you are done.
For no-dig beds it is particularly important to keep them planted with cover crops when fallow during the off-season because you are depending on the action of plant roots to mix the soil and keep it loose.
Because seeds don't always germinate well in compost, I'd recommend using the bed for transplanted crops for the first year , and then a good soil builder like beans the next year . In all other respects, you can treat this just like a regular raised bed. If fresh compost is added yearly, after three years the productivity will be the same as for a double-dug bed.
Trellising for Raised Beds: Flexible Trellising System
Trellises are necessary for certain crops and can be a valuable adjunct for others. Because raised beds don't provide much room for sprawling plants such as cucumbers or pole beans, adding a trellis makes growing these crops more practical and space efficient.
Many crops are more productive in vining versions than bush versions. This includes beans, peas, cucumbers, tomatoes, and more. Pole beans, for example, can yield almost twice as much product per square foot as bush beans. This means that a row of pole beans grown on a trellis along the north side of an 8-foot bed using only 8 square feet of space can produce nearly as many beans as 16 square feet of bush beans. This same calculation applies to other vegetables.

------- Electrical conduit makes a sturdy and versatile trellis.
As mentioned earlier in the section , beds will ideally be located with the long sides facing north and south. Trellises should be established on the north side. If, for some reason, this orientation isn't convenient, the second-best choice is to have the long side upon which trellises will be established on the north west or , in the worst case, west side. Don't establish trellises on the south or east sides of a bed or they will shade crops during the times of day that are most sunny.
There are as many ways to erect trellises as there are farmers, and I've used many different methods over the years. In the past few years, my preferred method of trellising uses rebar , electrical conduit, and conduit fittings. Electrical conduit comes in lengths 10 feet long. By cutting it to strategic lengths and using appropriate fittings, you can vary its height and length. By fitting it over rebar driven into the ground, you can lift it off the rebar easily in the fall for storage, and moving it to a different bed is a snap.
Because lumber used to create the beds is eight feet long, the longest you need the conduit to be is eight feet. This is for the horizontal piece on top. Meanwhile, trellis heights can range all the way from two feet for peas to four feet for tomatoes to even six feet for pole beans. A trellis height of more than six feet isn't a good idea, as reaching the top would be tiring or-even worse if a stool is required-dangerous.
The easy way to get a flexible system is to buy 10-foot lengths of conduit six pieces at a time. Three are cut into an 8-foot and a 2 foot piece, two are cut into a 6-foot and a 4-foot piece, and the final length of conduit is cut into two 4-foot pieces and one 2-foot piece.
When done, you have three 8-foot horizontals, two 6-foot verticals, four 4-foot verticals, and four 2-foot verticals. In addition to these, for every six pieces of conduit, you will need six 90-degree elbows, four screw couplings, and six pieces of 2-foot rebar . (You can find rebar already cut to length and bundled at Home Depot and similar stores.) Once the rebar is hammered into the ground on either end of the beds, you can completely assemble or disassemble a trellis of any height from 2-foot to 8-foot in two-foot increments using only a screwdriver.
Complete Trellis Creation, Step-by-Step
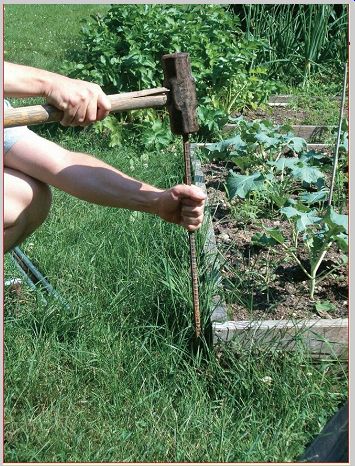


1. Hammer 2-foot pieces of rebar into the ground at either end of the raised bed, leaving 6 inches protruding above the ground.
Driving the rebar into the ground.
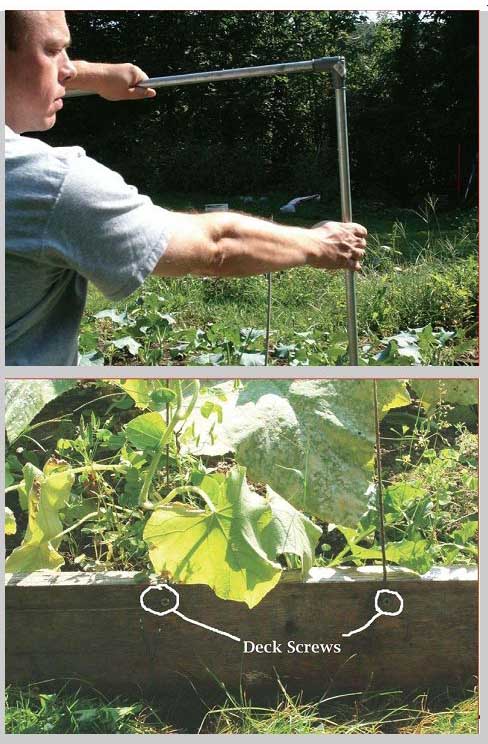
Placing an upright over the rebar.
Attaching the horizontal to the bend.
Deck screws drilled into the edge and protruding 3/8 inch.
Run string between the horizontal and the deck screws.
2. Slip your vertical piece of conduit over the rebar .
Repeat for the other side.
3. Attach a 90-degree elbow to each vertical piece of conduit, and then secure the horizontal conduit to the elbows.
4. Put deck screws into the side of the raised bed along the trellis every 6 to 12 inches. Leave them protruding about a quarter of an inch.
5. Run string between the horizontal bar on top and the deck screws in the side of the raised bed.
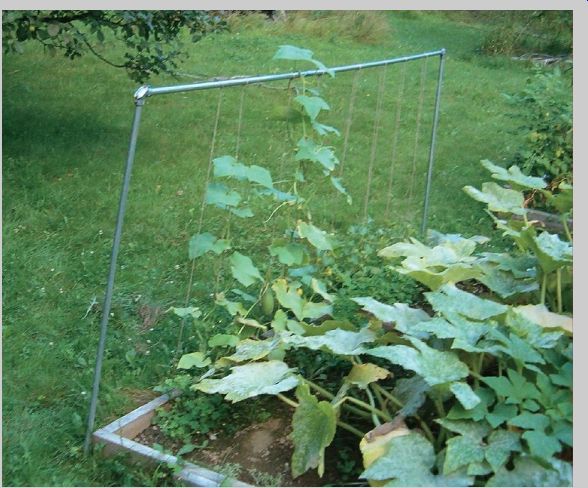
6. Now you have a completed trellis! Completed trellis.
-----