Buying the right stuff now helps you save big bucks in the long run.
Fiberglass insulation has a reputation for being itchy and irritating, but when it comes to convenience, price and installation ease, it can’t be beat. You can buy it at almost any home center, toss it in your car and install it in a jiffy.
But it can be confusing to pick out the best type for your project. Fiberglass insulation varies not only in size, thickness and length but also in efficiency, type of vapor barrier and potential for skin irritation.
The following four steps show you how to sort through the many types of fiberglass insulation and choose the one that works best. Once you decide, call lumberyards and home centers to locate the product. and check for substitutes in case you can’t find the type with the exact features you want.

1. Begin by selecting baits that completely fill the joist, rafter or stud space.
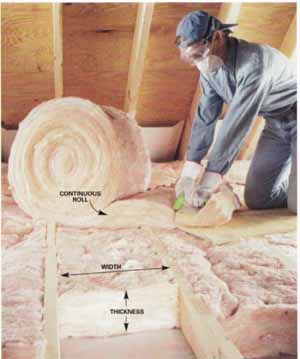
• Width. Buy 15-in, widths for studs or joists 16 in. on center, or 23-in. widths for spacing 24 in. on center.
• Thickness. Buy 3-1/2-in-thick insulation to go between 2x4s, 6-in.-thick insulation (actual range between 5-1/2 and 6-1/4 in.) to go between 2x6s. (You can compress a 6-in. batt into a 3-1/2-in, space, but you won’t gain much insulation value compared with a 3-1/2-in. batt.) Batts 8, 10 and 12 in. thick are also available for attics and deeper framing members.
• Length. If installing insulation between studs at a standard wall height, buy batts precut in lengths that fit (usually about 93 in.). If the height isn’t standard, buy whatever is readily available, from continuous rolls to standard precut 4-ft. lengths.
• Amount. Measure and multiply to find the number of square feet you need to cover. The packaging for each bag, bundle or roll of insulation lists the square footage it covers.
2. Buy “faced” or “unfaced” depending on your installation method.

Faced batts have a brown kraft or shiny facing paper glued to one side.
This special paper serves as a vapor barrier and has flaps so that you
can staple the batt to studs and joists to keep it in place.
The vapor barrier isn’t necessary if you intend to cover the wall or ceiling with plastic. However, you’ll need the paper facing for stud or joist spaces where unfaced batts might fall out. Faced batts cost about 2 more per sq. ft. The vapor barrier should face the inside of the wall, except in hot coastal regions. If in doubt, call your local building inspector.
3. Select the thermal resistance value (R-11, for example) according to the insulation requirements of your region.
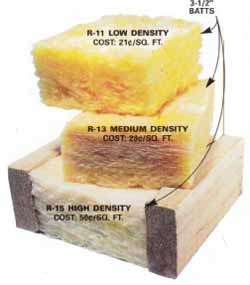
Manufacturers now produce batts with higher fiberglass densities, so you can buy 3-1/2-in-thick batts with R-11, R-13 or R-15 thermal resistance values. The higher the number, the better the insulation. The high-density R-15 batts are best, but they cost more than twice as much as R 11 batts. (They also contain three times as much fiberglass!)
Balance the price with the insulation requirements of your local building codes. If you have to cram more insulation into a minimal wall space, high-density batts might be worth the price. But in most cases, low- or medium- density insulation is adequate.
And where you have plenty of space, like in an attic, buy the least expensive. You can easily achieve adequate thermal resistance by piling it higher.

Because batts are sold in bundles of various sizes, cost comparisons are difficult. The best approach is to compare the cost per square foot for batts of the same thickness. You’ll need a pocket calculator to do the math!

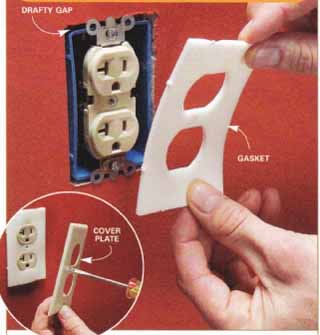
HINT: Stop a draft in 60 seconds! -- In
exterior walls, electrical boxes that hold switches or outlets can let
in a lot of cold air. Worse, they can let warm, moist indoor air into
walls, causing problems like wood rot or peeling exterior paint. One
way to stop the airflow is to seal the gaps around them and the holes
inside them with caulk—messy and time consuming. But there’s a much easier
way: With foam gaskets, all you have to do is unscrew the cover plate,
stick the gasket in place and put the plate back on. A pack of a dozen
gaskets costs about $3 at home centers and hardware stores.
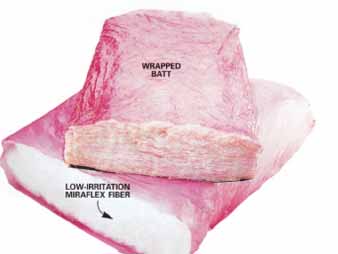
4. Look for wrapped or low-itch batts if the glass fibers cause skin irritation, coughing or any other discomfort.

Fiberglass dust is an irritant, so wear eye protection and a dust mask, as well as gloves and long sleeves and pants, when installing
it (see top image, opposite). Batts wrapped with perforated plastic or
other materials reduce the dust and irritation while still letting moisture
through. One brand, Miraflex (Owens Corning), is virtually dust-free.
Next: Blowing in wall insulation