Whereas weatherstripping is used to seal cracks between moving parts (doors and windows), caulking is for plugging the constant, unmoveable holes. Like weatherstripping, the purpose of caulking is to make your house more wind-resistant and to help re duce the infiltration of air, dirt, noise, moisture, and insect life.
In the natural course of things, houses settle, ground shifts, wood warps, and temperatures fluctuate. These changes cause materials to swell and contract. Often, the junctures where different building materials meet change size and shape; occasionally they separate permanently. Sometimes a material cracks, chips, or starts to disintegrate. Although these sorts of defects may be minor at the outset, if they are not corrected they can cause far greater difficulties than simple infiltration can. But if you catch them while they are still small, you can fix them all with caulking.
Properly applied, caulking is one of the least expensive ways to preserve the structure of your house. Caulking will protect its frame, sheathing, and even the paint job. and , in combination with weatherstripping, caulking may save your home enough energy within the first year or two of application to pay for all the materials you use.
The best time to caulk is on exactly those days you’d rather be doing some thing else: the warm-but-not-hot days of late April, May, early June, late September, and early October. Why? These days are sufficiently warm and dry to make the caulk flow, mold, and set easily, but the weather is not so hot as to give you sunstroke and make you fall off the ladder.
There are a couple of points to keep in mind for any caulking job. Buy the best-grade caulk for your purposes, even if it costs more. Caulk that isn’t durable or that fails to accomplish the required task will send you back to do the job again much sooner than you will want to.
Be careful. Sometimes people doing home repairs forget about obvious hazards. When you’re standing eight feet up on a ladder, don’t lean out too far—always keep your entire torso between the ladder rails.
Do not use caulking near an open flame, and do not smoke while caulking. Most caulking compounds are flammable to some degree, or at least give off noxious odors when in proximity to high heat.
If you must caulk in close quarters, make sure that ventilation is adequate to keep the air fresh. Wash your hands when you have finished working. and always keep these materials out of the reach of children and pets.
• Where to caulk: The illustration below indicates which places around your house to examine for possible caulking. In general, the most likely spots are wherever two different materials come together: where the roof joins the walls; where the walls join the foundation; where any exterior coverings such as masonry and siding meet each other; at corners where separate pieces of the same exterior covering join; where any thing—wires, chimneys, pipes, ducts— passes through the building’s shell; any place the frame of a window or door meets the siding; any place a porch or other addition joins the main body of the house; at cracks or holes in masonry or siding; around window air conditioners; around air and fan vents; at the roof flashing; around window glass; and any place water might collect, such as the junctures of eaves and downspouts.
Indoors, caulking may be used effectively on the walls, ceilings, or floors, where they have become cracked; where two different materials come together (as where a fireplace meets a wall); and around window and door frames. Even though no energy will be saved by caulking around tubs and sinks, and where bathroom walls meet ceilings and floors, these operations are worth doing, and are accomplished in the same fashion, and with the same materials, as other applications discussed in this section.
• Types of caulking: Caulking comes in a variety of forms: the cartridge (which fits into an open-barrel, trigger-operated “gun”); cans; tubes; and coils or rolls. Cartridge caulk, or gun caulk, is generally used for cracks about ⅛- to ¼-inch wide or deep. For narrower or shallower cracks, sealant from a toothpaste-dispenser-type tube is commonly used. Wider or deeper cracks are filled with canned caulking, putty, or other sealant, applied with a flat-bladed knife such as a putty knife. Very wide or deep fissures are sealed with rope or coil caulking. This will work only temporarily, since the rope or coil caulk does not adhere to surfaces; however it can be removed easily when you’re ready to make a real repair on that major hole.
Although caulking comes in a variety of forms, by far the cleanest, easiest, and most practical method of application is the caulking gun and cartridge.

Where to caulk your house (Exterior): Around air-conditioner;
Around faucets; Gutters and down spouts; Chimney flashing; Valley flashing;
Gutters and down spouts
How to Caulk
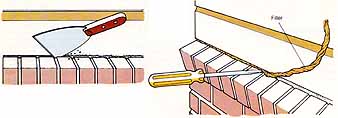
1. Thoroughly clean the crack or joint to be repaired,
using a putty knife to scrape away old caulk, paint, or other accumulations
of debris. If your caulk requires the crack or joint surface to be primed,
apply the primer and allow it to dry. Mask adjacent areas for easier cleanup
later. Do not caulk in cold weather (under 45° F). 2. If
the cracks you intend to fill are larger than about 1/2 inch, fill them
with strips of insulation, sponge rubber, oakum, or other filler before
caulking.
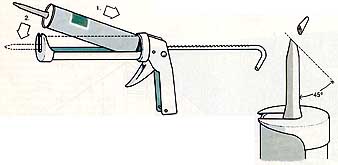
3. Load the caulking gun by pulling the plunger all
the way back, turning it so that the notches face up, away from the trigger.
Drop the cartridge into the open barrel rear end first, turn the plunger
so that the notches face down toward the trigger, and push the plunger or
pull the trigger until the plunger is in position for use. 4.
Cut off the tip of the cartridge nozzle on about a 45° angle, and only as
wide as the space to be filled (usually no more than ½ inch). The closer
to the tip you cut, the finer the bead of caulk will be. Use a long nail
or a piece of stiff wire to break the cartridge seal inside the nozzle.
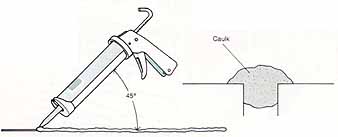
5. Hold the gun at 45° to the surface you are sealing, and maintain a steady pressure on the trigger, forcing the caulk out ahead
of the nozzle in order to push it as far into the crack as possible. Before
you begin, practice drawing a steady bead of caulk. Caulking can be difficult
at first—even after you have stopped pulling the trigger, pressure on the
cartridge continues to release caulk; also, sometimes the caulk will adhere
to itself rather than to the surface, and will pull away from the crack
or joint along with the bead still spilling from the gun. 6. Move
the gun along slowly and steadily, allowing the caulk to overlap both sides
of the crack or joint in order to make a tight seal.

7. When you have finished caulking, loosen the plunger
to stop the pressure on the cartridge, and cover the nozzle securely to
keep whatever caulk remains in it from hardening. If you insert a broad-headed
nail into the nozzle opening before covering it, and wipe off the caulk
that seeps out around it, the nail itself will act as a nozzle cap. Cover
this with metal foil or plastic.

8. Clean excess caulk off your seal and off adjacent
surfaces. All caulk can be finger dressed (smoothed over with the fingers)
after application—some, such as latex, with soapy water; others; such as
butyl rubber, with mineral oil.
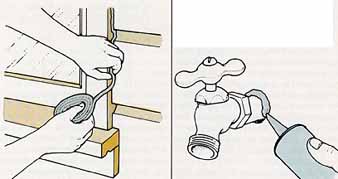
Coil/Rope caulk: Press into place with fingers. Small
Jobs: Small tubes of caulk, used for small re pairs such as the cracks
behind faucets, also have plastic tips that are trimmed at an angle for
proper bead. Apply the caulk as you would apply glue from a similar squeeze
tube.
• Caulking materials: No matter what the brand names, specific sealants, forms, or prices, caulking comes in some basic qualities. This chart identifies the ingredients that make up most caulks to help you choose your caulking material wisely. Before buying any caulking compound, and again before using it, read and follow the instructions on the container.
If you have specific questions about a particular application and can't find the answers here, ask the salesperson or someone who has done caulking before.
Caulking Material |
Cost (approximate, per 11-oz. cartridge) |
Life |
Application |
Remarks |
Oil base |
$1-2 |
1-2 years |
All household surfaces. |
Least expensive, least durable of all caulks. Oil tends to seep out and may stain unprimed surfaces, while drying out caulk itself, leading to shrinking, cracking, and the need for replacement. |
Latex base |
$3 |
3-10 years |
Indoors; outside only if painted, and not where seal moves or is subject to moisture. Only for narrow joints (less than ¼”). |
Because it is water-soluble, should not be used where it will become damp. Insufficiently flexible to withstand frequent expansion and contraction, and should not be used on moveable joints. May disintegrate on concrete or cement. |
Butyl rubber |
$3 |
3-10 years |
Outdoors, especially on metal and stone; good where water may collect such as eaves and downspouts, since it is water-resistant. Only for narrow or moderately narrow joints (less than ½”). |
Needs no paint. May take more than a week to cure. |
Acrylic latex |
$4 |
10 years |
All applications, indoors and out. For joints up to ½” X ½”. |
Durable, fast-curing (about 1 hour), does not stain. Should not be painted. |
Elastomer (synthetic base: silicone, poly-sulfide, or polyurethane) |
$6 |
20 years+ |
All applications, but does not adhere to paint, |
Highly flexible, long-lasting caulk. May be used on large joints. Some require surface priming before application. can't be painted. |
Lead base |
— |
— |
— |
Known to be toxic; illegal in many states. Use is discouraged. |
Next: Insulating Windows