Although doors tend to be larger than windows, they are generally easier to weatherstrip; unlike windows, these simple rectangles lack double sashes, center bars, and their attendant problems. For most doors, you can follow the same instructions as for weatherstrip ping a window.
Whether you use rigid insulation with a gasket, adhesive-backed felt, or any stripping in between, first measure the stripping carefully against the frame. Then fit it onto the frame against the doorstop so that it fits tightly when the door is closed, but not so tightly that the door can’t close. To ensure a proper fit, you may want to first tack the stripping loosely in place and test it by opening and closing the door gently a few times as you work. Then you can drive and set your nails completely.
The exterior door is a major source of infiltration. Its materials don’t over lap; its opening is extremely large; and the weight of the door swinging on its hinges over many years tends to loosen screws in the hinges and cause it to sag, making its edges meet the jambs unevenly. For all these reasons, it’s definitely worth your while to weatherstrip an exterior door. However, these very same reasons present some unique difficulties.

If your door hangs unevenly, you may have to remove it from its hinges and re hang it, or else the seal between the door and the stripping may
not be tight. and if you’re going to all that effort, you may want to do
it in conjunction with installing a door shoe or a gasket threshold, since
to accommodate either of these extremely useful stripping de vices, the
door bottom must be trimmed —which means that the door must come off its
hinges.
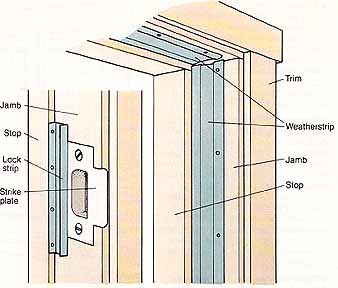
1. Begin with the lock strip, the small piece of stripping provided with most kits. Because this piece is the same height as, and placed behind, the strike plate, it will help guide you in measuring and placing your weatherstripping on the side of the jamb where the door is not hinged.
2. When the lock strip is in place, complete the stripping on the sides and top of the doorjamb, keeping the flanges facing toward the door stop. The door bottom will be stripped in another fashion (see below).
• Door sweeps: Of course, since cold air falls, it is most likely to enter your home through the lowest available cracks and crannies. Virtually any house is subject to this kind of infiltration at the bottoms of doors leading to the outside.
There are various ways to plug these door-bottom cracks, which entail either lowering the bottom of the door, or raising the top of the threshold over which the door passes.
The most common and effective kinds of weatherstripping you can add to the bottoms of your own doors are the door sweep, the door shoe, and the gasket threshold.
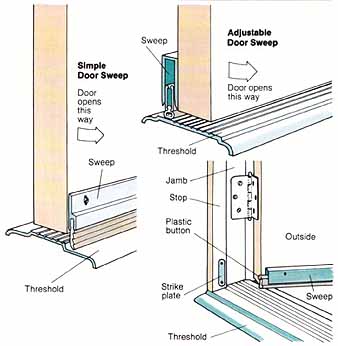
The simplest door-bottom weather stripping, as we’ve indicated, is a door sweep that you can easily attach while the door is still on its hinges. Just cut the sweep to size and screw it to the base of the door in a position that allows the door to open and close with out difficulty.
Adjustable door sweeps are designed to raise up when you open the door inward (over your carpeting, for example), and lower back down when you close the door, creating a tight seal.

Simple Door Sweep: Door opens this way; Adjustable Door
Sweep: Strike plate, Plastic button, Threshold
This kind of adjustable sweep is surface mounted to the outside face of your door. To attach it, close your door and measure the width between the stops. Cut the sweep to this size with a hacksaw. Hold the moveable part of the sweep in the up” position while you cut and be sure to cut the end without the plastic button. Screw the sweep to the door while the door is closed and while holding the sweep in the down” position so the rubber bottom is pressed snugly against the threshold. The end with the plastic button (which protrudes when the sweep is in the up” position) must be on the hinge side of the door. Note where the plastic button hits the stop. Open the door and nail the little strike plate (which comes with the sweep) in position at this spot.
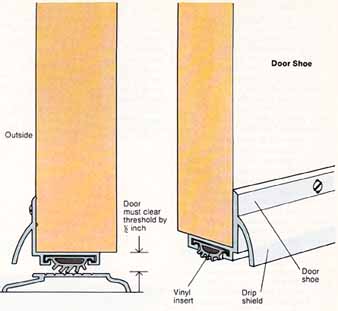
• Door shoe: The door shoe is similar to an adjustable door sweep, but it doesn’t “sweep.” Instead, the vinyl ridges of its tubular gasket make a tight seal with the door sill or threshold.
Attach a door shoe as you would an adjustable door sweep, gauging its fit as you work and trimming it with a hack saw if necessary. Remove the curved vinyl ridge from the shoe, slide the shoe over the door bottom, screw it on securely, and replace the vinyl so that it makes a tight seal with your threshold.

Door Shoe: Door must clear threshold by ½-inch; Vinyl insert,
Drip shield,
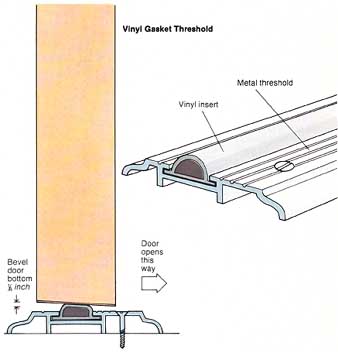
• Vinyl gasket threshold: If you intend to attach a door shoe, your threshold must be in fairly good condition, and preferably made of wood, so that the ridges of the gasket can grasp and make a tight seal. If you have no threshold, or if yours is worn enough to be re placed, you might consider a gasket threshold, as well as door-bottom weather-stripping. The disadvantage of a gasket threshold is that it gets walked on and eventually wears out.
To attach any threshold, it is often necessary to remove the door from its hinges in order to gain complete access to the threshold area. You may also have to trim the bottom of the door to accommodate the added height of the threshold. If so, first be sure to measure your doorsill, door bottom, and new threshold carefully, so that you know exactly how much of which part you must trim. If you trim too much from your door bottom, you will defeat the purpose of weatherstripping it; if you do not trim enough, your new gasket will wear out very quickly.
If you must trim the door, do it before you trim the threshold. Then cut the threshold to the proper width with a hacksaw, and file it smooth. Center your threshold, and screw it into place.
To achieve a tight seal, you may have to remove the door in any case, and bevel its base about 1/8-inch against the vinyl. Do not bevel in the wrong direction, or you may find it impossible to open your door.

Vinyl Gasket Threshold: Metal threshold, Bevel door bottom
1/8-inch
Next: Caulking