Once you know where to add insulation to your house and how much to add, you can begin to actually do it. The following step-by-step instructions are for adding blanket insulation, with a vapor barrier attached, to an unfinished attic floor. This procedure will show you what’s involved in most insulation installations. We chose an unfinished attic because that’s the very first place to insulate a house that’s starting from ground zero—no insulation at all.
First, make sure to repair all leaks in the roof—there’s no point inviting water damage to your new insulation.
To begin the insulation installation, take the following materials with you to the attic.
1. Insulation;
2. One or more protected, movable hanging lights;
3. Some wide boards to lay across the ceiling joists so you can kneel and stand while working;
4. A pair of heavy-duty scissors, and a matt knife, linoleum knife, long serrated knife, or saw, to cut the insulation;
5. A heavy-duty staple gun, with ample staples, and a hammer and tacks;
6. Sturdy work gloves;
7. A respirator and goggles (not mandatory but highly recommended), and a long-sleeved shirt to wear—you want to minimize direct skin contact with the insulating materials.
When you walk on your temporary board-floor, keep your weight over the ceiling joists rather than over the empty spaces, in case the boards aren’t as strong as you thought.
Do not unwrap the insulation until you are ready to begin laying it in place.
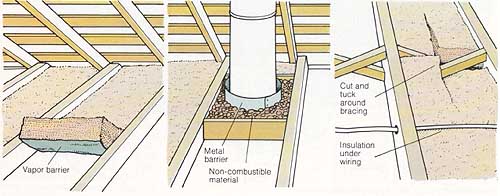
1. Beginning at the eaves to one side of the attic,
place the blankets between the joists with the vapor barrier down, toward
the living space you want to insulate. Work toward the center, pressing
the insulation into the joists firmly but gently so that you don’t compress
the material. 2. Provide a nonflammable buffer between
the insulation and any chimneys. Wrap the chimney with a metal barrier,
from the bottom of the floor to 2 inches above the joists, and then surround
it with noncombustible material. 3. Place insulation under
wiring. (If you have knob and tube wiring, be sure to cut the insulation
to fit down next to the wiring—not over or under it. Also, keep aluminum
vapor barriers away from the wiring so you won’t cause short circuits). 4. Separate
the layers of insulation to surround cross braces. A short, straight cut
up the center of the batt or blanket will allow you to tuck the insulation
tightly around the joist braces or pipes.
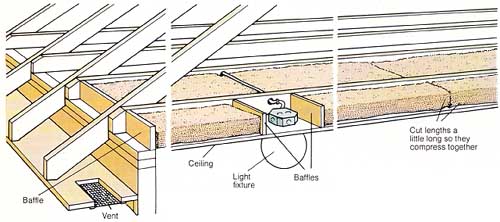
5. Do not block vents or ducts. Place a baffle between
the vent or duct and the insulation. 6. Keep insulation at least 3 inches
away from any lighting fixture or heating vent. Not only is this a requirement
of the National Electrical Code, but it is also good sense. Light fixtures
are electric heaters. If you insulate a 100 watt fixture, heat can build
up to the point of starting wood to smoulder. This is doubly dangerous if
the insulation itself is flammable. You can install a piece of sheet metal
or a baffle around any fixture, outlet, or vent as a means of ensuring that
the insulation stays out of the way. 7. When you near the
center of the attic, start over again from the eaves on the other side.
Compress the ends of the insulation together where they meet in the center
of the room to ensure a tight fit.
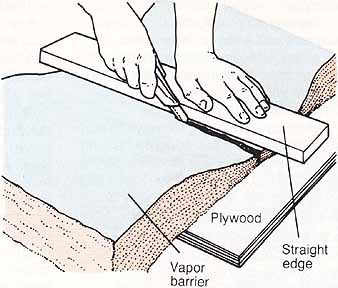
Cutting Blankets or Batts: If you have to cut a batt
or blanket, place it on a wide piece of plywood or other hard working-surface.
Using one of the temporary flooring boards to compress the insulation at
the cutting line and also as a straight-edge for cutting, cut the insulation
with your matt knife. If the matt knife is not long enough any strong, long,
sharp, serrated kitchen knife or scissors will do.
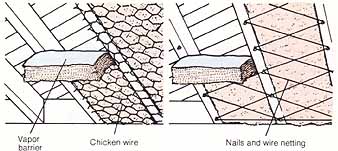
Insulating Under Floors: When you’re installing insulation
under floors to protect the living space above, make sure the vapor barrier
faces up, toward the space you want to insulate. You can hold the insulation
in place with chicken wire or a home-made system of wire netting, nailed
to the joists. Nails and wire netting.
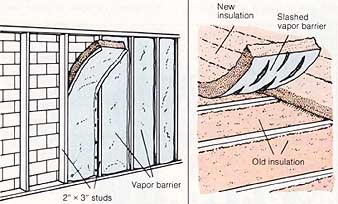
(left) insulating an Unfinished Wall: When adding
insulation to an unfinished wall in an area such as a basement or building
foundation, you may first have to build in a series of 1 by 3 inch studs.
Next, add batts or rigid board insulation. If the insulation has no vapor
barrier of its own, cover the insulated wall with heavy- duty foil or 2
mil polyethylene sheeting, stapling the vapor barrier into the studs, and repair any gashes with waterproof insulating tape. If your insulation is
flammable, make sure to use a fire- retardant wallboard when finishing off
the wall. (right) Adding to insulation: When adding to
preexisting insulation, it is important to keep moisture from accumulating
within and between the separate layers. If possible, use batts or blankets
without a vapor barrier for your addition. If your new insulation does have
a vapor barrier, slash the foil liberally. Then set the insulation in place
perpendicular to the old insulation, and with the slashed foil facing it.

Insulating with Loose Fill: When installing loose
fill, first put down a vapor barrier. Then baffle off all fixtures, vents, and other necessary openings. Pour the insulation between the joists, making
sure it gets into all the small crevices in corners and around bracings.
Spread and fluff the fill with a rake. If it is deep enough, you can level
it off with the edge of a board.
Next: Landscaping for Energy Conservation