Insulating is the most important of all energy-conserving measures, because it is with the use of insulation that we can have the greatest impact on our energy expenditure: for the average house we can reduce the amount of heat lost through the fabric of the house by at least half. If we also undertake all the other energy-conserving measures in this section, then on average the annual CO emissions resulting from domestic energy use can be cut to a quarter of what they are at present. However, this can only be achieved by taking the measures suggested in each section seriously— this is particularly true of this insulation section. The problems that arise in installing adequate amounts of insulation in existing buildings vary enormously. The question is no longer whether to insulate or even how much to insulate: we simply need to find the most effective way of insulating each element of the home to the highest standard that can be afforded. The purpose of this section is to give readers the background necessary to approach this task with confidence.
There are many positive benefits to come from insulating your home, as well as a few pitfalls to watch out for. Besides the environmental benefit of reduced CO emissions, there will be increased comfort and a more even temperature around your home. Also, your heating system can be scaled down and radiators can be more freely placed anywhere in the room and , in some cases, dispensed with altogether. Your house may also “feel” quieter.
The main pitfall of insulating is that of creating cold bridges, places where the original construction remains uninsulated and cold while the newly insulated surroundings became warm. These conditions can some times result in condensation. However, there are solutions to most problems, and that is just as true for cold bridging as for anything else.
PRINCIPLES OF INSULATION
There are very few principles to understand with insulation, and one concept in particular that is worth bearing in mind:
TOTAL HEAT PRODUCED IN A BUILDING = TOTAL HEAT LOST TO THE OUTSIDE
All that insulation does is to slow down the rate of heat loss, so that less heat required to maintain the same internal temperature. When we insulate our houses to a high standard, we not only conserve the heat from our heating appliances, but also allow all the other sources of heat, such as from cooking and lighting, to play a more important role in keeping our houses warm.
The Value of External Insulation
If we were able to throw a thick overcoat around a house, it would be a most effective way of keeping it warm. This fanciful notion, though, is closer to the truth than you might think. Theoretically, the best place for insulation is on the exterior of a building: it has the effect of keeping the whole fabric of the building warm and dry and raising the thermal capacity of the building, so that uneven fluctuations of temperature are reduced. Of course, it is necessary to provide a weatherproofing layer to keep out the rain, but generally it is worth bearing this principle in mind and putting it into practice wherever there is the opportunity.
CONDENSATION
Condensation occurs when warm air meets a cold surface: the moisture in the air cools and condenses on the surface in tiny droplets of water. Most commonly, condensation occurs on the inside of single-glazed windows, but it can also occur on walls and within the fabric of buildings.
Condensation is a problem that has a number of causes:
• It can be an indication of the internal temperature being too low for the internal humidity level. This can happen in an unheated room that is not being used. Insulating the whole building helps to solve this problem by evening out the temperatures internally, making it easier to keep the extremities of the house warm.
• It can also be an indication that humidity levels are too high and that water vapor produced elsewhere in the home is not being vented. The simplest way of avoiding this problem is to use mechanical extract fans connected to a humidistat, in both the bathroom and the kitchen. The humidistat will switch on when humidity levels exceed a predetermined limit. It is also a good idea to keep closed the door of a room where there is a source of water vapor (see the ventilation section under DRAFT-PROOFING).
• Finally, condensation in an insulated house can be an indication of cold bridging: where a non-insulated part of the construction protrudes through the well-insulated part and causes a surface in the interior to remain at a much lower temperature than its surroundings. If the humidity level is high enough, condensation will form on this cold surface, possibly causing problems of deterioration. Cold bridging occurs most commonly at windows and where brick partition walls meet internally insulated external walls.
Cold Bridging at Windows
With double-glazed windows, the problem of cold bridging usually only arises with metal windows. Metal, being a very good conductor of heat (and thus a poor insulator), conducts heat much more quickly to the outside than either wood or vinyl frames. If metal (either aluminum or steel) is chosen as a material for the window frames, then there needs to be what is called a thermal break incorporated into the frame. This is simply an insulating material sandwiched into the construction. Alternatively, wooden windows can be used, which is the more ecological solution anyway.
Cold Bridging at Partition Wall Junctions
This occurs with internally insulated external walls: any partition making a junction with the insulated wall bridges the insulation and loses heat much more rapidly at this point, producing a cold internal face adjacent to the insulated wall. This problem can be partly overcome by returning the insulation on the section of partition adjacent to the corner. If it is a plaster wall, the plaster can be removed at this point and replaced with insulation.
To sum up: although ventilation and heating play a role in preventing condensation, good insulation correctly installed provides the most effective and energy-efficient method of combating this problem.
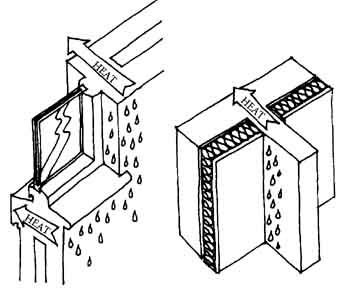
(L) Cold bridge at window reveal; (R) Cold bridge
at partition
INSULATING YOUR ROOF
Your attic is either lined or open such that you can see the whole structure.
The latter style is still the most common, although more and more people are undertaking attic conversions.
Unlined Attics
This involves insulating the ceilings of the uppermost floor from above. If your attic space is not used except for water storage tanks and services, then you have a simple job to insulate between the joists. Most people in this situation already have some form of attic insulation, but if you are installing from scratch, lay down 6 to 8 inches of insulation depending on what you have space for. If you have less than 4 inches of insulation, it is worth topping it up; otherwise work on other areas of the house first and come back later when you can afford to. The main principle to follow here is to cover over any pipes or tanks that contain water, as the air temperature above the insulation can go below freezing.
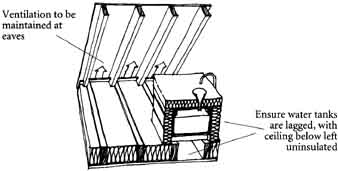
Attic insulation at ceiling level: Ventilation
to be maintained at eaves; Ensure water tanks are lagged, with ceiling
below left uninsulated
Lived-In or Lined Attic Space
If your attic space is habitable, whether it is heated or not, it is advisable to improve its insulation. In this case, we are concerned with insulating the roof rafters and not the joists. There are different ways of doing this, depending on the construction. Insulation can be fitted:
• Below the rafters
• Between the rafters
• Above the rafters, or
• Some combination of the above
1. Below the Rafters
If the rafters are open and unplastered, it is a simple matter to place sandwich insulation boards on the inside and fix drywall underneath. This method of insulation reduces the room height and may inhibit the thickness of insulation possible.
You may want to add insulation between the rafters as well, to increase the thickness of insulation. In this case, it is necessary to leave a gap of 2 inches between the insulation and the roofing felt, to allow the rafters to breathe. This may well determine the thickness of the insulation possible. There is an advantage if at least one of the insulation boards is covered with a layer of aluminum foil to add to the effectiveness of the insulation. It is also necessary to place a vapor-proof barrier between the insulation board and the drywall. If your attic space is already lined and you do not want to go to the trouble of removing it (and headroom is not critical), the insulation could be placed directly on the underside of the lining.
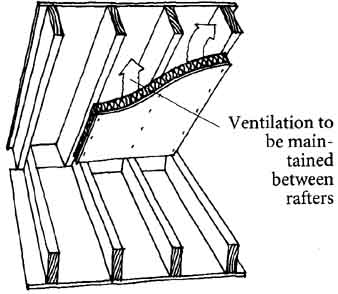
Attic insulation below rafters: Ventilation to
be maintained between rafters.
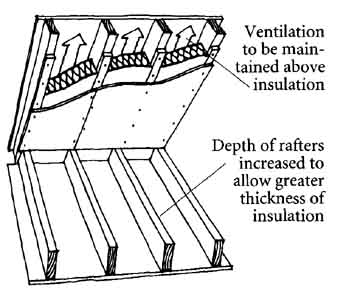
Attic insulation between rafters
2. Between the Rafters
This is the most usual place to install the insulation: the main problem here is often that the rafters are not deep enough to accommodate a reasonable thickness of insulation. However, with this method it is possible to increase the depth of the rafters by adding a lath underneath each of them to what ever thickness is necessary to allow the 2-inch gap between the insulation board and the roofing felt. For example, if you have a rafter with a 3-inch depth and you want to install 2 inches of insulation board, you could attach a lath of about 1 inch underneath. The same would apply with the foil and the vapor-proof barrier.
3. Above the Rafters
This particular option is worthwhile only if you are having your roof re shingled. It is also the most complicated method as because it almost certainly involves the redesign of the eaves to allow for the added thickness of insulation. The basic procedure involves stripping the roof of tiles and tile laths, laying a rigid insulation board on top of the rafters (with a vapor-proof barrier in between), and then laying a building board or roofing laths on top of this to attach the tiles or slates. Before undertaking such a job it may be necessary to employ an architect or someone who can competently produce details of how the construction at the eaves can be altered. This type of insulation enhancement is likely to become much more common in the future and , with routine construction details being developed for the eaves, it will allow almost any thickness of insulation to be installed on the roof.
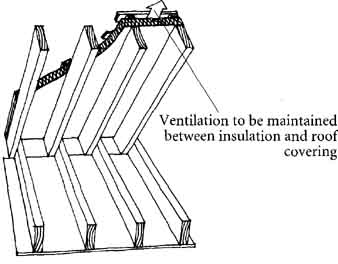
Attic insulation above rafters: Ventilation to
be maintained between insulation and roof covering
WALL INSULATION
Most external walls in Britain are of brick or masonry construction. The insulation of other types of construction can broadly follow either the same pattern as that for the roof construction, which has just been described, or the construction described below.
There are three possibilities for the insulation of external walls:
• Insulating the internal cavity
• Insulating externally (the most effective form of insulation)
• Insulating internally (the most involved form of insulation)
Cavity Wall Insulation
More heat is lost through the walls than through any other part of the house. Yet only 20% of homes with cavity walls have cavity wall insulation. This is a simple measure to under take, with very little internal or external disruption. It is advisable to have the insulation installed by a professional contractor; it usually takes less than a day for the insulating material to be injected into the walls from the outside. Various insulating materials can be injected into the walls, including mineral wool, an inorganic fibrous product made by steaming and cooling molten silicate material.

Top to bottom: External insulation with rendered
(stucco or cement) finish; Cavity filled with blown insulation; Internal
dry-lining
External Insulation
As was pointed out earlier, the most effective place to install insulation is on the exterior of the house. It keeps the whole fabric warm and dry, and the contained walls provide the thermal capacity that can even out extremes of hot and cold. However, installing external insulation is also a professional job and can prove expensive. The biggest design problem occurs at the windows; here again, it is important to have some design advice and not necessarily leave it to the contractors who are installing the insulation. This solution is particularly appropriate if your house’s exterior is rendered (that is, has a stucco or cement finish applied over masonry walls), but it may also be a good option if the general quality of the outside is not of a high standard.
Internal Insulation
There are many situations where it may not be appropriate to place the insulation on the outside of a building, such as in a conservation area or where the existing exterior brickwork or stonework is particularly attractive. In these cases (assuming there are also no cavities between the walls) the insulation needs to be installed on the inside of the external walls.
This can be done in one of two ways:
• By attaching rigid board insulation to the existing interior wall, then covering it with drywall (some drywall has insulation already attached).
• By building a new stud wall against the inside face of the masonry and placing fiberglass batts (mineral fibers glued together in a semi-rigid quilt) between the studs, then covering the studs and insulation with drywall. Architraves around doors and windows need to be removed and replaced after relining.
If you decide to undertake the internal insulating of your external walls, you can choose to install the insulation all at once (the cheapest way, if you are using a contractor) or room-by-room as you redecorate.
WINDOW INSULATION
Once you have insulated the roof space and walls it becomes essential to double- or even triple-glaze your windows, as they will now be the main cause of heat loss. If you are insulating your walls, you may well want to consider the windows at the same time.
Principles of Double-Glazing
The main principle behind standard double-glazing is that of trapping an insulating layer of air or other insulating gas between two panes of glass. The distance between the two panes is important because, if the two panes are too close, there is increased conduction of heat across the gap, and if they are too far apart there are convection currents set up between the two panes of glass, which will decrease the insulating effectiveness. The ideal gap is about 1/2 inch. Increasing this gap does not significantly improve its insulating properties, though it does improve the sound-proofing. There are three other ways of increasing the effectiveness of double-glazing:
1. Improving the Greenhouse Properties of the Glass
The normal properties of clear glass include its transparency to sunlight (the visible spectrum) and its ability to reflect to the longer infrared wave lengths of heat from inside. This reflective quality, which keeps the heat in, can be further enhanced by the use of special coatings on inner panes.
2. Improving the Insulating Properties of the Frame
The insulating properties of the frame itself are important and can help increase the overall insulating effectiveness and prevent condensation arising from thermal bridging. Solid metal frames conduct heat quickly and should be avoided unless they contain a thermal break. Vinyl frames have the advantage of low maintenance in the short run, but their long-term durability is unknown.
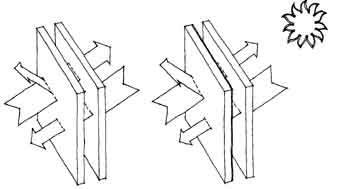
(left) Conventional double-glazing; (right) Low-E
(low-emissivity) double-glazing increases the proportion of heat reflected
back into the room
Wooden frames provide the best all-round ecological solution if the timber is well seasoned in the first place and is kept protected.
3. Improving the Insulating Properties of the Gap between Panes The insulating layer between the two panes of glass can be improved either by creating a vacuum between the two layers of glass or by substituting a light gas such as argon or krypton for the existing air. Producing a vacuum is an ideal way of eliminating the conduction of heat between the two panes of glass. In practice, though, this is difficult to attain and is only possible in factory-sealed glass envelopes that are expensive and limited in size. However, factory-sealed units containing argon or krypton are becoming much more common.
The Benefits of Double-Glazing
There are several benefits of double-glazing besides saving energy:
• The amount of condensation on the panes will be greatly reduced or eliminated.
• Noise from outside will also be reduced, especially if effective draft- proofing is used to seal out airborne sound.
• There will also be a significant decrease in downdrafts from the windows, which will allow radiators to be positioned more freely.
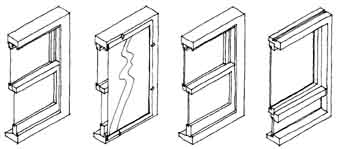
Single-glazing; Secondary glazing; New double-glazing
to original frames; Double-glazing in replacement windows
Types of Double-Glazing
There are three ways to add double-glazing to existing housing:
• Secondary glazing. This is a second pane of glass or plastic, either fixed or openable, that is installed on the inside of the existing window. Increasingly these systems have come to look like a second window, including a second frame.
• Sealed units. These consist of two panes of glass which are sealed in a workshop or factory with the use of a separating edging strip. These units can then be used to replace the panes of glass in the sashes or fixed windows. Thicknesses of these vary from about 1/2 inch to 1 inch, giving a choice of thinner units to fit narrower sash or mullion widths.
• Replacement windows. These are whole windows that replace the existing window, frame and all, incorporating sealed units.
The three most important considerations in choice of window are:
• The state of the existing windows and whether double-glazed units can be incorporated into the existing sashes.
• The aesthetic or architectural quality of the existing windows.
• Cost.
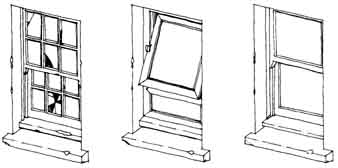
Original window in timber with small-paned sliding
sashes; New window in unsympathetic design and materials; New window
sympathetic in design and materials to original.
The State and Aesthetic Quality of the Existing Windows
Your windows may be in a poor state of repair, being partly rotten (if wooden), or corroded (if metal). The decision whether to replace them completely or repair them can be a difficult one, but ultimately the expenditure and savings in terms of energy, money, time, and materials need to be balanced up. Although almost any wooden window can be r (and this should be the preferred option), it is sometimes the most sensible step to start again, if you can considerably increase the insulating value of the window by doing so. What will often be the deciding factor is the aesthetic quality of the existing windows compared with that of the replacement units.
Other Ways to Improve Insulating Properties of Windows
There are many ways that windows can be insulated at night, or when a particular room is not being used in winter:
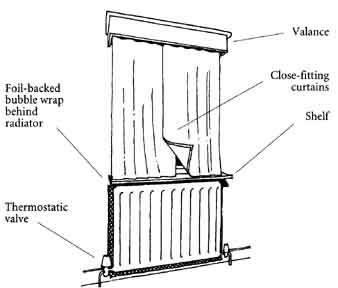
Foil-backed bubble wrap behind radiator; Close-fitting
curtains; Shelf
• Curtains. There are many ways that curtains can be made more effective. You can use thicker material, or even a quilted material with an insulating filling. You can add a reflective covering to reflect heat back into the room, and you can make sure that escaping downdrafts from between the window and the curtains are reduced by:
—using a valance that fits well around the top of the curtain;
—ensuring that the sides of the curtain connect as well as possible to the sides of the frame and to themselves in the middle;
—providing a shelf or sill for the seam of the curtains to lie on; and —ensuring that if a radiator is fitted below the window, the warm convection current from the radiator does not go up behind the curtain (either tuck the curtain behind the radiator or fit a shelf).
• Blinds can be made to fit in slides at the side of windows, so they are easier to seal than curtains. The bottom of the blind can simply rest on the sill and a simple flap can contain the top. Blinds, being more rigid than curtains, can more easily be treated with special coatings or incorporate a thin insulating film.
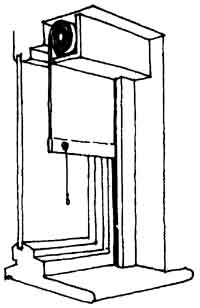
Insulated blind running in channels
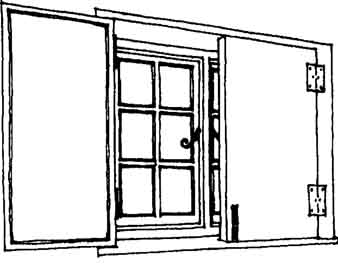
Close-fitting shutters
• Shutters can be designed to be insulated and tight-fitting, and hinged so that they fold back and to the side when not in use. These will almost certainly need to be specially made.
• Pop-in insulation panels. These are a cheap and effective solution. A rigid sheet of insulation, preferably one that is a sandwich of aluminum foil and card (in order to protect the foil), is cut to size and fitted to exactly the inside of the frame, and the side facing the room is covered with fabric. The main disadvantage is the extra work required to place them each time you wish to insulate the window. One solution is to have them hinged at the top so they can swing up out of the way and be attached to the ceiling by a hook.
• External security and insulation blinds. These are made first and foremost for security. However, they have the advantage that they are placed on the outside of the house and so do not interfere with the internal arrangements of rooms. They would be worth considering if you are having external insulation fitted, if you have a real security problem in your neighborhood, or if the facade of your house has little aesthetic significance.
GROUND FLOOR INSULATION
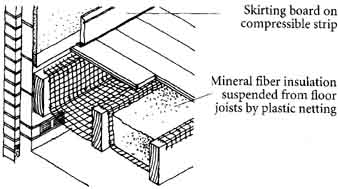
Insulation of suspended ground floor (1): Skirting
board on compressible strip; Mineral fiber insulation suspended from
floor joists by plastic netting.
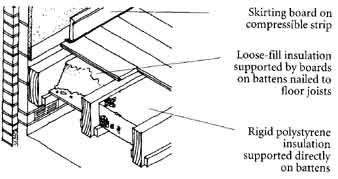
Insulation of suspended ground floor (2): Skirting
board on compressible strip; Loose-fill insulation supported by boards
on battens nailed to floor joists; Rigid polystyrene insulation supported
directly on battens
If you have suspended wooden floors, it is relatively easy to insulate them by laying either mineral fiber, rigid, or loose-fill insulation between the floor joists. This is sometimes possible to carry out from below (if there is adequate height in the crawlspace), or from above by removing the floorboards. If the floor is solid it will be necessary to either take up and replace the whole floor or raise the floor level by adding a layer of insulation on top of the existing floor, then covering it with tongue-and-groove boards or chipboard.
BASEMENT INSULATION
Basement walls can be insulated on the inside with either rigid boards or fiberglass batts, using the methods described above. Another option is to attach moisture-resistant insulation to the outside of the wall below ground level. This can be done by digging out and fixing the insulation to the external wall three feet below ground level. At the same time it is possible to water proof the outside of this wall and carry out any damp-proof course work that may be necessary. It is worth remembering that, below the surface, the earth is a good insulator, so the levels of insulation required are consider ably less than for above ground.
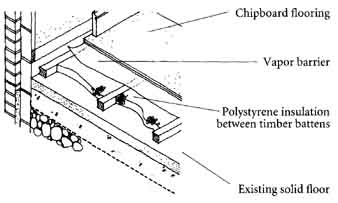
Insulation of solid ground floor (raising its
level): Polystyrene insulation; between timber battens; Existing solid
floor; Chipboard flooring Vapor barrier
PRIORITIES FOR ACTION
Upgrading the insulation of your home is undoubtedly the most involved and costly of all the measures in this guide. For most people it is not feasible to carry it out all at once. The important thing is to undertake the work step by step, obtaining the best advice you can beforehand.
• If your roof space has not been converted or insulated, undertake this first using 6 to 8 inches of cellulose, glass fiber, or mineral wool. If your existing insulation is less than 4 inches thick, top it up with an extra 4 inches. If your attic is converted, see above.
• Insulating the walls of your house is the next most important measure to undertake. If you have an uninsulated cavity, have a reputable contractor carry this out. If your walls are solid, look at the wall insulation subsection above to help you decide which is your next option to choose from. If you are applying external insulation, you will almost certainly require the services of a specialized contractor. If you are applying insulation internally, try and undertake this work when you are having the house decorated.
• Double-glaze your windows at the same time as you insulate your walls if possible, and use low-emissivity (low-E) glass to make it as effective as triple-glazing (refer to the section on double-glazing).
• Ground floor: if you have a suspended wooden floor, insulate between the joists either from underneath or from above by taking up and then replacing the floorboards. Take this opportunity to properly draft-proof the floor and ensure that your underfloor space has through ventilation.
• Basement or cellar: concentrate on insulating any parts of the external walls that are above ground, either internally or externally. Damp-proof and improve ventilation before doing any extensive insulation work.
Next: Space Heating