Draft-proofing is one of the first energy-conserving measures to under take, if you have not already done so. It is one of the easiest, cheapest, and most effective improvements of all. If, however, it is spring or summer, concentrate on improving your ventilation strategy first. Ventilation needs to be attended to either before or in conjunction with draft- proofing, since it is necessary to ensure that you have adequate, controlled ventilation where you need it.
Causes of pressure differences
This section takes a more in-depth look at the causes of drafts than is usual, in order for you to have a better idea what you may be up against. The average home has a total of about two square feet of air leaks, once you add up all the gaps around doors, windows, service entry points, and the possible hidden airways up through the middle of your house that you may not know about. These unwanted drafts and leaks are known collectively as infiltration, and they will vary according to many factors, such as how well you secure your windows or doors; hut at whatever level they occur they are essentially continuous every winter, day and night. Just think of how concerned you would be about a leaking tap—and yet heat leaks are far more costly. Lack of draft-proofing can account for anything from 10% to 30% of your total energy expenditure. (In the UK, if one was to add up the national total, it would amount to thousands of tons of CO2 emissions, millions of pounds all spent unnecessarily in heating the sky!)
In winter the benefits of draft-proofing are immediate. You no longer have uncomfortably cold drafts from the outside, and the house immediately feels warmer. You feel freer to move around and even use rooms where you would never usually sit because of drafts. You will find that, if you use the right methods, your windows will stop rattling, and you may also find your home quieter and less dusty than before.
THE DRIVING FORCES OF AIR FLOW
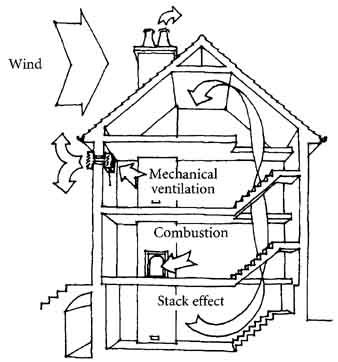
Air will only pass from the outside to the inside, or from the inside to the outside, of a building if there is both a passage for it to pass through and a pressure difference between the two sides. There are four main causes of pressure differences:
• Wind
• The “stack effect”
• Combustion
• Mechanical extract fans
Wind
Wind can create pressure and suction on different parts of the house: these pressures and suctions depend on both the wind speed and the configuration of the buildings, trees, and other objects around them. The higher the wind speed, the greater the pressure differences.
The Stack Effect
The “stack effect” occurs because warmer air is lighter than colder air. Thus in winter and at night, whenever there is a big temperature difference between the inside and the outside, there is higher pressure at the top of the house, forcing air out, and a correspondingly lower pressure at the bottom, sucking air in. These pressure differences are increased still further with each increase in the number of stories. Research has shown that we can make the greatest difference by concentrating our attention on our basements and attics.
Combustion
Combustion in heating is another of the forces that can contribute to low pressure inside the house. The worst problems occur with open hearth fires, or with gas fires or wood-burning stoves fitted to existing fireplaces. In these cases the flue acts to produce a powerful suction that draws air up the chimney—precisely what the chimney was designed to do in the first place!
Ventilating Fans
Ventilating fans, particularly those expelling air from kitchens and bath rooms, are another cause of low pressure. These fans need to be balanced with incoming air, and it is worth planning how this can be done in the most controlled way. There are two further points relating to air flow which are useful to bear in mind:
• Air flow will always take the path of least resistance. The greater the size of the opening, the more air will pass through. This only highlights the importance of ensuring that the largest voids are attended to first and that we discover where they are. Especially in older houses, air flow can occur through vertical channels up through the house interior. This is particularly true of wood framed structures, but it can also occur in internal stud partitioning that connects top and bottom with the floor cavities. The same thing can apply to staircases and vertical service runs that are boxed in and allow large volumes of air to flow from floor to ceiling.
Paths of least resistance
• Incoming cold air drafts are balanced by outgoing warn: air leaks.
This is another obvious fact that we are often not aware of— simply because we don’t feel outgoing warm air leaks as we do incoming cold drafts. In two- or three-story buildings drafts are often noticeable at the ground-floor level, but these are not so apparent in the upper stories or attic unless it is windy. After all, most of us never go outside and climb up a ladder to the second- floor windows on a cold day to check for hot air leaks!
ASSESSING THE EXTENT OF INFILTRATION
You probably have a very good idea as to how drafty your house is. When there’s a storm, do the lampshades wave in the wind? How easy it is to find and fix the leaks depends to a large extent on the type of construction. If yours is a standard brick-built house with plaster-covered brick partition (internal) walls, then your problem is probably confined largely to the openings in the basic structure: the windows, doors, and ground floors. However, if your house is of timber construction or built with a composite material, there are likely to be more passageways for the air to find its way about.
CARRYING OUT DRAFT-PROOFING
There are many books which cover the materials and techniques of draft- proofing well. Here are some practical suggestions of what to look out for in different parts of the house:
• Attic or roof space: look for any passageways leading up through internal partitions and surrounding services. Properly seal the door or hatch leading to the attic.
• Ground floor/basement: there should be adequate ventilation under the floorboards and cross-ventilation in any basement, to keep these spaces dry. The ventilation spaces should, however, be sealed off, similar to the treatment of the attic space above. The floors and skirting boards should all be draft-proofed along with any door leading to a basement.
• Windows and doors: start with doors, as these are likely to prove the worst offenders. The most complex draft-proofing occurs with a sliding sash window: an illustration showing one way of draft-proofing such a window is shown below.
• Fireplaces and chimneys: seal fireplaces, but also consider installing a ventilator here as a means of introducing controlled ventilation. Chimneys should also be topped with ventilated caps, ensuring that the inside of the chimney remains dry.
• Entryways: in houses where there is the possibility of wind blowing through when both front and back doors are open, construct an enclosed entryway to contain drafts or install automatic door closers.
At the same time as draft-proofing, you need to consider an overall approach to controlled ventilation.
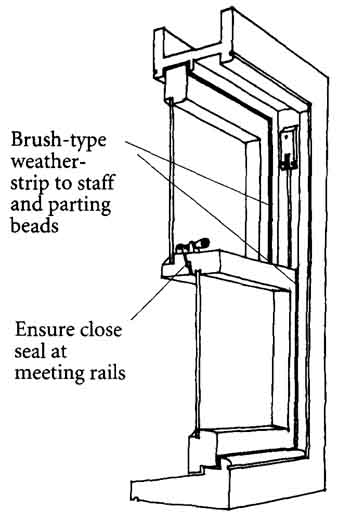
Sash window weather-stripping: Brush-type weather
strip to staff and parting beads; Ensure close seal at meeting rails.
VENTILATION
If we sealed our home completely, we would only get fresh air inside when we opened a door or window. We need ventilation to exhaust unwanted smells, water vapor, and pollution and replace them with fresh air, but we also need to control ventilation so that we can turn it on and off as we need it, and direct it where it is necessary. In this way we can prevent the waste of heat in the same way that water is saved by fixing dripping taps. We then only lose the heat in air allowed to escape for ventilation purposes.
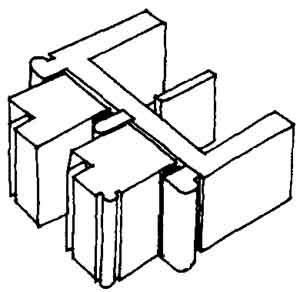
Brush-type weather-strips as shown
Conventional wisdom has established that an average-sized room requires at least one air change per hour when occupied. However, this figure varies and depends on such factors as the number of occupants and the number and nature of the sources of pollution. Traditionally, ventilation was achieved with the use of air bricks and infiltration; however, as our energy conservation measures become more sophisticated, we need to develop a correspondingly more sophisticated ventilation strategy. Before listing the possible measures in a strategy, we shall look at ventilation for combustion and heat exchangers.
Permanent Ventilation for Combustion
Safety codes require that heating appliances which make use of air from inside a room have a permanent ventilator. The danger is that the fuel does not burn efficiently without sufficient oxygen; if toxic products of combustion are not exhausted, they can build up inside a room and possibly prove fatal. In old houses the original ventilators are often papered over, and it is obviously important that either they are unblocked or some alternative route is found for the incoming combustion air. One way of providing this alter native route is via a purpose-built duct delivering air directly to the appliance. Many modern appliances overcome this problem by having a balanced flue, which draws air from the outside and expels it through the same fitting.
Heat Exchangers
Is there any way we can save the heat lost through controlled ventilation? Heat exchangers are designed to do just this. They are a relatively new method of recovering the heat from warm air before it is exhausted to the outside, and are being used increasingly as part of an overall strategy for ventilation and energy conservation. The principle is simple: the outgoing air is extracted through a matrix of hollow tubes and fins and warms the incoming air contained within them. In larger systems, warm air is collected via ducts from various places around the house, such as bathrooms and kitchens, and the warmed fresh air is then delivered to the living rooms. The heat exchanger can be placed anywhere in the house, but the roof space is the usual location. Expert advice is essential if you are thinking of installing a heat exchanger.
Your Ventilation Strategy
Once you have identified individual problems in each room of the house, such as a heater requiring combustion ventilation or a room with too much humidity, it is necessary to draw up a ventilation strategy. Perhaps the most important decision you should make at the very beginning is whether to install a heat exchanger with ducts to various parts of your home. If you do decide to install such a system, your ventilation problems should be more or less solved in one fell swoop. This should represent the most energy-efficient option. If you decide not to opt for a heat exchanger, then consider all the measures listed below and try to balance the air flow in each room of the house so that you have an inflow and an outflow. If this seems complicated, persevere and find ways of simplifying the problem in your mind: for instance, if you fit controllable trickle ventilators to all your windows, leave gaps around internal doors, and install extractor fans in the bathroom and kitchen, this would be sufficient. You will, of course, always have the option of simply opening windows as required. It is up to you how sophisticated a system you devise. Remember that, in a tall house in very cold or very windy weather, whatever system you have will need to be closed right down, as the pressure differences will force air through much smaller openings. Whatever you decide, it is important to develop a ventilation strategy that fits your home and the way you use it. These are some of the possibilities for you to consider:
• Decide whether to install a heat exchange system.
• Fit controllable trickle ventilators in each room to obtain cross- ventilation (the ease with which these can be fitted to existing windows varies with the type of window).
• Install mechanical extractor fans in the kitchen and bathroom, controlled by a timer or humidistat (moisture control switch).
• Install permanent ventilation for combustion appliances that rely on a supply of air from inside.
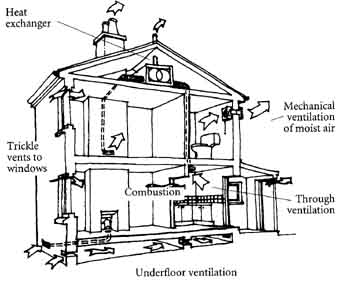
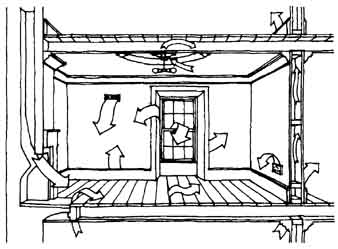
Ventilation strategies: Underfloor ventilation;
Heat exchanger; Mechanical ventilation of moist air; Through ventilation.
• Employ disused chimneys as channels for ventilation or ducting. This may be particularly useful if it is difficult to fit ventilators to the windows. Consider also using your chimneys to recirculate warm air to upper stories or vice versa.
• Install air-cleaning measures: whether mechanical or biological (see our section on the use of PLANTS), ionizers (see the AIR quality section of this guide), or filters. If the main problem is humidity, consider using a dehumidifier; if lack of humidity, then consider a misting humidifier or, again, the use of plants.
• Open and close windows as necessary: if external doors are constantly being used, this may provide sufficient ventilation.
PRIORITIES FOR ACTION
• Take each room in turn and assess its draft-proofing and ventilation requirements.
• If it is autumn or winter, start draft-proofing right away. In a two- or more story house, the most effective place to start is at both the top and bottom of the house, to reduce immediately the gaps and cracks where the pressures are greatest. Also draft-proof the rooms you keep the warmest
• Workout carefully where you have hidden air leaks: you will know them by the accumulated dust. Also, go for the biggest holes first, like the undamped chimney or the hole in the ceiling that you have never gotten around to fixing.
• External doors are likely to be a worse fit than windows, so check these for leaks.
• Ensure that ventilation is provided for any combustion requiring a supply of air from inside the house.
• Use mechanical ventilation, controlled by a timer or a humidistat, to vent humid air from your kitchen and bathroom. (You can always open windows as an interim means of ventilation).
Next: Insulating