Typically installed at waist level or below, drawers provide storage space and relatively convenient access without the stooping that is required by door- fronted cabinets at the same level.
Drawers are not installed at higher levels because it becomes impossible to see what is stored inside. However, slide-out shelves, using inverted drawer construction and the same hardware, can be very useful.
Drawer guides
Drawer guides perform two distinct functions. They serve to locate the drawer as it is opened and closed, much as rails hold a train on track. And the guides also keep the back of the drawer from rising up as the drawer is opened beyond the halfway point. Good guides enable you to open and close a drawer with a smooth, effortless action—even when the drawer is heavily loaded.
Although it is possible to design and build drawer guide systems out of wood, the use of manufactured systems is recommended. These systems are inexpensive, they ensure smooth operation, and maybe best of all, they are adjustable. Two basic types are available, although there are many variations on each type. Check to see what is available in your area, and choose guides before starting drawer construction so that you can take the particular requirements into account.
Side-mounted guides
Although these are generally considered to provide the smoothest operation, side-mounted roller guides necessitate building special side rails. The cabinet case, specifically the area into which the drawer will slide, must have side rails installed from front to back on each side of the opening. These rails can be simple 1 by 2s, but they must be perpendicular to the face frame and must be mounted absolutely parallel to each other. The outer parts of the guides are mounted onto these rails. The inner parts of the guides attach to the sides of the drawer. There is room for some adjustment, but not very much. Two versions of the side-mounted guides are available. One includes a pair of nylon wheels inside each set of tracks; the other has telescoping tracks that ride on ball bearings.
Center-mounted guides
This type of guide does not require additional side rails within the case, as side mounts do, and the cost is generally less. The action, however, is not quite as smooth, especially after extended use. Still, center-mounted guides are quite adequate for drawers in most cabinets.
The normal installation involves nailing or screwing an extendable guide rail to the back of the face frame and to the rear of the cabinet, at the bottom of the opening. A follower is attached to the lower back of the drawer. This follower keeps the drawer centered when it is opened and closed, and prevents the drawer from tipping when it is open. Most of the weight of the drawer is carried on L-shaped guide pads fastened to the lower inside corners of the opening in the face frame. In one version of the center-mounted guide system, L-shaped pads are replaced with rollers. This type, which also has a roller at the back of the drawer, operates more smoothly.

Side-mounted; Center-mounted: Roller guide on bottom;
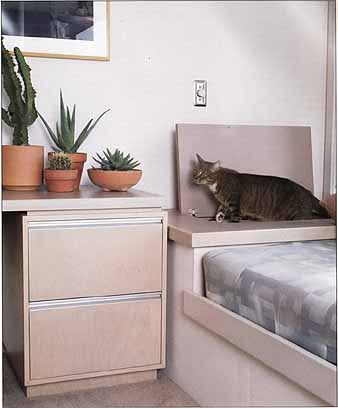
Furniture that offers storage potential allows a room to be put to several
uses. In a study/guest bedroom, drawers with channel pulls are file cabinets
and the headboard unit doubles as a blanket chest.
Drawer construction
Commercially-made drawers often utilize a type of routed dovetail construction. This method of construction is rather involved and requires a router, special bits, and a dovetailing jig. Although this joint is not beyond the scope of the do-it-yourselfer, it is better suited to the production of quantities of drawers where the cost of the equipment and the set-up time required can be amortized over a number of drawers. Unless you are crafting antique reproductions by hand or making a lot of drawers (or boxes), you will find the rabbet-dado groove method described below satisfactory for most projects. However, to make even the simplest drawers, you will need a table saw or a radial arm saw and a dado blade.
Drawer fronts
Start with the front panel of the drawer, which is composed of either one or two pieces. One-piece construction is sometimes used in the construction of lipped drawer fronts, but the two-piece construction discussed here is adaptable to virtually any drawer. It results in a stronger drawer and one that can be adjusted slightly for fit during construction.
If your cabinet will have both drawers and doors, they should match in style. In fact, you would do well to take measurements from the cabinet case and make all the doors and drawer fronts at the same time. (See the Doors section.)
A note of caution: If you are making drawers to match raised-panel doors, keep in mind that it will be necessary to fasten the front drawer panel to the drawer box. It is recommended that you modify your overall plan so that the drawer fronts are solid panels, perhaps shaped at the edges in a pattern that matches the cabinet doors. This will make them much easier to attach to the box.
When drawer fronts are completed, check them for fit in the face frame of the cabinet. If they are correct, set them aside. You can, if you wish, apply the finish before setting them aside.
Drawer boxes
The next step is to build the drawer boxes onto which the fronts will later be fastened.
Before starting construction, you must have decided these three things about the drawers in your case.
+ The dimensions of the opening in the face frame;
+ The space requirements of the glides to be used; and,
+ The maximum depth of the drawer box. This may be affected by the type of glide system used. Center-mounted glide systems allow you to build slightly wider drawers than those supported on side-mounted rail systems. They are also a bit more forgiving when it comes to a neat fit.
When making drawers that will be supported on center guides, cut the drawer box 1/8-inch to ½-inch narrower than the face-frame opening. This will allow for 3/16 inch to ¼-inch of space on each side of the drawer.
The gap will, of course, be covered by the front panel when the drawer is closed. Follow the same guidelines when measuring the height of the drawer boxes.
Manufacturer’s instructions regarding clearances are generally included with the side-rail hardware. Be sure to read all instructions before you build the boxes.
After determining the dimensions for the drawer boxes, you are ready to lay out the stock and cut pieces to the required lengths.
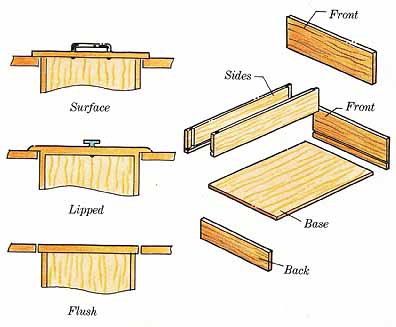
Drawer fronts: Surface, Lipped, Flush
Look at the illustration below. Note that the pieces fit together in an interlocking pattern, calling for a number of dadoes, rabbets, and grooves. When building several drawer boxes for a particular project, you can save a great deal of time by doing all the layout first, then the cutting, then the dadoes, rabbets, and grooves.
Determine the height of the drawer boxes and, using ½-inch plywood, cut the strips that will form the fronts, sides, and backs of the boxes. Cut all the pieces the same height at this time; the rear panels will be cut down later. From these strips, cut pairs of side panels and matching front and back panels.
Set aside the back panel and, using a dado blade, cut grooves for the drawer base. For example: If the drawer bases will be made from ¼- inch plywood (suitable for most drawers), cut ¼-inch by ¼-inch grooves ½-inch up from the bottom edges of the front panel and both side pieces.
Next, set up the saw to cut the crosswise dadoes and rabbets in the side panels. Dadoes for attaching the back panel should be cut ½ inch from the back of each side panel. Cut rabbets at the front edges that are ½-inch wide and ¼ inch deep.
Measure from the tops of the side panels to the tops of the grooves, and cut back panels to this height. Cut drawer bases out of ¼-inch plywood.
Using glue and 5/8-inch brads, assemble the drawer box pieces in the following order.
+ Attach each of the side panels to the front panel.
+ Slide drawer base into position. Slide back panel down to base.
Place drawer box assembly on a flat surface and check for square. If the box is not square, check that all pieces are seated into the grooves. Nail and glue. When glue is dry, sand boxes and apply finish.
If there will be several drawers stacked one above the other, it is important that the edges of the face frame line up. To do this, wait until the finish is dry then draw an X on the front of each drawer box from corner to corner to locate the center. Mount the hardware on the drawers and the cabinet, then slide drawers into the closed position. Using a level and the X marked on the front of each drawer box, mark the center point of the drawer box on the face frame as well as on the top and bottom edges. Pull drawer open slightly and extend marks around to the sides of drawer box.
Hold the front panels (which were completed earlier and set aside) up to the face frame and transfer center point marks on all 4 sides to the edges of each drawer front. Remove drawer boxes from cabinet. Position and attach front panels to fronts of the drawer boxes carefully matching the marks you have made.
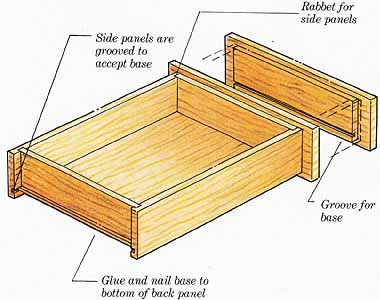
Drawer construction: Side panels are grooved to accept base; Rabbet
for side panels; groove for base; Glue and nail base to bottom of back panel.
Drawer pulls
Most hardware and home-center stores offer a large selection of pulls, knobs, and handles that can be mounted on a drawer front—shop around to find the type that appeals. If there are doors as well as drawers in your case, use the same pulls or knobs on both.
Mount the pulls according to the manufacturer’s directions. Attaching the pulls usually requires drilling one or more holes into the front of the drawer face. Therefore, choose care fully. If you change your mind at some later date, you will probably have to fill these holes and refinish the drawer front.
For a contemporary, streamlined look, channel track may be more suitable than knobs or pulls. This track is mounted to the top edge and provides a finger slot to enable you to pull the drawer open. If this is your choice, make a flush-mounted drawer and remember to allow for the depth of the channel when you plan the drawer openings in the case.
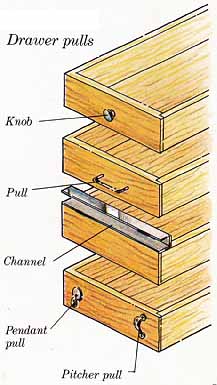
Drawer pulls: Pitcher pull
Drawer dividers
The contents of large drawers can be organized with adjustable dividers.
Cut strips of ¼-inch plywood as wide (minus a half inch or so) as the drawer is high. Then cut the strips into appropriate lengths. Cut at least 2 pieces that are as long as the drawer is deep (measure from inside front to inside back) and 2 or more that are as long as the drawer is wide (inside dimensions again).
Stack pieces together and cut a series of ¼-inch-wide slots into them. Use a dado blade to cut these slots so that they extend just beyond the mid point of the width of the boards. Space the slots every 2 inches or at points where dividers are desired. After sanding and painting, dividers are ready to slide together and drop into the most cluttered drawers.
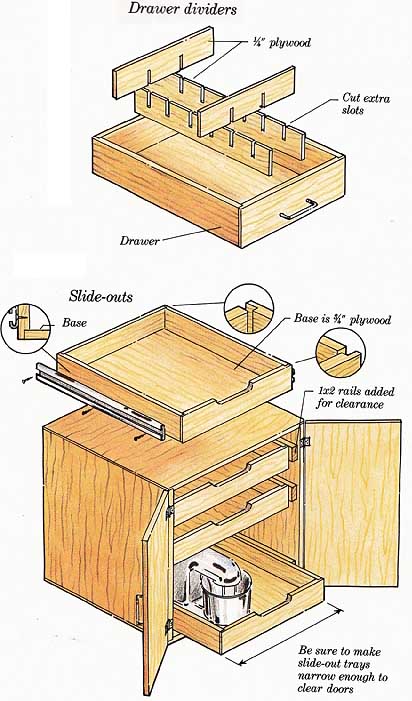
Drawer dividers; Slide-outs: Be sure to make slide-out trays
narrow enough to clear doors
Slide-outs
A variation on standard drawer construction, these tray-like drawers are good for stowing bulky items in low cabinets—items such as small appliances, pots and pans, canned goods, a slide projector, and file boxes.
Make the base of the tray from a sturdy piece of ¾-inch plywood and the sides from 1 by 3 pine. Be sure that drawers are narrow enough so that they will slide out when cabinet doors are open. Add 1 by 2 rails to the inside of the cabinet if necessary.
Using a dado blade, cut 3/8-inch by 3 rabbets along bottom edge and back end of each side panel and at both ends of the front panel (see details on illustration).
Assemble sides and bottom using 4-penny (4d) finishing nails and a liberal amount of glue. When glue is dry, sand, paint, and install side-mounted roller guides, as described above.
Vertical drawers
Vertical drawers are not drawers at all but, rather, vertical sliding panels. Make the sliding version for hanging long or flat utensils that cause a jumble when stored in a drawer. The same construction methods can also be used to create vertical storage space for items such as baking sheets and serving platters. The fact that the dividers will slide out is an advantage when you want to clean the cabinet.
The dividers do not extend the full depth; however, the tracks in which they slide do (see illustration). This gives extra support when dividers are pulled out and allows shelves to be hung on the inside of cabinet doors.
Make panels from ¼-inch plywood or perforated hardboard. If you plan to hang heavy items on the panels, such as iron trivets or a griddle, use 3/8” plywood instead.
Make tracks by gluing and nailing lengths of quarter-round to a 2 by 2, or by routing a groove directly into a solid board. For easier operation, mount drawer glides (either the roller or telescoping type) to the panels. Install 1-by boards on edge inside the cabinet and fasten the stationary part of the glide hardware onto these boards. The shape of the inside of your cabinet and the way in which the doors are hung will determine the exact size of the boards needed.
When planning vertical drawers, remember to leave enough space between panels to allow storage on both sides of each panel. As shown in the illustration, a screw driven into the bottom track board and a small hinge placed at the lower back of the panel act as a stop. Lift lower leaf of hinge to bypass screw when you need to remove the panel.
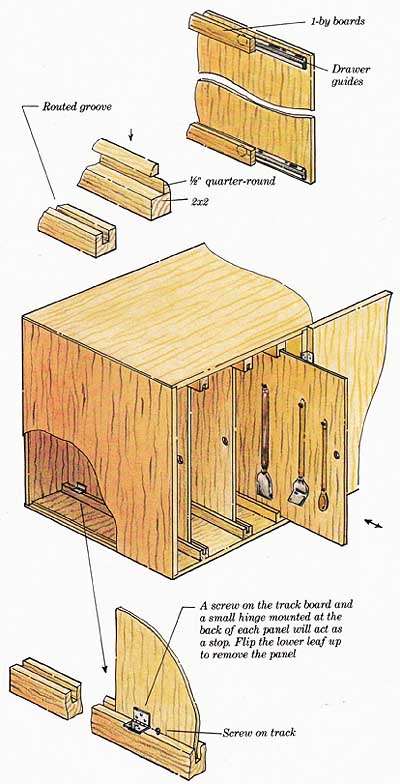
Vertical drawers: A screw on the track board and a small hinge
mounted at the back of each panel will act as a stop. Flip the lower leaf
up to remove the panel.
Prev.: Doors
Next: Computer Center
Full guide: How to Plan & Build Bookcases, Cabinets & Shelves
Product
Catalog
