It is a good idea to put doors on cases when ever the stored items need to be protected from dust or hidden from view.
The basic construction for a case with doors need not be substantially different from a bookcase, so what follows is a discussion about the doors themselves. After deciding on a basic case design, you might choose to enclose just part of the case with doors and leave the rest as open shelving. Look over the possibilities illustrated below.
Flush doors
The term flush door has a double meaning in cabinetry terminology. First, it describes a door that has a flat front surface as opposed to a door with a raised panel. The door can be made from a sheet of plywood with a paint or varnish finish, or it can be surfaced with veneer or plastic laminate. But whatever the material, the surface is flat.
The second meaning of the term flush refers to the way in which the door panel is mounted onto the cabinet. As you might expect, the front of a flush door is in the same plane as the front of the cabinet. This means that the door has to be small enough to fit within the opening, and special consideration has to be given to the way in which the door is hinged.
Making flush doors
Plywood is most commonly used for making flush doors. For economy, particleboard will suffice for flush door panels in a garage or workshop.
Finishing flush doors
Plywood is easy to paint. For installations where a wood finish is desired, you can get a grade where the surfaces are hardwood veneers and finish them with varnish. Whenever a finished appearance is called for, re member to finish the edges of the door. Always finish both sides of a door with similar materials; if one side absorbs more moisture than the other side, the panel will warp.
There are several alternatives to paint or varnish worth considering if you are looking for a fancier or more durable finish. Note that these suggestions do not apply to lipped doors.
Plastic Laminate. Affixing sheets of plastic laminate will increase the durability and moisture resistance of door panels. Remember that both sides of the door should be covered to prevent warping.
Start with the side edges: Cut strips of laminate that are fractionally wider than the doors are thick and long enough to avoid joint. Glue strips to both side edges with contact cement. When cement has set, trim off excess with a laminate-trimmer bit placed in a router. Cover top and bottom edges following the same procedure.
When all 4 edges are covered, cut a panel fractionally larger than the door. Glue it to the front surface, let it dry, then trim. Repeat procedure for back surface.
Veneer. You can dress up plain plywood doors by applying good-looking, wood veneer. To surface ply wood with veneer, follow exactly the same procedure as described above for applying plastic laminate.
Emulating paneled doors. Rather than a finish, this is a different look. If you want to dress up the appearance of flush doors to make them fit in with a traditional decor, you can nail and glue small moldings to the fronts of the doors to mimic the look of a paneled door.
Use a rectangular pattern, or a pattern of several rectangles, cutting 45-degree miters at the corners of the molding. Unless you can match the molding stock to the wood used for the fronts of the door panels, this approach works best on doors that will be painted. Of course, with the molding attached, the doors are no longer true flush doors.
Mounting flush doors
Flush doors can be surface-mounted on a cabinet, that is, mounted so they overlap the door openings. They can be partially inset, as in the case of lipped doors; or they can be f lush- mounted, meaning that they are inset into the door openings.
Making doors flush
Cabinet designs that call for doors mounted flush often call for flush-type doors, as well. If this seems confusing, read Flush Doors. What follows deals with the mounting of doors onto a cabinet structure in a way referred to as flush—meaning that the front surfaces of the doors are in the same plane as the front of the cabinet.
If possible, build the cabinet structure first, making it as square and plumb as you can. Then take measurements for the inset (flush) doors directly from the openings in the case. Creating doors that hang so there is an equal amount of space on each of the four sides will be a test of your cabinetmaking skills, or at least good practice!
Cut door panels 3/16-inch shorter and narrower than the openings in the case; this will result in a 3/32” gap around each door. If you plan to apply either plastic laminate or veneer to the case or the door panels, remember to subtract the appropriate number of added thicknesses from the door measurements. Additionally, cut the latch edge of flush doors at a slight inward bevel—approximately 5 degrees—to allow adequate clearance when they are opened: This is particularly critical on narrow doors or doors of thick material.
Hinges for flush doors
A variety of hardware is manufactured for hinging flush-mounted doors to a case.
Butt hinges. The most common is the universal butt hinge, widely avail able in hardware stores in several finishes and many sizes. Pick the size equal to the thickness of your door panel or face frame, whichever is smaller. To maintain an even gap around the door panel, mortise one or both of the hinge leaves into the door edge and/or face frame.
A special hinge with a right-angle bend in one of the leaves allows you to attach the hinge to the back of the door. This, type is recommended if you are using particleboard. Note that the pivot portion of the hinge will be visible on the finished case. This may not bother you; if it does, consider other options.
Pivot hinges. The pivot-type hid den hinge attaches at the top and bottom edges of the door. It requires some mortising and is not entirely hidden. Other versions of the pivot hidden hinge are designed to be mounted mid-door, with the pivot protruding through a small kerf in the edge of the door.
Invisible hinges. Several types of completely invisible hinges are avail able for flush-mounted doors. (They are not invisible when the door is open, however!) One type attaches to the inside of the storage area and to the backside of the door panel. Another type fits into bores made in the edge of the face frame and the edge of the door panel. Check local hard ware and home-center stores to see what is available in your area.
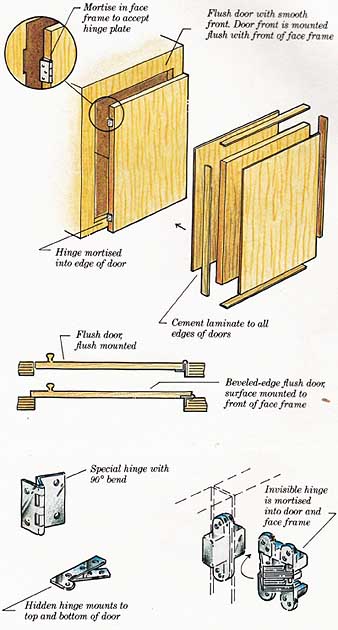
Flush door with smooth front. Door front is mounted flush with front
of face frame; Hinge mortised into edge of door; Cement laminate to all
edges of doors; Flush door flush mounted; Beveled-edge flush door surface
mounted to front of face frame; Special hinge with 90-degree; Invisible
is mortised into door and face frame
Lipped doors
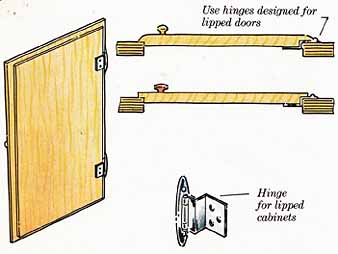
Flush-mounted doors are mounted within the openings in the face frame; surface-mounted doors are mounted on top of the openings. Lipped doors can be described as a combination of those two types of door-mounting techniques. This results in the advantages of the relatively forgiving fit requirements of the surface-mounted door as well as the sleeker, or at least slimmed-down, appearance of the flush-mounted door.
The lipped door requires both a unique door construction and a special mounting technique.
Making lipped doors
Make each door panel ½-inch taller and 5/8-inch wider than its respective opening. If you want the outer edges of the door panel to be rounded (a common practice with lipped door panels), rout the edges now using a ¼-inch radius bit.
Whether the doors are made from ¾” sheet stock (such as birch plywood), or are built in a paneled style (see Paneled Doors, opposite), the next step in fitting them is to cut the rabbets at the door edges. Rout or cut a 3/8-inch by 3/8-inch rabbet along all 4 inner edges of each door.
Hanging lipped doors
Purchase 3/8-inch offset lipped door hinges, and mount the doors. The hinges are available in regular or self- closing versions, but there is no type of hidden hinge for a lipped door.
When building a cabinet that will contain lipped doors, remember to use face-frame members wide enough to allow sufficient clearance for lips and hinges.
Cabinets will stay much tidier if they are fitted to suit the contents.
In a kitchen slide-out shelves allow convenient and easy access to large
cooking utensils.; Use hinges designed for lipped
doors.
Paneled doors
Building paneled doors is challenging, but the results can be gratifying. An exploded view of paneled-door construction is shown below. How ever, it is advisable to follow any instructions that may accompany your router set or shaper bits. Note that at least three bits are required: one to rout grooves in stiles and rails; one to mate stiles to rails; and one to taper edges of panels. Paneled doors are normally rabbeted at the edges so that they can be partially inset into the cabinet openings.
There are many variations on the paneled door. By modifying any number of moldings sold at lumber-yards, you can create frames into which any rigid sheet material can be mounted. One method calls for mounting the panel into the frame in a fashion similar to mounting a picture in a picture frame. (See Glazed-Panel Doors, below.) Another variation is the mock-paneled door, in which the appearance of panel construction is created by routing a pat tern into ¾” board or sheet stock.
Raised-panel doors
You will recognize raised-panel doors as the most familiar of the traditional door types. Each door has one or more panels that are set into a frame composed of vertical stiles and horizontal rails. If you choose to make this type of door for your cabinet project, you will need a heavy-duty router and router table, or a shaper, and special sets of panel-door bits to use in your machine. Assembling the doors will be easier if you have, or make, a gluing table with a large flat surface and bench dogs (stops that can be inserted into holes drilled into the work surface) to be used with a wide tail vise. Bar clamps large enough to span the longest door dimension will work in place of the wide tail vise.
Glazed-panel doors
In any panel-door construction, the raised panel may be replaced with a sheet of glass, thereby putting the cabinet contents on view. The grooves routed into the stiles and rails must be open on the inside edges and will therefore be rabbets rather than grooves. Thin quarter-round molding is tacked to the inside of the rabbets to complete the grooves and hold the glass in place. If you are making panel doors to show off your leaded-glass handiwork (or perhaps you are the woodworker and your partner is the artist in glass), make sure the quarter-round is strong enough to secure the glass firmly in place. The quarter-round should also be removable so that the glass can be replaced if necessary.
Make stiles and rails thin and red- angular for a contemporary look or wider and more ornate for a more traditional look.
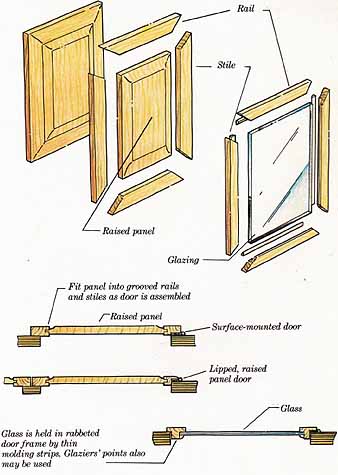
Fit panel into grooved rails and stiles as door is assembled; Raised
panel; Glass is held in rabbeted door frame by thin molding strips. Glaziers
points also may be used.
Bifold doors
When fitting a large cabinet into a small room or constricted area, the space required to allow the doors to swing open freely can sometimes be a problem. Bi-fold doors allow access to wide storage spaces without needing a large swing-out area. Consider the three types of bifold doors discussed below.
Manufactured bifold door sets
For large cabinets or armoires, or for built-in storage cabinets, consider using regular bifold doors. These are sold in sets complete with the necessary mounting hardware. Height of these doors is the standard 6 feet 8 inches, and widths range from 2 feet (two 12-inch bifold panels) to 3 feet (two 18-inch bifold panels). By installing two 3-foot sets side by side, you effectively enclose an opening 6 feet wide. Larger spaces can be enclosed by installing more vertical supports and more bifold sets, or by installing special folding door sets in which multiple, accordion-fold panels are suspended from an overhead track.
Projects where a bifold door is particularly useful include an ironing- board cabinet, a case containing a fold-out bed, or a large built-in entertainment center. Any one of these projects may require doors the full 6-foot, 8-inch height. Although bifold doors can be cut down somewhat to fit smaller projects, because of the construction, they cannot be cut down more than 1 or 2 inches in any direction.
Louvered shutters
Appropriate for smaller openings, louvered shutters are attractive and do not require special hardware for installation. Being smaller and lighter, they are especially suitable for bifold installations. The shutters are avail able with movable slats, but the fixed- slat version is recommended for cabinet doors.
Many precut sizes are available. Buy ones that are as close as possible to the required size and make minor adjustments to fit the opening. Attach panels with high-quality butt hinges; problems with sticking and sagging are directly related to the quality of the hinges used. Remember that, in a bifold installation, 2 of the hinges will have pivots facing outward; on the other 2 hinges, pivots will face in ward. Two-way hinges may add to the convenience of reaching the storage area but should be used only with lightweight panels.
Custom bifold doors
An experienced woodworker knows that it is not necessary to buy manufactured bifold door sets or louvered shutters in order to hang bifold doors. In fact, almost all cabinet doors can be mounted in a bifold fashion as long as they are made in a paired set. This is true of inset, flush, lipped, raised-panel, or glazed-panel doors.
As is the case with louvered doors, it is advisable to use high-quality hinges and to keep the weight of the door panels to a minimum. To make sure inset door panels are neatly positioned while being opened and closed, rout a small groove on the bottom of the face-frame member above the opening. Drill a hole in the top corner of the inner bifold panel, and insert a small spring and a loose pin or dowel. This pin tracks in the groove in the face frame. The spring allows you to engage and disengage the pin, as necessary, during installation. Use a magnetic catch as a stop to hold the center of each pair of doors in the closed position, and locate the pull as close to the magnetic catch as possible.
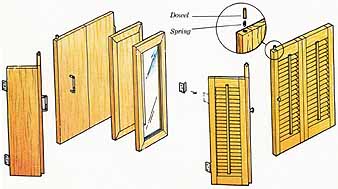
Bifold door sets
Sliding doors
Using sliding doors is another way to eliminate the swing-out area required by hinged doors. They are also fairly economical and fast to build. Make the panels from plywood, hardboard, plastic, or glass. Unless you have built a pocket opening into which to slide a single panel, the panels must be installed in pairs. Additional panels can be added to the left or right of the main pair, as long as they ride in the same tracks.
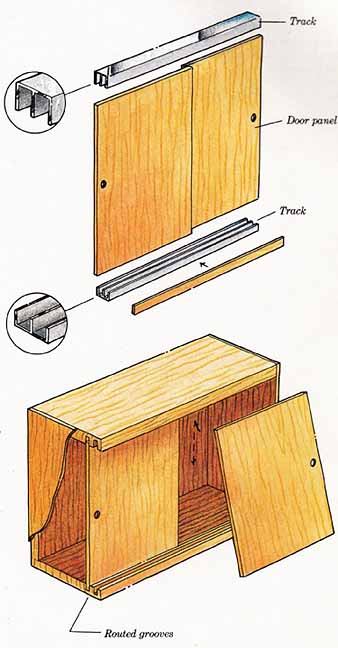
Sliding doors: Routed grooves, Door panes, Track
Manufactured track
Buy metal or plastic tracks, cut them to length, and install them at the top and bottom of the door opening. Attach the shallower track at the bottom. Cut the sliding panels so that the combined width is 1 inch wider than the opening in the case. The height should correspond to the height of the opening minus an allowance for the lower track. The width of the track channels determines the thickness of the door panels. Most channels are designed to accommodate panels ¼-inch thick.
Track and grooves
Be aware that the track will be visible, unless hidden by a face frame. If this is undesirable, rout grooves in the case in which to install the track. (Remember that you will have to ad just the height and width of the door panels accordingly.)
Routed grooves
For installations where appearance is not a major factor—cabinets in the garage or workshop, for example— the manufactured tracks can be altogether eliminated. Simply rout or cut the grooves directly into the case. Make the grooves 1/16-inch wider than the door panels. Also, the upper grooves should be twice as deep as the lower ones.
Tongue-and-groove doors
Most often used to create a country or cottage look, tongue-and-groove cabinet doors can be constructed in several ways. Pre-milled tongue-and- groove boards are manufactured for siding. Thinner pre-milled pieces in tended for use as interior wall panel ling are also available.
Using glue and finishing nails, mount the boards directly on pairs of back rails, letting the ends extend beyond the finished dimensions. When glue is dry, trim door panel to the proper size. If you use exterior siding, the panels will be thick enough to be lipped. Thinner tongue- and-groove boards require heftier back rails, resulting in a door that is suitable for surface-mounting only.
It is possible to create your own tongue-and-groove boards if you have the time and a good router table or shaper. Whether or not you make your own boards, consider different options for your cabinet doors, such as mounting the boards horizontally or at an angle.
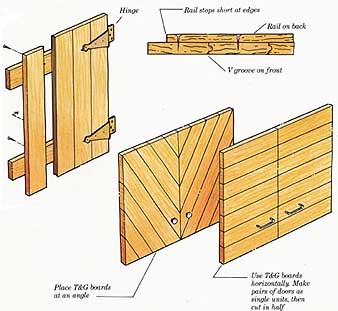
These cabinets are carefully crafted so that the flush doors in the
buffet align with the glazed panel doors in the wall-mounted unit. Place
T&G boards at an angle; Use T&G boards horizontally. Make pairs
of doors as single units, then cut in half; Rail stops short at edges ;
V groove on front Note: Make mock T&G boards by routing grooves into
plywood doors
Full guide: How
to Plan & Build
Bookcases, Cabinets & Shelves
Product
Catalog
